Page 101 of 505
NOTE:The frames must lie flat on each other in order to
snap them together. 4. Pivot the small frame (1) away from the large frame (2)
until the pivot lock (3) engages to lock the two frames in
an L shape.
3
UNDERSTANDING THE FEATURES OF YOUR VEHICLE 99
Page 103 of 505
7. Align the pins at the front of the large frame with the
hole in each trim panel. Slide the pins outward until fully
extended into each hole.Removing And Storing The Wind Stop
Reverse the installation procedure to remove, fold, and
store the Wind Stop. However, note the following before
doing so:
Disengage the pivot lock (1) to fold the small frame flat
onto the large frame. Disengage the frame lock (2) to
disconnect the small frame from the large frame.
3
UNDERSTANDING THE FEATURES OF YOUR VEHICLE 101
Page 107 of 505
EVIC
Message\bEVIC
Message
Display
Time\bOdometer
Message
(< 5 mph
[8 km/h])
\b\bOdometer
Message
Display
Time\b\b
Odometer
Message
(> 5 mph
[8 km/h])
\b\bOdometer
Message
Display
Time\b\b
Chime Condition Operator
Action
Required
CONVERT-
IBLE TOP
MAL-
FUNC-
TION 6 sec. TOP FAIL Display
Scrolls for
6 SecondsTOP 6 sec. Single
ChimeThe PTCM
Activated the
System
LOCKOUT
Feature Refer to
Foot Note
\b\b\b
CONVERT-
IBLE TOP
MAL-
FUNC-
TION Until
Fault is
No Lon-
ger De-
tected or
RepairedTOP FAIL Display
Scrolls
until Fault
is No Lon-
ger De-
tected or
RepairedTOP Display
Flashes
until Fault
is No Lon-
ger De-
tected or
RepairedSingle
Chime
The PTCM
Activated the
System
LOCKOUT
Feature See your
authorized
dealer for
service
\b If so equipped.
\b\b For vehicles not equipped with the EVIC.
3
UNDERSTANDING THE FEATURES OF YOUR VEHICLE 105
Page 108 of 505

\b\b\bThe PTCM will lockout the power convertible top system if the vehicle charging system is malfunction-
ing, or the battery is run down, or the hydraulic pump is overheating. In addition, the system prohibits lower-
ing the top when ambient temperature is at 0°F (-18°C) or lower and raising the top when ambient temperature
is below -40°F (-40°C).
• If you are trying to lower the top and ambient temperature is 0°F (-18°C) or lower, wait until the temperature
rises and the top is thawed and dry before operating the power top. A soft top should not be lowered at tem-
peratures below 32°F (0°C).
• If you are trying to raise the top and ambient temperature is below -40°F (-40°C), wait until the temperature
rises before operating the power top.
• If the vehicle charging system is malfunctioning, see your authorized dealer for service.
• If the battery is run down, have it recharged and tested at your authorized dealer.
• Hydraulic pump overheating can occur if you lower and raise the top consecutively (usually more than six or
seven times depending upon the ambient temperature). Wait at least five minutes before operating the power
top again. NOTE:If lockout occurs due to hydraulic pump overheating, the system will allow you to raise the
top without waiting five minutes. However, do so only if necessary.
106 UNDERSTANDING THE FEATURES OF YOUR VEHICLE
Page 159 of 505
CAUTION!
To prevent possible damage, do not slam the hood to
close it. Use a firm downward push at the center of
the hood to ensure that both latches engage.
WARNING!
Be sure the hood is fully latched before driving your
vehicle. If the hood is not fully latched, it could open
when the vehicle is in motion and block your vision.
Failure to follow this warning could result in serious
injury or death.
LIGHTS
Multifunction Lever
The multifunction lever on the left side of the steering
column controls the operation of the headlights, parkinglights, turn signal lights, instrument panel lights, instru-
ment panel light dimming, interior lights and fog lights
(if equipped).
Multifunction Lever
3
UNDERSTANDING THE FEATURES OF YOUR VEHICLE 157
Page 160 of 505

Headlights And Parking Lights
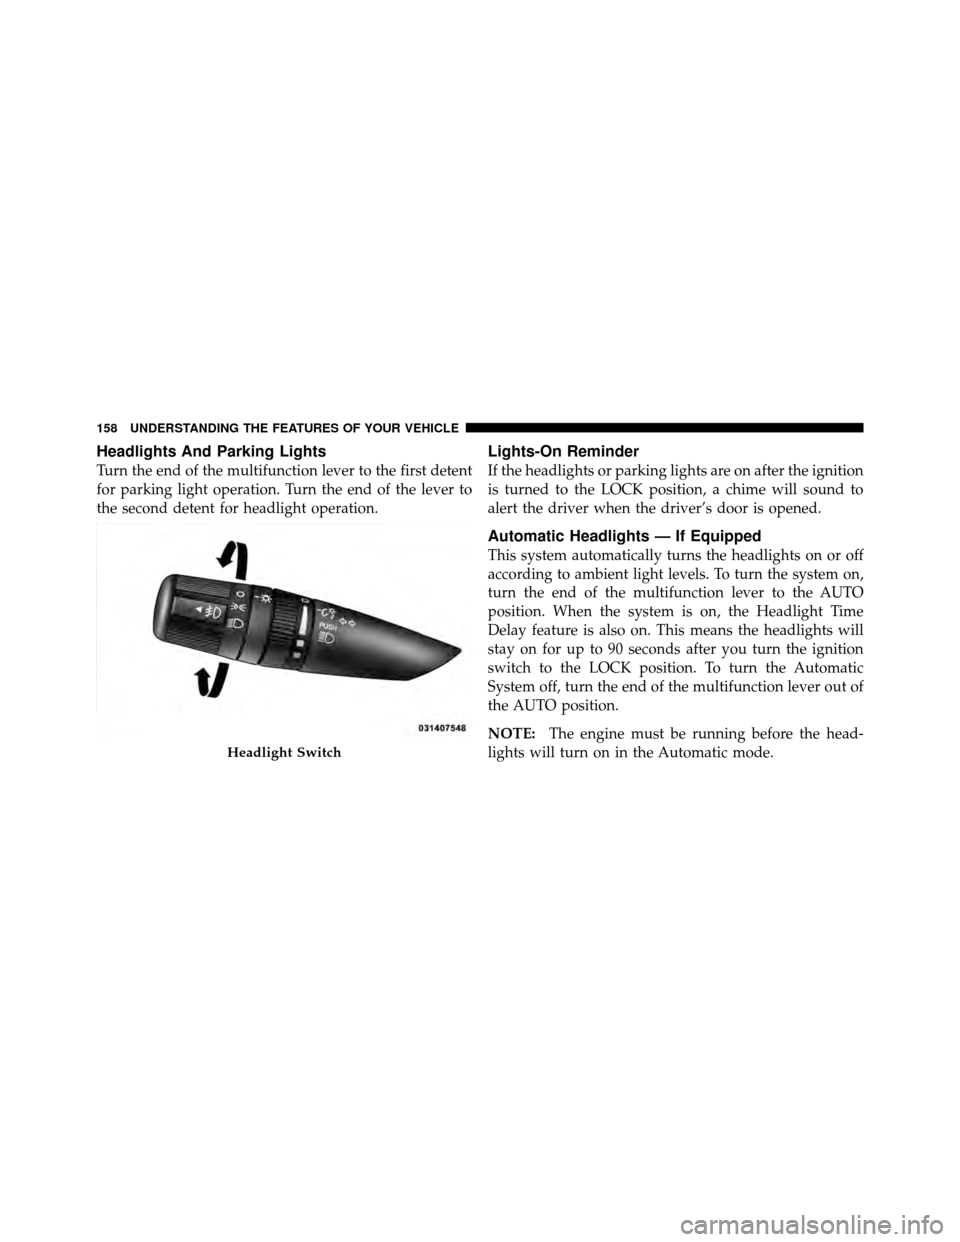
Turn the end of the multifunction lever to the first detent
for parking light operation. Turn the end of the lever to
the second detent for headlight operation.
Lights-On Reminder
If the headlights or parking lights are on after the ignition
is turned to the LOCK position, a chime will sound to
alert the driver when the driver’s door is opened.
Automatic Headlights — If Equipped
This system automatically turns the headlights on or off
according to ambient light levels. To turn the system on,
turn the end of the multifunction lever to the AUTO
position. When the system is on, the Headlight Time
Delay feature is also on. This means the headlights will
stay on for up to 90 seconds after you turn the ignition
switch to the LOCK position. To turn the Automatic
System off, turn the end of the multifunction lever out of
the AUTO position.
NOTE:The engine must be running before the head-
lights will turn on in the Automatic mode.
Headlight Switch
158 UNDERSTANDING THE FEATURES OF YOUR VEHICLE
Page 161 of 505

Headlights With Wipers
(Available With Automatic Headlights Only)
When this feature is active, the headlights will turn on
approximately 10 seconds after the wipers are turned on
if the multifunction lever is placed in the AUTO position.
In addition, the headlights will turn off when the wipers
are turned off if they were turned on by this feature.
The Headlights with Wipers feature can be turned on or
off through the Electronic Vehicle Information Center
(EVIC) — if equipped. Refer to “Electronic Vehicle Infor-
mation Center (EVIC)/Customer-Programmable Fea-
tures” in “Understanding Your Instrument Panel” for
further information.
Headlight Time Delay — If Equipped
This feature is particularly useful when exiting your
vehicle in an unlit area. It provides the safety of headlight
illumination for about 90 seconds after turning the igni-
tion switch to the LOCK position.To activate the delay, turn the ignition switch to the
LOCK position while the headlights are still on. Then,
turn off the headlights within 45 seconds. The delay
interval begins when you turn off the headlights. Only
the headlights will illuminate during this time.
If you turn the headlights, parking lights, or ignition
switch ON again, the system will cancel the delay.
If you turn the headlights off before the ignition, they will
turn off in the normal manner.
The Headlight delay time is programmable on vehicles
equipped with the Electronic Vehicle Information Center
(EVIC). Refer to “Electronic Vehicle Information Center
(EVIC)/Customer-Programmable Features” in “Under-
standing Your Instrument Panel” for further information.
3
UNDERSTANDING THE FEATURES OF YOUR VEHICLE 159
Page 165 of 505
Interior Lights
Two courtesy/reading lights are located in the bottom of
the rearview mirror. You can turn these lights on and off
from the switches in the mirror or from the dimmer
control in the multifunction lever. These lights are also
controlled automatically by the Illuminated Entry Sys-
tem.A courtesy light is also found in the rear of the center
console. You can turn this light on and off from the
dimmer control in the multifunction lever. This light is
also controlled automatically by the Illuminated Entry
System.
Battery Saver Feature
To protect the battery, the interior lights will turn off
automatically 10 minutes after the ignition switch is
moved to the LOCK position. This will occur if the
interior lights were switched on manually or are on
because a door is open.
Courtesy/Reading Light Switches
3
UNDERSTANDING THE FEATURES OF YOUR VEHICLE 163