Page 312 of 505

checked if a leak is suspected, abnormal noises are
apparent, and/or the system is not functioning as antici-
pated. Coordinate inspection efforts through an autho-
rized dealer.
CAUTION!
Do not use chemical flushes in your power steering
system as the chemicals can damage your power
steering components. Such damage is not covered by
the New Vehicle Limited Warranty.
WARNING!
Fluid level should be checked on a level surface and
with the engine off to prevent injury from moving
parts and to ensure accurate fluid level reading. Do
not overfill. Use only manufacturer’s recommended
power steering fluid.If necessary, add fluid to restore to the proper indicated
level. With a clean cloth, wipe any spilled fluid from all
surfaces. Refer to “Fluids, Lubricants, and Genuine
Parts” in “Maintaining Your Vehicle” for further
information.
PARKING BRAKE
Before leaving the vehicle, make sure that the parking
brake is fully applied. Also, be certain to leave the
transmission in PARK.
The parking brake lever is located in the center console.
To apply the parking brake, pull the lever up as firmly as
possible. To release the parking brake, pull the lever up
slightly, press the center button, then lower the lever
completely.
310 STARTING AND OPERATING
Page 362 of 505

requirements of Material Standard MS-6395. MS-6395
contains additional requirements, developed during ex-
tensive fleet testing, to provide additional protection to
Chrysler Group LLC engines. Use MOPAR�or an
equivalent oil meeting the specification MS-6395.
Starting
The characteristics of E-85 fuel make it unsuitable for use
when ambient temperatures fall below 0°F (-18°C). In the
range of 0°F (-18°C) to 32°F (0°C), you may experience an
increase in the time it takes for your engine to start, and
a deterioration in driveability (sags and/or hesitations)
until the engine is fully warmed up.
NOTE: Use of the engine block heater (if equipped) is
beneficial for E-85 startability when the ambient tempera-
ture is less than 32°F (0°C).
Cruising Range
Because E-85 fuel contains less energy per gallon/liter
than gasoline, you will experience an increase in fuel
consumption. You can expect your miles per gallon
(mpg)/miles per liter and your driving range to decrease
by about 30%, compared to gasoline operation.
Replacement Parts
Many components in your Flexible Fuel Vehicle (FFV) are
designed to be compatible with ethanol. Always be sure
that your vehicle is serviced with correct ethanol com-
patible parts.
CAUTION!
Replacing fuel system components with non-ethanol
compatible components can damage your vehicle.
360 STARTING AND OPERATING
Page 373 of 505

NOTE:Remember that everything put into or on the
trailer adds to the load on your vehicle. Also, additional
factory-installed options, or authorized dealer-installed
options, must be considered as part of the total load on
your vehicle. Refer to “Tire Safety Information/Tire and
Loading Information Placard” in “Starting and Operat-
ing” for the maximum combined weight of occupants
and cargo for your vehicle.
CAUTION!
Incorrect trailer tongue weight could result in in-
creased yaw or vehicle instability. A negative trailer
tongue weight could unload the rear suspension of
the tow vehicle decreasing vehicle stability. Negative
trailer tongue weight could cause the trailer to squat
and potentially become disengaged from the tow
vehicle resulting in a runaway trailer condition.
Towing Requirements
To promote proper break-in of your new vehicle drive-
train components the following guidelines are recom-
mended:
CAUTION!
•Do not tow a trailer at all during the first 500 miles
(805 km) the new vehicle is driven. The engine,
axle or other parts could be damaged.
•Then, during the first 500 miles (805 km) that a
trailer is towed, do not drive over 50 mph
(80 km/h) and do not make starts at full throttle.
This helps the engine and other parts of the
vehicle wear in at the heavier loads.5
STARTING AND OPERATING 371
Page 389 of 505

WARNING!
•To avoid the risk of forcing the vehicle off the jack,
do not tighten the wheel nuts fully until the
vehicle has been lowered. Failure to follow this
warning may result in personal injury.
•To avoid possible personal injury, handle the
wheel covers with care to avoid contact with any
sharp edges.
7. Lower the vehicle by turning the jack screw to the left.
8. Finish tightening the nuts. Push down on the wrench
while at the end of the handle for increased leverage.
Tighten the lug nuts in a star pattern until each nut has
been tightened twice. The correct wheel nut torque is
100 ft lbs (135 N·m). If you doubt that you have tightened
the nuts correctly, have them checked with a torque
wrench by your authorized dealer or at a service station. 9. Remove the wheel blocks and lower the jack until it is
free. Reassemble the lug wrench to the jack assembly and
stow it in the spare tire area. Secure the assembly using
the means provided.
WARNING!
A loose tire or jack thrown forward in a collision or
hard stop could endanger the occupants of the ve-
hicle. Always stow the jack parts and the spare tire in
the places provided.
10. Place the deflated (flat) tire in the cargo area and have
the tire repaired or replaced as soon as possible.
11. Check the tire pressure as soon as possible. Correct
the tire pressure as required.
6
WHAT TO DO IN EMERGENCIES 387
Page 403 of 505
MAINTAINING YOUR VEHICLE
CONTENTS
�Engine Compartment — 2.4L ............. 403
� Engine Compartment — 3.6L ............. 404
� Onboard Diagnostic System — OBD II ...... 405
▫ Loose Fuel Filler Cap Message ........... 405
� Emissions Inspection And Maintenance
Programs ............................ 406
� Replacement Parts ..................... 407
� Dealer Service ........................ 407 �
Maintenance Procedures ................. 408
▫ Engine Oil ......................... 409
▫ Engine Oil Filter ..................... 412
▫ Engine Air Cleaner Filter ............... 413
▫ Maintenance-Free Battery .............. 413
▫ Air Conditioner Maintenance ............ 415
▫ A/C Air Filter – If Equipped ............ 416
▫ Body Lubrication .................... 417
▫ Windshield Wiper Blades ............... 418
7
Page 404 of 505

▫Adding Washer Fluid ................. 419
▫ Exhaust System ..................... 419
▫ Cooling System ..................... 422
▫ Brake System ....................... 427
▫ Automatic Transmission ............... 429
▫ Appearance Care And Protection From
Corrosion .......................... 432
▫ Cleaning Center Console Cupholders ...... 438
▫ Convertible Top Care ................. 438
▫ Weather Strip Care – Soft And Hard Top .... 440
� Fuses .............................. 441
▫ Totally Integrated Power Module ......... 441
� Vehicle Storage ....................... 446 �
Replacement Bulbs .................... 446
� Bulb Replacement ..................... 447
▫ Headlamp ......................... 447
▫ Front Turn Signal .................... 449
▫ Front Fog Lamp ..................... 449
▫ Backup Lamps ...................... 450
▫ License Plate Lamp ................... 451
� Fluid Capacities ...................... 451
� Fluids, Lubricants, And Genuine Parts ....... 452
▫ Engine ............................ 452
▫ Chassis ........................... 453
402 MAINTAINING YOUR VEHICLE
Page 409 of 505

4. Approximately 15 seconds later, one of two things will
happen:a. The MIL will flash for about 10 seconds and then
return to being fully illuminated until you turn OFF
the ignition or start the engine. This means that your
vehicle’s OBD II system is not readyand you should
not proceed to the I/M station.
b. The MIL will not flash at all and will remain fully
illuminated until you turn OFF the ignition or start the
engine. This means that your vehicle’s OBD II system
is ready and you can proceed to the I/M station.
If your OBD II system is not ready,you should see your
authorized dealer or repair facility. If your vehicle was
recently serviced or had a battery failure or replacement,
you may need to do nothing more than drive your
vehicle as you normally would in order for your OBD II
system to update. A recheck with the above test routine
may then indicate that the system is now ready. Regardless of whether your vehicle’s OBD II system is
ready or not, if the MIL is illuminated during normal
vehicle operation you should have your vehicle serviced
before going to the I/M station. The I/M station can fail
your vehicle because the MIL is on with the engine
running.
REPLACEMENT PARTS
Use of genuine MOPAR�
parts for normal/scheduled
maintenance and repairs is highly recommended to en-
sure the designed performance. Damage or failures
caused by the use of non-MOPAR� parts for maintenance
and repairs will not be covered by the manufacturer’s
warranty.
DEALER SERVICE
Your authorized dealer has the qualified service person-
nel, special tools, and equipment to perform all service
operations in an expert manner. Service Manuals are
available which include detailed service information for
7
MAINTAINING YOUR VEHICLE 407
Page 419 of 505

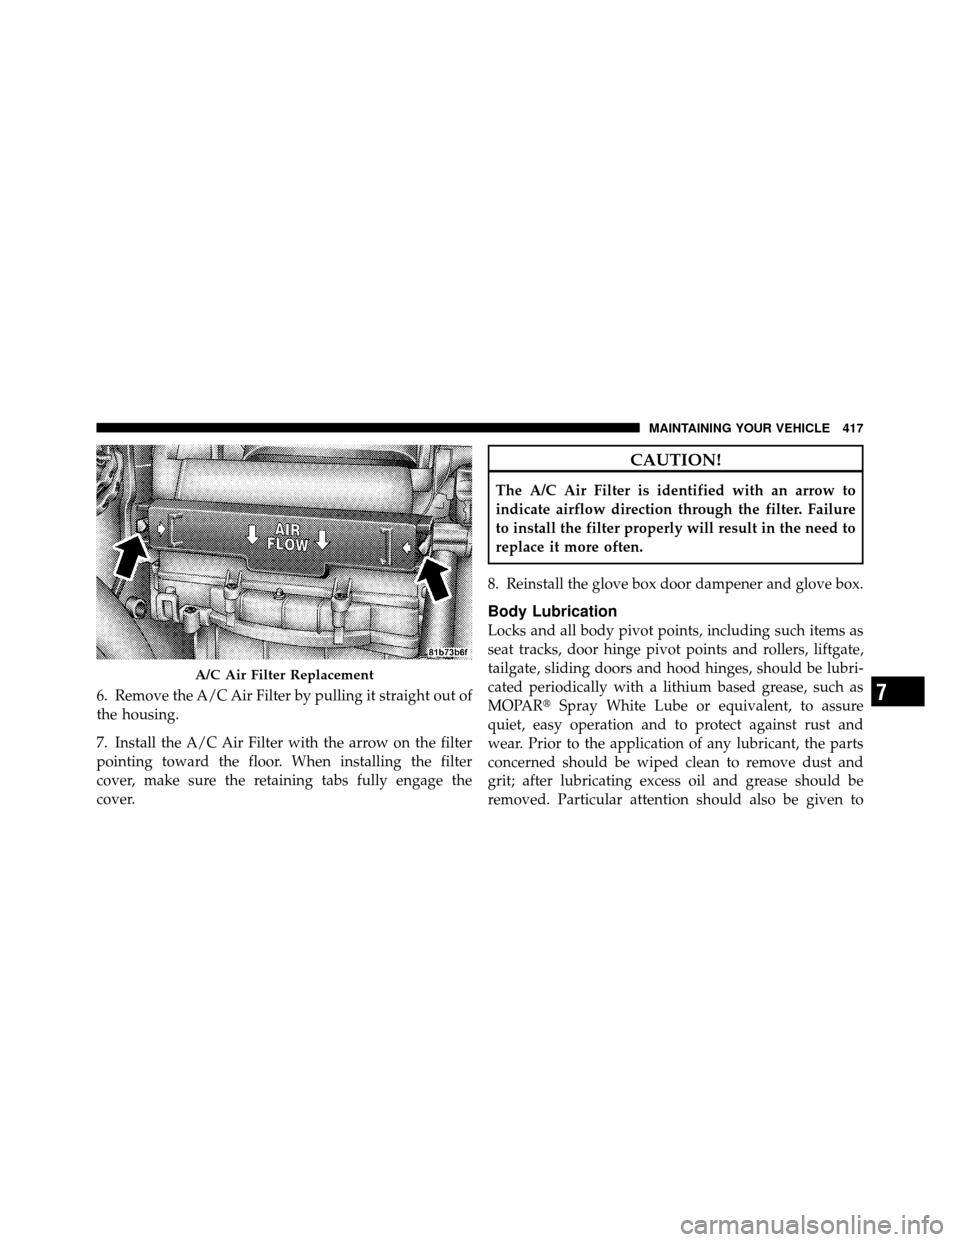
6. Remove the A/C Air Filter by pulling it straight out of
the housing.
7. Install the A/C Air Filter with the arrow on the filter
pointing toward the floor. When installing the filter
cover, make sure the retaining tabs fully engage the
cover.
CAUTION!
The A/C Air Filter is identified with an arrow to
indicate airflow direction through the filter. Failure
to install the filter properly will result in the need to
replace it more often.
8. Reinstall the glove box door dampener and glove box.
Body Lubrication
Locks and all body pivot points, including such items as
seat tracks, door hinge pivot points and rollers, liftgate,
tailgate, sliding doors and hood hinges, should be lubri-
cated periodically with a lithium based grease, such as
MOPAR� Spray White Lube or equivalent, to assure
quiet, easy operation and to protect against rust and
wear. Prior to the application of any lubricant, the parts
concerned should be wiped clean to remove dust and
grit; after lubricating excess oil and grease should be
removed. Particular attention should also be given to
A/C Air Filter Replacement
7
MAINTAINING YOUR VEHICLE 417