Page 14 of 542
Black plate (8,1)Chevrolet Tahoe/Suburban Owner Manual - 2011
1-8 In Brief
Power Lumbar
To adjust the power lumbar support,
if equipped:
.On vehicles with two-way
lumbar, press and hold the top
or bottom of the control to
increase or decrease lumbar
support.
.On vehicles with four-way
lumbar, press and hold the front
or rear of the control to increase
or decrease lumbar support. To
raise or lower the height of the
support, press and hold the top
or bottom of the control.
See Lumbar Adjustment on
page 3‑6 for more information.Reclining Seatbacks
Manual Reclining Seatbacks
To recline a manual seatback:
1. Lift the lever.
2. Move the seatback to the
desired position, and then
release the lever to lock the
seatback in place.
3. Push and pull on the seatback to make sure it is locked.
Page 17 of 542

Black plate (11,1)Chevrolet Tahoe/Suburban Owner Manual - 2011
In Brief 1-11
Heated Seats
Front Seats
On vehicles with heated front seats,
or heated and cooled front seats,
the controls are on the driver and
passenger doors.
{(If Equipped):Press to cool the
entire seat.
+: Press to heat the
seatback only.
z: Press to heat the seat and
seatback.
Repeatedly press and release the
desired button to cycle through the
temperature settings.
See Heated Front Seats on
page 3‑9 andHeated and Ventilated
Front Seats on page 3‑10.
Rear Seats
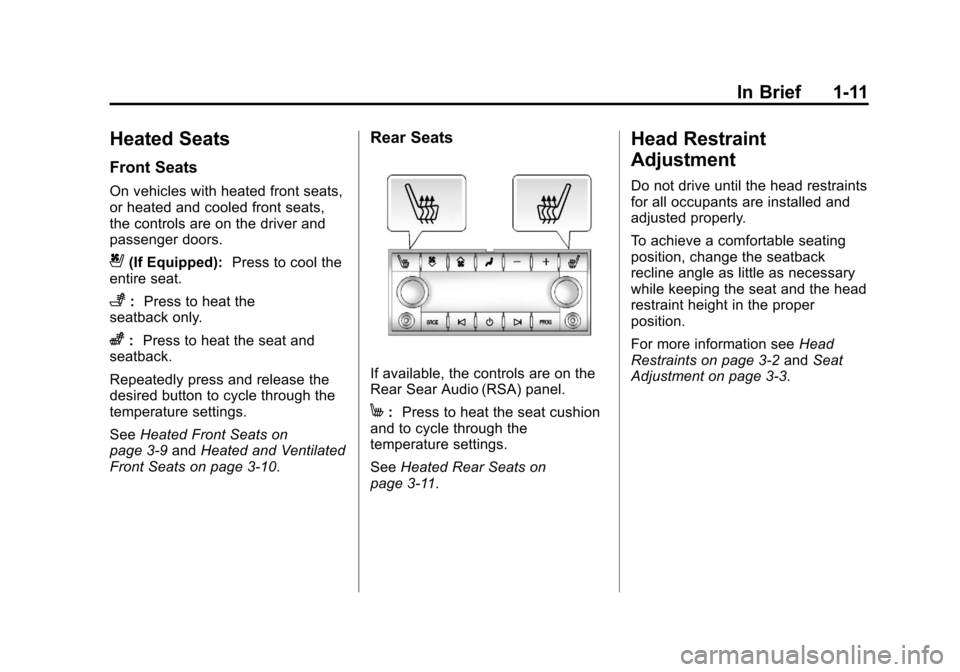
If available, the controls are on the
Rear Sear Audio (RSA) panel.
M: Press to heat the seat cushion
and to cycle through the
temperature settings.
See Heated Rear Seats on
page 3‑11.
Head Restraint
Adjustment
Do not drive until the head restraints
for all occupants are installed and
adjusted properly.
To achieve a comfortable seating
position, change the seatback
recline angle as little as necessary
while keeping the seat and the head
restraint height in the proper
position.
For more information see Head
Restraints on page 3‑2 andSeat
Adjustment on page 3‑3.
Page 99 of 542

Black plate (35,1)Chevrolet Tahoe/Suburban Owner Manual - 2011
Seats and Restraints 3-35
4. If equipped with a shoulder beltheight adjuster, move it to the
height that is right for you. See
“Shoulder Belt Height Adjuster”
in this section for instructions on
use and important safety
information.
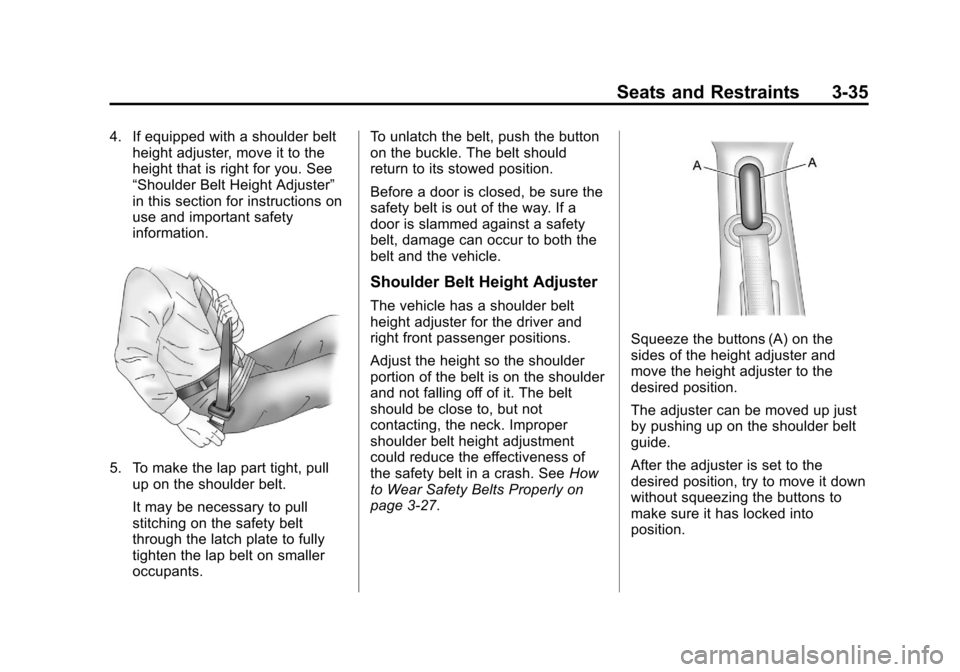
5. To make the lap part tight, pull
up on the shoulder belt.
It may be necessary to pull
stitching on the safety belt
through the latch plate to fully
tighten the lap belt on smaller
occupants. To unlatch the belt, push the button
on the buckle. The belt should
return to its stowed position.
Before a door is closed, be sure the
safety belt is out of the way. If a
door is slammed against a safety
belt, damage can occur to both the
belt and the vehicle.
Shoulder Belt Height Adjuster
The vehicle has a shoulder belt
height adjuster for the driver and
right front passenger positions.
Adjust the height so the shoulder
portion of the belt is on the shoulder
and not falling off of it. The belt
should be close to, but not
contacting, the neck. Improper
shoulder belt height adjustment
could reduce the effectiveness of
the safety belt in a crash. See
How
to Wear Safety Belts Properly on
page 3‑27.
Squeeze the buttons (A) on the
sides of the height adjuster and
move the height adjuster to the
desired position.
The adjuster can be moved up just
by pushing up on the shoulder belt
guide.
After the adjuster is set to the
desired position, try to move it down
without squeezing the buttons to
make sure it has locked into
position.
Page 416 of 542

Black plate (26,1)Chevrolet Tahoe/Suburban Owner Manual - 2011
10-26 Vehicle Care
Brakes
This vehicle has disc brakes. Disc
brake pads have built-in wear
indicators that make a high-pitched
warning sound when the brake pads
are worn and new pads are needed.
The sound can come and go or be
heard all the time the vehicle is
moving, except when applying the
brake pedal firmly.
{WARNING
The brake wear warning sound
means that soon the brakes will
not work well. That could lead to
a crash. When the brake wear
warning sound is heard, have the
vehicle serviced.
Notice: Continuing to drive with
worn-out brake pads could result
in costly brake repair. Some driving conditions or climates
can cause a brake squeal when the
brakes are first applied or lightly
applied. This does not mean
something is wrong with the brakes.
Properly torqued wheel nuts are
necessary to help prevent brake
pulsation. When tires are rotated,
inspect brake pads for wear and
evenly tighten wheel nuts in the
proper sequence to torque
specifications in
Capacities and
Specifications on page 12‑2.
Brake linings should always be
replaced as complete axle sets.
Brake Pedal Travel
See your dealer if the brake pedal
does not return to normal height,
or if there is a rapid increase in
pedal travel. This could be a sign
that brake service might be
required.
Brake Adjustment
Every time the brakes are applied,
with or without the vehicle moving,
the brakes adjust for wear.
Replacing Brake System Parts
The braking system on a vehicle is
complex. Its many parts have to be
of top quality and work well together
if the vehicle is to have really good
braking. The vehicle was designed
and tested with top-quality brake
parts. When parts of the braking
system are replaced, be sure to get
new, approved replacement parts.
If this is not done, the brakes might
not work properly. For example,
installing disc brake pads that are
wrong for the vehicle, can change
the balance between the front and
rear brakes —for the worse. The
braking performance expected can
change in many other ways if the
wrong replacement brake parts are
installed.
Page 427 of 542

Black plate (37,1)Chevrolet Tahoe/Suburban Owner Manual - 2011
Vehicle Care 10-37
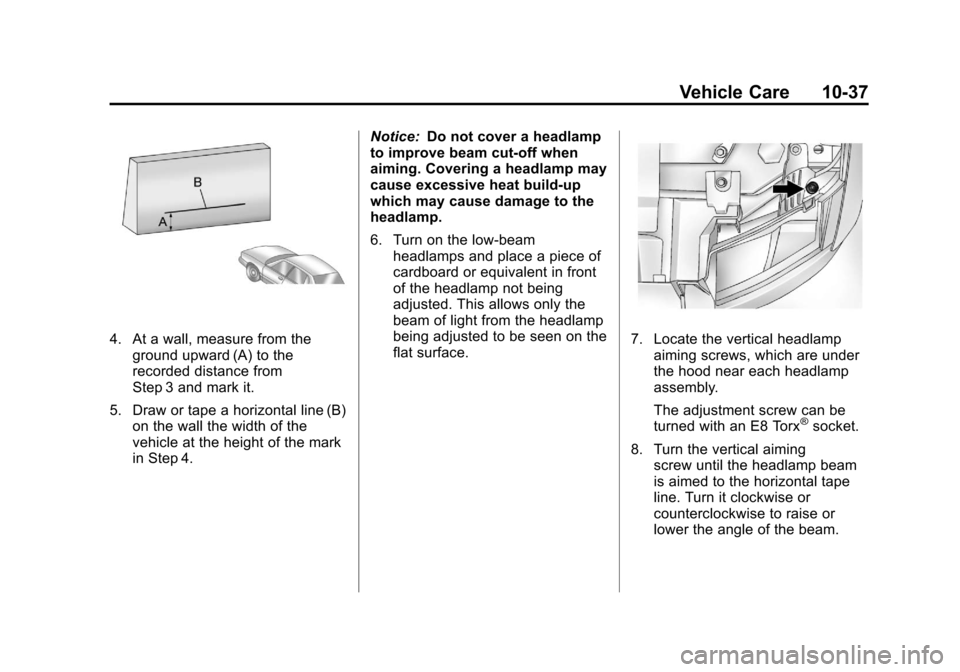
4. At a wall, measure from theground upward (A) to the
recorded distance from
Step 3 and mark it.
5. Draw or tape a horizontal line (B) on the wall the width of the
vehicle at the height of the mark
in Step 4. Notice:
Do not cover a headlamp
to improve beam cut-off when
aiming. Covering a headlamp may
cause excessive heat build-up
which may cause damage to the
headlamp.
6. Turn on the low-beam
headlamps and place a piece of
cardboard or equivalent in front
of the headlamp not being
adjusted. This allows only the
beam of light from the headlamp
being adjusted to be seen on the
flat surface.7. Locate the vertical headlampaiming screws, which are under
the hood near each headlamp
assembly.
The adjustment screw can be
turned with an E8 Torx
®socket.
8. Turn the vertical aiming screw until the headlamp beam
is aimed to the horizontal tape
line. Turn it clockwise or
counterclockwise to raise or
lower the angle of the beam.