2011 CHEVROLET SUBURBAN key
[x] Cancel search: keyPage 356 of 542
Black plate (68,1)Chevrolet Tahoe/Suburban Owner Manual - 2011
9-68 Driving and Operating
The delay that is received after
shifting out of R (Reverse) is
approximately 10 seconds. The
delay can be cancelled by
performing one of the following:
.Pressing a hard key on the
navigation system.
.Shifting in to P (Park).
.Reach a vehicle speed of
5 mph (8 km/h).
There is a message on the rear
vision camera screen that states
“Check Surroundings for Safety.”
Adjusting the Brightness and
Contrast of the Screen
To adjust the brightness and
contrast of the screen, press the
MENU button while the rear vision
camera image is on the display. Any
adjustments made will only affect
the rear vision camera screen.
](Brightness): Touch the + (plus)
or –(minus) screen buttons to
increase or decrease the brightness
of the screen.
_(Contrast): Touch the + (plus)
or –(minus) screen buttons to
increase or decrease the contrast of
the screen.
Symbols
The navigation system may have a
feature that lets the driver view
symbols on the navigation screen
while using the rear vision camera.
The Ultrasonic Rear Park Assist
(URPA) system must not be
disabled to use the caution symbols.
If URPA has been disabled and the
symbols have been turned on, the
Rear Parking Assist Symbols
Unavailable error message may
display. See Ultrasonic Parking
Assist on page 9‑61.
The symbols appear when an object
has been detected by the URPA
system. The symbol may cover the
object when viewing the navigation
screen. To turn the symbols on or off:
1. Make sure that URPA has not
been disabled.
2. Shift into P (Park).
3. Press the MENU hard key to enter the configure menu
options, then press the MENU
hard key repeatedly until Display
is selected or touch the Display
screen button.
4. Select the Rear Camera Options screen button. The Rear Camera
Options screen will display.
5. Touch the Symbols screen button. The screen button will be
highlighted when on.
Page 393 of 542
Black plate (3,1)Chevrolet Tahoe/Suburban Owner Manual - 2011
Vehicle Care 10-3
California Proposition
65 Warning
Most motor vehicles, including this
one, contain and/or emit chemicals
known to the State of California to
cause cancer and birth defects or
other reproductive harm. Engine
exhaust, many parts and systems,
many fluids, and some component
wear by-products contain and/or
emit these chemicals.
California Perchlorate
Materials Requirements
Certain types of automotive
applications, such as airbag
initiators, seat belt pretensioners,
and lithium batteries contained in
remote keyless transmitters, may
contain perchlorate materials.
Special handling may be necessary.
For additional information, see
www.dtsc.ca.gov/hazardouswaste/
perchlorate.
Accessories and
Modifications
Adding non‐dealer accessories to
the vehicle can affect vehicle
performance and safety, including
such things as airbags, braking,
stability, ride and handling,
emissions systems, aerodynamics,
durability, and electronic systems
like antilock brakes, traction control,
and stability control. Some of these
accessories could even cause
malfunction or damage not covered
by the vehicle warranty.
Damage to vehicle components
resulting from the installation or use
of non‐GM certified parts, including
control module modifications, is not
covered under the terms of the
vehicle warranty and may affect
remaining warranty coverage for
affected parts.
Page 414 of 542
Black plate (24,1)Chevrolet Tahoe/Suburban Owner Manual - 2011
10-24 Vehicle Care
If the vehicle has electric cooling
fans, the fans may be heard
spinning at low speed during most
everyday driving. The fans may turn
off if no cooling is required. Under
heavy vehicle loading, trailer towing,
high outside temperatures,
or operation of the air conditioning
system, the fans may change to
high speed and an increase in fan
noise may be heard. This is normal
and indicates that the cooling
system is functioning properly. The
fans will change to low speed when
additional cooling is no longer
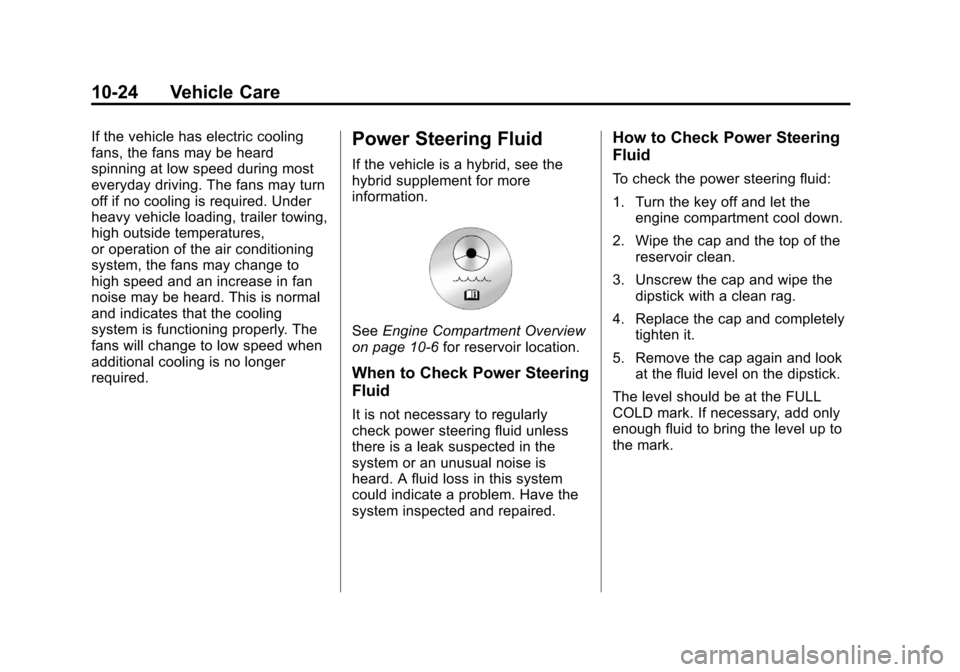
required.Power Steering Fluid
If the vehicle is a hybrid, see the
hybrid supplement for more
information.
SeeEngine Compartment Overview
on page 10‑6 for reservoir location.
When to Check Power Steering
Fluid
It is not necessary to regularly
check power steering fluid unless
there is a leak suspected in the
system or an unusual noise is
heard. A fluid loss in this system
could indicate a problem. Have the
system inspected and repaired.
How to Check Power Steering
Fluid
To check the power steering fluid:
1. Turn the key off and let the
engine compartment cool down.
2. Wipe the cap and the top of the reservoir clean.
3. Unscrew the cap and wipe the dipstick with a clean rag.
4. Replace the cap and completely tighten it.
5. Remove the cap again and look at the fluid level on the dipstick.
The level should be at the FULL
COLD mark. If necessary, add only
enough fluid to bring the level up to
the mark.
Page 423 of 542
Black plate (33,1)Chevrolet Tahoe/Suburban Owner Manual - 2011
Vehicle Care 10-33
Do not use the accelerator
pedal, and be ready to turn off
the engine immediately if it
starts.
3. Try to start the engine in each gear. The vehicle should start
only in P (Park) or N (Neutral).
If the vehicle starts in any other
position, contact your dealer for
service.
Automatic Transmission
Shift Lock Control
Function Check
{WARNING
When you are doing this
inspection, the vehicle could
move suddenly. If the vehicle
moves, you or others could be
injured. 1. Before starting this check, be
sure there is enough room
around the vehicle. It should be
parked on a level surface.
2. Firmly apply the parking brake. See Parking Brake on
page 9‑54.
Be ready to apply the regular
brake immediately if the vehicle
begins to move.
3. With the engine off, turn the ignition on, but do not start the
engine. Without applying the
regular brake, try to move the
shift lever out of P (Park) with
normal effort. If the shift lever
moves out of P (Park), contact
your dealer for service.
Ignition Transmission
Lock Check
While parked, and with the parking
brake set, try to turn the ignition to
LOCK/OFF in each shift lever
position.
.The ignition should turn to
LOCK/OFF only when the shift
lever is in P (Park).
.The ignition key should come
out only in LOCK/OFF.
Contact your dealer if service is
required.
Page 434 of 542
Black plate (44,1)Chevrolet Tahoe/Suburban Owner Manual - 2011
10-44 Vehicle Care
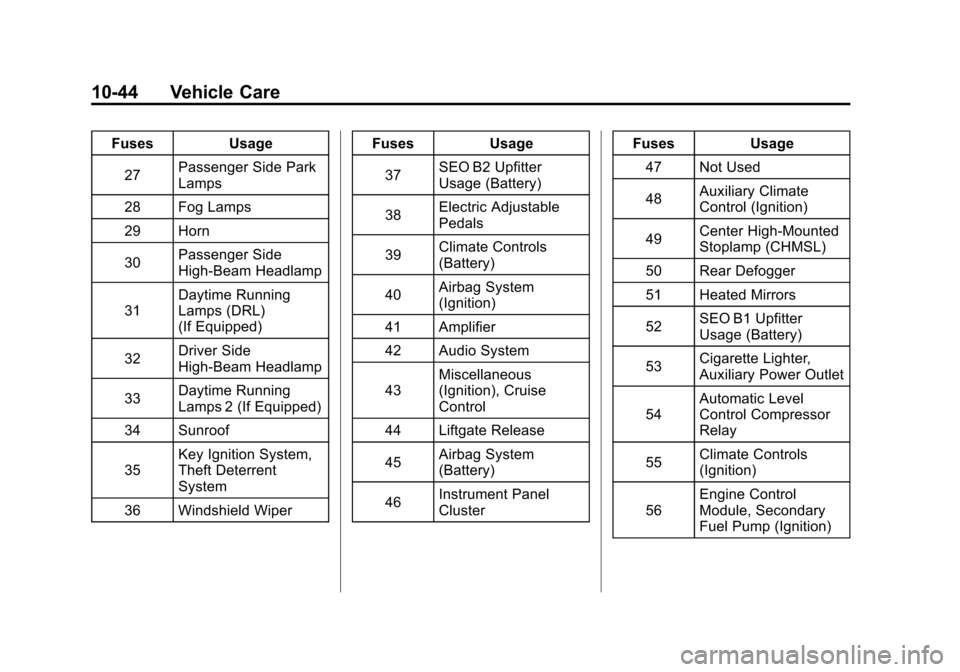
FusesUsage
27 Passenger Side Park
Lamps
28 Fog Lamps
29 Horn
30 Passenger Side
High-Beam Headlamp
31 Daytime Running
Lamps (DRL)
(If Equipped)
32 Driver Side
High-Beam Headlamp
33 Daytime Running
Lamps 2 (If Equipped)
34 Sunroof
35 Key Ignition System,
Theft Deterrent
System
36 Windshield Wiper Fuses
Usage
37 SEO B2 Upfitter
Usage (Battery)
38 Electric Adjustable
Pedals
39 Climate Controls
(Battery)
40 Airbag System
(Ignition)
41 Amplifier
42 Audio System
43 Miscellaneous
(Ignition), Cruise
Control
44 Liftgate Release
45 Airbag System
(Battery)
46 Instrument Panel
Cluster Fuses
Usage
47 Not Used
48 Auxiliary Climate
Control (Ignition)
49 Center High-Mounted
Stoplamp (CHMSL)
50 Rear Defogger
51 Heated Mirrors
52 SEO B1 Upfitter
Usage (Battery)
53 Cigarette Lighter,
Auxiliary Power Outlet
54 Automatic Level
Control Compressor
Relay
55 Climate Controls
(Ignition)
56 Engine Control
Module, Secondary
Fuel Pump (Ignition)
Page 437 of 542
Black plate (47,1)Chevrolet Tahoe/Suburban Owner Manual - 2011
Vehicle Care 10-47
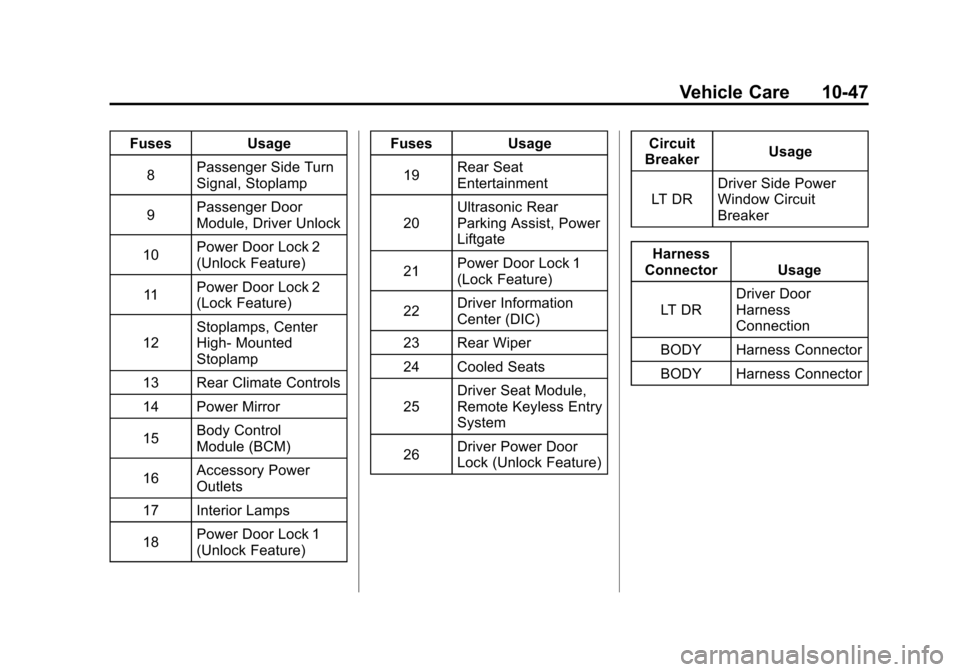
FusesUsage
8 Passenger Side Turn
Signal, Stoplamp
9 Passenger Door
Module, Driver Unlock
10 Power Door Lock 2
(Unlock Feature)
11 Power Door Lock 2
(Lock Feature)
12 Stoplamps, Center
High‐
Mounted
Stoplamp
13 Rear Climate Controls
14 Power Mirror
15 Body Control
Module (BCM)
16 Accessory Power
Outlets
17 Interior Lamps
18 Power Door Lock 1
(Unlock Feature) Fuses
Usage
19 Rear Seat
Entertainment
20 Ultrasonic Rear
Parking Assist, Power
Liftgate
21 Power Door Lock 1
(Lock Feature)
22 Driver Information
Center (DIC)
23 Rear Wiper
24 Cooled Seats
25 Driver Seat Module,
Remote Keyless Entry
System
26 Driver Power Door
Lock (Unlock Feature) Circuit
Breaker Usage
LT DR Driver Side Power
Window Circuit
Breaker
Harness
Connector Usage
LT DR Driver Door
Harness
Connection
BODY Harness Connector
BODY Harness Connector
Page 452 of 542
Black plate (62,1)Chevrolet Tahoe/Suburban Owner Manual - 2011
10-62 Vehicle Care
.Operating electronic devices or
being near facilities using radio
wave frequencies similar to the
TPMS could cause the TPMS
sensors to malfunction.
If the TPMS is not functioning it
cannot detect or signal a low tire
condition. See your dealer for
service if the TPMS malfunction
light and DIC message comes on
and stays on.
TPMS Sensor Matching
Process
Each TPMS sensor has a unique
identification code. Any time you
rotate your vehicle's tires or replace
one or more of the TPMS sensors,
the identification codes will need to
be matched to the new tire/wheel
position. The sensors are matched
to the tire/wheel positions in the
following order: driver side front tire,
passenger side front tire, passenger
side rear tire, and driver side rear
tire using a TPMS diagnostic tool.
See your dealer for service. The TPMS sensors can also be
matched to each tire/wheel position
by increasing or decreasing the
tire's air pressure. If increasing the
tire's air pressure, do not exceed
the maximum inflation pressure
indicated on the tire's sidewall.
To decrease air-pressure out of a
tire you can use the pointed end of
the valve cap, a pencil-style air
pressure gauge, or a key.
You have two minutes to match the
first tire/wheel position, and
five minutes overall to match all four
tire/wheel positions. If it takes longer
than two minutes, to match the first
tire and wheel, or more than
five minutes to match all four tire
and wheel positions the matching
process stops and you need to
start over.
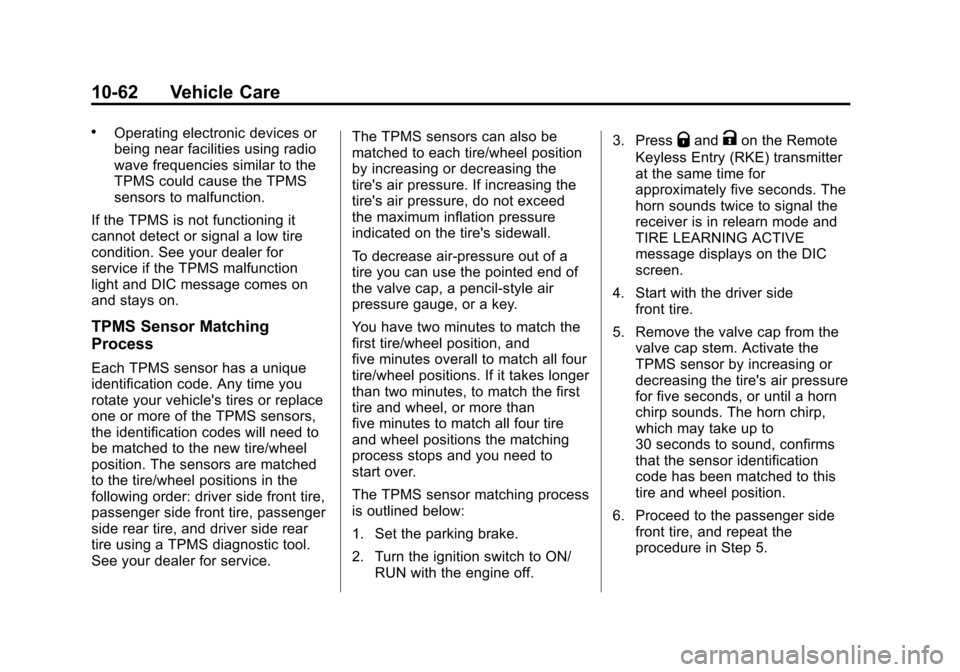
The TPMS sensor matching process
is outlined below:
1. Set the parking brake.
2. Turn the ignition switch to ON/
RUN with the engine off. 3. Press
QandKon the Remote
Keyless Entry (RKE) transmitter
at the same time for
approximately five seconds. The
horn sounds twice to signal the
receiver is in relearn mode and
TIRE LEARNING ACTIVE
message displays on the DIC
screen.
4. Start with the driver side front tire.
5. Remove the valve cap from the valve cap stem. Activate the
TPMS sensor by increasing or
decreasing the tire's air pressure
for five seconds, or until a horn
chirp sounds. The horn chirp,
which may take up to
30 seconds to sound, confirms
that the sensor identification
code has been matched to this
tire and wheel position.
6. Proceed to the passenger side front tire, and repeat the
procedure in Step 5.
Page 465 of 542
Black plate (75,1)Chevrolet Tahoe/Suburban Owner Manual - 2011
Vehicle Care 10-75
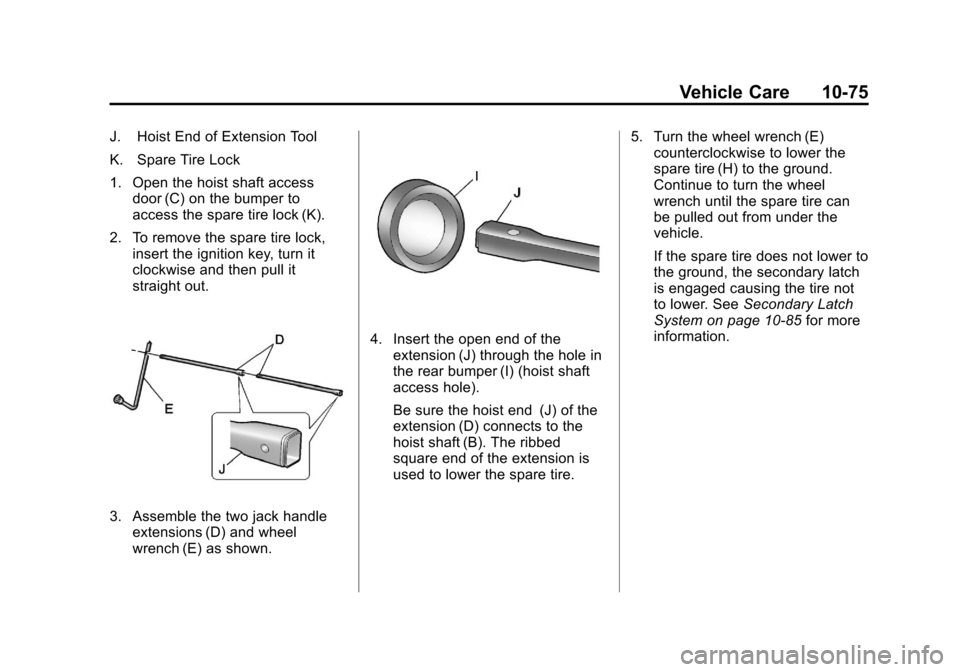
J. Hoist End of Extension Tool
K. Spare Tire Lock
1. Open the hoist shaft accessdoor (C) on the bumper to
access the spare tire lock (K).
2. To remove the spare tire lock, insert the ignition key, turn it
clockwise and then pull it
straight out.
3. Assemble the two jack handleextensions (D) and wheel
wrench (E) as shown.
4. Insert the open end of theextension (J) through the hole in
the rear bumper (I) (hoist shaft
access hole).
Be sure the hoist end (J) of the
extension (D) connects to the
hoist shaft (B). The ribbed
square end of the extension is
used to lower the spare tire. 5. Turn the wheel wrench (E)
counterclockwise to lower the
spare tire (H) to the ground.
Continue to turn the wheel
wrench until the spare tire can
be pulled out from under the
vehicle.
If the spare tire does not lower to
the ground, the secondary latch
is engaged causing the tire not
to lower. See Secondary Latch
System on page 10‑85 for more
information.