2011 CHEVROLET MALIBU steering
[x] Cancel search: steeringPage 230 of 382
Black plate (36,1)Chevrolet Malibu Owner Manual - 2011
9-36 Driving and Operating
Increasing Speed While Using
Cruise Control
If the cruise control system is
already activated,
.Press and hold the RES+ button
on the steering wheel until the
desired speed is reached, then
release it.
.To increase the vehicle speed in
small amounts, press the RES+
button briefly. Each time this is
done, the vehicle goes about
1.6 km/h (1 mph) faster.
Reducing Speed While Using
Cruise Control
If the cruise control system is
already activated,
.Press and hold the SET− on the
steering wheel until the lower
speed desired is reached, then
release it.
.To slow down in small amounts,
press the SET− button briefly.
Each time this is done, the
vehicle goes about 1.6 km/h
(1 mph) slower.
Passing Another Vehicle While
Using Cruise Control
Use the accelerator pedal to
increase the vehicle speed. When
you take your foot off the pedal, the
vehicle will slow down to the
previously set cruise control speed.
Using Cruise Control on Hills
How well the cruise control works
on hills depends upon the vehicle
speed, load, and the steepness of
the hills. When going up steep hills,
you might have to step on the
accelerator pedal to maintain the
vehicle speed. When going
downhill, you might have to brake or
shift to a lower gear to keep the
vehicle at a lower speed. When the
brakes are applied this ends the
cruise control. Ending Cruise Control
There are two ways to end cruise
control:
.To disengage the cruise control,
step lightly on the brake pedal.
.To turn off cruise control, press
the
Ibutton.
Erasing Speed Memory
The cruise control set speed is
erased from memory, by pressing
the
Ibutton or if the ignition is
turned off.
Page 238 of 382
Black plate (44,1)Chevrolet Malibu Owner Manual - 2011
9-44 Driving and Operating
.Do not tow a trailer at all during
the first 1 600 km (1,000 miles)
the new vehicle is driven. The
engine, axle or other parts could
be damaged.
.During the first 800 km
(500 miles) that a trailer is
towed, do not drive over 80 km/h
(50 mph) and do not make starts
at full throttle. This reduces wear
on the vehicle.
.The vehicle can tow in D (Drive).
Use a lower gear if the
transmission shifts too often.
.Obey speed limit restrictions.
Do not drive faster than the
maximum posted speed for
trailers, or no more than 90 km/h
(55 mph), to reduce wear on the
vehicle.
Driving with a Trailer
Towing a trailer requires experience.
Get familiar with handling and
braking with the added trailerweight. The vehicle is now longer
and not as responsive as the
vehicle is by itself.
Check all trailer hitch parts and
attachments, safety chains,
electrical connectors, lamps, tires
and mirror adjustments. If the trailer
has electric brakes, start the vehicle
and trailer moving and then apply
the trailer brake controller by hand
to be sure the brakes are working.
During the trip, check regularly to be
sure that the load is secure, and the
lamps and trailer brakes are working
properly.
Towing with a Stability Control
System
When towing, the sound of the
stability control system might be
heard. The system is reacting to the
vehicle movement caused by the
trailer, which mainly occurs during
cornering. This is normal when
towing heavier trailers.
Following Distance
Stay at least twice as far behind the
vehicle ahead as you would when
driving the vehicle without a trailer.
This can help to avoid situations
that require heavy braking and
sudden turns.
Passing
More passing distance is needed
when towing a trailer. Because the
rig is longer, it is necessary to go
farther beyond the passed vehicle
before returning to the lane.
Backing Up
Hold the bottom of the steering
wheel with one hand. To move the
trailer to the left, move that hand to
the left. To move the trailer to the
right, move your hand to the right.
Always back up slowly and,
if possible, have someone
guide you.
Page 243 of 382
Black plate (1,1)Chevrolet Malibu Owner Manual - 2011
Vehicle Care 10-1
Vehicle Care
General Information
General Information . . . . . . . . . . 10-2
California Proposition65 Warning . . . . . . . . . . . . . . . . . 10-3
California Perchlorate Materials Requirements . . . . 10-3
Accessories and Modifications . . . . . . . . . . . . . . . 10-3
Vehicle Checks
Doing Your OwnService Work . . . . . . . . . . . . . . . 10-4
Hood . . . . . . . . . . . . . . . . . . . . . . . . 10-5
Engine Compartment Overview . . . . . . . . . . . . . . . . . . . 10-6
Engine Oil . . . . . . . . . . . . . . . . . . . 10-9
Engine Oil Life System . . . . . 10-12
Automatic Transmission Fluid . . . . . . . . . . . . . . . . . . . . . . 10-13
Engine Air Cleaner/Filter . . . . 10-14
Cooling System . . . . . . . . . . . . 10-15
Engine Coolant . . . . . . . . . . . . . 10-16
Engine Overheating . . . . . . . . 10-19 Overheated Engine
Protection
Operating Mode . . . . . . . . . . . 10-20
Power Steering Fluid . . . . . . . 10-21
Washer Fluid . . . . . . . . . . . . . . . 10-22
Brakes . . . . . . . . . . . . . . . . . . . . . 10-22
Brake Fluid . . . . . . . . . . . . . . . . . 10-23
Battery . . . . . . . . . . . . . . . . . . . . . 10-25
Starter Switch Check . . . . . . . 10-25
Automatic Transmission Shift Lock Control Function
Check . . . . . . . . . . . . . . . . . . . . . 10-26
Ignition Transmission Lock Check . . . . . . . . . . . . . . . . . . . . . 10-26
Park Brake and P (Park) Mechanism Check . . . . . . . . 10-26
Wiper Blade Replacement . . . . . . . . . . . . . . 10-27
Headlamp Aiming
Headlamp Aiming . . . . . . . . . . 10-27
Bulb Replacement
Bulb Replacement . . . . . . . . . . 10-28
Halogen Bulbs . . . . . . . . . . . . . . 10-28
Taillamps, Turn Signal, andStoplamps . . . . . . . . . . . . . . . . 10-28
License Plate Lamp . . . . . . . . 10-29
Replacement Bulbs . . . . . . . . . 10-29
Electrical System
Electrical System Overload . . . . . . . . . . . . . . . . . . 10-30
Fuses . . . . . . . . . . . . . . . . . . . . . . 10-30
Engine Compartment Fuse Block . . . . . . . . . . . . . . . . . . . . . 10-31
Instrument Panel Fuse Block . . . . . . . . . . . . . . . . . . . . . 10-33
Rear Compartment Fuse Block . . . . . . . . . . . . . . . . . . . . . 10-35
Wheels and Tires
Tires . . . . . . . . . . . . . . . . . . . . . . . . 10-38
Winter Tires . . . . . . . . . . . . . . . . 10-39
Low-Profile Tires . . . . . . . . . . . 10-39
Tire Sidewall Labeling . . . . . . 10-40
Tire Designations . . . . . . . . . . . 10-42
Tire Terminology andDefinitions . . . . . . . . . . . . . . . . 10-42
Tire Pressure . . . . . . . . . . . . . . . 10-45
Tire Pressure for High-Speed Operation . . . . . . . . . . . . . . . . . 10-46
Tire Pressure Monitor System . . . . . . . . . . . . . . . . . . . 10-47
Tire Pressure Monitor Operation . . . . . . . . . . . . . . . . . 10-48
Tire Inspection . . . . . . . . . . . . . . 10-51
Tire Rotation . . . . . . . . . . . . . . . 10-52
Page 247 of 382
Black plate (5,1)Chevrolet Malibu Owner Manual - 2011
Vehicle Care 10-5
Hood
To open the hood:
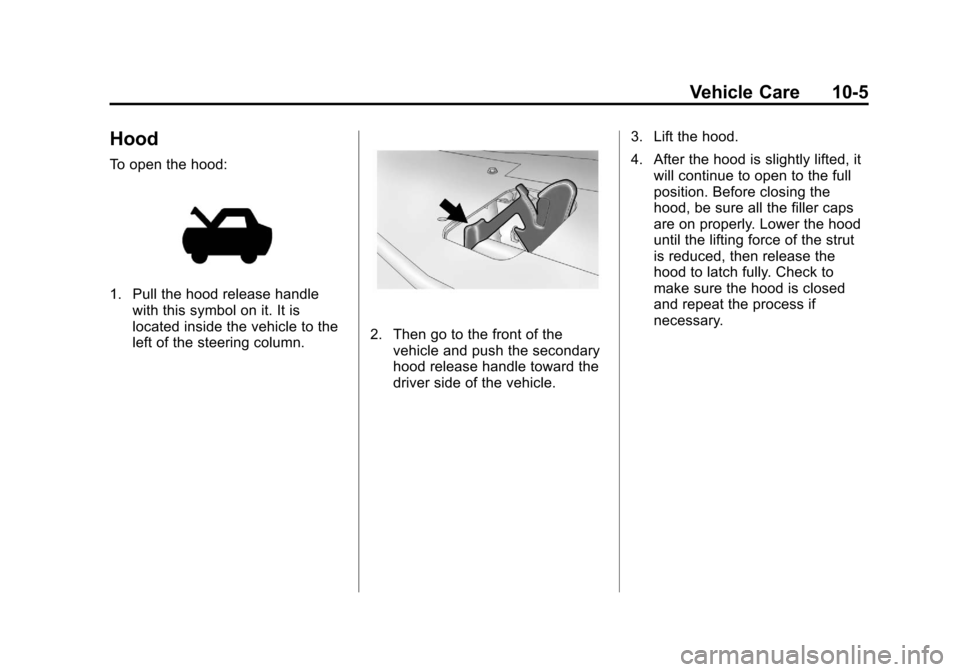
1. Pull the hood release handlewith this symbol on it. It is
located inside the vehicle to the
left of the steering column.
2. Then go to the front of thevehicle and push the secondary
hood release handle toward the
driver side of the vehicle. 3. Lift the hood.
4. After the hood is slightly lifted, it
will continue to open to the full
position. Before closing the
hood, be sure all the filler caps
are on properly. Lower the hood
until the lifting force of the strut
is reduced, then release the
hood to latch fully. Check to
make sure the hood is closed
and repeat the process if
necessary.
Page 251 of 382
Black plate (9,1)Chevrolet Malibu Owner Manual - 2011
Vehicle Care 10-9
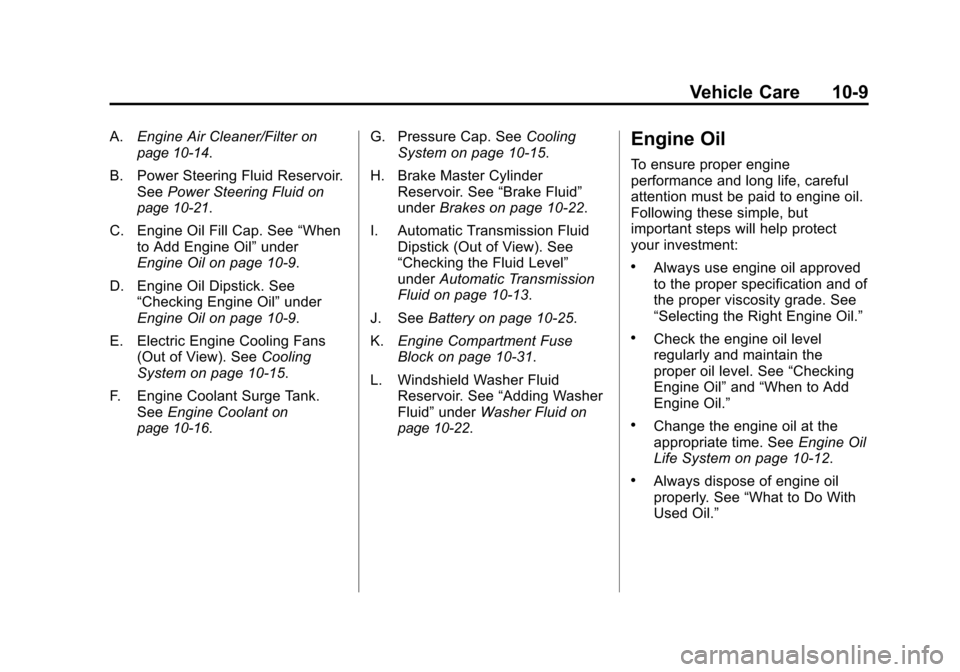
A.Engine Air Cleaner/Filteron
page 10‑14.
B. Power Steering Fluid Reservoir. See Power Steering Fluid
on
page 10‑21.
C. Engine Oil Fill Cap. See “When
to Add Engine Oil” under
Engine Oil on page 10‑9.
D. Engine Oil Dipstick. See “Checking Engine Oil” under
Engine Oil on page 10‑9.
E. Electric Engine Cooling Fans (Out of View). See Cooling
System on page 10‑15.
F. Engine Coolant Surge Tank. See Engine Coolant
on
page 10‑16. G. Pressure Cap. See
Cooling
System on page 10‑15.
H. Brake Master Cylinder Reservoir. See “Brake Fluid”
under Brakes on page 10‑22.
I. Automatic Transmission Fluid Dipstick (Out of View). See
“Checking the Fluid Level”
under Automatic Transmission
Fluid on page 10‑13.
J. See Battery on page 10‑25.
K. Engine Compartment Fuse
Block on page 10‑31.
L. Windshield Washer Fluid Reservoir. See “Adding Washer
Fluid” under Washer Fluidon
page 10‑22.
Engine Oil
To ensure proper engine
performance and long life, careful
attention must be paid to engine oil.
Following these simple, but
important steps will help protect
your investment:
.Always use engine oil approved
to the proper specification and of
the proper viscosity grade. See
“Selecting the Right Engine Oil.”
.Check the engine oil level
regularly and maintain the
proper oil level. See “Checking
Engine Oil” and“When to Add
Engine Oil.”
.Change the engine oil at the
appropriate time. See Engine Oil
Life System on page 10‑12.
.Always dispose of engine oil
properly. See “What to Do With
Used Oil.”
Page 255 of 382
Black plate (13,1)Chevrolet Malibu Owner Manual - 2011
Vehicle Care 10-13
The engine oil and filter must be
changed at least once a year and,
at this time, the system must be
reset. Your dealer has trained
service people who will perform this
work and reset the system. It is also
important to check the oil regularly
over the course of an oil drain
interval and keep it at the proper
level.
If the system is ever reset
accidentally, the oil must be
changed at 5 000 km (3,000 miles)
since the last oil change.
Remember to reset the oil life
system whenever the oil is changed.How to Reset the Engine Oil
Life System
Reset the system whenever the
engine oil is changed so that the
system can calculate the next
engine oil change. To reset the
system:
1. Turn the ignition toON/RUN, with the
engine off.
2. Press and hold the DIC INFO and reset buttons, on the left
side of the steering wheel, at the
same time to enter the
personalization menu. The OIL
LIFE RESET message displays.
See Driver Information Center
(DIC)
on page 5‑23and Engine
Oil Messages on page 5‑27. 3. Press and hold the reset button
until the DIC display shows
ACKNOWLEDGED.
4. Turn the key to LOCK/OFF.
The system is reset when the
CHANGE OIL SOON message
is off.
If the CHANGE OIL SOON
message comes back on when the
vehicle is started, the engine oil life
system has not reset. Repeat the
procedure.
Automatic Transmission
Fluid
It is not necessary to check the
transmission fluid level.
A transmission fluid leak is the only
reason for fluid loss. If a leak
occurs, take the vehicle to the
dealer and have it repaired as
soon as possible.
Page 263 of 382
Black plate (21,1)Chevrolet Malibu Owner Manual - 2011
Vehicle Care 10-21
Notice:After driving in the
overheated engine protection
operating mode, to avoid engine
damage, allow the engine to cool
before attempting any repair. The
engine oil will be severely
degraded. Repair the cause of
coolant loss, change the oil and
reset the oil life system. See
Engine Oil on page 10‑9.
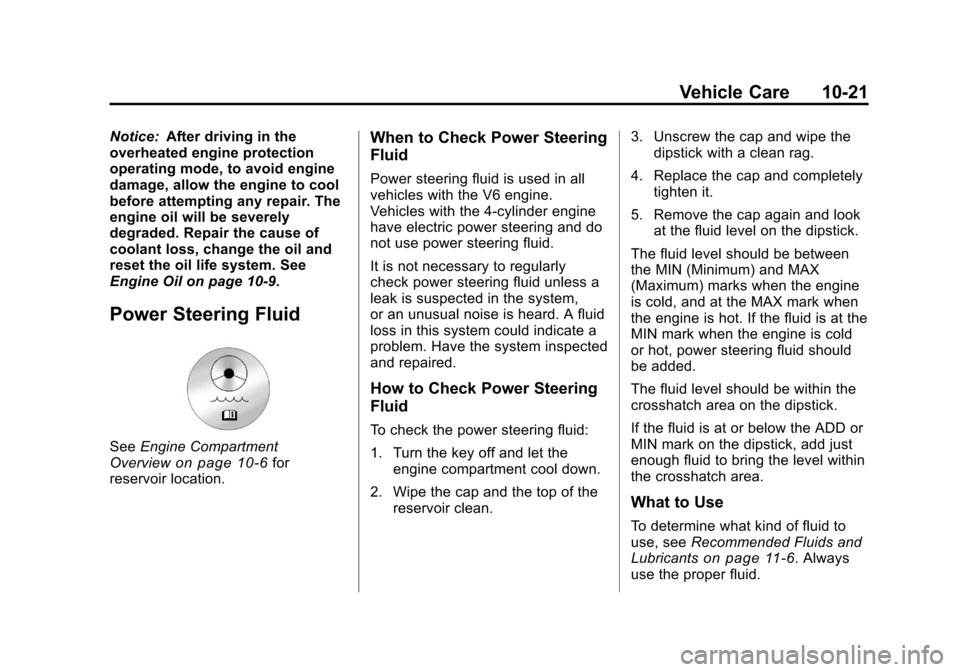
Power Steering Fluid
See Engine Compartment
Overviewon page 10‑6for
reservoir location.
When to Check Power Steering
Fluid
Power steering fluid is used in all
vehicles with the V6 engine.
Vehicles with the 4-cylinder engine
have electric power steering and do
not use power steering fluid.
It is not necessary to regularly
check power steering fluid unless a
leak is suspected in the system,
or an unusual noise is heard. A fluid
loss in this system could indicate a
problem. Have the system inspected
and repaired.
How to Check Power Steering
Fluid
To check the power steering fluid:
1. Turn the key off and let the
engine compartment cool down.
2. Wipe the cap and the top of the reservoir clean. 3. Unscrew the cap and wipe the
dipstick with a clean rag.
4. Replace the cap and completely tighten it.
5. Remove the cap again and look at the fluid level on the dipstick.
The fluid level should be between
the MIN (Minimum) and MAX
(Maximum) marks when the engine
is cold, and at the MAX mark when
the engine is hot. If the fluid is at the
MIN mark when the engine is cold
or hot, power steering fluid should
be added.
The fluid level should be within the
crosshatch area on the dipstick.
If the fluid is at or below the ADD or
MIN mark on the dipstick, add just
enough fluid to bring the level within
the crosshatch area.
What to Use
To determine what kind of fluid to
use, see Recommended Fluids and
Lubricants
on page 11‑6. Always
use the proper fluid.
Page 274 of 382
Black plate (32,1)Chevrolet Malibu Owner Manual - 2011
10-32 Vehicle Care
FusesUsage
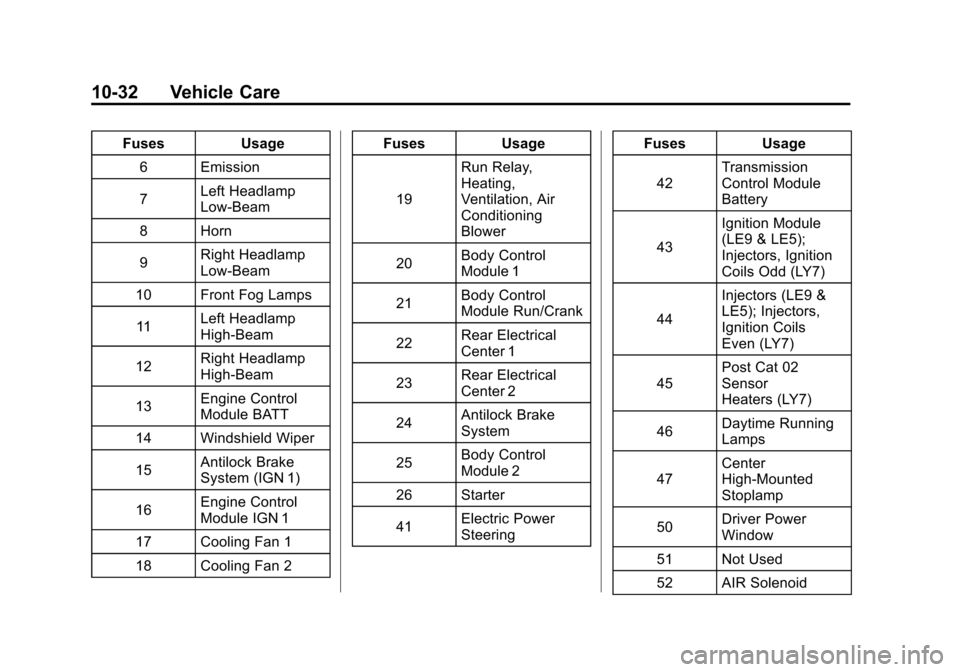
6 Emission
7 Left Headlamp
Low-Beam
8 Horn
9 Right Headlamp
Low-Beam
10 Front Fog Lamps
11 Left Headlamp
High-Beam
12 Right Headlamp
High-Beam
13 Engine Control
Module BATT
14 Windshield Wiper
15 Antilock Brake
System (IGN 1)
16 Engine Control
Module IGN 1
17 Cooling Fan 1
18 Cooling Fan 2 Fuses
Usage
19 Run Relay,
Heating,
Ventilation, Air
Conditioning
Blower
20 Body Control
Module 1
21 Body Control
Module Run/Crank
22 Rear Electrical
Center 1
23 Rear Electrical
Center 2
24 Antilock Brake
System
25 Body Control
Module 2
26 Starter
41 Electric Power
Steering Fuses
Usage
42 Transmission
Control Module
Battery
43 Ignition Module
(LE9 & LE5);
Injectors, Ignition
Coils Odd (LY7)
44 Injectors (LE9 &
LE5); Injectors,
Ignition Coils
Even (LY7)
45 Post Cat 02
Sensor
Heaters (LY7)
46 Daytime Running
Lamps
47 Center
High-Mounted
Stoplamp
50 Driver Power
Window
51 Not Used
52 AIR Solenoid