2011 CHEVROLET MALIBU spare tire
[x] Cancel search: spare tirePage 293 of 382
Black plate (51,1)Chevrolet Malibu Owner Manual - 2011
Vehicle Care 10-51
time, for about five seconds to
start the TPMS learn mode. The
horn sounds twice indicating the
TPMS receiver is ready and in
learn mode.
4. Start with the driver side front tire. The driver side front turn
signal also comes on to indicate
that corner's sensor is ready to
be learned.
5. Remove the valve cap from the tire's valve stem. Activate the
TPMS sensor by increasing or
decreasing the tire's air pressure
for about eight seconds. The
horn chirp, can take up to
30 seconds to sound. It chirps
one time and then all the turn
signals flash one time to confirm
the sensor identification code
has been matched to the tire/
wheel position. 6. The passenger side front turn
signal comes on to indicate that
corner sensor is ready to be
learned. Proceed to the
passenger side front tire and
repeat the procedure in Step 5.
7. The passenger side rear turn signal comes on to indicate that
corner sensor is ready to be
learned. Proceed to the
passenger side rear tire and
repeat the procedure in Step 5.
8. The driver side rear turn signal comes on to indicate that corner
sensor is ready to be learned.
Proceed to the driver side rear
tire, and repeat the procedure in
Step 5.
9. After hearing the single horn chirp for the driver side rear tire,
two additional horn chirps sound
to indicate the tire learning
process is done. Turn the
ignition switch to LOCK/OFF. If no tires are learned after
entering the TPMS learn mode,
or if communication with the
receiver stops, or if the time limit
has expired, turn the ignition
switch to LOCK/OFF and start
over beginning with Step 2.
10. Set all four tires to the recommended air pressure
level as indicated on the Tire
and Loading Information label.
11. Put the valve caps back on the valve stems.
Tire Inspection
We recommend that you
regularly inspect your vehicle's
tires, including the spare tire,
if the vehicle has one, for signs
of wear or damage at least once
a month.
Page 294 of 382
Black plate (52,1)Chevrolet Malibu Owner Manual - 2011
10-52 Vehicle Care
Always remove the tires if any of
the following statements
are true:
.You can see the indicators at
three or more places around
the tire.
.You can see cord or fabric
showing through the tire's
rubber.
.The tread or sidewall is
cracked, cut, or snagged
deep enough to show cord or
fabric.
.The tire has a bump, bulge,
or split.
.The tire has a puncture, cut,
or other damage that cannot
be repaired well because of
the size or location of the
damage.
Tire Rotation
Tires should be rotated every
12 000 km (7,500 miles). See
Scheduled Maintenance
on
page 11‑2
.
The purpose of a regular tire
rotation is to achieve a uniform
wear for all tires on the vehicle.
This will ensure that the vehicle
continues to perform most like it
did when the tires were new.
Any time you notice unusual
wear, rotate the tires as soon as
possible and check wheel
alignment. Also check for
damaged tires or wheels. SeeWhen It Is Time for New
Tires
on page 10‑53and
Wheel
Replacement
on page 10‑58.
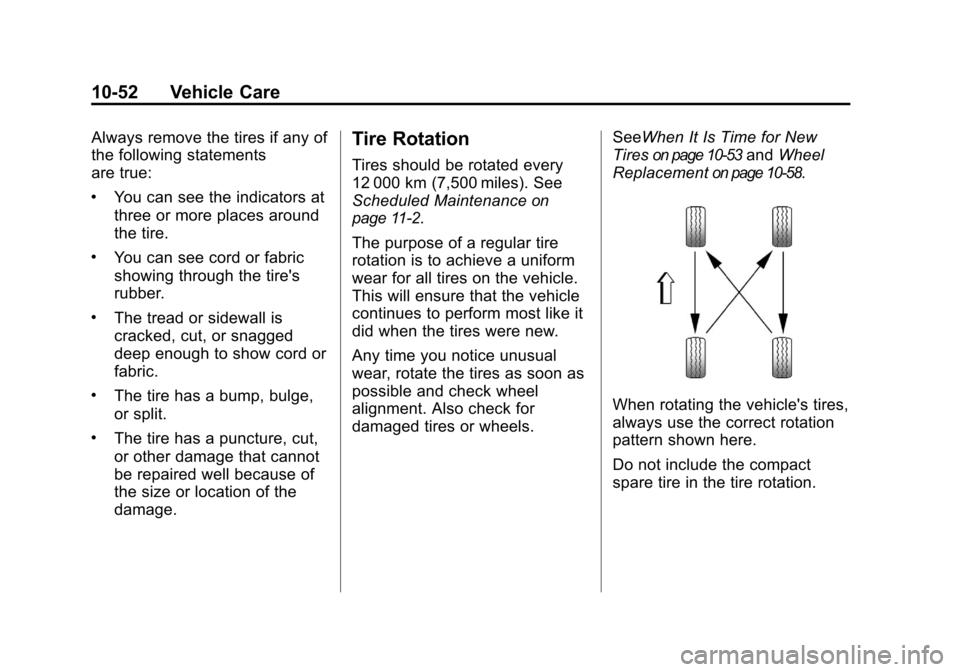
When rotating the vehicle's tires,
always use the correct rotation
pattern shown here.
Do not include the compact
spare tire in the tire rotation.
Page 296 of 382
Black plate (54,1)Chevrolet Malibu Owner Manual - 2011
10-54 Vehicle Care
Inspectionon page 10‑52andTire
Rotationon page 10‑52for
additional information.
The rubber in tires ages over time.
This is also true for the spare tire,
if the vehicle has one, even if it is
not being used. Multiple conditions
affect how fast this aging takes
place, including temperatures,
loading conditions, and inflation
pressure maintenance. Tires will
typically need to be replaced due to
wear before they may need to be
replaced due to age. Consult the tire
manufacturer for more information
on when tires should be replaced.
Vehicle Storage
Tires age when stored normally
mounted on a parked vehicle. Park
a vehicle that will be stored for at
least a month in a cool, dry, clean
area away from direct sunlight to
slow aging. This area should be free
of grease, gasoline, or other
substances that can deteriorate
rubber. Parking for an extended period can
cause flat spots on the tires that
may result in vibrations while
driving. When storing a vehicle for
at least a month, remove the tires or
raise the vehicle to reduce the
weight from the tires.
Buying New Tires
GM has developed and matched
specific tires for your vehicle.
The original equipment tires
installed on your vehicle, when it
was new, were designed to meet
General Motors Tire
Performance Criteria
Specification (TPC Spec)
system rating. If you need
replacement tires, GM strongly
recommends that you get tires
with the same TPC Spec rating.
This way, your vehicle will
continue to have tires that are
designed to give the same
performance and vehicle safety,
during normal use, as the
original tires.
GM's exclusive TPC Spec
system considers over a dozen
critical specifications that impact
the overall performance of your
vehicle, including brake system
performance, ride and handling,
traction control, and tire
pressure monitoring
performance. GM's TPC Spec
number is molded onto the tire's
sidewall near the tire size. If the
tires have an all‐season tread
design, the TPC Spec number
will be followed by an MS for
mud and snow. See
Tire
Sidewall Labeling
on page 10‑40
for additional information.
Page 297 of 382
Black plate (55,1)Chevrolet Malibu Owner Manual - 2011
Vehicle Care 10-55
GM recommends replacing tires
in sets of four. This is because
uniform tread depth on all tires
will help keep your vehicle
performing most like it did when
the tires were new. Replacing
less than a full set of tires can
affect the braking and handling
performance of your vehicle.
SeeTire Inspection
on page 10‑51
andTire Rotationon page 10‑52
for information on proper tire
rotation.
{WARNING
Tires could explode during
improper service. You or others
could be injured or killed if you
attempt to mount or dismount a
tire. Only your dealer or an
authorized tire service center
should mount and dismount the
tires.
{WARNING
Mixing tires could cause you
to lose control while driving.
If you mix tires of different
sizes, brands, or types (radial
and bias-belted tires), the
vehicle may not handle
properly, and you could have
a crash. Using tires of different
sizes, brands, or types may
also cause damage to your
vehicle. Be sure to use the
correct size, brand, and type
of tires on all wheels. It is all
right to drive with your
compact spare temporarily, as
it was developed for use on
your vehicle. See Compact
Spare Tire
on page 10‑77.
{WARNING
If you use bias-ply tires on the
vehicle, the wheel rim flanges
could develop cracks after
many miles of driving. A tire
and/or wheel could fail
suddenly, causing a crash.
Use only radial-ply tires with
the wheels on the vehicle.
If you must replace your
vehicle's tires with those that do
not have a TPC Spec number,
make sure they are the same
size, load range, speed rating,
and construction type (radial and
bias‐belted tires) as your
vehicle's original tires.
Vehicles that have a tire
pressure monitoring system
could give an inaccurate
low‐pressure warning if non‐TPC
Spec rated tires are installed on
your vehicle. Non‐TPC Spec
Page 299 of 382
Black plate (57,1)Chevrolet Malibu Owner Manual - 2011
Vehicle Care 10-57
use spare tires, tires with
nominal rim diameters of
10 to 12 inches (25 to 30 cm),
or to some limited-production
tires.
While the tires available on
General Motors passenger cars
and light trucks may vary with
respect to these grades, they
must also conform to federal
safety requirements and
additional General Motors Tire
Performance Criteria (TPC)
standards.
All Passenger Car Tires Must
Conform to Federal Safety
Requirements In Addition To
These Grades.
Treadwear
The treadwear grade is a
comparative rating based on the
wear rate of the tire when tested
under controlled conditions on a
specified government testcourse. For example, a tire
graded 150 would wear one and
a half (1½) times as well on the
government course as a tire
graded 100. The relative
performance of tires depends
upon the actual conditions of
their use, however, and may
depart significantly from the
norm due to variations in driving
habits, service practices and
differences in road
characteristics and climate.
Traction
–AA, A, B, C
The traction grades, from
highest to lowest, are AA, A, B,
and C. Those grades represent
the tire's ability to stop on wet
pavement as measured under
controlled conditions on
specified government test
surfaces of asphalt and
concrete. A tire marked C may
have poor traction performance.
Warning: The traction grade assigned to this tire is based on
straight-ahead braking traction
tests, and does not include
acceleration, cornering,
hydroplaning, or peak traction
characteristics.
Temperature
–A, B, C
The temperature grades are A
(the highest), B, and C,
representing the tire's resistance
to the generation of heat and its
ability to dissipate heat when
tested under controlled
conditions on a specified indoor
laboratory test wheel. Sustained
high temperature can cause the
material of the tire to degenerate
and reduce tire life, and
excessive temperature can lead
to sudden tire failure. The grade
C corresponds to a level of
performance which all
passenger car tires must meet
under the Federal Motor Safety
Standard No. 109. Grades B and
Page 303 of 382
Black plate (61,1)Chevrolet Malibu Owner Manual - 2011
Vehicle Care 10-61
WARNING (Continued)
To be certain the vehicle will not
move, put blocks at the front and
rear of the tire farthest away from
the one being changed. That
would be the tire on the other
side, at the opposite end of the
vehicle.
This vehicle may come with a jack
and spare tire or a tire sealant and
compressor kit. To use the jacking
equipment to change a spare tire
safely, follow the instructions below.
Then see Tire Changing
on
page 10‑68. To use the tire sealant
and compressor kit, see Tire
Sealant and Compressor Kit
on
page 10‑61.
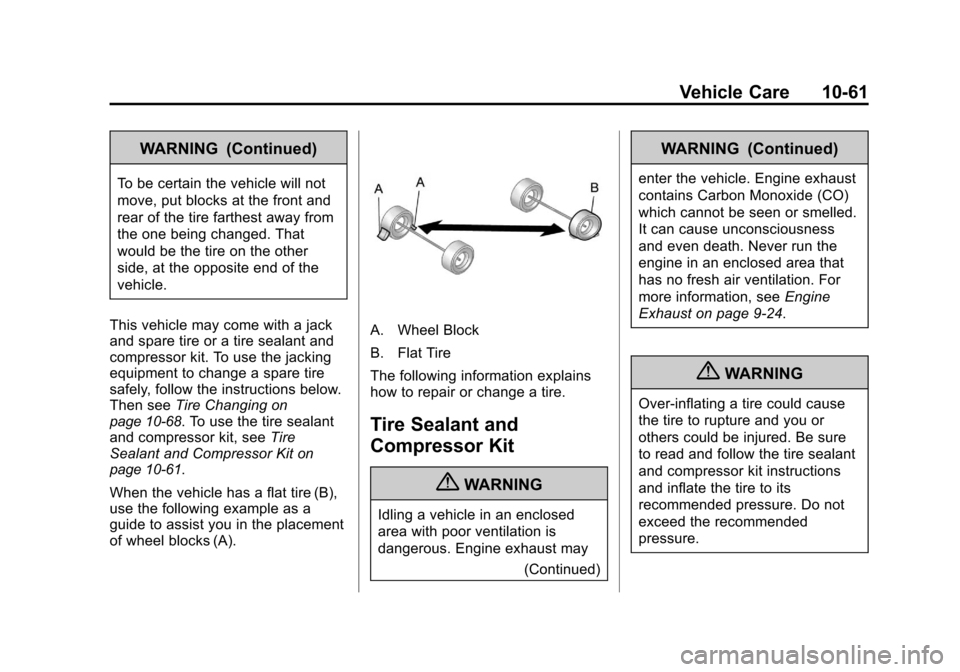
When the vehicle has a flat tire (B),
use the following example as a
guide to assist you in the placement
of wheel blocks (A).
A. Wheel Block
B. Flat Tire
The following information explains
how to repair or change a tire.
Tire Sealant and
Compressor Kit
{WARNING
Idling a vehicle in an enclosed
area with poor ventilation is
dangerous. Engine exhaust may (Continued)
WARNING (Continued)
enter the vehicle. Engine exhaust
contains Carbon Monoxide (CO)
which cannot be seen or smelled.
It can cause unconsciousness
and even death. Never run the
engine in an enclosed area that
has no fresh air ventilation. For
more information, seeEngine
Exhaust on page 9‑24.
{WARNING
Over-inflating a tire could cause
the tire to rupture and you or
others could be injured. Be sure
to read and follow the tire sealant
and compressor kit instructions
and inflate the tire to its
recommended pressure. Do not
exceed the recommended
pressure.
Page 304 of 382
Black plate (62,1)Chevrolet Malibu Owner Manual - 2011
10-62 Vehicle Care
{WARNING
Storing the tire sealant and
compressor kit or other
equipment in the passenger
compartment of the vehicle could
cause injury. In a sudden stop or
collision, loose equipment could
strike someone. Store the tire
sealant and compressor kit in its
original location.
If this vehicle has a tire sealant and
compressor kit, there may not be a
spare tire, tire changing equipment,
and on some vehicles there may not
be a place to store a tire.
The tire sealant and compressor
can be used to temporarily seal
punctures up to 6 mm (¼ in) in the
tread area of the tire. It can also be
used to inflate an under inflated tire.
If the tire has been separated from
the wheel, has damaged sidewalls,
or has a large puncture, the tire is
too severely damaged for the tire sealant and compressor kit to be
effective. See
Roadside Assistance
Program (United States and
Canada)on page 13‑7or Roadside
Assistance Program (Mexico)on
page 13‑9.
Read and follow all of the tire
sealant and compressor kit
instructions.
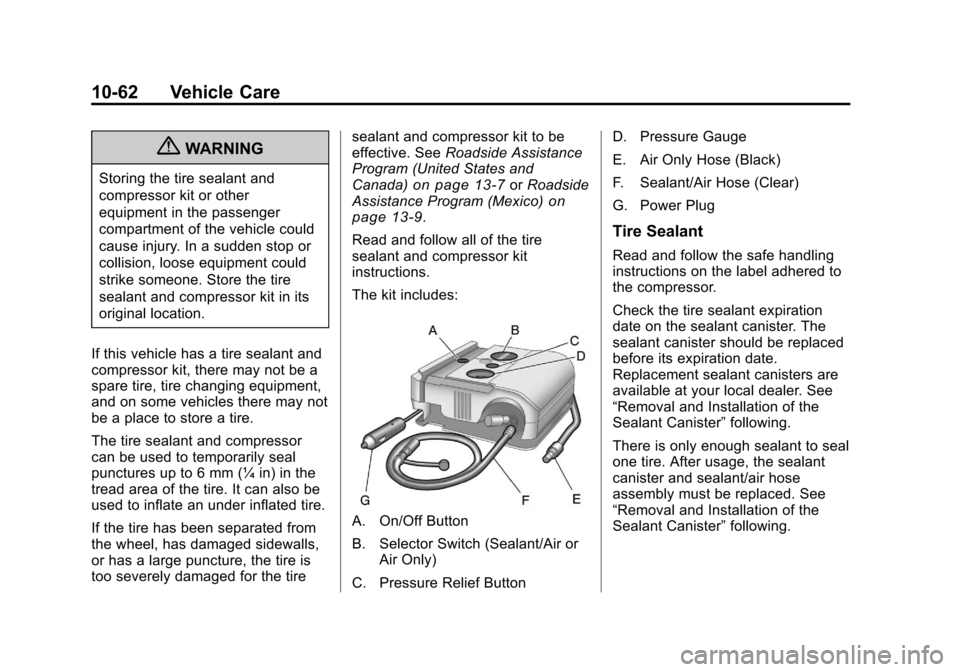
The kit includes:
A. On/Off Button
B. Selector Switch (Sealant/Air or Air Only)
C. Pressure Relief Button D. Pressure Gauge
E. Air Only Hose (Black)
F. Sealant/Air Hose (Clear)
G. Power Plug
Tire Sealant
Read and follow the safe handling
instructions on the label adhered to
the compressor.
Check the tire sealant expiration
date on the sealant canister. The
sealant canister should be replaced
before its expiration date.
Replacement sealant canisters are
available at your local dealer. See
“Removal and Installation of the
Sealant Canister”
following.
There is only enough sealant to seal
one tire. After usage, the sealant
canister and sealant/air hose
assembly must be replaced. See
“Removal and Installation of the
Sealant Canister” following.
Page 310 of 382
Black plate (68,1)Chevrolet Malibu Owner Manual - 2011
10-68 Vehicle Care
4. Replace with a new canisterwhich is available from your
dealer.
5. Push the new canister into place.
6. Screw the connector (B) to the canister (A).
7. Slide the plastic cover back on.
Storing the Tire Sealant
and Compressor Kit
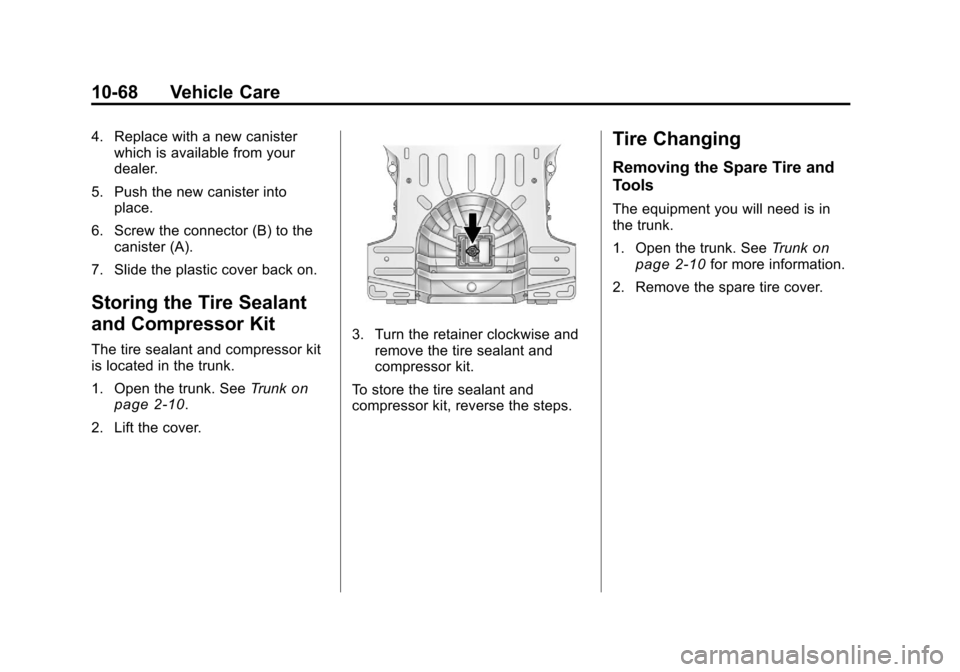
The tire sealant and compressor kit
is located in the trunk.
1. Open the trunk. See Trunk
on
page 2‑10.
2. Lift the cover.
3. Turn the retainer clockwise and remove the tire sealant and
compressor kit.
To store the tire sealant and
compressor kit, reverse the steps.
Tire Changing
Removing the Spare Tire and
Tools
The equipment you will need is in
the trunk.
1. Open the trunk. See Trunk
on
page 2‑10for more information.
2. Remove the spare tire cover.