2011 CHEVROLET IMPALA climate control
[x] Cancel search: climate controlPage 1 of 376

Black plate (1,1)Chevrolet Impala Owner Manual - 2011
2011 Chevrolet Impala Owner ManualM
In Brief. . . . . . . . . . . . . . . . . . . . . . . . 1-1
Instrument Panel . . . . . . . . . . . . . . 1-2
Initial Drive Information . . . . . . . . 1-4
Vehicle Features . . . . . . . . . . . . . 1-14
Performance and Maintenance . . . . . . . . . . . . . . . . 1-17
Keys, Doors and Windows . . . 2-1
Keys and Locks . . . . . . . . . . . . . . . 2-2
Doors . . . . . . . . . . . . . . . . . . . . . . . . 2-10
Vehicle Security . . . . . . . . . . . . . . 2-12
Exterior Mirrors . . . . . . . . . . . . . . . 2-14
Interior Mirrors . . . . . . . . . . . . . . . . 2-15
Windows . . . . . . . . . . . . . . . . . . . . . 2-16
Roof . . . . . . . . . . . . . . . . . . . . . . . . . . 2-19
Seats and Restraints . . . . . . . . . 3-1
Head Restraints . . . . . . . . . . . . . . . 3-2
Front Seats . . . . . . . . . . . . . . . . . . . . 3-3
Rear Seats . . . . . . . . . . . . . . . . . . . . 3-8
Safety Belts . . . . . . . . . . . . . . . . . . 3-10
Airbag System . . . . . . . . . . . . . . . . 3-26
Child Restraints . . . . . . . . . . . . . . 3-41 Storage
. . . . . . . . . . . . . . . . . . . . . . . 4-1
Storage Compartments . . . . . . . . 4-1
Additional Storage Features . . . 4-2
Instruments and Controls . . . . 5-1
Controls . . . . . . . . . . . . . . . . . . . . . . . 5-2
Warning Lights, Gauges, and
Indicators . . . . . . . . . . . . . . . . . . . 5-10
Information Displays . . . . . . . . . . 5-24
Vehicle Messages . . . . . . . . . . . . 5-28
Vehicle Personalization . . . . . . . 5-36
Universal Remote System . . . . 5-42
Lighting . . . . . . . . . . . . . . . . . . . . . . . 6-1
Exterior Lighting . . . . . . . . . . . . . . . 6-2
Interior Lighting . . . . . . . . . . . . . . . . 6-6
Lighting Features . . . . . . . . . . . . . . 6-6
Infotainment System . . . . . . . . . 7-1
Introduction . . . . . . . . . . . . . . . . . . . . 7-1
Radio . . . . . . . . . . . . . . . . . . . . . . . . . . 7-6
Audio Players . . . . . . . . . . . . . . . . 7-14
Phone . . . . . . . . . . . . . . . . . . . . . . . . 7-20 Climate Controls
. . . . . . . . . . . . . 8-1
Climate Control Systems . . . . . . 8-1
Air Vents . . . . . . . . . . . . . . . . . . . . . . . 8-5
Maintenance . . . . . . . . . . . . . . . . . . . 8-6
Driving and Operating . . . . . . . . 9-1
Driving Information . . . . . . . . . . . . . 9-2
Starting and Operating . . . . . . . 9-16
Engine Exhaust . . . . . . . . . . . . . . 9-24
Automatic Transmission . . . . . . 9-25
Brakes . . . . . . . . . . . . . . . . . . . . . . . 9-27
Ride Control Systems . . . . . . . . 9-29
Cruise Control . . . . . . . . . . . . . . . . 9-32
Fuel . . . . . . . . . . . . . . . . . . . . . . . . . . 9-35
Towing . . . . . . . . . . . . . . . . . . . . . . . 9-41
Conversions and Add-Ons . . . 9-47
Vehicle Care . . . . . . . . . . . . . . . . . 10-1
General Information . . . . . . . . . . 10-2
Vehicle Checks . . . . . . . . . . . . . . . 10-4
Headlamp Aiming . . . . . . . . . . . 10-29
Bulb Replacement . . . . . . . . . . 10-29
Electrical System . . . . . . . . . . . . 10-33
Page 7 of 376

Black plate (1,1)Chevrolet Impala Owner Manual - 2011
In Brief 1-1
In Brief
Instrument Panel
Instrument Panel . . . . . . . . . . . . . . 1-2
Initial Drive Information
Initial Drive Information . . . . . . . . 1-4
Remote KeylessEntry (RKE) System . . . . . . . . 1-4
Remote Vehicle Start . . . . . . . . . 1-5
Door Locks . . . . . . . . . . . . . . . . . . . 1-5
Trunk Release . . . . . . . . . . . . . . . . 1-5
Windows . . . . . . . . . . . . . . . . . . . . . . 1-6
Seat Adjustment . . . . . . . . . . . . . . 1-6
Second Row Seats . . . . . . . . . . . 1-7
Head Restraint Adjustment . . . . 1-7
Safety Belt . . . . . . . . . . . . . . . . . . . . 1-8 Sensing System for
Passenger Airbag . . . . . . . . . . . 1-8
Mirror Adjustment . . . . . . . . . . . . . 1-9
Steering Wheel Adjustment . . . 1-9
Interior Lighting . . . . . . . . . . . . . . 1-10
Exterior Lighting . . . . . . . . . . . . . 1-10
Windshield Wiper/Washer . . . . 1-11
Climate Controls . . . . . . . . . . . . . 1-12
Vehicle Features
Radio(s) . . . . . . . . . . . . . . . . . . . . . 1-14
Satellite Radio . . . . . . . . . . . . . . . 1-15
Portable Audio Devices . . . . . . 1-15
Bluetooth
®. . . . . . . . . . . . . . . . . . . 1-15
Steering Wheel Controls . . . . . 1-16
Cruise Control . . . . . . . . . . . . . . . 1-16
Power Outlets . . . . . . . . . . . . . . . 1-17
Performance and Maintenance
Traction Control System (TCS) . . . . . . . . . . . . . . 1-17
Electronic Stability Control (ESC) . . . . . . . . . . . . . . 1-18
Tire Pressure Monitor . . . . . . . . 1-18
Engine Oil Life System . . . . . . 1-19
Fuel E85 (85% Ethanol) . . . . . 1-19
Driving for Better Fuel
Economy . . . . . . . . . . . . . . . . . . . 1-19
Roadside Assistance Program . . . . . . . . . . . . . . . . . . . . 1-19
OnStar
®. . . . . . . . . . . . . . . . . . . . . 1-20
Page 9 of 376

Black plate (3,1)Chevrolet Impala Owner Manual - 2011
In Brief 1-3
A.Air Vents on page 8‑5.
B. Remote Trunk Release Button. See Trunk on page 2‑10.
C. Turn and Lane-Change Signals
on page 6‑5.
D. Instrument Cluster on
page 5‑11.
E. Hazard Warning Flashers on
page 6‑4.
F. Driver Information Center (DIC)
on page 5‑24.
G. Passenger Airbag Status
Indicator on page 5‑16.
H. AM-FM Radio on page 7‑6.
I. Exterior Lamp Controls on
page 6‑2. J.
Instrument Panel Illumination
Control on page 6‑6.
K. Traction Control System (TCS)
on page 9‑29 (If Equipped).
L. Steering Wheel Adjustment on
page 5‑2.
M. Cruise Control on page 9‑32.
N. Hood Release. See Hood on
page 10‑5.
O. Data Link Connector. See Malfunction Indicator Lamp on
page 5‑17.
P. Horn on page 5‑3.
Q. Steering Wheel Controls on
page 5‑3 (If Equipped). R.
Ignition Positions on page 9‑16.
S. Climate Control Systems on
page 8‑1.
T. Power Outlets on page 5‑9.
U. Center Console Shift Lever (If Equipped). See Shifting Into
Park on page 9‑20.
V. Glove Box on page 4‑1.
Page 11 of 376

Black plate (5,1)Chevrolet Impala Owner Manual - 2011
In Brief 1-5
Remote Vehicle Start
With this feature the engine can be
started from outside of the vehicle.
Starting the Vehicle
1. Aim the RKE transmitter at thevehicle.
2. Press
Q.
3. Immediately after completing Step 2, press and hold
/until
the turn signal lamps flash.
When the vehicle starts, the parking
lamps will turn on and remain on as
long as the engine is running. The
doors will be locked and the climate
control system may come on.
The engine will continue to run for
10 minutes. Repeat the steps for a
10-minute time extension. Remote
start can be extended only once.
Canceling a Remote Start
To cancel a remote start:
.Aim the RKE transmitter at the
vehicle and press and hold
/
until the parking lamps turn off.
.Turn on the hazard warning
flashers.
.Turn the ignition on and then
back off.
See Remote Vehicle Start on
page 2‑5.
Door Locks
Manual Locks
From outside the vehicle, use the
key in the door or the Remote
Keyless Entry (RKE) transmitter to
lock or unlock the vehicle. From the
inside, pull up or push down on the
manual door lock knobs.
See Door Locks on page 2‑6.
Power Door Locks
Power door lock switches are
located on the front doors near the
handle.
Q:Press the bottom of the switch
to lock all doors.
K: Press the top of the switch to
unlock all doors.
For more information, see:
.Power Door Locks on page 2‑7.
.Delayed Locking on page 2‑8.
Trunk Release
In addition to the trunk release
button on the RKE transmitter, there
is a remote release
Vbutton
located on the left side of the
instrument panel.
For more information, see Trunk on
page 2‑10.
Page 18 of 376

Black plate (12,1)Chevrolet Impala Owner Manual - 2011
1-12 In Brief
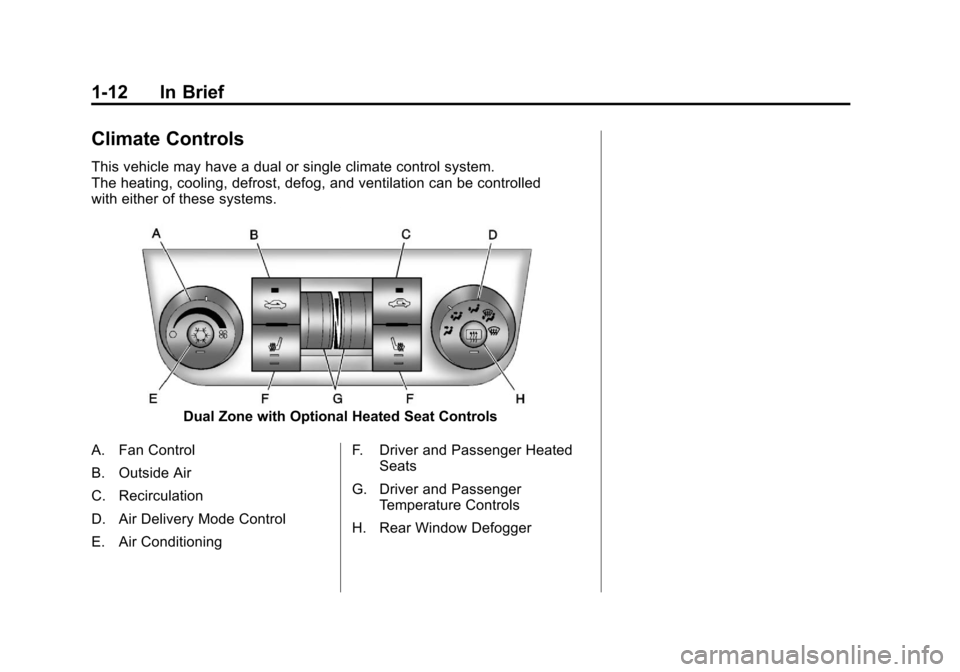
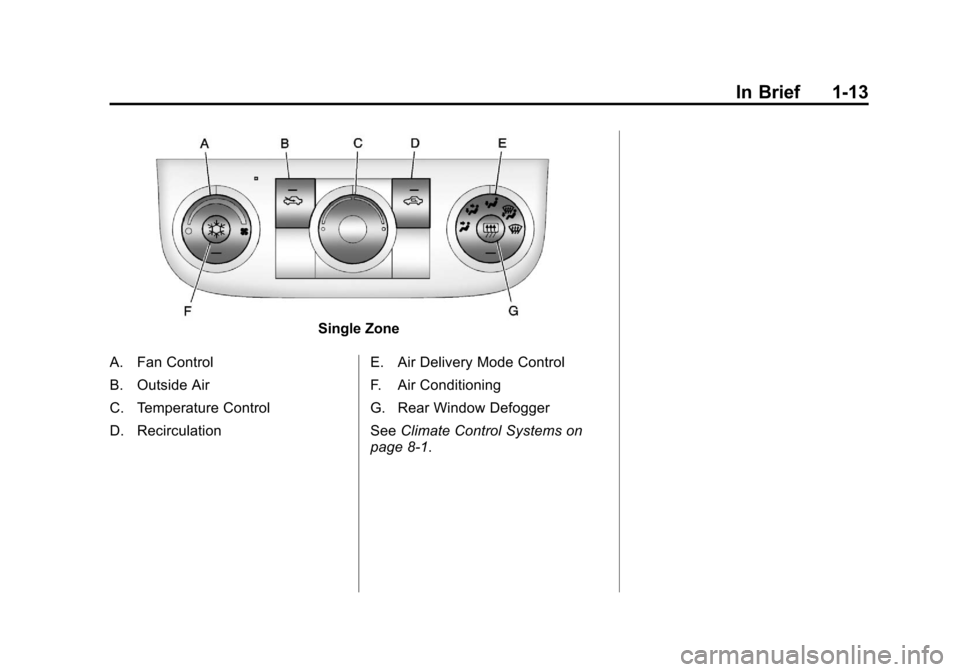
Climate Controls
This vehicle may have a dual or single climate control system.
The heating, cooling, defrost, defog, and ventilation can be controlled
with either of these systems.
Dual Zone with Optional Heated Seat Controls
A. Fan Control
B. Outside Air
C. Recirculation
D. Air Delivery Mode Control
E. Air Conditioning F. Driver and Passenger Heated
Seats
G. Driver and Passenger Temperature Controls
H. Rear Window Defogger
Page 19 of 376

Black plate (13,1)Chevrolet Impala Owner Manual - 2011
In Brief 1-13
Single Zone
A. Fan Control
B. Outside Air
C. Temperature Control
D. Recirculation E. Air Delivery Mode Control
F. Air Conditioning
G. Rear Window Defogger
See
Climate Control Systems on
page 8‑1.
Page 23 of 376

Black plate (17,1)Chevrolet Impala Owner Manual - 2011
In Brief 1-17
[:Press to disengage cruise
control without erasing the set
speed from memory.
For more information, see Cruise
Control on page 9‑32.
Power Outlets
The vehicle has three 12‐volt outlets
which can be used to plug in
electrical equipment, such as a cell
phone or MP3 player.
On vehicles with a center console,
one outlet is located inside the
center floor console and two outlets
are located at the front of the
console bin under the instrument
panel.
On vehicles without a center
console, two are located under the
climate controls and another outlet
for the rear seat passengers is at
the rear of the center front seat.
Remove the cover to access and
replace when not in use.
See Power Outlets on page 5‑9.
Performance and
Maintenance
Traction Control
System (TCS)
The vehicle may have a traction
control system which limits wheel
spin. The system turns on
automatically every time the vehicle
is started.
.For vehicles with traction control,
press and release
ion the
instrument panel to turn off
traction control.
Filluminates
and the appropriate DIC
message displays. See Ride
Control System Messages on
page 5‑32.
.For vehicles with traction control
and electronic stability control,
press and release
5on the
instrument panel to turn off
traction control.
Filluminates
and the appropriate DIC
message displays. See Ride
Control System Messages on
page 5‑32.
.Press and release the button
again to turn on traction control.
For more information, see Traction
Control System (TCS) on
page 9‑29.
Page 33 of 376

Black plate (5,1)Chevrolet Impala Owner Manual - 2011
Keys, Doors and Windows 2-5
2. Remove the old battery. Do notuse a metal object.
3. Insert the new battery, positive side facing down. Replace with a
CR2032 or equivalent battery.
4. Snap the transmitter back together.
Remote Vehicle Start
Your vehicle may have a remote
starting feature that allows you to
start the engine from outside the
vehicle. It may also start the
vehicle's heating or air conditioning
systems and rear window defogger.
When the remote start system is
active and the vehicle has an
automatic climate control system,
it will automatically regulate the
inside temperature. Normal
operation of these systems will
return after the ignition key is
turned to ON/RUN. Laws in some communities may
restrict the use of remote starters.
For example, some laws may
require a person using remote start
to have the vehicle in view when
doing so. Check local regulations for
any requirements on remote starting
of vehicles.
Do not use the remote start feature
if your vehicle is low on fuel. Your
vehicle may run out of fuel.
If your vehicle has the remote start
feature, the RKE transmitter
functions will have an increased
range of operation. However, the
range may be less while the vehicle
is running.
There are other conditions which
can affect the performance of the
transmitter. See
Remote Keyless
Entry (RKE) System on page 2‑2.
/(Remote Start): This button will
be on the RKE transmitter if you
have remote start.
To start the vehicle using the
remote start feature:
1. Aim the transmitter at the vehicle.
2. Press and release
Q, then
immediately press and hold
/
for two to four seconds or until
the vehicle's turn signal lamps
flash. The doors will lock.
When the vehicle starts, the
parking lamps turn on and
remain on while the engine is
running.
The remote start feature provides
two separate starts per ignition
cycle, each with 10 minutes of
engine running time, or one start
with a time extension. The first start
must expire or be canceled to get
two separate 10-minute starts.