2011 CHEVROLET IMPALA automatic transmission
[x] Cancel search: automatic transmissionPage 242 of 376
Black plate (44,1)Chevrolet Impala Owner Manual - 2011
9-44 Driving and Operating
Maintenance When Trailer
Towing
The vehicle needs service more
often when pulling a trailer. See
Scheduled Maintenance on
page 11‑2for more information.
Things that are especially important
in trailer operation are automatic
transmission fluid, engine oil, belts,
cooling system and brake system.
It is a good idea to inspect these
before and during the trip.
Check periodically to see that all
hitch nuts and bolts are tight.
Engine Cooling When Trailer
Towing
The cooling system may temporarily
overheat during severe operating
conditions. See Engine Overheating
on page 10‑19.
Changing a Tire When Trailer
Towing
If the vehicle gets a flat tire while
towing a trailer, be sure to secure
the trailer and disconnect it from the
vehicle before changing the tire.
Trailer Towing
{WARNING
The driver can lose control when
pulling a trailer if the correct
equipment is not used or the
vehicle is not driven properly.
For example, if the trailer is too
heavy, the brakes may not work
well —or even at all. The driver
and passengers could be
seriously injured. The vehicle may
also be damaged; the resulting
repairs would not be covered by
the vehicle warranty. Pull a trailer
only if all the steps in this section
have been followed.
(Continued)
WARNING (Continued)
Ask your dealer for advice and
information about towing a trailer
with the vehicle.
Notice: Pulling a trailer
improperly can damage the
vehicle and result in costly
repairs not covered by the
vehicle warranty. To pull a trailer
correctly, follow the advice in this
section and see your dealer for
important information about
towing a trailer with the vehicle.
The vehicle can tow a trailer if it is
equipped with the proper trailer
towing equipment. To identify the
trailering capacity of the vehicle,
read the information in “Weight of
the Trailer” that appears later in this
section. Trailering is different than
just driving the vehicle by itself.
Trailering means changes in
handling, acceleration, braking,
durability and fuel economy.
Page 247 of 376

Black plate (1,1)Chevrolet Impala Owner Manual - 2011
Vehicle Care 10-1
Vehicle Care
General Information
General Information . . . . . . . . . . 10-2
California Proposition65 Warning . . . . . . . . . . . . . . . . . 10-3
California Perchlorate Materials Requirements . . . . 10-3
Accessories and Modifications . . . . . . . . . . . . . . . 10-3
Vehicle Checks
Doing Your OwnService Work . . . . . . . . . . . . . . . 10-4
Hood . . . . . . . . . . . . . . . . . . . . . . . . 10-5
Engine Compartment Overview . . . . . . . . . . . . . . . . . . . 10-6
Engine Oil . . . . . . . . . . . . . . . . . . . 10-8
Engine Oil Life System . . . . . 10-10
Automatic Transmission Fluid . . . . . . . . . . . . . . . . . . . . . . 10-11
Engine Air Cleaner/Filter . . . . 10-13
Cooling System . . . . . . . . . . . . 10-15
Engine Coolant . . . . . . . . . . . . . 10-16 Engine Overheating . . . . . . . . 10-19
Overheated Engine
Protection
Operating Mode . . . . . . . . . . . 10-21
Power Steering Fluid . . . . . . . 10-21
Washer Fluid . . . . . . . . . . . . . . . 10-22
Brakes . . . . . . . . . . . . . . . . . . . . . 10-23
Brake Fluid . . . . . . . . . . . . . . . . . 10-24
Battery . . . . . . . . . . . . . . . . . . . . . 10-25
Starter Switch Check . . . . . . . 10-26
Automatic Transmission Shift
Lock Control Function
Check . . . . . . . . . . . . . . . . . . . . . 10-26
Ignition Transmission Lock Check . . . . . . . . . . . . . . . . . . . . . 10-27
Park Brake and P (Park) Mechanism Check . . . . . . . . 10-27
Wiper Blade Replacement . . . . . . . . . . . . . . 10-27
Headlamp Aiming
Headlamp Aiming . . . . . . . . . . 10-29
Bulb Replacement
Bulb Replacement . . . . . . . . . . 10-29
Halogen Bulbs . . . . . . . . . . . . . . 10-29
Headlamps, Front TurnSignal, Sidemarker, and
Parking Lamps . . . . . . . . . . . . 10-30 Taillamps, Turn Signal,
Sidemarker, Stoplamps,
and Back-Up Lamps . . . . . . 10-32
License Plate Lamp . . . . . . . . 10-33
Replacement Bulbs . . . . . . . . . 10-33
Electrical System
Electrical System Overload . . . . . . . . . . . . . . . . . . 10-33
Fuses and Circuit Breakers . . . . . . . . . . . . . . . . . . 10-34
Engine Compartment Fuse Block . . . . . . . . . . . . . . . . . . . . . 10-34
Instrument Panel Fuse Block . . . . . . . . . . . . . . . . . . . . . 10-37
Wheels and Tires
Tires . . . . . . . . . . . . . . . . . . . . . . . . 10-38
Tire Sidewall Labeling . . . . . . 10-39
Tire Designations . . . . . . . . . . . 10-41
Tire Terminology andDefinitions . . . . . . . . . . . . . . . . 10-41
Tire Pressure . . . . . . . . . . . . . . . 10-44
Tire Pressure Monitor System . . . . . . . . . . . . . . . . . . . 10-46
Tire Pressure Monitor Operation . . . . . . . . . . . . . . . . . 10-47
Tire Inspection . . . . . . . . . . . . . . 10-51
Tire Rotation . . . . . . . . . . . . . . . 10-51
Page 253 of 376

Black plate (7,1)Chevrolet Impala Owner Manual - 2011
Vehicle Care 10-7
A. Windshield Washer FluidReservoir. See “Adding Washer
Fluid” under Washer Fluid on
page 10‑22.
B. Battery. See Battery on
page 10‑25.
C. Underhood Fuse Block. See Engine Compartment Fuse
Block on page 10‑34.
D. Remote Positive (+) Terminal. See Jump Starting on
page 10‑70. E. Coolant Recovery Tank. See
“Checking Coolant” under
Cooling System on page 10‑15.
F. Pressure Cap. See Cooling
System on page 10‑15.
G. Power Steering Fluid Cap. See Power Steering Fluid on
page 10‑21.
H. Engine Oil Fill Cap. See “When to Add Engine Oil”
under Engine Oil on page 10‑8.
I. Engine Oil Dipstick. See “Checking Engine Oil” under
Engine Oil on page 10‑8. J. Automatic Transmission Fluid
Dipstick (Out of View). See
“Checking the Fluid Level”
under Automatic Transmission
Fluid on page 10‑11.
K. Brake Master Cylinder Reservoir. See “Brake Fluid”
under Brakes on page 10‑23.
L. Engine Air Cleaner/Filter. See Engine Air Cleaner/Filter
on page 10‑13.
Page 257 of 376
Black plate (11,1)Chevrolet Impala Owner Manual - 2011
Vehicle Care 10-11
For the oil life system to work
properly, the system must be reset
every time the oil is changed.
When the system has calculated
that oil life has been diminished, it
indicates that an oil change is
necessary. A CHANGE ENGINE
OIL SOON message comes on.
SeeDIC Warnings and Messages.
Change the oil as soon as possible
within the next 1 000 km (600 miles).
It is possible that, if driving under
the best conditions, the oil life
system might indicate that an oil
change is not necessary for up to a
year. The engine oil and filter must
be changed at least once a year
and, at this time, the system must
be reset. Your dealer has trained
service people who will perform this
work and reset the system. It is also
important to check the oil regularly
over the course of an oil drain
interval and keep it at the
proper level. If the system is ever reset
accidentally, the oil must be
changed at 5 000 km (3,000 miles)
since the last oil change.
Remember to reset the oil life
system whenever the oil is changed.
How to Reset the Engine Oil
Life System
Reset the system whenever the
engine oil is changed so that the
system can calculate the next
engine oil change. Always reset the
engine oil life to 100% after every oil
change. It will not reset itself.
To reset the system:
1. Display OIL LIFE REMAINING
on the DIC.
2. Press and hold the SET/RESET button on the DIC for more than
five seconds. The oil life will
change to 100%.
If the CHANGE ENGINE OIL SOON
message comes back on when the
vehicle is started, the engine oil life
system has not reset. Repeat the
procedure.
Automatic Transmission
Fluid
When to Check and Change
Automatic Transmission Fluid
A good time to check the automatic
transmission fluid level is when the
engine oil is changed.
Change the fluid and filter at the
intervals listed in Scheduled
Maintenance on page 11‑2, and be
sure to use the transmission fluid
listed in Recommended Fluids and
Lubricants on page 11‑6.
How to Check Automatic
Transmission Fluid
Because this operation can be a
little difficult, it may be decided to
have this done at the dealer service
department.
If not taken to the dealer, be sure
to follow all the instructions here,
or a false reading on the dipstick
could result.
Page 259 of 376
Black plate (13,1)Chevrolet Impala Owner Manual - 2011
Vehicle Care 10-13
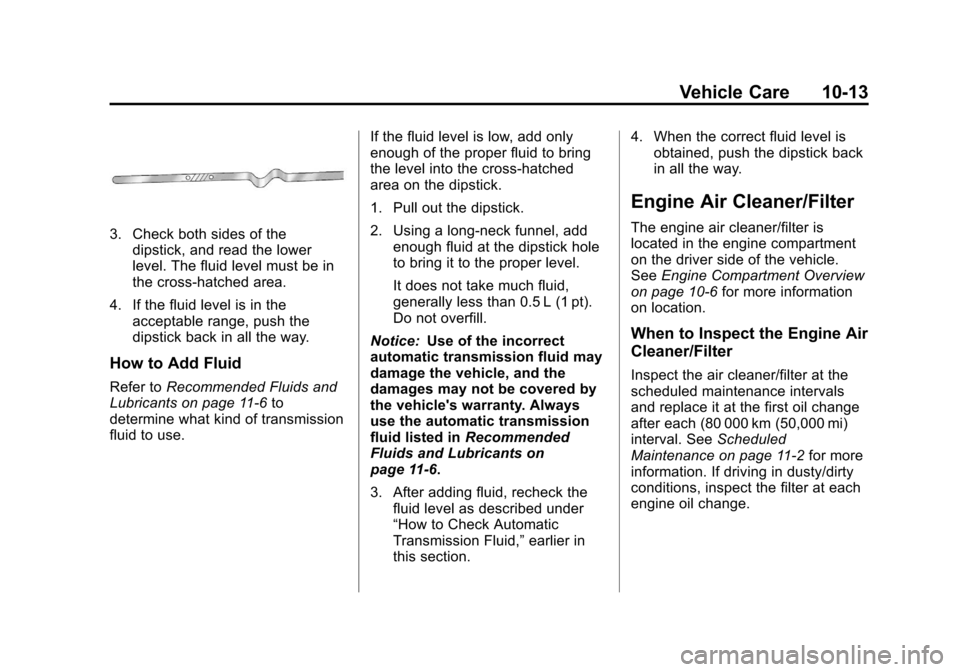
3. Check both sides of thedipstick, and read the lower
level. The fluid level must be in
the cross-hatched area.
4. If the fluid level is in the acceptable range, push the
dipstick back in all the way.
How to Add Fluid
Refer to Recommended Fluids and
Lubricants on page 11‑6 to
determine what kind of transmission
fluid to use. If the fluid level is low, add only
enough of the proper fluid to bring
the level into the cross-hatched
area on the dipstick.
1. Pull out the dipstick.
2. Using a long-neck funnel, add
enough fluid at the dipstick hole
to bring it to the proper level.
It does not take much fluid,
generally less than 0.5 L (1 pt).
Do not overfill.
Notice: Use of the incorrect
automatic transmission fluid may
damage the vehicle, and the
damages may not be covered by
the vehicle's warranty. Always
use the automatic transmission
fluid listed in Recommended
Fluids and Lubricants on
page 11‑6.
3. After adding fluid, recheck the fluid level as described under
“How to Check Automatic
Transmission Fluid,” earlier in
this section. 4. When the correct fluid level is
obtained, push the dipstick back
in all the way.
Engine Air Cleaner/Filter
The engine air cleaner/filter is
located in the engine compartment
on the driver side of the vehicle.
See Engine Compartment Overview
on page 10‑6 for more information
on location.
When to Inspect the Engine Air
Cleaner/Filter
Inspect the air cleaner/filter at the
scheduled maintenance intervals
and replace it at the first oil change
after each (80 000 km (50,000 mi)
interval. See Scheduled
Maintenance on page 11‑2 for more
information. If driving in dusty/dirty
conditions, inspect the filter at each
engine oil change.
Page 272 of 376
Black plate (26,1)Chevrolet Impala Owner Manual - 2011
10-26 Vehicle Care
Starter Switch Check
{WARNING
When you are doing this
inspection, the vehicle could
move suddenly. If the vehicle
moves, you or others could
be injured.
1. Before starting this check, be sure there is enough room
around the vehicle.
2. Firmly apply both the parking brake and the regular brake.
See Parking Brake on
page 9‑29.
Do not use the accelerator
pedal, and be ready to turn off
the engine immediately if it
starts. 3. Try to start the engine in each
gear. The vehicle should start
only in P (Park) or N (Neutral).
If the vehicle starts in any other
position, contact your dealer
for service.
Automatic Transmission
Shift Lock Control
Function Check
{WARNING
When you are doing this
inspection, the vehicle could
move suddenly. If the vehicle
moves, you or others could
be injured.
1. Before starting this check, be sure there is enough room
around the vehicle. It should be
parked on a level surface. 2. Firmly apply the parking brake.
See Parking Brake on
page 9‑29.
Be ready to apply the regular
brake immediately if the vehicle
begins to move.
3. With the engine off, turn the ignition to ON/RUN, but do not
start the engine. Without
applying the regular brake,
try to move the shift lever out of
P (Park) with normal effort. If the
shift lever moves out of P (Park),
contact your dealer for service.
Page 287 of 376
Black plate (41,1)Chevrolet Impala Owner Manual - 2011
Vehicle Care 10-41
Tire Designations
Tire Size
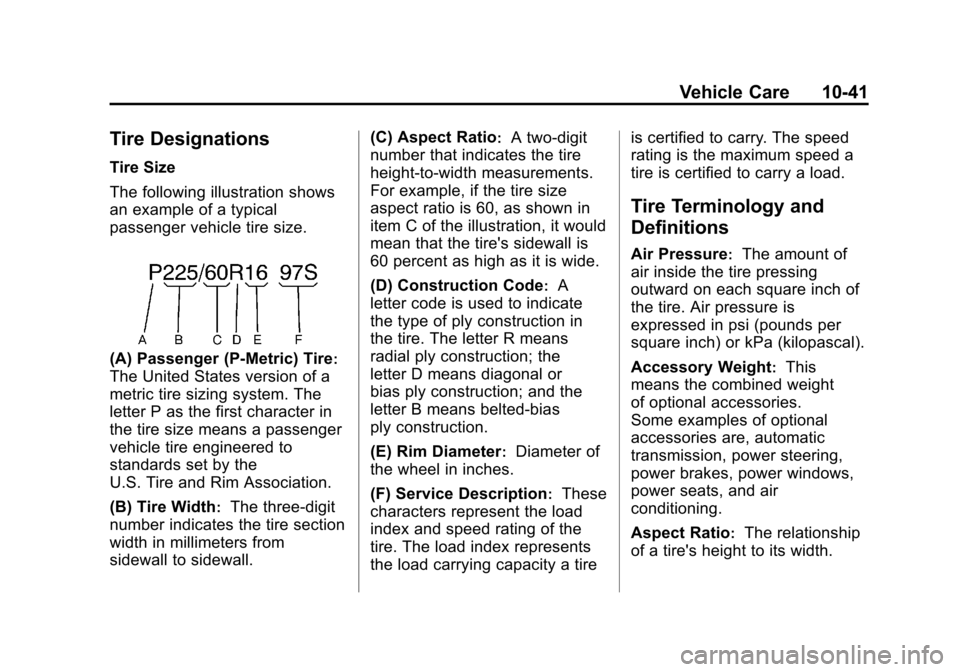
The following illustration shows
an example of a typical
passenger vehicle tire size.
(A) Passenger (P‐Metric) Tire:
The United States version of a
metric tire sizing system. The
letter P as the first character in
the tire size means a passenger
vehicle tire engineered to
standards set by the
U.S. Tire and Rim Association.
(B) Tire Width
:The three‐digit
number indicates the tire section
width in millimeters from
sidewall to sidewall. (C) Aspect Ratio
:A two‐digit
number that indicates the tire
height‐to‐width measurements.
For example, if the tire size
aspect ratio is 60, as shown in
item C of the illustration, it would
mean that the tire's sidewall is
60 percent as high as it is wide.
(D) Construction Code
:A
letter code is used to indicate
the type of ply construction in
the tire. The letter R means
radial ply construction; the
letter D means diagonal or
bias ply construction; and the
letter B means belted‐bias
ply construction.
(E) Rim Diameter
:Diameter of
the wheel in inches.
(F) Service Description
:These
characters represent the load
index and speed rating of the
tire. The load index represents
the load carrying capacity a tire is certified to carry. The speed
rating is the maximum speed a
tire is certified to carry a load.
Tire Terminology and
Definitions
Air Pressure:The amount of
air inside the tire pressing
outward on each square inch of
the tire. Air pressure is
expressed in psi (pounds per
square inch) or kPa (kilopascal).
Accessory Weight
:This
means the combined weight
of optional accessories.
Some examples of optional
accessories are, automatic
transmission, power steering,
power brakes, power windows,
power seats, and air
conditioning.
Aspect Ratio
:The relationship
of a tire's height to its width.
Page 306 of 376
Black plate (60,1)Chevrolet Impala Owner Manual - 2011
10-60 Vehicle Care
If a tire goes flat, avoid further tire
and wheel damage by driving slowly
to a level place, well off the road,
if possible. Turn on the hazard
warning flashers. SeeHazard
Warning Flashers on page 6‑4.
{WARNING
Changing a tire can be
dangerous. The vehicle can slip
off the jack and roll over or fall on
you or other people. You and they
could be badly injured or even
killed. Find a level place to
change your tire. To help prevent
the vehicle from moving:
1. Set the parking brake firmly.
2. Put an automatic transmission shift lever in
P (Park), or shift a manual
transmission to 1 (First) or
R (Reverse).
(Continued)
WARNING (Continued)
3. Turn off the engine and donot restart while the vehicle
is raised.
4. Do not allow passengers to remain in the vehicle.
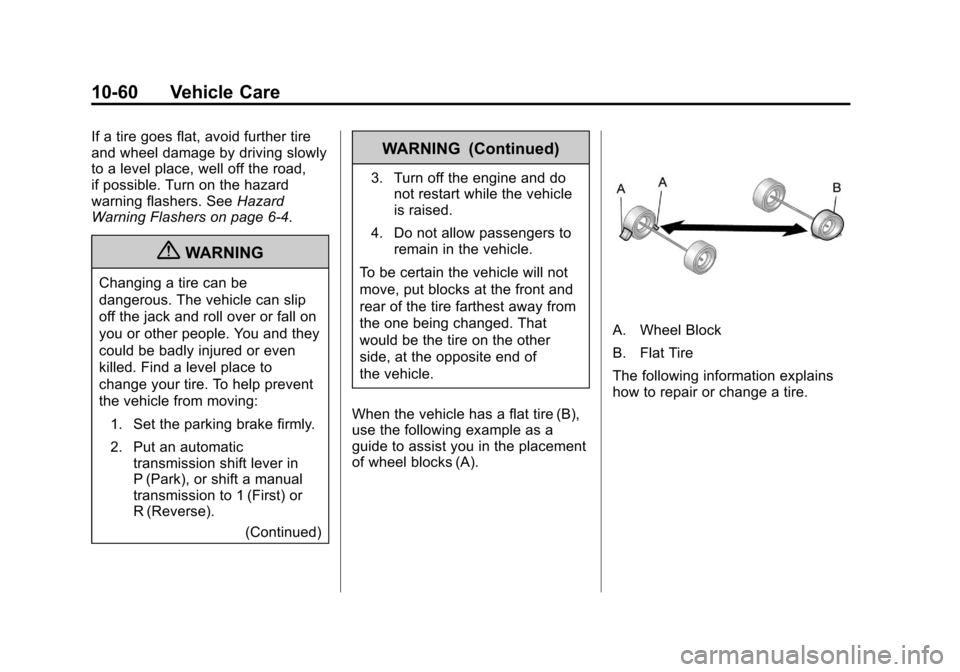
To be certain the vehicle will not
move, put blocks at the front and
rear of the tire farthest away from
the one being changed. That
would be the tire on the other
side, at the opposite end of
the vehicle.
When the vehicle has a flat tire (B),
use the following example as a
guide to assist you in the placement
of wheel blocks (A).
A. Wheel Block
B. Flat Tire
The following information explains
how to repair or change a tire.