Page 278 of 376
Black plate (32,1)Chevrolet Impala Owner Manual - 2011
10-32 Vehicle Care
Taillamps, Turn Signal,
Sidemarker, Stoplamps,
and Back-Up Lamps
A. Rear Sidemarker Lamp
B. Back-up Lamp
C. Stoplamp/Taillamp/Turn Signal
To replace one of these bulbs:
1. Open the trunk. SeeTrunk on
page 2‑10.
2. Remove the convenience net (if equipped). Unhook the net
from the upper wing nut.
3. Turn the upper wing nutcounterclockwise and remove it.
4. Pull the carpet away from the rear of the vehicle.5. Turn the two hex nutscounterclockwise to
remove them.
6. Pull out the taillamp assembly and disconnect the wiring
harness.
7. Turn the bulb socket counterclockwise to remove it.
8. Pull the old bulb straight out to remove it.
9. Push the new bulb straight in until it clicks to install it.
10. Reverse steps 1 through 7 to reinstall.
Page 279 of 376

Black plate (33,1)Chevrolet Impala Owner Manual - 2011
Vehicle Care 10-33
License Plate Lamp
To replace one of these bulbs:
1. Turn the lamp assemblycounterclockwise and pull the
lamp assembly out of the
connector.
2. Pull the old bulb from the lamp assembly, keeping the bulb
straight as you pull it out.
3. Install the new bulb.
4. Reverse Steps 1 through 3 to reinstall the license plate lamp.
Replacement Bulbs
Exterior Lamp Bulb
Number
Back-Up 921LL
Front Parking/
Turn Signal 3157NAK
License
Plate Lamp 194ll
Headlamps High-Beam H9
Low-Beam H11
Sidemarker 194LL
Stoplamp,
Taillamp, and
Turn Signal 3057
For replacement bulbs not listed
here, contact your dealer.
Electrical System
Electrical System
Overload
The vehicle has fuses and circuit
breakers to protect against an
electrical system overload.
When the current electrical load is
too heavy, the circuit breaker opens
and closes, protecting the circuit
until the current load returns to
normal or the problem is fixed.
This greatly reduces the chance of
circuit overload and fire caused by
electrical problems.
Fuses and circuit breakers protect
the following in the vehicle:
.Headlamp Wiring
.Windshield Wiper Motor
.Power Windows and Other
Power Accessories
Replace a bad fuse with a new one
of the identical size and rating.
Page 280 of 376

Black plate (34,1)Chevrolet Impala Owner Manual - 2011
10-34 Vehicle Care
If there is a problem on the road and
a fuse needs to be replaced, the
same amperage fuse can be
borrowed. Choose some feature of
the vehicle that is not needed to use
and replace it as soon as possible.
Headlamp Wiring
An electrical overload may cause
the lamps to go on and off, or in
some cases to remain off. Have the
headlamp wiring checked right away
if the lamps go on and off or
remain off.
Windshield Wipers
If the wiper motor overheats due to
heavy snow or ice, the windshield
wipers will stop until the motor cools
and will then restart.
Although the circuit is protected
from electrical overload, overload
due to heavy snow or ice may
cause wiper linkage damage.Always clear ice and heavy snow
from the windshield before using the
windshield wipers.
If the overload is caused by an
electrical problem and not snow or
ice, be sure to get it fixed.
Fuses and Circuit
Breakers
The wiring circuits in the vehicle are
protected from short circuits by a
combination of fuses and circuit
breakers. This greatly reduces the
chance of fires caused by electrical
problems.
Look at the silver-colored band
inside the fuse. If the band is broken
or melted, replace the fuse. Be sure
you replace a bad fuse with a new
one of the identical size and rating.
Engine Compartment
Fuse Block
The Engine Compartment Fuse
Block is in the engine compartment.
See
Engine Compartment Overview
on page 10‑6 for more information
on location.
Notice: Spilling liquid on any
electrical component on the
vehicle may damage it. Always
keep the covers on any electrical
component.
Page 281 of 376
Black plate (35,1)Chevrolet Impala Owner Manual - 2011
Vehicle Care 10-35
The vehicle may not have all of the
fuses, relays, and features shown.Fuses Usage
A/C CMPRSR Air Conditioning
Compressor
ABS MTR 1 Antilock Brake
System (ABS)
Motor 1
ABS MTR 2 ABS Motor 2
AIR PUMP Air Pump
AIR SOL Air Injection
Reactor Solenoid
AIRBAG/
DISPLAY Airbag,
Display
AUX PWR Auxiliary Power
BATT 1 Battery 1
BATT 2 Battery 2
BATT 3 Battery 3
BATT 4 Battery 4
BCM Body Control
Module (BCM) Fuses Usage
CHMSL/
BCK‐UP Center
High‐Mounted
Stoplamp,
Back‐up Lamp
DISPLAY Display
DRL 1 Daytime Running
Lamps 1
DRL 2 Daytime Running
Lamps 2
ECM IGN Engine Control
Module (ECM),
Ignition
ECM/TCM ECM,
Transmission
Control
Module (TCM)
EMISSIONS 1 Emissions 1
EMISSIONS 2 Emissions 2
ETC/ECM Electronic
Throttle
Control, ECM
Page 283 of 376
Black plate (37,1)Chevrolet Impala Owner Manual - 2011
Vehicle Care 10-37
Instrument Panel Fuse
Block
The fuse block is on the passenger
side of the vehicle in the carpet
molding. Remove the fuse block
door to access the fuses.
The vehicle may not be equipped
with all of the fuses, relays, and
features shown.Fuses Usage
AIRBAG Airbags
AMP Amplifier
AUX Auxiliary Outlets
CNSTR Canister Fuses Usage
DR/LCK Door Locks
HTD/SEAT Heated Seats
PWR/MIR Power Mirrors
PWR/SEAT Power Seats
PWR/WNDW Power Window
RAP Retained
Accessory
Power
S/ROOF Sunroof
TRUNK Trunk
TRUNK Trunk Relay
XM XM™ Radio
Page 296 of 376

Black plate (50,1)Chevrolet Impala Owner Manual - 2011
10-50 Vehicle Care
The TPMS sensor matching process
is outlined below:
1. Set the parking brake.
2. Turn the ignition switch to ON/RUN with the engine off.
3. Press the Remote Keyless Entry (RKE) transmitter's lock and
unlock buttons at the same time
for approximately five seconds.
The horn sounds twice to signal
the receiver is in relearn mode
and the TIRE LEARNING
ACTIVE message displays on
the DIC screen.
4. Start with the driver side front tire. 5. Remove the valve cap from the
valve cap stem. Activate the
TPMS sensor by increasing or
decreasing the tire's air pressure
for five seconds, or until a
horn chirp sounds. The horn
chirp, which may take up to
30 seconds to sound, confirms
that the sensor identification
code has been matched to this
tire and wheel position.
6. Proceed to the passenger side front tire, and repeat the
procedure in Step 5.
7. Proceed to the passenger side rear tire, and repeat the
procedure in Step 5. 8. Proceed to the driver side rear
tire, and repeat the procedure
in Step 5. The horn sounds
two times to indicate the sensor
identification code has been
matched to the driver side rear
tire, and the TPMS sensor
matching process is no longer
active. The TIRE LEARNING
ACTIVE message on the
DIC display screen goes off.
9. Turn the ignition switch to LOCK/OFF.
10. Set all four tires to the recommended air pressure
level as indicated on the Tire
and Loading Information label.
11. Put the valve caps back on the valve stems.
Page 301 of 376

Black plate (55,1)Chevrolet Impala Owner Manual - 2011
Vehicle Care 10-55
Non‐TPC Spec rated tires may
give a low‐pressure warning
that is higher or lower than the
proper warning level you would
get with TPC Spec rated tires.
SeeTire Pressure Monitor
System on page 10‑46.
Your vehicle's original
equipment tires are listed on the
Tire and Loading Information
label. See Vehicle Load Limits
on page 9‑12 for more
information about the Tire and
Loading Information label and its
location on your vehicle.
Different Size Tires and
Wheels
If you add wheels or tires that are a
different size than your original
equipment wheels and tires, this
could affect the way your vehicle
performs, including its braking, ride
and handling characteristics,
stability, and resistance to rollover. Additionally, if your vehicle has
electronic systems such as antilock
brakes, rollover airbags, traction
control, and electronic stability
control, the performance of these
systems can be affected.
{WARNING
If you add different sized wheels,
your vehicle may not provide
an acceptable level of
performance and safety if tires
not recommended for those
wheels are selected. You may
increase the chance that you will
crash and suffer serious injury.
Only use GM specific wheel and
tire systems developed for your
vehicle, and have them properly
installed by a GM certified
technician.
See Buying New Tires on
page 10‑53 andAccessories and
Modifications on page 10‑3 for
additional information.
Uniform Tire Quality
Grading
Quality grades can be found
where applicable on the tire
sidewall between tread shoulder
and maximum section width.
For example:
Treadwear 200 Traction AA
Temperature A
The following information
relates to the system developed
by the United States National
Highway Traffic Safety
Administration (NHTSA),
which grades tires
by treadwear, traction,
and temperature performance.
Page 306 of 376

Black plate (60,1)Chevrolet Impala Owner Manual - 2011
10-60 Vehicle Care
If a tire goes flat, avoid further tire
and wheel damage by driving slowly
to a level place, well off the road,
if possible. Turn on the hazard
warning flashers. SeeHazard
Warning Flashers on page 6‑4.
{WARNING
Changing a tire can be
dangerous. The vehicle can slip
off the jack and roll over or fall on
you or other people. You and they
could be badly injured or even
killed. Find a level place to
change your tire. To help prevent
the vehicle from moving:
1. Set the parking brake firmly.
2. Put an automatic transmission shift lever in
P (Park), or shift a manual
transmission to 1 (First) or
R (Reverse).
(Continued)
WARNING (Continued)
3. Turn off the engine and donot restart while the vehicle
is raised.
4. Do not allow passengers to remain in the vehicle.
To be certain the vehicle will not
move, put blocks at the front and
rear of the tire farthest away from
the one being changed. That
would be the tire on the other
side, at the opposite end of
the vehicle.
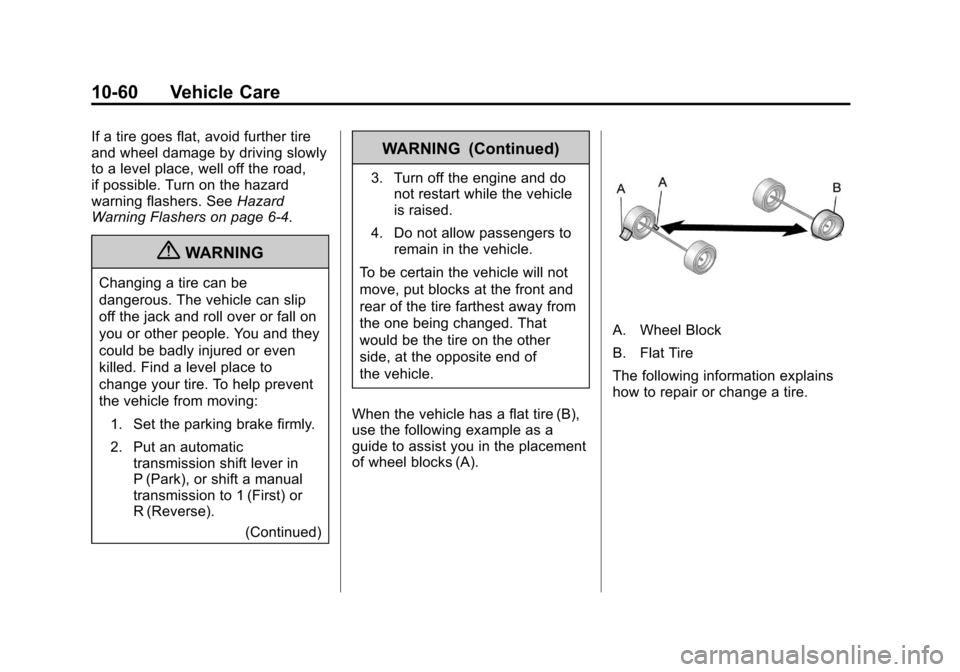
When the vehicle has a flat tire (B),
use the following example as a
guide to assist you in the placement
of wheel blocks (A).
A. Wheel Block
B. Flat Tire
The following information explains
how to repair or change a tire.