2011 CHEVROLET HHR fuel cap
[x] Cancel search: fuel capPage 286 of 430
Black plate (10,1)Chevrolet HHR Owner Manual - 2011
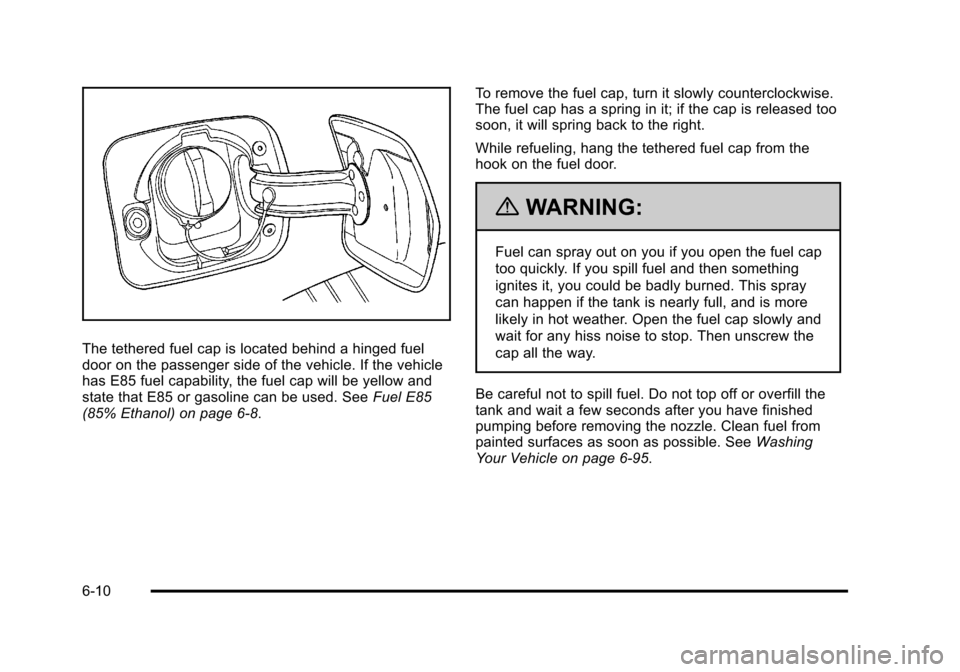
The tethered fuel cap is located behind a hinged fuel
door on the passenger side of the vehicle. If the vehicle
has E85 fuel capability, the fuel cap will be yellow and
state that E85 or gasoline can be used. SeeFuel E85
(85% Ethanol) on page 6‑8. To remove the fuel cap, turn it slowly counterclockwise.
The fuel cap has a spring in it; if the cap is released too
soon, it will spring back to the right.
While refueling, hang the tethered fuel cap from the
hook on the fuel door.
{WARNING:
Fuel can spray out on you if you open the fuel cap
too quickly. If you spill fuel and then something
ignites it, you could be badly burned. This spray
can happen if the tank is nearly full, and is more
likely in hot weather. Open the fuel cap slowly and
wait for any hiss noise to stop. Then unscrew the
cap all the way.
Be careful not to spill fuel. Do not top off or overfill the
tank and wait a few seconds after you have finished
pumping before removing the nozzle. Clean fuel from
painted surfaces as soon as possible. See Washing
Your Vehicle on page 6‑95.
6-10
Page 287 of 430
Black plate (11,1)Chevrolet HHR Owner Manual - 2011
When replacing the fuel cap, turn it clockwise until it
clicks. Make sure the cap is fully installed. The
diagnostic system can determine if the fuel cap has
been left off or improperly installed. This would allow
fuel to evaporate into the atmosphere. SeeMalfunction
Indicator Lamp on page 4‑33.
The CHECK GAS CAP message displays on the Driver
Information Center (DIC) if the fuel cap is not properly
installed. See DIC Warnings and Messages
on
page 4‑40for more information.
To close the fuel door securely, push the door to the
closed position.
{WARNING:
If a fire starts while you are refueling, do not
remove the nozzle. Shut off the flow of fuel by
shutting off the pump or by notifying the station
attendant. Leave the area immediately.
Notice: If you need a new fuel cap, be sure to get
the right type. Your dealer can get one for you.
If you get the wrong type, it may not fit properly.
This may cause the malfunction indicator lamp to
light and may damage the fuel tank and emissions
system. See Malfunction Indicator Lamp
on
page 4‑33.
6-11
Page 292 of 430
Black plate (16,1)Chevrolet HHR Owner Manual - 2011
Engine Oil
To ensure proper engine performance and long life,
careful attention must be paid to engine oil. Following
these simple, but important steps will help protect your
investment:
.Always use engine oil approved to the proper
specification and of the proper viscosity grade.
See“Selecting the Right Engine Oil.”
.Check the engine oil level regularly and maintain
the proper oil level. See “Checking Engine Oil”and
“When to Add Engine Oil.”
.Change the engine oil at the appropriate time.
See Engine Oil Life System on page 6‑19.
.Always dispose of engine oil properly. See “What
to Do With Used Oil.”
Checking Engine Oil
It is a good idea to check the engine oil level at each
fuel fill. In order to get an accurate reading, the vehicle
must be on level ground. The engine oil dipstick handle
is a yellow loop. See Engine Compartment Overview
on
page 6‑14for the location of the engine oil dipstick.
Obtaining an accurate oil level reading is essential:
1. If the engine has been running recently, turn off the engine and allow several minutes for the oil to
drain back into the oil pan. Checking your oil level
too soon after engine shut off will not provide an
accurate oil level reading. 2. Pull out the dipstick and clean it with a paper towel
or cloth, then push it back in all the way. Remove it
again, keeping the tip down, and check the level.
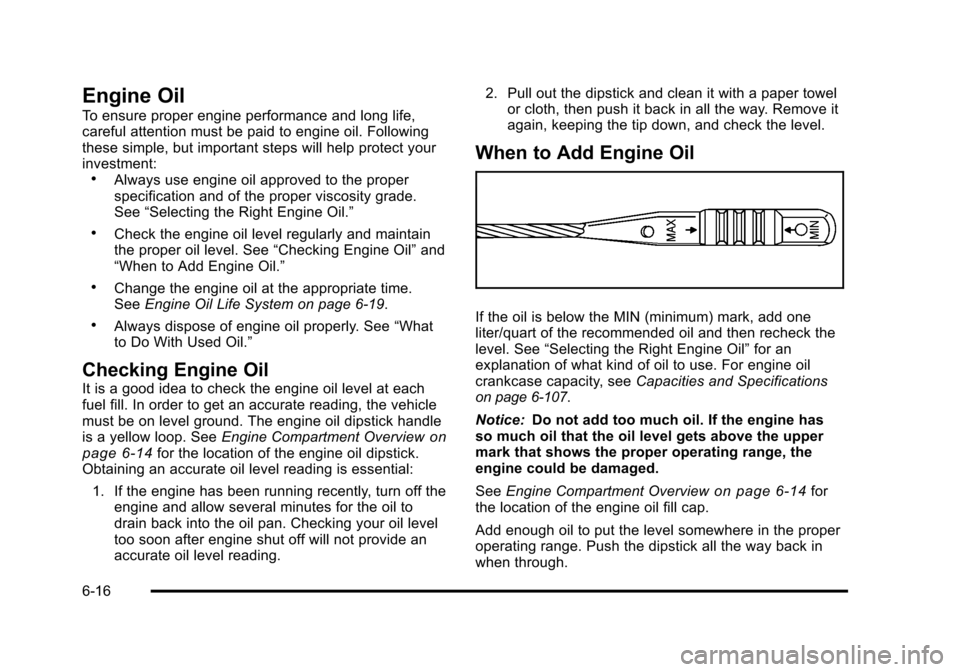
When to Add Engine Oil
If the oil is below the MIN (minimum) mark, add one
liter/quart of the recommended oil and then recheck the
level. See “Selecting the Right Engine Oil” for an
explanation of what kind of oil to use. For engine oil
crankcase capacity, see Capacities and Specifications
on page 6‑107.
Notice: Do not add too much oil. If the engine has
so much oil that the oil level gets above the upper
mark that shows the proper operating range, the
engine could be damaged.
See Engine Compartment Overview
on page 6‑14for
the location of the engine oil fill cap.
Add enough oil to put the level somewhere in the proper
operating range. Push the dipstick all the way back in
when through.
6-16
Page 328 of 430

Black plate (52,1)Chevrolet HHR Owner Manual - 2011
Cold Tire Pressure:The amount of air pressure
in a tire, measured in pounds per square inch (psi)
or kilopascals (kPa) before a tire has built up heat
from driving. See Inflation - Tire Pressure
on
page 6‑54
.
Curb Weight
:The weight of a motor vehicle with
standard and optional equipment including the
maximum capacity of fuel, oil, and coolant, but
without passengers and cargo.
DOT Markings
:A code molded into the sidewall
of a tire signifying that the tire is in compliance
with the U.S. Department of Transportation (DOT)
motor vehicle safety standards. The DOT code
includes the Tire Identification Number (TIN), an
alphanumeric designator which can also identify
the tire manufacturer, production plant, brand, and
date of production.
GVWR
:Gross Vehicle Weight Rating. See
Loading the Vehicle
on page 5‑22.
GAWR FRT
:Gross Axle Weight Rating for the
front axle. See Loading the Vehicle
on page 5‑22.
GAWR RR
:Gross Axle Weight Rating for the rear
axle. See Loading the Vehicle
on page 5‑22. Intended Outboard Sidewall
:The side of an
asymmetrical tire, that must always face outward
when mounted on a vehicle.
Kilopascal (kPa)
:The metric unit for air pressure.
Light Truck (LT‐Metric) Tire
:A tire used on light
duty trucks and some multipurpose passenger
vehicles.
Load Index
:An assigned number ranging from 1
to 279 that corresponds to the load carrying
capacity of a tire.
Maximum Inflation Pressure
:The maximum air
pressure to which a cold tire can be inflated. The
maximum air pressure is molded onto the
sidewall.
Maximum Load Rating
:The load rating for a tire
at the maximum permissible inflation pressure for
that tire.
Maximum Loaded Vehicle Weight
:The sum of
curb weight, accessory weight, vehicle capacity
weight, and production options weight.
Normal Occupant Weight
:The number of
occupants a vehicle is designed to seat multiplied
by 150 lbs (68 kg). See Loading the Vehicle
on
page 5‑22
.
6-52
Page 330 of 430
Black plate (54,1)Chevrolet HHR Owner Manual - 2011
Vehicle Maximum Load on the Tire:Load on an
individual tire due to curb weight, accessory
weight, occupant weight, and cargo weight.
Vehicle Placard
:A label permanently attached to
a vehicle showing the vehicle's capacity weight
and the original equipment tire size and
recommended inflation pressure. See “Tire and
Loading Information Label” underLoading the
Vehicle
on page 5‑22.
Inflation - Tire Pressure
Tires need the correct amount of air pressure to
operate effectively.
Notice:Do not let anyone tell you that under‐
inflation or over‐inflation is all right. It is not.
If your tires do not have enough air (under‐
inflation), you can get the following:
.Tire overloading and over-heating which
could lead to a blowout.
.Premature or irregular wear.
.Poor handling.
.Reduced fuel economy. If your tires have too much air (over‐inflation),
you can get the following:
.Unusual wear.
.Poor handling.
.Rough ride.
.Needless damage from road hazards.
A vehicle specific Tire and Loading Information
label is attached to your vehicle. This label shows
your vehicle's original equipment tires and the
correct inflation pressures for your tires when they
are cold. The recommended cold tire inflation
pressure, shown on the label, is the minimum
amount of air pressure needed to support your
vehicle's maximum load carrying capacity.
For additional information regarding how much
weight your vehicle can carry, and an example of
the Tire and Loading Information label, see
Loading the Vehicle
on page 5‑22. How you load
your vehicle affects vehicle handling and ride
comfort. Never load your vehicle with more weight
than it was designed to carry.
6-54
Page 383 of 430
Black plate (107,1)Chevrolet HHR Owner Manual - 2011
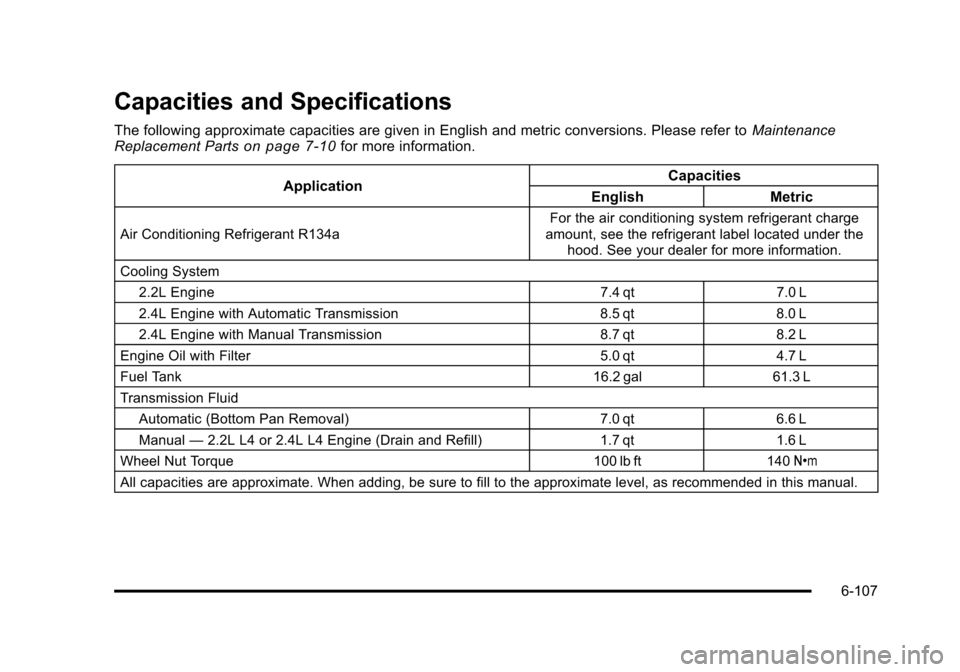
Capacities and Specifications
The following approximate capacities are given in English and metric conversions. Please refer toMaintenance
Replacement Partson page 7‑10for more information.
Application Capacities
English Metric
Air Conditioning Refrigerant R134a For the air conditioning system refrigerant charge
amount, see the refrigerant label located under the hood. See your dealer for more information.
Cooling System 2.2L Engine 7.4 qt7.0 L
2.4L Engine with Automatic Transmission 8.5 qt8.0 L
2.4L Engine with Manual Transmission 8.7 qt8.2 L
Engine Oil with Filter 5.0 qt4.7 L
Fuel Tank 16.2 gal61.3 L
Transmission Fluid
Automatic (Bottom Pan Removal) 7.0 qt6.6 L
Manual —2.2L L4 or 2.4L L4 Engine (Drain and Refill) 1.7 qt1.6 L
Wheel Nut Torque 100 lb ft140Y
All capacities are approximate. When adding, be sure to fill to the approximate level, as recommended in this manual.
6-107
Page 418 of 430

Black plate (2,1)Chevrolet HHR Owner Manual - 2011
Audio System . . . . . . . . . . . . . . . . . . . . . . . . . . . . . . . . . . . . . . 4-50Audio Steering Wheel Controls . . . . . . . . . . . . . . . . . . . 4-79
Radio Reception . . . . . . . . . . . . . . . . . . . . . . . . . . . . . . . . . . 4-80
Setting the Clock . . . . . . . . . . . . . . . . . . . . . . . . . . . . . . . . . 4-51
Theft-Deterrent Feature . . . . . . . . . . . . . . . . . . . . . . . . . . . 4-79
XM™ Satellite Radio Antenna System . . . . . . . . . . . . 4-81
Audio System(s) . . . . . . . . . . . . . . . . . . . . . . . . . . . . . . . . . . . 4-53
Automatic Door Lock . . . . . . . . . . . . . . . . . . . . . . . . . . . . . . 3-10
Automatic Headlamp System . . . . . . . . . . . . . . . . . . . . . . 4-13
Automatic Transmission Fluid . . . . . . . . . . . . . . . . . . . . . . . . . . . . . . . . . . . . . . . . . . . . . . 6-21
Operation . . . . . . . . . . . . . . . . . . . . . . . . . . . . . . . . . . . . . . . . . 3-26
B
Battery . . . . . . . . . . . . . . . . . . . . . . . . . . . . . . . . . . . . . . . . . . . . 6-33
Electric Power Management . . . . . . . . . . . . . . . . . . . . . . 4-15
Run-Down Protection . . . . . . . . . . . . . . . . . . . . . . . . . . . . . 4-15
Belt Routing, Engine . . . . . . . . . . . . . . . . . . . . . . . . . . . . . . . 7-11
Bluetooth
®. . . . . . . . . . . . . . . . . . . . . . . . . . . . . . . . . . . . . . . . . 4-71
Brake Emergencies . . . . . . . . . . . . . . . . . . . . . . . . . . . . . . . . . . . . . . 5-5
Brakes . . . . . . . . . . . . . . . . . . . . . . . . . . . . . . . . . . . . . . . . . . . . . 6-30 Antilock . . . . . . . . . . . . . . . . . . . . . . . . . . . . . . . . . . . . . . . . . . . . 5-4
Parking . . . . . . . . . . . . . . . . . . . . . . . . . . . . . . . . . . . . . . . . . . . 3-30
System Warning Light . . . . . . . . . . . . . . . . . . . . . . . . . . . . 4-29
Braking . . . . . . . . . . . . . . . . . . . . . . . . . . . . . . . . . . . . . . . . . . . . . .5-3
Braking in Emergencies . . . . . . . . . . . . . . . . . . . . . . . . . . . . .5-5 Break-In, New Vehicle . . . . . . . . . . . . . . . . . . . . . . . . . . . . . 3-20
Bulb Replacement . . . . . . . . . . . . . . . . . . . . . . . . . . . . . . . . . 6-45
Center High-Mounted Stoplamp (CHMSL) . . . . . . . . 6-43
Fog Lamps . . . . . . . . . . . . . . . . . . . . . . . . . . . . . . . . . . . . . . . 4-13
Halogen Bulbs . . . . . . . . . . . . . . . . . . . . . . . . . . . . . . . . . . . . 6-41
Headlamp Aiming . . . . . . . . . . . . . . . . . . . . . . . . . . . . . . . . . 6-38
Headlamps . . . . . . . . . . . . . . . . . . . . . . . . . . . . . . . . . . . . . . . 6-41
Headlamps, Front Turn Signal, and ParkingLamps . . . . . . . . . . . . . . . . . . . . . . . . . . . . . . . . . . . . . . . . . . 6-41
License Plate Lamps . . . . . . . . . . . . . . . . . . . . . . . . . . . . . 6-45
Taillamps, Turn Signal, Stoplamps and Back-up Lamps . . . . . . . . . . . . . . . . . . . . . . . . . . . . . . . . . 6-44
Buying New Tires . . . . . . . . . . . . . . . . . . . . . . . . . . . . . . . . . . 6-62
C
Calibration . . . . . . . . . . . . . . . . . . . . . . . . . . . . . . . . . . . . . . . . . 3-36
California Perchlorate Materials Requirements . . . . . . . . . . . . . . . 6-4
Warning . . . . . . . . . . . . . . . . . . . . . . . . . . . . . . . . . . . . . . . . . . . 6-4
California Fuel . . . . . . . . . . . . . . . . . . . . . . . . . . . . . . . . . . . . . . .6-6
Camera, Rear Vision . . . . . . . . . . . . . . . . . . . . . . . . . . . . . . 3-39
Canadian Owners . . . . . . . . . . . . . . . . . . . . . . . . . . . . . . . . . . . . iii
Capacities and Specifications . . . . . . . . . . . . . . . . . . . . . 6-107
Carbon Monoxide Engine Exhaust . . . . . . . . . . . . . . . . . . . . . . . . . . . . . . . . . . . 3-34
Liftgate . . . . . . . . . . . . . . . . . . . . . . . . . . . . . . . . . . . . . . . . . . . 3-11
Winter Driving . . . . . . . . . . . . . . . . . . . . . . . . . . . . . . . . . . . . 5-19
i - 2