2011 CHEVROLET HHR flat tire
[x] Cancel search: flat tirePage 264 of 430
Black plate (26,1)Chevrolet HHR Owner Manual - 2011
Certification Label
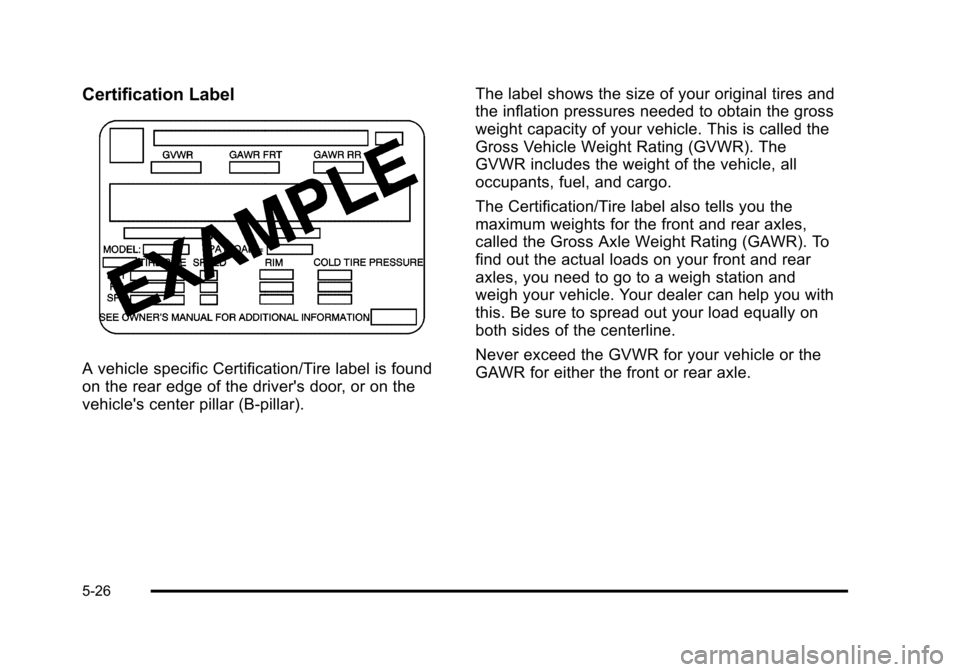
A vehicle specific Certification/Tire label is found
on the rear edge of the driver's door, or on the
vehicle's center pillar (B‐pillar).The label shows the size of your original tires and
the inflation pressures needed to obtain the gross
weight capacity of your vehicle. This is called the
Gross Vehicle Weight Rating (GVWR). The
GVWR includes the weight of the vehicle, all
occupants, fuel, and cargo.
The Certification/Tire label also tells you the
maximum weights for the front and rear axles,
called the Gross Axle Weight Rating (GAWR). To
find out the actual loads on your front and rear
axles, you need to go to a weigh station and
weigh your vehicle. Your dealer can help you with
this. Be sure to spread out your load equally on
both sides of the centerline.
Never exceed the GVWR for your vehicle or the
GAWR for either the front or rear axle.
5-26
Page 272 of 430
Black plate (34,1)Chevrolet HHR Owner Manual - 2011
Total Weight on the Vehicle's Tires
Be sure the vehicle's tires are inflated to the upper limit
for cold tires. These numbers can be found on the
Tire-Loading Information label. SeeLoading the Vehicle
on page 5‑22. Make sure not to go over the GVW limit
for the vehicle, or the GAWR, including the weight of the
trailer tongue.
Hitches
It is important to have the correct hitch equipment.
Crosswinds, large trucks going by and rough roads are
a few reasons why the right hitch is needed.
.The rear bumper on the vehicle is not intended for
hitches. Do not attach rental hitches or other
bumper-type hitches to it. Use only a
frame-mounted hitch that does not attach to the
bumper.
.Will there be any holes in the body of the vehicle
after installing a trailer hitch? If there are, then be
sure to seal the holes later when the hitch is
removed. If the holes are not sealed, deadly
carbon monoxide (CO) from exhaust can get into
the vehicle. See Engine Exhaust
on page 3‑34.
Dirt and water can also enter the vehicle.
Safety Chains
Always attach chains between the vehicle and the
trailer. Cross the safety chains under the tongue of the
trailer to help prevent the tongue from contacting the
road if it becomes separated from the hitch. Always
leave just enough slack so the rig can turn. Never allow
safety chains to drag on the ground.
Trailer Brakes
A loaded trailer that weighs more than 1,500 lbs
(680 kg) needs to have its own brake system that is
adequate for the weight of the trailer. Be sure to read
and follow the instructions for the trailer brakes so they
are installed, adjusted and maintained properly.
Driving with a Trailer
Towing a trailer requires a certain amount of
experience. Get to know the rig before setting out for
the open road. Get acquainted with the feel of handling
and braking with the added weight of the trailer. And
always keep in mind that the vehicle you are driving is
now longer and not as responsive as the vehicle is by
itself.
5-34
Page 277 of 430
Black plate (1,1)Chevrolet HHR Owner Manual - 2011
Section 6 Service and Appearance Care
Service. . . . . . . . . . . . . . . . . . . . . . . . . . . . . . . . . . . . . . . . . . . . . 6-3
Accessories and Modifications . . . . . . . . . . . . . . . . . . 6-3
California Proposition 65 Warning . . . . . . . . . . . . . . . 6-4
California Perchlorate Materials Requirements . . . . . . . . . . . . . . . . . . . . . . . . . . . . . . . . . 6-4
Doing Your Own Service Work . . . . . . . . . . . . . . . . . . 6-4
Adding Equipment to the Outside of the Vehicle . . . . . . . . . . . . . . . . . . . . . . . . . . . . . . . . . . . . . . . . 6-5
Fuel . . . . . . . . . . . . . . . . . . . . . . . . . . . . . . . . . . . . . . . . . . . . . . . . . 6-5
Gasoline Octane . . . . . . . . . . . . . . . . . . . . . . . . . . . . . . . . 6-6
Gasoline Specifications . . . . . . . . . . . . . . . . . . . . . . . . . 6-6
California Fuel . . . . . . . . . . . . . . . . . . . . . . . . . . . . . . . . . . 6-6
Additives . . . . . . . . . . . . . . . . . . . . . . . . . . . . . . . . . . . . . . . . 6-7
Fuel E85 (85% Ethanol) . . . . . . . . . . . . . . . . . . . . . . . . . 6-8
Fuels in Foreign Countries . . . . . . . . . . . . . . . . . . . . . . 6-9
Filling the Tank . . . . . . . . . . . . . . . . . . . . . . . . . . . . . . . . . . 6-9
Filling a Portable Fuel Container . . . . . . . . . . . . . . . 6-12
Checking Things Under the Hood . . . . . . . . . . . . . . .6-12
Hood Release . . . . . . . . . . . . . . . . . . . . . . . . . . . . . . . . . 6-13
Engine Compartment Overview . . . . . . . . . . . . . . . . 6-14
Engine Oil . . . . . . . . . . . . . . . . . . . . . . . . . . . . . . . . . . . . . 6-16
Engine Oil Life System . . . . . . . . . . . . . . . . . . . . . . . . 6-19
Engine Air Cleaner/Filter . . . . . . . . . . . . . . . . . . . . . . . 6-20
Automatic Transmission Fluid . . . . . . . . . . . . . . . . . . 6-21
Manual Transmission Fluid . . . . . . . . . . . . . . . . . . . . 6-22
Hydraulic Clutch . . . . . . . . . . . . . . . . . . . . . . . . . . . . . . . 6-22 Cooling System . . . . . . . . . . . . . . . . . . . . . . . . . . . . . . . . 6-22
Engine Coolant . . . . . . . . . . . . . . . . . . . . . . . . . . . . . . . . 6-24
Engine Overheating . . . . . . . . . . . . . . . . . . . . . . . . . . . 6-28
Windshield Washer Fluid . . . . . . . . . . . . . . . . . . . . . . 6-30
Brakes . . . . . . . . . . . . . . . . . . . . . . . . . . . . . . . . . . . . . . . . . 6-30
Battery . . . . . . . . . . . . . . . . . . . . . . . . . . . . . . . . . . . . . . . . . 6-33
Jump Starting . . . . . . . . . . . . . . . . . . . . . . . . . . . . . . . . . . 6-34
Headlamp Aiming . . . . . . . . . . . . . . . . . . . . . . . . . . . . . . . . 6-38
Bulb Replacement . . . . . . . . . . . . . . . . . . . . . . . . . . . . . . . . 6-41
Halogen Bulbs . . . . . . . . . . . . . . . . . . . . . . . . . . . . . . . . . 6-41
Headlamps, Front Turn Signal, and Parking Lamps . . . . . . . . . . . . . . . . . . . . . . . . . . . . . . . . . . . . . . . 6-41
Center High-Mounted Stoplamp (CHMSL) . . . . . 6-43
Taillamps, Turn Signal, Stoplamps and Back-up Lamps . . . . . . . . . . . . . . . . . . . . . . . . . . . . . . . . . . . . . . . 6-44
License Plate Lamp . . . . . . . . . . . . . . . . . . . . . . . . . . . . 6-45
Replacement Bulbs . . . . . . . . . . . . . . . . . . . . . . . . . . . . 6-45
Windshield Wiper Blade Replacement . . . . . . . . . . .6-46
Tires . . . . . . . . . . . . . . . . . . . . . . . . . . . . . . . . . . . . . . . . . . . . . . . 6-47
Tire Sidewall Labeling . . . . . . . . . . . . . . . . . . . . . . . . . 6-48
Tire Terminology and Definitions . . . . . . . . . . . . . . . 6-51
Inflation - Tire Pressure . . . . . . . . . . . . . . . . . . . . . . . . 6-54
Tire Pressure Monitor System . . . . . . . . . . . . . . . . . 6-55
Tire Pressure Monitor Operation . . . . . . . . . . . . . . . 6-57
Tire Inspection and Rotation . . . . . . . . . . . . . . . . . . . 6-60
6-1
Page 278 of 430
Black plate (2,1)Chevrolet HHR Owner Manual - 2011
Section 6 Service and Appearance Care
When It Is Time for New Tires . . . . . . . . . . . . . . . . . 6-62
Buying New Tires . . . . . . . . . . . . . . . . . . . . . . . . . . . . . . 6-62
Different Size Tires and Wheels . . . . . . . . . . . . . . . 6-65
Uniform Tire Quality Grading . . . . . . . . . . . . . . . . . . . 6-65
Wheel Alignment and Tire Balance . . . . . . . . . . . . 6-67
Wheel Replacement . . . . . . . . . . . . . . . . . . . . . . . . . . . 6-67
Tire Chains . . . . . . . . . . . . . . . . . . . . . . . . . . . . . . . . . . . . 6-68
If a Tire Goes Flat . . . . . . . . . . . . . . . . . . . . . . . . . . . . . 6-68
Tire Sealant and Compressor Kit . . . . . . . . . . . . . . 6-70
Tire Sealant and Compressor Kit Storage . . . . . . 6-78
Changing a Flat Tire . . . . . . . . . . . . . . . . . . . . . . . . . . . 6-78
Removing the Spare Tire and Tools . . . . . . . . . . . . 6-80
Removing the Flat Tire and Installing theSpare Tire . . . . . . . . . . . . . . . . . . . . . . . . . . . . . . . . . . . 6-82
Storing a Flat or Spare Tire and Tools . . . . . . . . . 6-87
Compact Spare Tire . . . . . . . . . . . . . . . . . . . . . . . . . . . 6-91
Appearance Care . . . . . . . . . . . . . . . . . . . . . . . . . . . . . . . . . 6-92
Interior Cleaning . . . . . . . . . . . . . . . . . . . . . . . . . . . . . . 6-92
Fabric/Carpet . . . . . . . . . . . . . . . . . . . . . . . . . . . . . . . . . . 6-93
Leather . . . . . . . . . . . . . . . . . . . . . . . . . . . . . . . . . . . . . . . . 6-94
Instrument Panel, Vinyl, and Other Plastic Surfaces . . . . . . . . . . . . . . . . . . . . . . . . . . . . . . . . . . . . . 6-94
Care of Safety Belts . . . . . . . . . . . . . . . . . . . . . . . . . . . 6-95
Weatherstrips . . . . . . . . . . . . . . . . . . . . . . . . . . . . . . . . . . 6-95 Washing Your Vehicle . . . . . . . . . . . . . . . . . . . . . . . . . 6-95
Cleaning Exterior Lamps/Lenses . . . . . . . . . . . . . . 6-95
Finish Care . . . . . . . . . . . . . . . . . . . . . . . . . . . . . . . . . . . . 6-96
Windshield and Wiper Blades . . . . . . . . . . . . . . . . . . 6-96
Aluminum or Chrome-Plated Wheels
and Trim . . . . . . . . . . . . . . . . . . . . . . . . . . . . . . . . . . . . . 6-97
Tires . . . . . . . . . . . . . . . . . . . . . . . . . . . . . . . . . . . . . . . . . . . 6-98
Sheet Metal Damage . . . . . . . . . . . . . . . . . . . . . . . . . . 6-98
Finish Damage . . . . . . . . . . . . . . . . . . . . . . . . . . . . . . . . 6-98
Underbody Maintenance . . . . . . . . . . . . . . . . . . . . . . . 6-98
Chemical Paint Spotting . . . . . . . . . . . . . . . . . . . . . . . 6-98
Vehicle Identification . . . . . . . . . . . . . . . . . . . . . . . . . . . . . 6-99
Vehicle Identification Number (VIN) . . . . . . . . . . . . 6-99
Service Parts Identification Label . . . . . . . . . . . . . . 6-99
Electrical System . . . . . . . . . . . . . . . . . . . . . . . . . . . . . . . . 6-100
Add-On Electrical Equipment . . . . . . . . . . . . . . . . . 6-100
Headlamp Wiring . . . . . . . . . . . . . . . . . . . . . . . . . . . . . 6-100
Windshield Wiper Fuses . . . . . . . . . . . . . . . . . . . . . . 6-100
Power Windows and Other Power Options . . . 6-100
Fuses and Circuit Breakers . . . . . . . . . . . . . . . . . . . 6-101
Floor Console Fuse Block . . . . . . . . . . . . . . . . . . . . 6-101
Engine Compartment Fuse Block . . . . . . . . . . . . . 6-104
Capacities and Specifications . . . . . . . . . . . . . . . . . .6-107
6-2
Page 314 of 430
Black plate (38,1)Chevrolet HHR Owner Manual - 2011
3. Disconnect the red positive (+) cable from thevehicle with the good battery.
4. Disconnect the red positive (+) cable from the other vehicle.
5. Return the positive (+) terminal cover to its original position.
Headlamp Aiming
The vehicle has a visual optical headlamp aiming
system. The aim has been preset at the factory and
should need no further adjustment.
However, if the vehicle is damaged in a crash, the
headlamp aim may be affected and adjustment may be
necessary.
If oncoming vehicles flash their high beams at you, this
may also mean the vertical aim needs to be adjusted.
It is recommended that the vehicle is taken to your
dealer for service if the headlamps need to be re-aimed.
It is possible however, to re-aim the headlamps as
described. The vehicle should:
.Be placed so the headlamps are 25 ft. (7.6 m) from
a light colored wall.
.Have all four tires on a level surface which is level
all the way to the wall.
.Be placed so it is perpendicular to the wall or other
flat surface.
.Not have any snow, ice, or mud on it.
.Be fully assembled and all other work stopped
while headlamp aiming is being performed.
.Normally loaded with a full tank of fuel and
one person or 160 lbs (75 kg) sitting on the
driver seat.
.Have all tires properly inflated.
.Have the spare tire is in its original location in the
vehicle.
Headlamp aiming is done with the vehicle's low-beam
headlamps. The high-beam headlamps will be correctly
aimed if the low-beam headlamps are aimed properly.
6-38
Page 323 of 430
Black plate (47,1)Chevrolet HHR Owner Manual - 2011
Tires
Your new vehicle comes with high-quality tires
made by a leading tire manufacturer. If you ever
have questions about your tire warranty and
where to obtain service, see your vehicle
Warranty booklet for details. For additional
information refer to the tire manufacturer.
{WARNING:
.Poorly maintained and improperly used tires
are dangerous.
.Overloading your tires can cause overheating
as a result of too much flexing. You could
have a blowout and a serious accident. See
Loading the Vehicle on page 5‑22.
.Under inflated tires pose the same danger as
overloaded tires. The resulting crash could
cause serious injury. Check all tires frequently
to maintain the recommended pressure. Tire
pressure should be checked when your tires
are cold.(Continued)
WARNING: (Continued)
.Over inflated tires are more likely to be
cut, punctured, or broken by a sudden
impact—such as when you hit a pothole.
Keep tires at the recommended pressure.
.Worn or old tires can cause a crash. If your
tread is badly worn, replace them.
.Replace any tires that have been damaged by
impacts with potholes, curbs, etc.
.Improperly repaired tires can cause a crash.
Only your dealer or an authorized tire service
center should repair, replace, dismount, and
mount the tires.
.Do not spin the tires in excess of 55 km/h
(35 mph) on slippery surfaces such as snow,
mud, ice, etc. Excessive spinning may cause
the tires to explode.
6-47
Page 325 of 430
Black plate (49,1)Chevrolet HHR Owner Manual - 2011
(E) Tire Ply Material:The type of cord and
number of plies in the sidewall and under the
tread.
(F) Uniform Tire Quality Grading (UTQG)
:Tire
manufacturers are required to grade tires based
on three performance factors: treadwear, traction,
and temperature resistance. For more information
see Uniform Tire Quality Grading
on page 6‑65.
(G) Maximum Cold Inflation Load Limit
:
Maximum load that can be carried and the
maximum pressure needed to support that load.
Compact Spare Tire Example
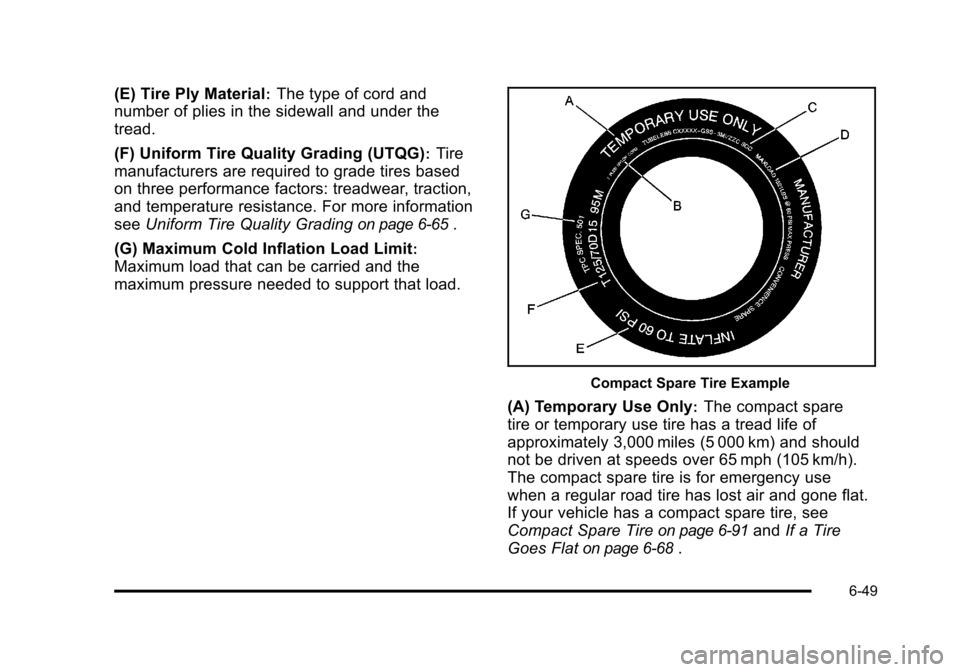
(A) Temporary Use Only:The compact spare
tire or temporary use tire has a tread life of
approximately 3,000 miles (5 000 km) and should
not be driven at speeds over 65 mph (105 km/h).
The compact spare tire is for emergency use
when a regular road tire has lost air and gone flat.
If your vehicle has a compact spare tire, see
Compact Spare Tire
on page 6‑91and If a Tire
Goes Flat
on page 6‑68.
6-49
Page 326 of 430
Black plate (50,1)Chevrolet HHR Owner Manual - 2011
(B) Tire Ply Material:The type of cord and
number of plies in the sidewall and under the
tread.
(C) Tire Identification Number (TIN)
:The letters
and numbers following the DOT (Department of
Transportation) code is the Tire Identification
Number (TIN). The TIN shows the manufacturer
and plant code, tire size, and date the tire was
manufactured. The TIN is molded onto both sides
of the tire, although only one side may have the
date of manufacture.
(D) Maximum Cold Inflation Load Limit
:
Maximum load that can be carried and the
maximum pressure needed to support that load.
(E) Tire Inflation
:The temporary use tire or
compact spare tire should be inflated to 60 psi
(420 kPa). For more information on tire pressure
and inflation see Inflation - Tire Pressure
on
page 6‑54
.
(F) Tire Size
:A combination of letters and
numbers define a tire's width, height, aspect ratio,
construction type, and service description. The
letter T as the first character in the tire size means
the tire is for temporary use only. (G) TPC Spec (Tire Performance Criteria
Specification)
:Original equipment tires designed
to GM's specific tire performance criteria have a
TPC specification code molded onto the sidewall.
GM's TPC specifications meet or exceed all
federal safety guidelines.
Tire Size
The following illustration shows an example of a
typical passenger vehicle tire size.
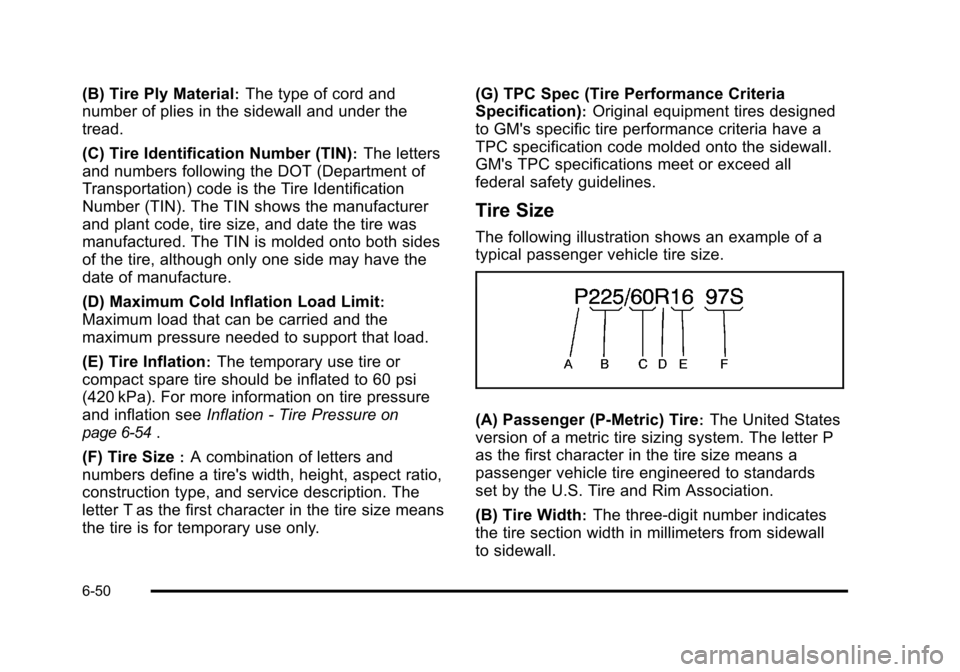
(A) Passenger (P‐Metric) Tire:The United States
version of a metric tire sizing system. The letter P
as the first character in the tire size means a
passenger vehicle tire engineered to standards
set by the U.S. Tire and Rim Association.
(B) Tire Width
:The three‐digit number indicates
the tire section width in millimeters from sidewall
to sidewall.
6-50