Page 348 of 430

Black plate (72,1)Chevrolet HHR Owner Manual - 2011
Using the Tire Sealant and Compressor
Kit to Temporarily Seal and Inflate a
Punctured Tire
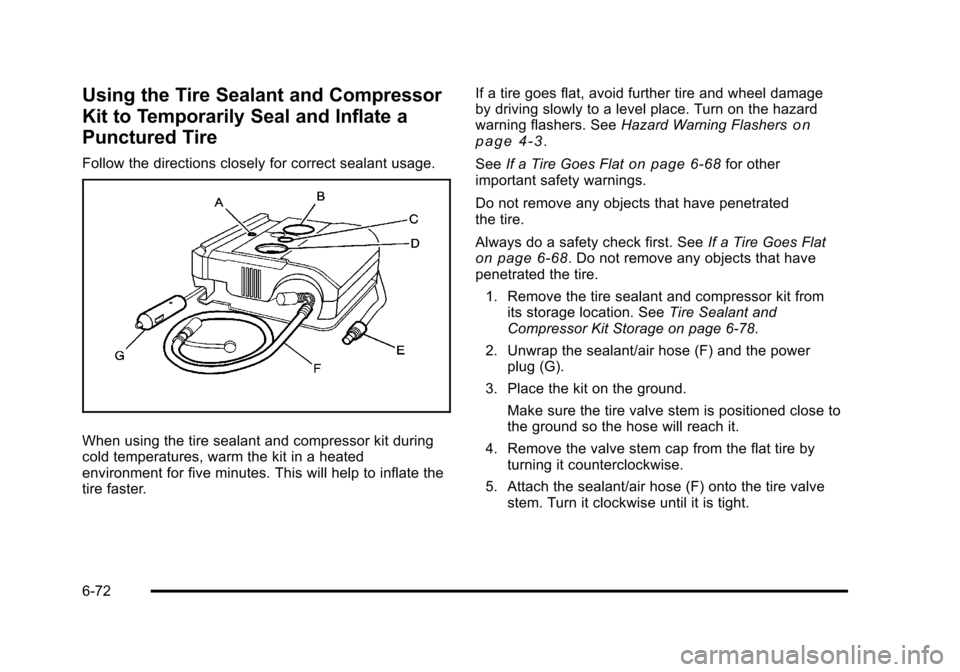
Follow the directions closely for correct sealant usage.
When using the tire sealant and compressor kit during
cold temperatures, warm the kit in a heated
environment for five minutes. This will help to inflate the
tire faster.If a tire goes flat, avoid further tire and wheel damage
by driving slowly to a level place. Turn on the hazard
warning flashers. See
Hazard Warning Flashers
on
page 4‑3.
See If a Tire Goes Flat
on page 6‑68for other
important safety warnings.
Do not remove any objects that have penetrated
the tire.
Always do a safety check first. See If a Tire Goes Flat
on page 6‑68. Do not remove any objects that have
penetrated the tire.
1. Remove the tire sealant and compressor kit from its storage location. See Tire Sealant and
Compressor Kit Storage on page 6‑78.
2. Unwrap the sealant/air hose (F) and the power plug (G).
3. Place the kit on the ground.
Make sure the tire valve stem is positioned close to
the ground so the hose will reach it.
4. Remove the valve stem cap from the flat tire by turning it counterclockwise.
5. Attach the sealant/air hose (F) onto the tire valve stem. Turn it clockwise until it is tight.
6-72
Page 351 of 430

Black plate (75,1)Chevrolet HHR Owner Manual - 2011
Using the Tire Sealant and Compressor
Kit without Sealant to Inflate a Tire (Not
Punctured)
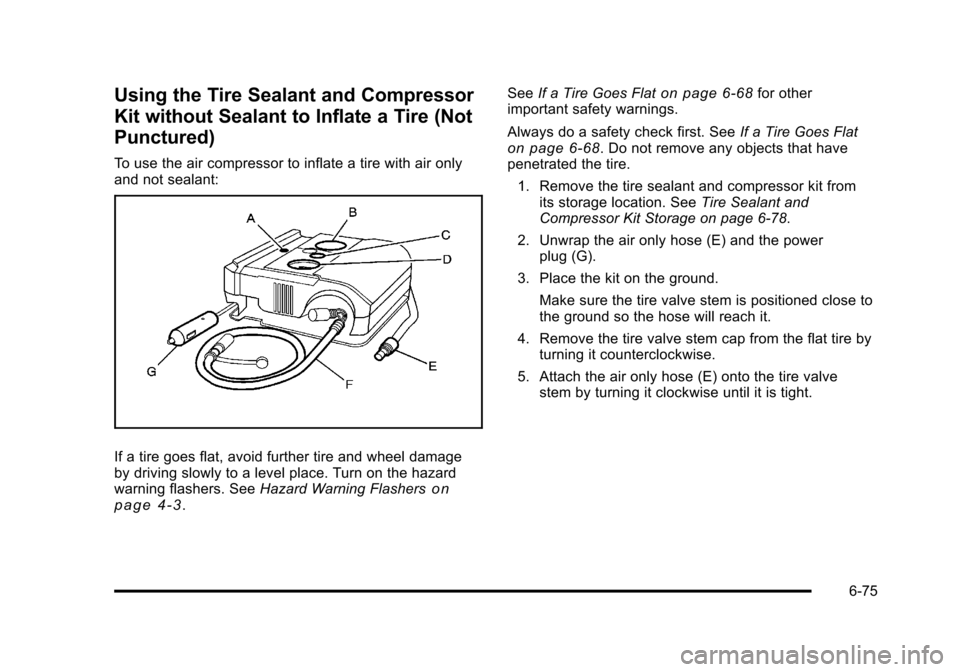
To use the air compressor to inflate a tire with air only
and not sealant:
If a tire goes flat, avoid further tire and wheel damage
by driving slowly to a level place. Turn on the hazard
warning flashers. SeeHazard Warning Flashers
on
page 4‑3. See
If a Tire Goes Flat
on page 6‑68for other
important safety warnings.
Always do a safety check first. See If a Tire Goes Flat
on page 6‑68. Do not remove any objects that have
penetrated the tire.
1. Remove the tire sealant and compressor kit from its storage location. See Tire Sealant and
Compressor Kit Storage on page 6‑78.
2. Unwrap the air only hose (E) and the power plug (G).
3. Place the kit on the ground. Make sure the tire valve stem is positioned close to
the ground so the hose will reach it.
4. Remove the tire valve stem cap from the flat tire by turning it counterclockwise.
5. Attach the air only hose (E) onto the tire valve stem by turning it clockwise until it is tight.
6-75
Page 354 of 430

Black plate (78,1)Chevrolet HHR Owner Manual - 2011
Tire Sealant and Compressor Kit
Storage
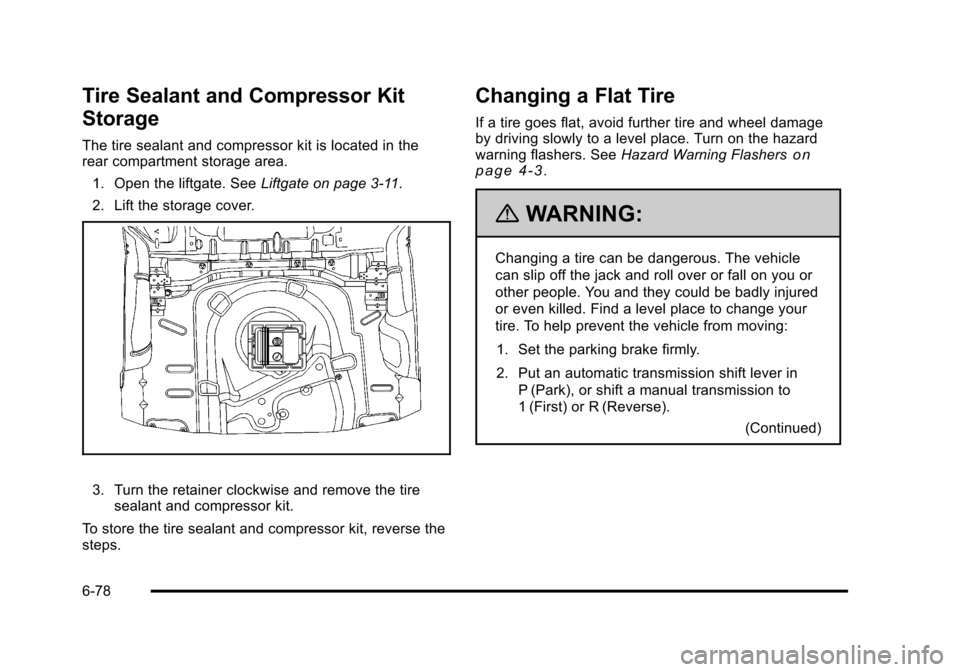
The tire sealant and compressor kit is located in the
rear compartment storage area.1. Open the liftgate. See Liftgate on page 3‑11.
2. Lift the storage cover.
3. Turn the retainer clockwise and remove the tire sealant and compressor kit.
To store the tire sealant and compressor kit, reverse the
steps.
Changing a Flat Tire
If a tire goes flat, avoid further tire and wheel damage
by driving slowly to a level place. Turn on the hazard
warning flashers. See Hazard Warning Flashers
on
page 4‑3.
{WARNING:
Changing a tire can be dangerous. The vehicle
can slip off the jack and roll over or fall on you or
other people. You and they could be badly injured
or even killed. Find a level place to change your
tire. To help prevent the vehicle from moving:
1. Set the parking brake firmly.
2. Put an automatic transmission shift lever in P (Park), or shift a manual transmission to
1 (First) or R (Reverse).
(Continued)
6-78
Page 355 of 430
Black plate (79,1)Chevrolet HHR Owner Manual - 2011
WARNING: (Continued)
3. Turn off the engine and do not restart whilethe vehicle is raised.
4. Do not allow passengers to remain in the vehicle.
To be even more certain the vehicle will not move,
you should put blocks at the front and rear of the
tire farthest away from the one being changed.
That would be the tire on the other side, at the
opposite end of the vehicle.
When the vehicle has a flat tire (B), use the following
example as a guide to assist you in the placement of
wheel blocks (A).
A. Wheel Block
B. Flat Tire
The following information explains how to use the jack
and change a tire.
6-79
Page 359 of 430
Black plate (83,1)Chevrolet HHR Owner Manual - 2011
3. Position the jack and raise the jack lift head to fitover the car flange under the down arrow markings
on the rocker panel.
{WARNING:
Getting under a vehicle when it is jacked up is
dangerous. If the vehicle slips off the jack, you
could be badly injured or killed. Never get under a
vehicle when it is supported only by a jack.
{WARNING:
Raising your vehicle with the jack improperly
positioned can damage the vehicle and even
make the vehicle fall. To help avoid personal
injury and vehicle damage, be sure to fit the jack
lift head into the proper location before raising the
vehicle.
6-83
Page 360 of 430
Black plate (84,1)Chevrolet HHR Owner Manual - 2011
4. Raise the vehicle by turning the jack handleclockwise. Raise the vehicle far enough off the
ground so there is enough room for the compact
spare tire to fit underneath the wheel well.
5. Remove all the wheel
nuts and take off the
flat tire.
{WARNING:
Rust or dirt on a wheel, or on the parts to which it
is fastened, can make wheel nuts become loose
after time. The wheel could come off and cause
an accident. When changing a wheel, remove any
rust or dirt from places where the wheel attaches
to the vehicle. In an emergency, use a cloth or a
paper towel to do this; but be sure to use a
scraper or wire brush later, if needed, to get all the
rust or dirt off. See Changing a Flat Tire
on
page 6‑78
.
6-84
Page 361 of 430
Black plate (85,1)Chevrolet HHR Owner Manual - 2011
6. Remove any rust or dirtfrom the wheel bolts,
mounting surfaces and
spare wheel.
7. Place the compact spare tire on the wheel-mounting surface.
{WARNING:
Never use oil or grease on bolts or nuts because
the nuts might come loose. The vehicle's wheel
could fall off, causing a crash.
8. Reinstall the wheel nuts with the rounded end of the nuts toward the wheel. Tighten each nut by
hand until the wheel is held against the hub.
9. Lower the vehicle by turning the jack handlecounterclockwise. Lower the jack completely.
6-85
Page 362 of 430
Black plate (86,1)Chevrolet HHR Owner Manual - 2011
{WARNING:
Wheel nuts that are improperly or incorrectly
tightened can cause the wheels to become loose
or come off. The wheel nuts should be tightened
with a torque wrench to the proper torque
specification after replacing. Follow the torque
specification supplied by the aftermarket
manufacturer when using accessory locking wheel
nuts. SeeCapacities and Specifications
on
page 6‑107
for original equipment wheel nut
torque specifications.
Notice: Improperly tightened wheel nuts can lead to
brake pulsation and rotor damage. To avoid
expensive brake repairs, evenly tighten the wheel
nuts in the proper sequence and to the proper
torque specification. See Capacities and
Specifications
on page 6‑107for the wheel nut torque
specification.
10. Tighten the wheel nuts
firmly in a crisscross
sequence as shown.
6-86