2011 CHEVROLET CRUZE ECU
[x] Cancel search: ECUPage 1 of 394

Black plate (1,1)Chevrolet Cruze Owner Manual - 2011
2011 Chevrolet Cruze Owner ManualM
In Brief. . . . . . . . . . . . . . . . . . . . . . . . 1-1
Instrument Panel . . . . . . . . . . . . . . 1-2
Initial Drive Information . . . . . . . . 1-4
Vehicle Features . . . . . . . . . . . . . 1-16
Performance and Maintenance . . . . . . . . . . . . . . . . 1-20
Keys, Doors and Windows . . . 2-1
Keys and Locks . . . . . . . . . . . . . . . 2-2
Doors . . . . . . . . . . . . . . . . . . . . . . . . . . 2-8
Vehicle Security . . . . . . . . . . . . . . . . 2-9
Exterior Mirrors . . . . . . . . . . . . . . . 2-11
Interior Mirrors . . . . . . . . . . . . . . . . 2-12
Windows . . . . . . . . . . . . . . . . . . . . . 2-13
Roof . . . . . . . . . . . . . . . . . . . . . . . . . . 2-17
Seats and Restraints . . . . . . . . . 3-1
Head Restraints . . . . . . . . . . . . . . . 3-2
Front Seats . . . . . . . . . . . . . . . . . . . . 3-3
Rear Seats . . . . . . . . . . . . . . . . . . . . 3-8
Safety Belts . . . . . . . . . . . . . . . . . . . . 3-9
Airbag System . . . . . . . . . . . . . . . . 3-25
Child Restraints . . . . . . . . . . . . . . 3-40 Storage
. . . . . . . . . . . . . . . . . . . . . . . 4-1
Storage Compartments . . . . . . . . 4-1
Additional Storage Features . . . 4-2
Instruments and Controls . . . . 5-1
Controls . . . . . . . . . . . . . . . . . . . . . . . 5-2
Warning Lights, Gauges, and
Indicators . . . . . . . . . . . . . . . . . . . . 5-7
Information Displays . . . . . . . . . . 5-24
Vehicle Messages . . . . . . . . . . . . 5-27
Vehicle Personalization . . . . . . . 5-34
Lighting . . . . . . . . . . . . . . . . . . . . . . . 6-1
Exterior Lighting . . . . . . . . . . . . . . . 6-1
Interior Lighting . . . . . . . . . . . . . . . . 6-5
Lighting Features . . . . . . . . . . . . . . 6-6
Infotainment System . . . . . . . . . 7-1
Introduction . . . . . . . . . . . . . . . . . . . . 7-1
Radio . . . . . . . . . . . . . . . . . . . . . . . . . 7-11
Audio Players . . . . . . . . . . . . . . . . 7-18
Phone . . . . . . . . . . . . . . . . . . . . . . . . 7-23
Climate Controls . . . . . . . . . . . . . 8-1
Climate Control Systems . . . . . . 8-1
Air Vents . . . . . . . . . . . . . . . . . . . . . . . 8-6 Driving and Operating
. . . . . . . . 9-1
Driving Information . . . . . . . . . . . . . 9-2
Starting and Operating . . . . . . . 9-17
Engine Exhaust . . . . . . . . . . . . . . 9-24
Automatic Transmission . . . . . . 9-26
Manual Transmission . . . . . . . . . 9-29
Brakes . . . . . . . . . . . . . . . . . . . . . . . 9-31
Ride Control Systems . . . . . . . . 9-33
Cruise Control . . . . . . . . . . . . . . . . 9-36
Object Detection Systems . . . . 9-38
Fuel . . . . . . . . . . . . . . . . . . . . . . . . . . 9-40
Towing . . . . . . . . . . . . . . . . . . . . . . . 9-45
Conversions and Add-Ons . . . 9-52
Vehicle Care . . . . . . . . . . . . . . . . . 10-1
General Information . . . . . . . . . . 10-2
Vehicle Checks . . . . . . . . . . . . . . . 10-4
Headlamp Aiming . . . . . . . . . . . 10-30
Bulb Replacement . . . . . . . . . . 10-30
Electrical System . . . . . . . . . . . . 10-36
Wheels and Tires . . . . . . . . . . . 10-42
Jump Starting . . . . . . . . . . . . . . . 10-84
Towing . . . . . . . . . . . . . . . . . . . . . . 10-87
Appearance Care . . . . . . . . . . . 10-90
Page 29 of 394

Black plate (23,1)Chevrolet Cruze Owner Manual - 2011
In Brief 1-23
OnStar®
For vehicles with an active OnStar
subscription, OnStar uses several
innovative technologies and live
Advisors to provide a wide range of
safety, security, navigation,
diagnostics, and calling services.
Automatic Crash Response
In a crash, built‐in sensors can
automatically alert an OnStar
Advisor who is immediately
connected to the vehicle to see if
you need help.
How OnStar Service Works
Q:Push this blue button to
connect to a specially trained
OnStar Advisor to verify your
account information and to answer
questions.
]: Push this red emergency
button to get priority help from
specially trained OnStar Emergency
Advisors.
X: Push this button for hands‐free,
voice‐activated calling and to give
voice commands for Hands‐Free
Calling and Turn‐by‐Turn
Navigation.
Automatic Crash Response,
Emergency Services, Crisis Assist,
Stolen Vehicle Assistance, Vehicle
Diagnostics, Remote Door Unlock,
Roadside Assistance, Turn‐by‐Turn
Navigation, and Hands‐Free Calling
are available on most vehicles. Not
all OnStar services are available on
all vehicles. For more information,
see the OnStar Owner's Guide;
visit www.onstar.com (U.S.) or
www.onstar.ca (Canada); contact
OnStar at 1-888-4-ONSTAR
(1‐888‐466‐7827) or TTY
1‐877‐248‐2080; or push the
Q
button to speak with an OnStar
Advisor 24 hours a day, 7 days
a week. For a full description of OnStar
services and system limitations, see
the OnStar Owner's Guide in the
glove box.
OnStar service is subject to the
OnStar Terms and Conditions
included in the OnStar Glove
Box Kit.
OnStar service requires wireless
communication networks and the
Global Positioning System (GPS)
satellite network. Not all OnStar
services are available everywhere
or on all vehicles at all times.
OnStar service can’t work unless
the vehicle is in a place where
OnStar has an agreement with a
wireless service provider for service
in that area, and the wireless
service provider has coverage,
network capacity, reception, and
technology compatible with OnStar's
service. Service involving location
information about the vehicle can’t
work unless GPS signals are
available, unobstructed, and
compatible with the OnStar
Page 31 of 394

Black plate (1,1)Chevrolet Cruze Owner Manual - 2011
Keys, Doors and Windows 2-1
Keys, Doors and
Windows
Keys and Locks
Keys . . . . . . . . . . . . . . . . . . . . . . . . . . 2-2
Remote Keyless Entry (RKE)System . . . . . . . . . . . . . . . . . . . . . . 2-3
Remote Keyless Entry (RKE) System Operation . . . . . . . . . . . 2-3
Remote Vehicle Start . . . . . . . . . 2-5
Door Locks . . . . . . . . . . . . . . . . . . . 2-6
Power Door Locks . . . . . . . . . . . . 2-7
Automatic Door Locks . . . . . . . . . 2-7
Safety Locks . . . . . . . . . . . . . . . . . . 2-7
Doors
Trunk . . . . . . . . . . . . . . . . . . . . . . . . . 2-8
Vehicle Security
Vehicle Security . . . . . . . . . . . . . . . 2-9
Vehicle Alarm System . . . . . . . . . 2-9
Immobilizer . . . . . . . . . . . . . . . . . . 2-10
Immobilizer Operation . . . . . . . 2-10
Exterior Mirrors
Convex Mirrors . . . . . . . . . . . . . . 2-11
Manual Mirrors . . . . . . . . . . . . . . . 2-11
Power Mirrors . . . . . . . . . . . . . . . . 2-12
Folding Mirrors . . . . . . . . . . . . . . . 2-12
Heated Mirrors . . . . . . . . . . . . . . . 2-12
Interior Mirrors
Manual Rearview Mirror . . . . . . 2-12
Automatic Dimming Rearview Mirror . . . . . . . . . . . . . . . . . . . . . . . 2-13
Windows
Windows . . . . . . . . . . . . . . . . . . . . . 2-13
Power Windows . . . . . . . . . . . . . 2-14
Sun Visors . . . . . . . . . . . . . . . . . . . 2-16
Roof
Sunroof . . . . . . . . . . . . . . . . . . . . . . 2-17
Page 39 of 394
Black plate (9,1)Chevrolet Cruze Owner Manual - 2011
Keys, Doors and Windows 2-9
Remote Trunk Release
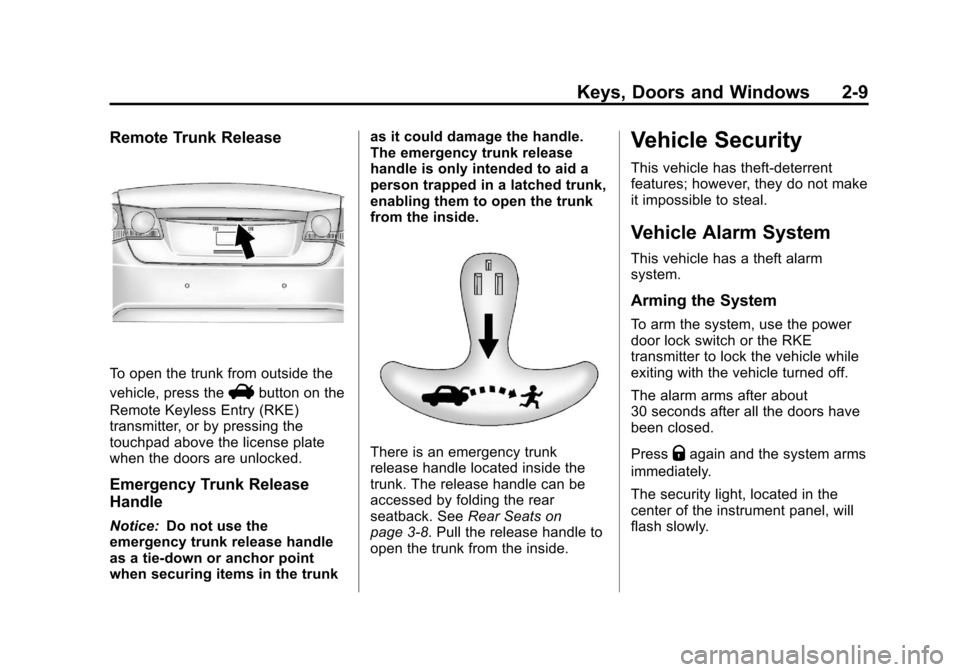
To open the trunk from outside the
vehicle, press the
Vbutton on the
Remote Keyless Entry (RKE)
transmitter, or by pressing the
touchpad above the license plate
when the doors are unlocked.
Emergency Trunk Release
Handle
Notice: Do not use the
emergency trunk release handle
as a tie-down or anchor point
when securing items in the trunk as it could damage the handle.
The emergency trunk release
handle is only intended to aid a
person trapped in a latched trunk,
enabling them to open the trunk
from the inside.
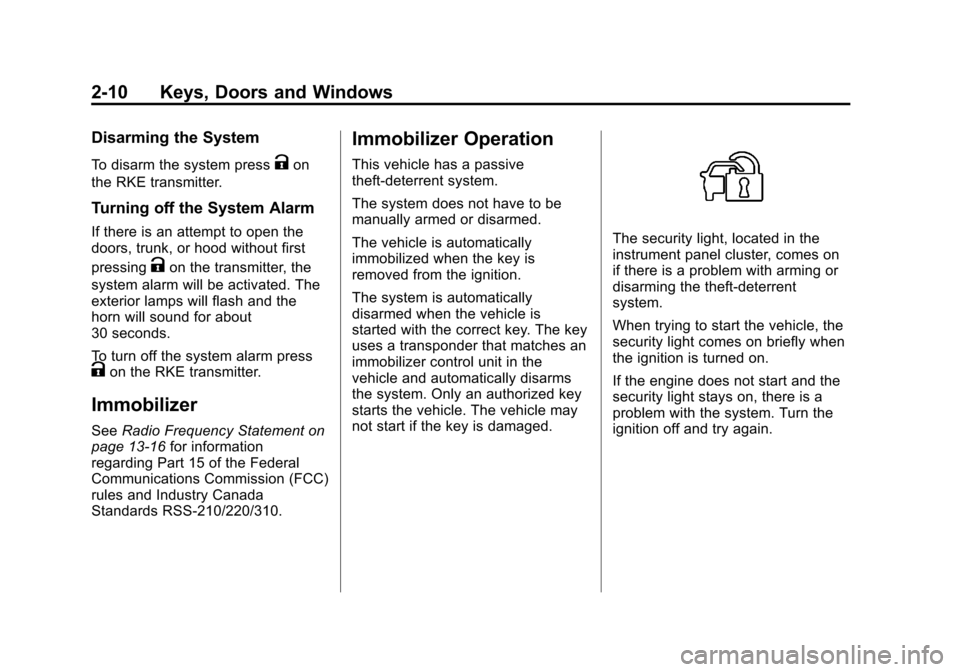
There is an emergency trunk
release handle located inside the
trunk. The release handle can be
accessed by folding the rear
seatback. See
Rear Seats on
page 3‑8. Pull the release handle to
open the trunk from the inside.
Vehicle Security
This vehicle has theft-deterrent
features; however, they do not make
it impossible to steal.
Vehicle Alarm System
This vehicle has a theft alarm
system.
Arming the System
To arm the system, use the power
door lock switch or the RKE
transmitter to lock the vehicle while
exiting with the vehicle turned off.
The alarm arms after about
30 seconds after all the doors have
been closed.
Press
Qagain and the system arms
immediately.
The security light, located in the
center of the instrument panel, will
flash slowly.
Page 40 of 394
Black plate (10,1)Chevrolet Cruze Owner Manual - 2011
2-10 Keys, Doors and Windows
Disarming the System
To disarm the system pressKon
the RKE transmitter.
Turning off the System Alarm
If there is an attempt to open the
doors, trunk, or hood without first
pressing
Kon the transmitter, the
system alarm will be activated. The
exterior lamps will flash and the
horn will sound for about
30 seconds.
To turn off the system alarm press
Kon the RKE transmitter.
Immobilizer
See Radio Frequency Statement on
page 13‑16 for information
regarding Part 15 of the Federal
Communications Commission (FCC)
rules and Industry Canada
Standards RSS-210/220/310.
Immobilizer Operation
This vehicle has a passive
theft-deterrent system.
The system does not have to be
manually armed or disarmed.
The vehicle is automatically
immobilized when the key is
removed from the ignition.
The system is automatically
disarmed when the vehicle is
started with the correct key. The key
uses a transponder that matches an
immobilizer control unit in the
vehicle and automatically disarms
the system. Only an authorized key
starts the vehicle. The vehicle may
not start if the key is damaged.
The security light, located in the
instrument panel cluster, comes on
if there is a problem with arming or
disarming the theft-deterrent
system.
When trying to start the vehicle, the
security light comes on briefly when
the ignition is turned on.
If the engine does not start and the
security light stays on, there is a
problem with the system. Turn the
ignition off and try again.
Page 49 of 394
Black plate (1,1)Chevrolet Cruze Owner Manual - 2011
Seats and Restraints 3-1
Seats and
Restraints
Head Restraints
Head Restraints . . . . . . . . . . . . . . . 3-2
Front Seats
Seat Adjustment . . . . . . . . . . . . . . 3-3
Power Seat Adjustment . . . . . . . 3-4
Reclining Seatbacks . . . . . . . . . . 3-5
Heated Front Seats . . . . . . . . . . . 3-7
Rear Seats
Rear Seats . . . . . . . . . . . . . . . . . . . . 3-8
Safety Belts
Safety Belts . . . . . . . . . . . . . . . . . . . 3-9
How to Wear Safety BeltsProperly . . . . . . . . . . . . . . . . . . . . 3-13
Lap-Shoulder Belt . . . . . . . . . . . 3-18
Safety Belt Use During Pregnancy . . . . . . . . . . . . . . . . . . 3-23
Safety Belt Extender . . . . . . . . . 3-23
Safety System Check . . . . . . . . 3-23
Safety Belt Care . . . . . . . . . . . . . 3-24
Replacing Safety Belt System Parts After a Crash . . . . . . . . . 3-24
Airbag System
Airbag System . . . . . . . . . . . . . . . 3-25
Where Are the Airbags? . . . . . 3-27
When Should an AirbagInflate? . . . . . . . . . . . . . . . . . . . . . 3-29
What Makes an Airbag
Inflate? . . . . . . . . . . . . . . . . . . . . . 3-30
How Does an Airbag Restrain? . . . . . . . . . . . . . . . . . . . 3-31
What Will You See After an Airbag Inflates? . . . . . . . . . . . . 3-31
Passenger Sensing System . . . . . . . . . . . . . . . . . . . . . 3-33
Servicing the Airbag-Equipped Vehicle . . . . . . . . . . . . . . . . . . . . . 3-38
Adding Equipment to the Airbag-Equipped Vehicle . . . 3-38
Airbag System Check . . . . . . . . 3-39
Replacing Airbag System Parts After a Crash . . . . . . . . . 3-40
Child Restraints
Older Children . . . . . . . . . . . . . . . 3-40
Infants and YoungChildren . . . . . . . . . . . . . . . . . . . . 3-43
Child Restraint Systems . . . . . 3-45
Where to Put the Restraint . . . 3-47 Lower Anchors and Tethers
for Children (LATCH
System) . . . . . . . . . . . . . . . . . . . . 3-49
Replacing LATCH System Parts After a Crash . . . . . . . . . 3-56
Securing Child Restraints (Rear Seat) . . . . . . . . . . . . . . . . . 3-56
Securing Child Restraints (Front Passenger Seat) . . . . 3-58
Page 51 of 394
Black plate (3,1)Chevrolet Cruze Owner Manual - 2011
Seats and Restraints 3-3
The vehicle's rear seat may be
equipped with an adjustable
headrest in the center seating
position that can be adjusted the
same way as the head restraints.
The front seat outboard head
restraints and the center seat rear
headrest, if equipped, are not
designed to be removed.
If you are installing a child restraint
in the rear seat, see“Securing a
Child Restraint Designed for the
LATCH System” underLower
Anchors and Tethers for Children
(LATCH System) on page 3‑49.Front Seats
Seat Adjustment
{WARNING
You can lose control of the
vehicle if you try to adjust a
manual driver seat while the
vehicle is moving. The sudden
movement could startle and
confuse you, or make you push a
pedal when you do not want to.
Adjust the driver seat only when
the vehicle is not moving.
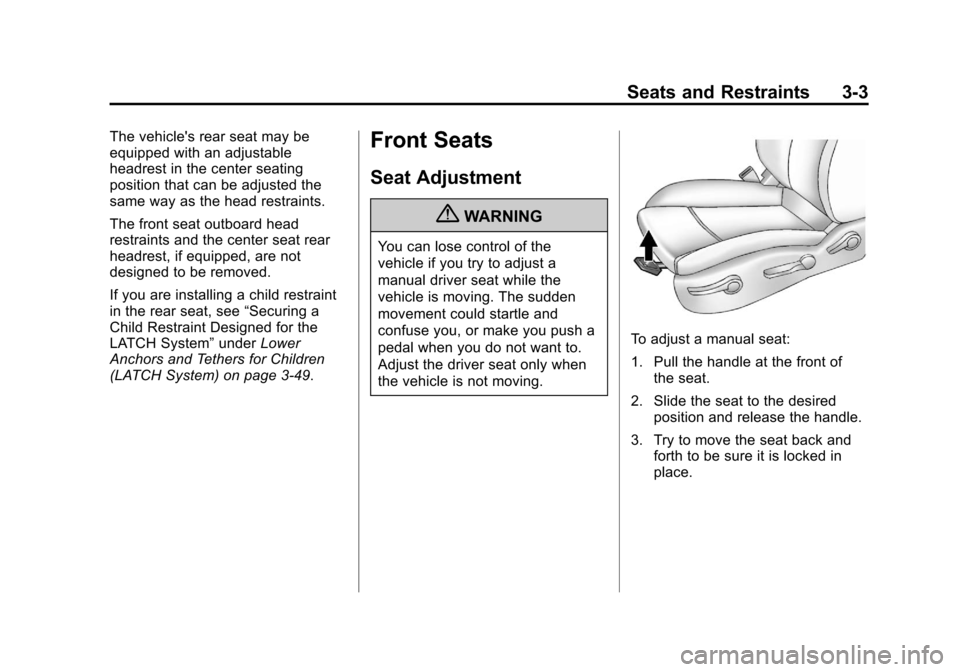
To adjust a manual seat:
1. Pull the handle at the front of the seat.
2. Slide the seat to the desired position and release the handle.
3. Try to move the seat back and forth to be sure it is locked in
place.
Page 67 of 394
Black plate (19,1)Chevrolet Cruze Owner Manual - 2011
Seats and Restraints 3-19
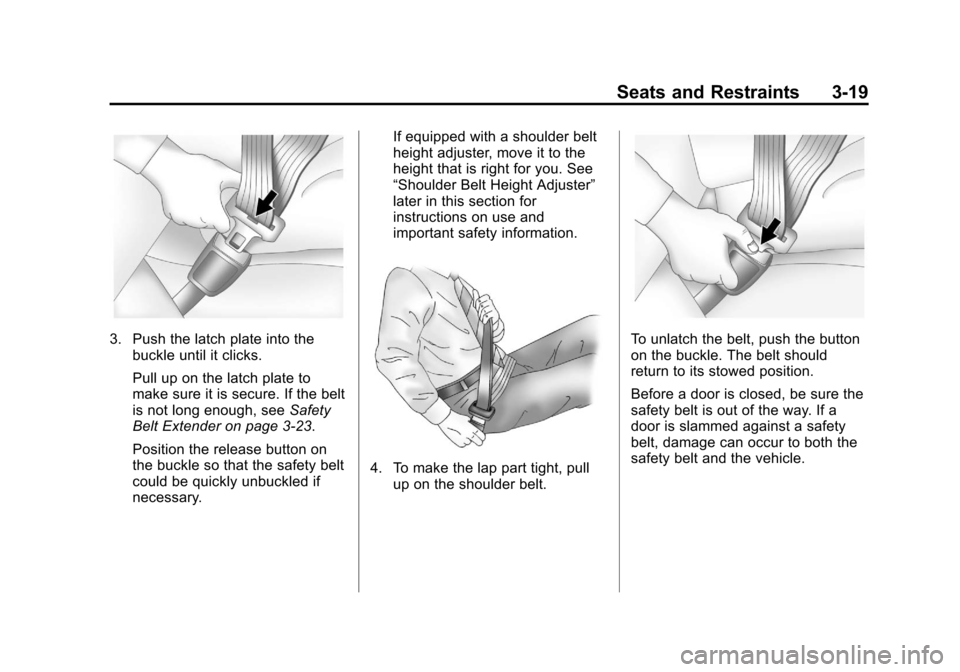
3. Push the latch plate into thebuckle until it clicks.
Pull up on the latch plate to
make sure it is secure. If the belt
is not long enough, see Safety
Belt Extender on page 3‑23.
Position the release button on
the buckle so that the safety belt
could be quickly unbuckled if
necessary. If equipped with a shoulder belt
height adjuster, move it to the
height that is right for you. See
“Shoulder Belt Height Adjuster”
later in this section for
instructions on use and
important safety information.
4. To make the lap part tight, pull
up on the shoulder belt.
To unlatch the belt, push the button
on the buckle. The belt should
return to its stowed position.
Before a door is closed, be sure the
safety belt is out of the way. If a
door is slammed against a safety
belt, damage can occur to both the
safety belt and the vehicle.