2011 CHEVROLET CRUZE ECU
[x] Cancel search: ECUPage 109 of 394
Black plate (61,1)Chevrolet Cruze Owner Manual - 2011
Seats and Restraints 3-61
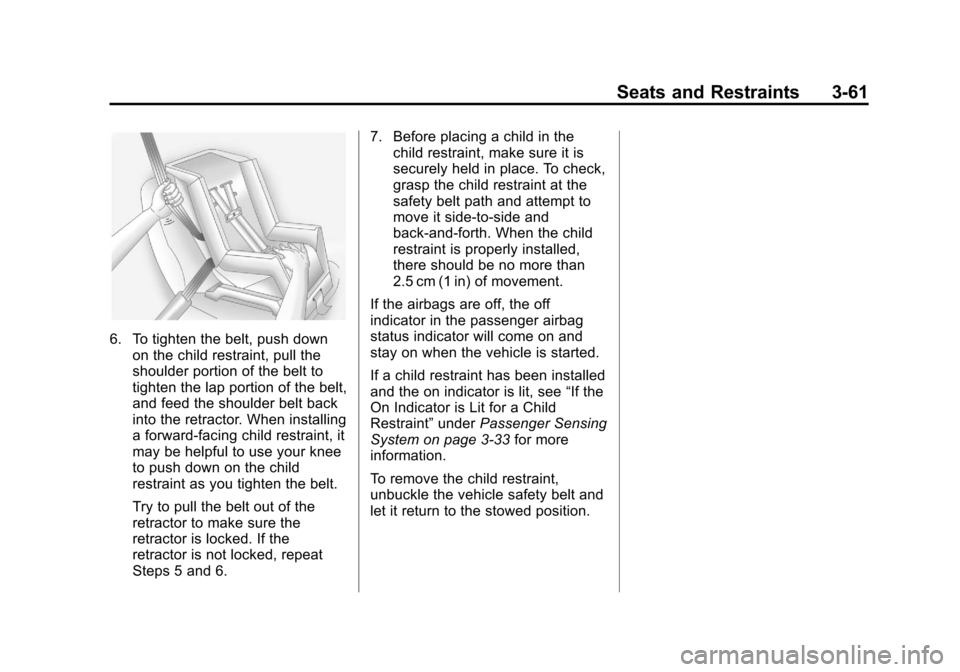
6. To tighten the belt, push downon the child restraint, pull the
shoulder portion of the belt to
tighten the lap portion of the belt,
and feed the shoulder belt back
into the retractor. When installing
a forward-facing child restraint, it
may be helpful to use your knee
to push down on the child
restraint as you tighten the belt.
Try to pull the belt out of the
retractor to make sure the
retractor is locked. If the
retractor is not locked, repeat
Steps 5 and 6. 7. Before placing a child in the
child restraint, make sure it is
securely held in place. To check,
grasp the child restraint at the
safety belt path and attempt to
move it side‐to‐side and
back‐and‐forth. When the child
restraint is properly installed,
there should be no more than
2.5 cm (1 in) of movement.
If the airbags are off, the off
indicator in the passenger airbag
status indicator will come on and
stay on when the vehicle is started.
If a child restraint has been installed
and the on indicator is lit, see “If the
On Indicator is Lit for a Child
Restraint” underPassenger Sensing
System on page 3‑33 for more
information.
To remove the child restraint,
unbuckle the vehicle safety belt and
let it return to the stowed position.
Page 113 of 394
Black plate (1,1)Chevrolet Cruze Owner Manual - 2011
Instruments and Controls 5-1
Instruments and
Controls
Controls
Steering Wheel Adjustment . . . 5-2
Steering Wheel Controls . . . . . . 5-2
Horn . . . . . . . . . . . . . . . . . . . . . . . . . . 5-3
Windshield Wiper/Washer . . . . . 5-3
Compass . . . . . . . . . . . . . . . . . . . . . 5-4
Clock . . . . . . . . . . . . . . . . . . . . . . . . . 5-5
Power Outlets . . . . . . . . . . . . . . . . . 5-5
Cigarette Lighter . . . . . . . . . . . . . . 5-6
Ashtrays . . . . . . . . . . . . . . . . . . . . . . 5-6
Warning Lights, Gauges, and
Indicators
Warning Lights, Gauges, andIndicators . . . . . . . . . . . . . . . . . . . . 5-7
Instrument Cluster . . . . . . . . . . . . 5-8
Speedometer . . . . . . . . . . . . . . . . . 5-9
Odometer . . . . . . . . . . . . . . . . . . . . . 5-9
Trip Odometer . . . . . . . . . . . . . . . . . 5-9
Tachometer . . . . . . . . . . . . . . . . . . . 5-9
Fuel Gauge . . . . . . . . . . . . . . . . . . . 5-9
Engine Coolant Temperature Gauge . . . . . . . . . . . . . . . . . . . . . . 5-10
Safety Belt Reminders . . . . . . . 5-10 Airbag Readiness Light . . . . . . 5-11
Passenger Airbag Status
Indicator . . . . . . . . . . . . . . . . . . . . 5-12
Charging System Light . . . . . . 5-13
Malfunction Indicator Lamp . . . . . . . . . . . . . 5-13
Service Vehicle Soon Light . . . . . . . . . . . . . . . . . . . . . . . 5-16
Brake System Warning Light . . . . . . . . . . . . . . . . . . . . . . . 5-16
Antilock Brake System (ABS) Warning Light . . . . . . . . . . . . . . 5-17
Up-Shift Light . . . . . . . . . . . . . . . . 5-18
Power Steering Warning Light . . . . . . . . . . . . . . . . . . . . . . . 5-18
Ultrasonic Parking Sensor Light . . . . . . . . . . . . . . . . . . . . . . . 5-18
Traction Off Light . . . . . . . . . . . . 5-19
StabiliTrak®OFF Light . . . . . . . 5-19
Traction Control System (TCS)/StabiliTrak
®Light . . . . 5-19
Tire Pressure Light . . . . . . . . . . 5-20
Engine Oil Pressure Light . . . . 5-21
Low Fuel Warning Light . . . . . . 5-21
Security Light . . . . . . . . . . . . . . . . 5-22
Reduced Engine Power Light . . . . . . . . . . . . . . . . . . . . . . . 5-22
High-Beam On Light . . . . . . . . . 5-22 Daytime Running Lamps
(DRL) Indicator Light . . . . . . . 5-23
Front Fog Lamp Light . . . . . . . . 5-23
Lamps On Reminder . . . . . . . . . 5-23
Cruise Control Light . . . . . . . . . 5-23
Door Ajar Light . . . . . . . . . . . . . . 5-24
Information Displays
Driver Information Center (DIC) . . . . . . . . . . . . . . . 5-24
Vehicle Messages
Vehicle Messages (CanadaBase Level) . . . . . . . . . . . . . . . . 5-27
Vehicle Messages (Canada Uplevel and United
States) . . . . . . . . . . . . . . . . . . . . . 5-28
Battery Voltage and Charging Messages . . . . . . . . . . . . . . . . . . 5-28
Brake System Messages . . . . 5-29
Compass Messages . . . . . . . . . 5-29
Cruise Control Messages . . . . 5-29
Door Ajar Messages . . . . . . . . . 5-29
Engine Cooling System Messages . . . . . . . . . . . . . . . . . . 5-30
Engine Oil Messages . . . . . . . . 5-30
Engine Power Messages . . . . 5-31
Fuel System Messages . . . . . . 5-31
Key and Lock Messages . . . . . 5-31
Page 114 of 394

Black plate (2,1)Chevrolet Cruze Owner Manual - 2011
5-2 Instruments and Controls
Lamp Messages . . . . . . . . . . . . . 5-31
Object Detection SystemMessages . . . . . . . . . . . . . . . . . . 5-32
Ride Control System Messages . . . . . . . . . . . . . . . . . . 5-32
Airbag System Messages . . . . 5-32
Security Messages . . . . . . . . . . 5-32
Service Vehicle Messages . . . 5-32
Starting the Vehicle Messages . . . . . . . . . . . . . . . . . . 5-33
Tire Messages . . . . . . . . . . . . . . . 5-33
Transmission Messages . . . . . 5-34
Vehicle Reminder Messages . . . . . . . . . . . . . . . . . . 5-34
Vehicle Personalization
Vehicle Personalization . . . . . . 5-34
Controls
Steering Wheel
Adjustment
To adjust the steering wheel:
1. Pull the lever (A) down.
2. Move the steering wheel up
or down.
3. Pull or push the steering wheel closer or away from you.
4. Push the lever (A) up to lock the steering wheel in place. Do not adjust the steering wheel
while driving.
Steering Wheel Controls
For vehicles with audio steering
wheel controls, some audio controls
can be adjusted at the steering
wheel.
b
g(Push to Talk): For vehicles
with a Bluetooth®, OnStar®,
or navigation system, press to
interact with those systems. See
Bluetooth (Overview) on page 7‑23
or Bluetooth (Infotainment Controls)
Page 134 of 394
Black plate (22,1)Chevrolet Cruze Owner Manual - 2011
5-22 Instruments and Controls
For vehicles with a Driver
Information Center (DIC), seeDriver
Information Center (DIC) on
page 5‑24 for more information.
Security Light
The immobilizer light should come
on briefly as the engine is started.
If it does not come on have the
vehicle serviced by your dealer.
If the system is working normally the
indicator light turns off.
This light comes on when the
ignition is turned from LOCK/OFF to
ON/RUN and stays on if the vehicle
is immobilized. This happens
when an incorrect key or an
unprogrammed key is used to start
the vehicle. If the light stays on and the engine
does not start, there could be a
problem with the theft-deterrent
system. See
Immobilizer Operation
on page 2‑10 for more information.
Reduced Engine Power
Light
The reduced engine power light
should come on briefly as the
engine is started. If it does not come
on have the vehicle serviced by
your dealer.
This light, along with the service
engine soon light, displays when a
noticeable reduction in the vehicle's
performance occurs. Stop the
vehicle and turn off the ignition. Wait for 10 seconds and restart the
vehicle. This might correct the
condition.
The vehicle can be driven at a
reduced speed when the reduced
engine power light is on but
acceleration and speed might be
reduced. The performance could be
reduced until the next time the
vehicle is driven. If this light stays
on, see your dealer as soon as
possible for diagnosis and repair.
High-Beam On Light
The high-beam on light comes on
when the high-beam headlamps are
in use.
See
Headlamp High/Low-Beam
Changer on page 6‑2 for more
information.
Page 136 of 394
Black plate (24,1)Chevrolet Cruze Owner Manual - 2011
5-24 Instruments and Controls
Door Ajar Light
For vehicles equipped with this light,
it comes on when a door is open or
not secured. Vehicles not equipped
with a light display a DIC message.
SeeDoor Ajar Messages on
page 5‑29 for more information.
Information Displays
Driver Information
Center (DIC)
The vehicle may have a Driver
Information Center (DIC). The DIC
displays information about your
vehicle. It also displays warning
messages if a system problem is
detected. See Vehicle Messages
(Canada Base Level) on page 5‑27
or Vehicle Messages (Canada
Uplevel and United States) on
page 5‑28 for more information. All
messages appear in the DIC display
located in the center of the
instrument panel cluster.
DIC Operation and Displays
The DIC has different displays
which can be accessed by using the
DIC buttons located on the turn
signal lever located on the left side
of the steering wheel. The DIC
displays trip, fuel, and warning
messages if a system problem is
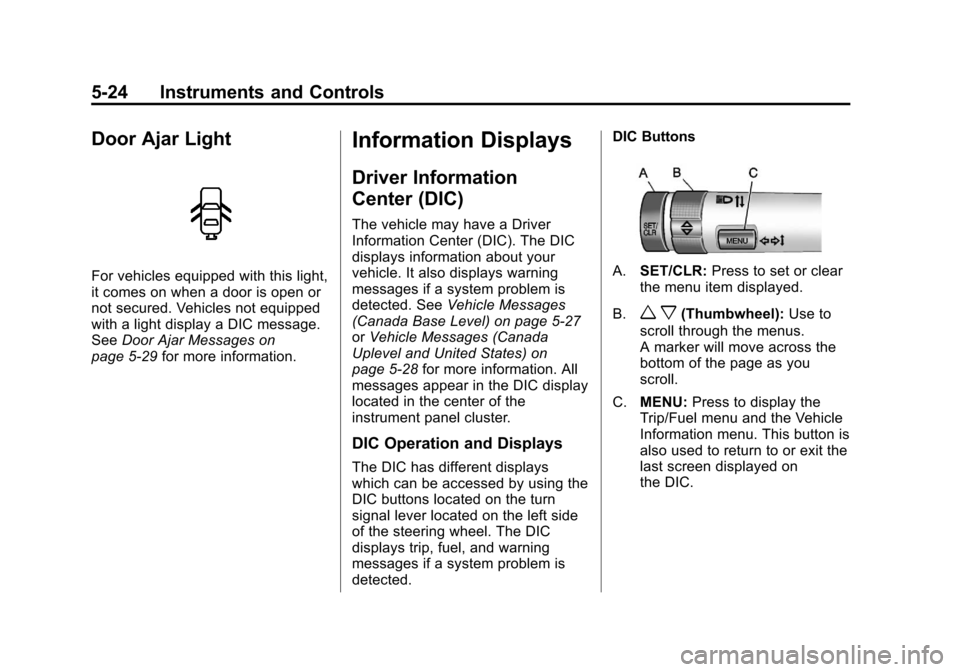
detected. DIC Buttons
A.
SET/CLR: Press to set or clear
the menu item displayed.
B.
w x(Thumbwheel): Use to
scroll through the menus.
A marker will move across the
bottom of the page as you
scroll.
C. MENU: Press to display the
Trip/Fuel menu and the Vehicle
Information menu. This button is
also used to return to or exit the
last screen displayed on
the DIC.
Page 144 of 394
Black plate (32,1)Chevrolet Cruze Owner Manual - 2011
5-32 Instruments and Controls
Object Detection System
Messages
PARK ASSIST OFF
This message is displayed when the
park assist system has been turned
off. SeeUltrasonic Parking Assist
on page 9‑38.
SERVICE PARK ASSIST
This message is displayed if there is
a problem with the park assist
system. Take the vehicle to your
dealer for service.
Ride Control System
Messages
SERVICE TRACTION
CONTROL
This message displays when there
is a problem with the Traction
Control System (TCS). See Traction
Control System (TCS) on
page 9‑33.
SERVICE STABILITRAK
This message displays if there is a
problem with the StabiliTrak®
system. See StabiliTrak®System on
page 9‑34.
Airbag System Messages
SERVICE AIRBAG
This message displays if there is a
problem with the airbag system.
Take the vehicle to your dealer for
service.
Security Messages
THEFT ATTEMPTED
This message displays if the vehicle
detects a tamper condition.
Service Vehicle Messages
SERVICE AC SYSTEM
This message is displays if there is
a problem with the air conditioning
system. Take the vehicle to your
dealer for service.
SERVICE POWER STEERING
This message is displays if there is
a problem with the power steering
system. Take the vehicle to your
dealer for service.
SERVICE STEERING
COLUMN LOCK
This message is displays if there is
a problem with the steering column
lock. Take the vehicle to your dealer
for service.
SERVICE VEHICLE SOON
This message is displays if there is
a problem with the vehicle. Take the
vehicle to your dealer for service.
Page 217 of 394
Black plate (17,1)Chevrolet Cruze Owner Manual - 2011
Driving and Operating 9-17
WARNING (Continued)
.Never stack heavier
things, like suitcases,
inside the vehicle so that
some of them are above
the tops of the seats.
.Do not leave an
unsecured child restraint
in the vehicle.
.When you carry something
inside the vehicle, secure
it whenever you can.
.Do not leave a seat folded
down unless you need to.
Starting and
Operating
New Vehicle Break-In
Notice:The vehicle does not
need an elaborate break-in. But it
will perform better in the long run
if you follow these guidelines:
.Do not drive at any one
constant speed, fast or slow,
for the first 805 km
(500 miles). Do not make
full-throttle starts. Avoid
downshifting to brake or
slow the vehicle.
.Avoid making hard stops for
the first 322 km (200 miles) or
so. During this time the new
brake linings are not yet
broken in. Hard stops with
new linings can mean
premature wear and earlier
replacement. Follow this
breaking-in guideline every
time you get new brake
linings.
Following break‐in, engine speed
and load can be gradually
increased.
Page 247 of 394
Black plate (47,1)Chevrolet Cruze Owner Manual - 2011
Driving and Operating 9-47
.Vehicles with automatic
transmissions can tow in
D (Drive) but M (Manual Mode)
is recommended. SeeManual
Mode on page 9‑28 for more
information. Use a lower gear if
the transmission shifts too often.
For vehicles with a manual
transmission, it is better not to
use the highest gear.
.Use the cruise control when
towing.
.Obey speed limit restrictions. Do
not drive faster than the
maximum posted speed for
trailers, or no more than 90 km/h
(55 mph), to reduce wear on the
vehicle.
Driving with a Trailer
Towing a trailer requires experience.
Get familiar with handling and
braking with the added trailer
weight. The vehicle is now longer
and not as responsive as the
vehicle is by itself. Check all trailer hitch parts and
attachments, safety chains,
electrical connectors, lamps, tires,
and mirror adjustments. If the trailer
has electric brakes, start the vehicle
and trailer moving and then apply
the trailer brake controller by hand
to be sure the brakes are working.
During the trip, check regularly to be
sure that the load is secure, and the
lamps and trailer brakes are working
properly.
Towing with a Stability Control
System
When towing, the sound of the
stability control system might be
heard. The system is reacting to the
vehicle movement caused by the
trailer, which mainly occurs during
cornering. This is normal when
towing heavier trailers.
Following Distance
Stay at least twice as far behind the
vehicle ahead as you would when
driving the vehicle without a trailer.
This can help to avoid situations
that require heavy braking and
sudden turns.
Passing
More passing distance is needed
when towing a trailer. Because the
rig is longer, it is necessary to go
much farther beyond the passed
vehicle before returning to the lane.
Backing Up
Hold the bottom of the steering
wheel with one hand. Then, to move
the trailer to the left, move that hand
to the left. To move the trailer to the
right, move your hand to the right.
Always back up slowly and,
if possible, have someone
guide you.