Page 257 of 394
Black plate (5,1)Chevrolet Cruze Owner Manual - 2011
Vehicle Care 10-5
2. Go to the front of the vehicle andpush the secondary hood
release handle toward the driver
side of the vehicle.3. Lift the hood and release thehood prop from its retainer,
located above the radiator.
Securely place the hood prop
into the slot on the underside of
the hood. To close the hood:
1. Before closing the hood, be sure
all the filler caps are on properly.
Then, lift the hood to relieve
pressure on the hood prop.
Remove the hood prop from the
slot on the underside of the hood
and return the prop to its
retainer. The prop rod must click
into place when returning it to
the retainer to prevent hood
damage.
2. Lower the hood 30 cm (12 in) above the vehicle and release it
so it fully latches. Check to
make sure the hood is closed
and repeat the process if
necessary.
Page 267 of 394

Black plate (15,1)Chevrolet Cruze Owner Manual - 2011
Vehicle Care 10-15
Engine Air Cleaner/Filter
SeeEngine Compartment Overview
on page 10‑6 for the location of the
engine air cleaner/filter.
When to Inspect the Engine Air
Cleaner/Filter
Inspect the air cleaner/filter at the
scheduled maintenance intervals
and replace it at the first oil change
after each 80 000 km (50,000 mi)
interval. See Scheduled
Maintenance on page 11‑2 for more
information. If you are driving in
dusty/dirty conditions, inspect the
filter at each engine oil change.
How to Inspect the Engine Air
Cleaner/Filter
To inspect the air cleaner/filter,
remove the filter from the vehicle
and lightly shake the filter to release
loose dust and dirt. If the filter
remains caked with dirt, a new filter
is required.
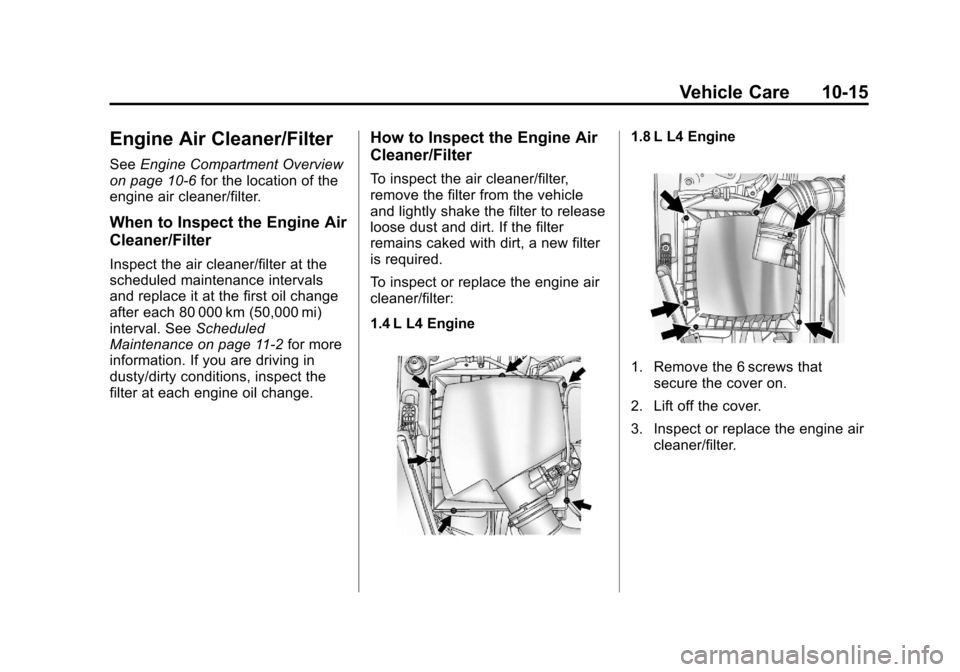
To inspect or replace the engine air
cleaner/filter:
1.4 L L4 Engine
1.8 L L4 Engine
1. Remove the 6 screws that secure the cover on.
2. Lift off the cover.
3. Inspect or replace the engine air cleaner/filter.
Page 268 of 394

Black plate (16,1)Chevrolet Cruze Owner Manual - 2011
10-16 Vehicle Care
4. Align the filter correctly.
5. Install the cover by lowering itover the filter and secure with
the 6 screws.
{WARNING
Operating the engine with the air
cleaner/filter off can cause you or
others to be burned. The air
cleaner not only cleans the air; it
helps to stop flames if the engine
backfires. Use caution when
working on the engine and do not
drive with the air cleaner/filter off.
Notice: If the air cleaner/filter is
off, dirt can easily get into the
engine, which could damage it.
Always have the air cleaner/filter
in place when you are driving.
Cooling System
The cooling system allows the
engine to maintain the correct
working temperature.
1.4 L L4 Engine Shown, 1.8 L L4
Engine Similar
A. Engine Cooling Fans (Out of View)
B. Engine Coolant Surge Tank and Pressure Cap
{WARNING
An electric engine cooling fan
under the hood can start up even
when the engine is not running
and can cause injury. Keep
hands, clothing, and tools away
from any underhood electric fan.
{WARNING
Heater and radiator hoses, and
other engine parts, can be very
hot. Do not touch them. If you do,
you can be burned.
Do not run the engine if there is a
leak. If you run the engine, it
could lose all coolant. That could
cause an engine fire, and you
could be burned. Get any leak
fixed before you drive the vehicle.
Page 286 of 394
Black plate (34,1)Chevrolet Cruze Owner Manual - 2011
10-34 Vehicle Care
To replace any one of these bulbs:
Stoplamp/Taillamp, Turn Signal,
Back‐up, and Sidemarker Lamp
1. Open the trunk.
2. Open the two screw covers.
3. Remove the two screws, whichsecure the taillamp assembly.4. Remove the taillamp assemblyby pulling it straight back until
the two posts disengage from
the grommets.
Page 287 of 394
Black plate (35,1)Chevrolet Cruze Owner Manual - 2011
Vehicle Care 10-35
A. Sidemarker Lamp
B. Turn Signal Lamp
C. Stop Lamp/Taillamp
D. Back-up Lamp
5. Remove the bulb socket from the taillamp assembly by turning
it counterclockwise.
6. Install a new bulb into the bulb socket.
7. Install the bulb socket into the taillamp assembly by turning it
clockwise. 8. Install the taillamp assembly and
tighten the two screws.
9. Close the two screw covers.
License Plate Lamp
To replace the license plate
lamp bulb:
1. Remove the two screws from the license plate lamp assembly.
2. Turn and pull the license platelamp assembly down.
3. Turn the bulb socket counterclockwise and pull the
bulb straight out of the socket.
4. Push the new bulb in and turn it clockwise to install.
5. Install the bulb socket by turning clockwise into the license plate
lamp assembly.
6. Replace the license plate lamp assembly by using the two
screws to secure.
Page 324 of 394

Black plate (72,1)Chevrolet Cruze Owner Manual - 2011
10-72 Vehicle Care
If the tire pressure has not
dropped more than 68 kPa
(10 psi) from the recommended
inflation pressure, inflate the
tire to the recommended
inflation pressure.
19. Wipe off any sealant from the wheel, tire or vehicle.
20. Dispose of the used sealant canister (B) and sealant/air
hose (G) assembly at a local
dealer or in accordance with
local state codes and practices.
21. Replace it with a new canister available from your dealer.
22. After temporarily sealing a tire using the tire sealant and
compressor kit, take the
vehicle to an authorized dealer
within 161 km (100 miles) of
driving to have the tire repaired
or replaced.Using the Tire Sealant and
Compressor Kit without
Sealant to Inflate a Tire
(Not Punctured)
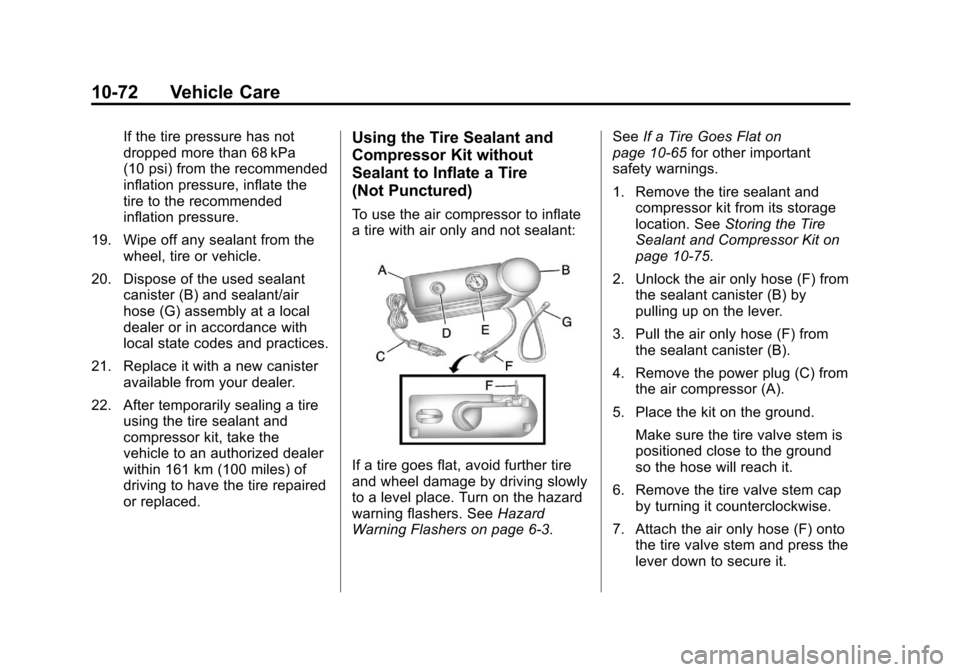
To use the air compressor to inflate
a tire with air only and not sealant:
If a tire goes flat, avoid further tire
and wheel damage by driving slowly
to a level place. Turn on the hazard
warning flashers. See Hazard
Warning Flashers on page 6‑3. See
If a Tire Goes Flat on
page 10‑65 for other important
safety warnings.
1. Remove the tire sealant and compressor kit from its storage
location. See Storing the Tire
Sealant and Compressor Kit on
page 10‑75.
2. Unlock the air only hose (F) from the sealant canister (B) by
pulling up on the lever.
3. Pull the air only hose (F) from the sealant canister (B).
4. Remove the power plug (C) from the air compressor (A).
5. Place the kit on the ground. Make sure the tire valve stem is
positioned close to the ground
so the hose will reach it.
6. Remove the tire valve stem cap by turning it counterclockwise.
7. Attach the air only hose (F) onto the tire valve stem and press the
lever down to secure it.
Page 340 of 394

Black plate (88,1)Chevrolet Cruze Owner Manual - 2011
10-88 Vehicle Care
.Does the vehicle have the
proper towing equipment. See
your dealer or trailering
professional for additional advice
and equipment
recommendations.
.Is the vehicle ready to be towed.
Just as preparing the vehicle for
a long trip, make sure the
vehicle is prepared to be towed.
Dinghy Towing
When dinghy towing a vehicle with
an automatic transmission, the
vehicle should be run at the
beginning of each day and at each
RV fuel stop for about five minutes.
This will ensure proper lubrication of
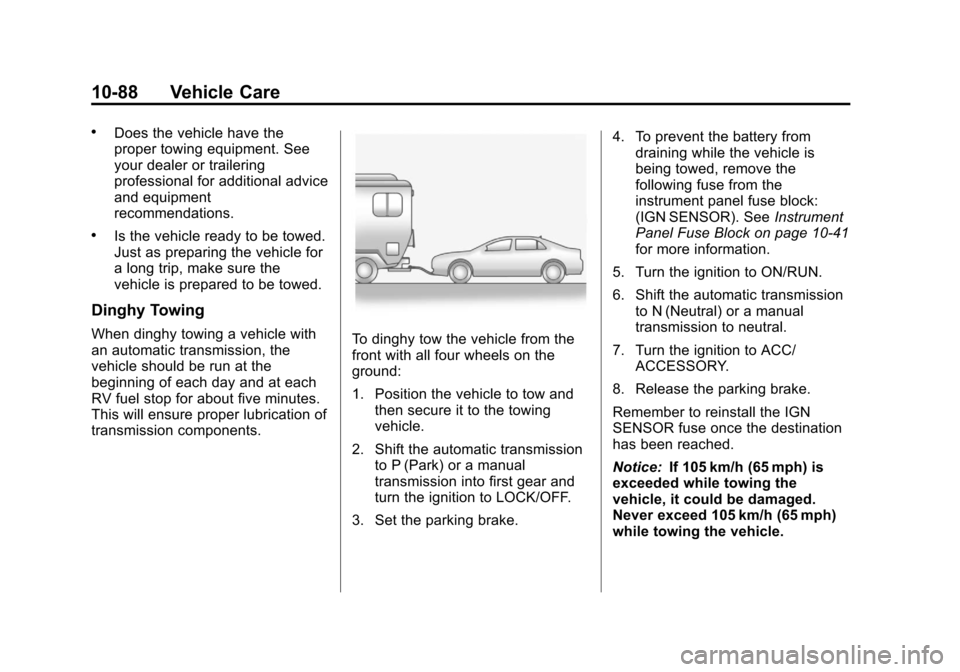
transmission components.To dinghy tow the vehicle from the
front with all four wheels on the
ground:
1. Position the vehicle to tow andthen secure it to the towing
vehicle.
2. Shift the automatic transmission to P (Park) or a manual
transmission into first gear and
turn the ignition to LOCK/OFF.
3. Set the parking brake. 4. To prevent the battery from
draining while the vehicle is
being towed, remove the
following fuse from the
instrument panel fuse block:
(IGN SENSOR). See Instrument
Panel Fuse Block on page 10‑41
for more information.
5. Turn the ignition to ON/RUN.
6. Shift the automatic transmission to N (Neutral) or a manual
transmission to neutral.
7. Turn the ignition to ACC/ ACCESSORY.
8. Release the parking brake.
Remember to reinstall the IGN
SENSOR fuse once the destination
has been reached.
Notice: If 105 km/h (65 mph) is
exceeded while towing the
vehicle, it could be damaged.
Never exceed 105 km/h (65 mph)
while towing the vehicle.
Page 341 of 394
Black plate (89,1)Chevrolet Cruze Owner Manual - 2011
Vehicle Care 10-89
Notice:Towing the vehicle from
the rear could damage it. Also,
repairs would not be covered by
the vehicle warranty. Never have
the vehicle towed from the rear.
Dolly Towing
Tow the vehicle with the two rear
wheels on the ground and the front
wheels on a dolly:
To tow the vehicle with two wheels
on the ground and a dolly:
1. Put the front wheels on a dolly.
2. Shift the automatic transmission into P (Park) or a manual
transmission into first gear.
3. Set the parking brake. 4. Clamp the steering wheel in a
straight-ahead position with a
clamping device designed for
towing.
5. Remove the key from the ignition.
6. Secure the vehicle to the dolly.
7. Release the parking brake.
Notice: Towing the vehicle from
the rear could damage it. Also,
repairs would not be covered by
the vehicle warranty. Never have
the vehicle towed from the rear.