Page 43 of 428

Black plate (11,1)Chevrolet Corvette Owner Manual - 2011
Keys, Doors and Windows 2-11
WARNING (Continued)
.Adjust the Climate Control
system to a setting that
brings in only outside air
and set the fan speed to the
highest setting. See Climate
Control System in the Index.
.If the vehicle is equipped with
a power liftgate, disable the
power liftgate function.
For more information about
carbon monoxide, see Engine
Exhaust on page 9‑26.
Notice: Closing the hatch/trunk
lid forcefully or from the sides
can cause damage to the glass,
the defogger or the weather
stripping. Be sure objects will fit
in the hatch/trunk area before
closing the hatch/trunk lid. When
closing the hatch/trunk lid, gently
pull down from the center. Notice:
Do not store heavy or
sharp objects in the rear storage
compartments located in the
hatch/trunk area. The objects
could damage the underbody.
Hatch/Trunk Lid Release
There are several ways to release
the hatch/trunk lid. If your vehicle
has an automatic transmission,
the shift lever must be in P (Park).
For manual transmission vehicles,
the parking brake must be set
when the ignition is started for
the hatch/trunk release to operate.
The parking brake does not need
to be set when the ignition is off for
the hatch/trunk release to operate.
See Parking Brake on page 9‑35.
V(Hatch/Trunk) : Press this
button, located on the instrument
panel to the left of the steering
wheel. The theft-deterrent alarm
system must not be armed.
}(Hatch/Trunk) : Press this
button on the keyless access
transmitter. See Remote Keyless
Entry (RKE) System on page 2‑3.
Press the hatch/trunk release button
located on the rear of the hatch/
trunk lid above the license plate, as
long as you have your transmitter
with you.
If your vehicle has lost battery
power, open the hatch/trunk using
the vehicle key. See Keys on
page 2‑2 for more information.
The key lock cylinder is located on
the rear of the hatch/trunk lid above
the license plate. Turn the vehicle
key clockwise in the lock.
Page 47 of 428

Black plate (15,1)Chevrolet Corvette Owner Manual - 2011
Keys, Doors and Windows 2-15
Exterior Mirrors
Convex Mirrors
{WARNING
A convex mirror can make things,
like other vehicles, look farther
away than they really are. If you
cut too sharply into the right lane,
you could hit a vehicle on the
right. Check the inside mirror or
glance over your shoulder before
changing lanes.
The passenger side mirror is convex
shaped. A convex mirror's surface is
curved so more can be seen from
the driver seat.
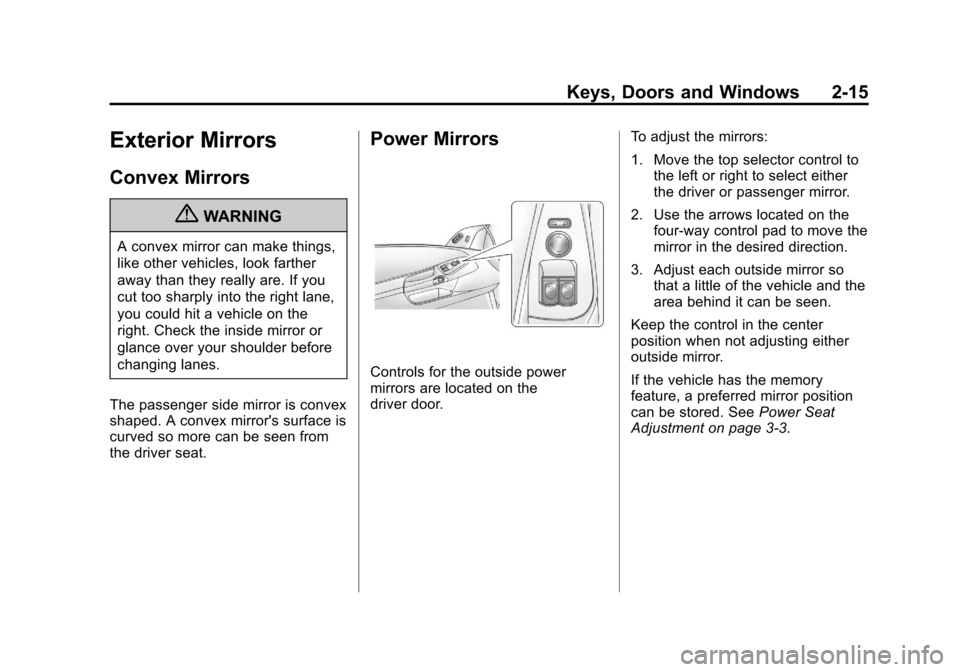
Power Mirrors
Controls for the outside power
mirrors are located on the
driver door. To adjust the mirrors:
1. Move the top selector control to
the left or right to select either
the driver or passenger mirror.
2. Use the arrows located on the four-way control pad to move the
mirror in the desired direction.
3. Adjust each outside mirror so that a little of the vehicle and the
area behind it can be seen.
Keep the control in the center
position when not adjusting either
outside mirror.
If the vehicle has the memory
feature, a preferred mirror position
can be stored. See Power Seat
Adjustment on page 3‑3.
Page 49 of 428
Black plate (17,1)Chevrolet Corvette Owner Manual - 2011
Keys, Doors and Windows 2-17
Windows
{WARNING
Leaving children, helpless adults,
or pets in a vehicle with the
windows closed is dangerous.
They can be overcome by
the extreme heat and suffer
permanent injuries or even death
from heat stroke. Never leave a
child, a helpless adult, or a pet
alone in a vehicle, especially with
the windows closed in warm or
hot weather.
Power Windows
The power window switches are
located on each door.
Pull up or press down on the front
of the switch to raise or lower the
window.
Retained Accessory Power (RAP)
allows you to use the power
windows when the ignition is off.
For more information, seeRetained
Accessory Power (RAP) on
page 9‑21.
Page 50 of 428

Black plate (18,1)Chevrolet Corvette Owner Manual - 2011
2-18 Keys, Doors and Windows
Express-Down Window
Press the front of the switch to
the second position to activate the
express-down feature. If you want
to stop the window as it is lowering,
press the switch again.
Window Indexing
This feature automatically lowers
the window a small amount when
the door is opened. When the door
is closed, the window will raise to
its full up position. If either window
does not index properly, it could
be due to loss of power. Before
returning to your dealer for service,
perform the power window initialize
procedure.
Power Window Initialize
After a power reconnect such as
battery replacement, the window
index‐up feature will not function
until the system is initialized.
Once power is restored:
1. Close the door.
2. Raise the window and hold theswitch up for three seconds after
the window is closed.
3. Release the switch, then hold the switch up again for
three seconds and release.
Sun Visors
Pull the visor toward you, or move it
to the side to help reduce glare.
To use the lighted mirror, lift the
cover.
Roof
Roof Panel
On vehicles with a removable roof
panel, follow the procedures when
removing or installing it.
Removing the Roof Panel
{WARNING
Do not try to remove a roof panel
while the vehicle is moving.
Trying to remove the roof panel
while the vehicle is moving could
cause an accident. The panel
could fall into the vehicle and
cause you to lose control, or it
could fly off and strike another
vehicle. You or others could be
injured. Remove the roof panel
only when the vehicle is parked.
Page 52 of 428

Black plate (20,1)Chevrolet Corvette Owner Manual - 2011
2-20 Keys, Doors and Windows
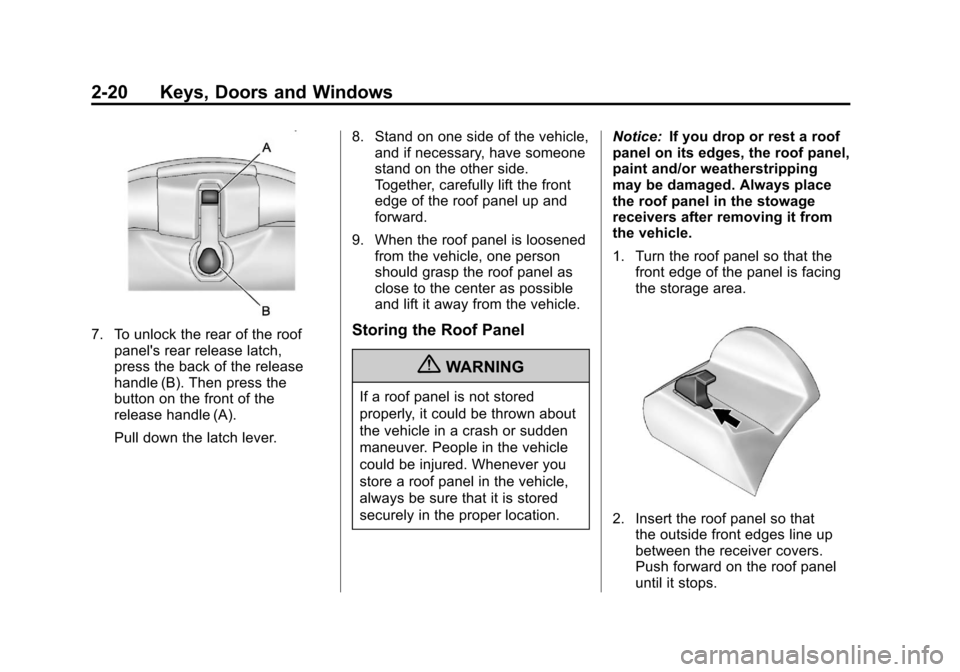
7. To unlock the rear of the roofpanel's rear release latch,
press the back of the release
handle (B). Then press the
button on the front of the
release handle (A).
Pull down the latch lever. 8. Stand on one side of the vehicle,
and if necessary, have someone
stand on the other side.
Together, carefully lift the front
edge of the roof panel up and
forward.
9. When the roof panel is loosened from the vehicle, one person
should grasp the roof panel as
close to the center as possible
and lift it away from the vehicle.Storing the Roof Panel
{WARNING
If a roof panel is not stored
properly, it could be thrown about
the vehicle in a crash or sudden
maneuver. People in the vehicle
could be injured. Whenever you
store a roof panel in the vehicle,
always be sure that it is stored
securely in the proper location. Notice:
If you drop or rest a roof
panel on its edges, the roof panel,
paint and/or weatherstripping
may be damaged. Always place
the roof panel in the stowage
receivers after removing it from
the vehicle.
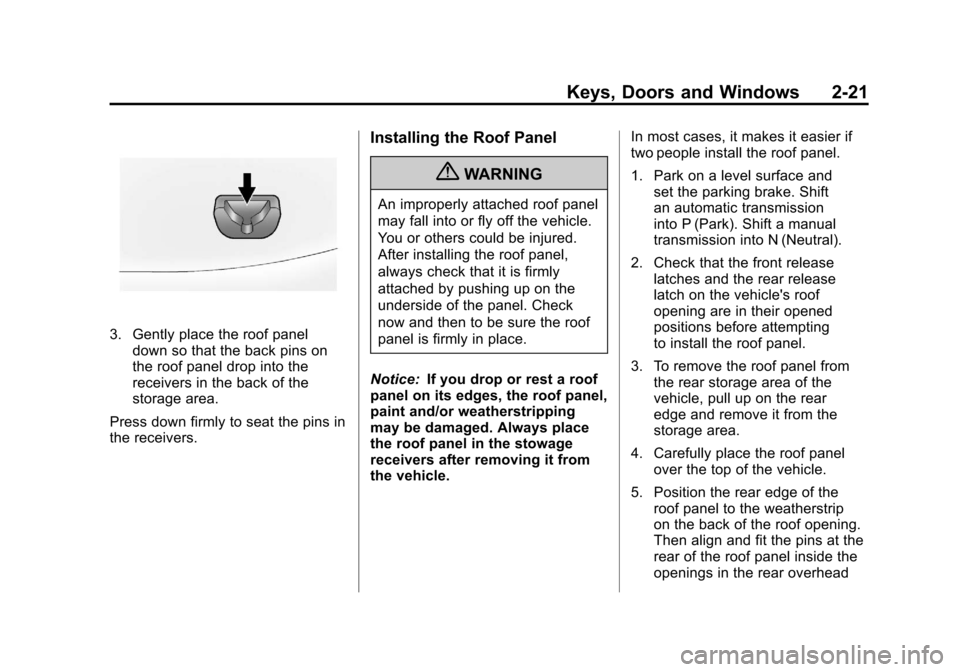
1. Turn the roof panel so that the front edge of the panel is facing
the storage area.
2. Insert the roof panel so thatthe outside front edges line up
between the receiver covers.
Push forward on the roof panel
until it stops.
Page 53 of 428

Black plate (21,1)Chevrolet Corvette Owner Manual - 2011
Keys, Doors and Windows 2-21
3. Gently place the roof paneldown so that the back pins on
the roof panel drop into the
receivers in the back of the
storage area.
Press down firmly to seat the pins in
the receivers.
Installing the Roof Panel
{WARNING
An improperly attached roof panel
may fall into or fly off the vehicle.
You or others could be injured.
After installing the roof panel,
always check that it is firmly
attached by pushing up on the
underside of the panel. Check
now and then to be sure the roof
panel is firmly in place.
Notice: If you drop or rest a roof
panel on its edges, the roof panel,
paint and/or weatherstripping
may be damaged. Always place
the roof panel in the stowage
receivers after removing it from
the vehicle. In most cases, it makes it easier if
two people install the roof panel.
1. Park on a level surface and
set the parking brake. Shift
an automatic transmission
into P (Park). Shift a manual
transmission into N (Neutral).
2. Check that the front release latches and the rear release
latch on the vehicle's roof
opening are in their opened
positions before attempting
to install the roof panel.
3. To remove the roof panel from the rear storage area of the
vehicle, pull up on the rear
edge and remove it from the
storage area.
4. Carefully place the roof panel over the top of the vehicle.
5. Position the rear edge of the roof panel to the weatherstrip
on the back of the roof opening.
Then align and fit the pins at the
rear of the roof panel inside the
openings in the rear overhead
Page 66 of 428
Black plate (2,1)Chevrolet Corvette Owner Manual - 2011
3-2 Seats and Restraints
Head Restraints
The vehicle's front seats have head
restraints in the outboard seating
positions that cannot be adjusted.
The front seat outboard head
restraints are not designed to be
removed.
Front Seats
Seat Adjustment
Manual Seats
{WARNING
You can lose control of the
vehicle if you try to adjust a
manual driver seat while the
vehicle is moving. The sudden
movement could startle and
confuse you, or make you push
a pedal when you do not want to.
Adjust the driver seat only when
the vehicle is not moving.To move a manual seat forward or
rearward:
1. Lift the bar under the front edge
of the seat cushion to unlock
the seat.
2. Slide the seat to the desired position and release the bar.
Try to move the seat back and forth
to be sure the seat is locked in
place.
Page 70 of 428

Black plate (6,1)Chevrolet Corvette Owner Manual - 2011
3-6 Seats and Restraints
Lumbar Adjustment
Power Lumbar and Side
Bolsters
On vehicles with power lumbar and
side bolsters, the controls are on the
outboard side of the seat.
To adjust the support:
.Move (A) forward or rearward to
adjust lumbar support.
.Move (B) up or down to adjust
the side bolsters.
Reclining Seatbacks
{WARNING
You can lose control of the
vehicle if you try to adjust a
manual driver seat while the
vehicle is moving. The sudden
movement could startle and
confuse you, or make you push a
pedal when you do not want to.
Adjust the driver seat only when
the vehicle is not moving.
{WARNING
If either seatback is not locked, it
could move forward in a sudden
stop or crash. That could cause
injury to the person sitting there.
Always push and pull on the
seatbacks to be sure they are
locked.The seats have manual reclining
seatbacks. The lever used to
operate them is on the outboard
side of the seats.
To recline the seatback:
1. Lift the lever.
2. Move the seatback to the
desired position, and then
release the lever to lock the
seatback in place.
3. Push and pull on the seatback to make sure it is locked.