2011 CHEVROLET CORVETTE brake fluid
[x] Cancel search: brake fluidPage 274 of 428

Black plate (44,1)Chevrolet Corvette Owner Manual - 2011
9-44 Driving and Operating
SPORT:Use where road conditions
or personal preference demand
more control. This setting provides
more “feel”, or response to the road
conditions.
The setting can be changed
at any time. Based on road
conditions, steering wheel angle
and the vehicle speed, the system
automatically adjusts to provide
the best handling while providing a
smooth ride. The Tour and Sport
modes will feel similar on a smooth
road. Select a new setting whenever
driving conditions change.
The Selective Ride knob will not
display the Tour or Sport setting
when the Performance Traction
Management mode is selected. When this mode is selected,
turning the Selective Ride knob
will change the Performance
Traction Management mode
and the suspension setting
will be determined automatically.
See
Competitive Driving Mode on
page 9‑38 for more information.
Three Driver Information Center
(DIC) messages (SERVICE
RIDE CONTROL, SHOCKS
INOPERATIVE and MAXIMUM
SPEED 80 MPH (129 KM/H) display
when a malfunction occurs with
the Selective Ride Control system.
Refer to Ride Control System
Messages on page 5‑44 for more
information.Cruise Control
With cruise control, a speed of
about 40 km/h (25 mph) or more can
be maintained without keeping your
foot on the accelerator. Cruise
control does not work at speeds
below about 40 km/h (25 mph).
Cruise control will not work if the
parking brake is set, or if the master
cylinder brake fluid level is low.
{WARNING
Cruise control can be dangerous
where you cannot drive safely at
a steady speed. So, do not use
the cruise control on winding
roads or in heavy traffic.
Cruise control can be dangerous
on slippery roads. On such roads,
fast changes in tire traction can
cause excessive wheel slip, and
you could lose control. Do not use
cruise control on slippery roads.
Page 285 of 428

Black plate (1,1)Chevrolet Corvette Owner Manual - 2011
Vehicle Care 10-1
Vehicle Care
General Information
General Information . . . . . . . . . . 10-3
California Proposition65 Warning . . . . . . . . . . . . . . . . . 10-3
California Perchlorate Materials Requirements . . . . 10-3
Accessories and Modifications . . . . . . . . . . . . . . . 10-4
Lifting the Vehicle . . . . . . . . . . . . 10-5
Vehicle Checks
Doing Your Own Service Work . . . . . . . . . . . . . . . 10-8
Hood . . . . . . . . . . . . . . . . . . . . . . . . 10-9
Engine Compartment Overview . . . . . . . . . . . . . . . . . . 10-10
Engine Oil . . . . . . . . . . . . . . . . . . 10-15
Engine Oil Life System . . . . . 10-22
Automatic Transmission Fluid . . . . . . . . . . . . . . . . . . . . . . 10-23 Manual Transmission
Fluid . . . . . . . . . . . . . . . . . . . . . . 10-23
Hydraulic Clutch . . . . . . . . . . . . 10-24
Engine Air Cleaner/Filter . . . . 10-24
Cooling System (Engine) . . . 10-28
Cooling System (Intercooler) . . . . . . . . . . . . . . . 10-29
Engine Coolant . . . . . . . . . . . . . 10-29
Engine Overheating . . . . . . . . 10-34
Overheated Engine Protection
Operating Mode . . . . . . . . . . . 10-35
Power Steering Fluid . . . . . . . 10-36
Washer Fluid . . . . . . . . . . . . . . . 10-37
Brakes . . . . . . . . . . . . . . . . . . . . . 10-38
Brake Fluid . . . . . . . . . . . . . . . . . 10-41
Battery . . . . . . . . . . . . . . . . . . . . . 10-43
Rear Axle . . . . . . . . . . . . . . . . . . 10-44
Starter Switch Check . . . . . . . 10-44
Automatic Transmission Shift Lock Control Function
Check . . . . . . . . . . . . . . . . . . . . . 10-45 Park Brake and P (Park)
Mechanism Check . . . . . . . . 10-45
Wiper Blade Replacement . . . . . . . . . . . . . . 10-46
Windshield Replacement . . . 10-47
Headlamp Aiming
Headlamp Aiming . . . . . . . . . . 10-48
Bulb Replacement
Bulb Replacement . . . . . . . . . . 10-48
Halogen Bulbs . . . . . . . . . . . . . . 10-48
High Intensity Discharge
(HID) Lighting . . . . . . . . . . . . . 10-48
Headlamps, Front Turn Signal and Parking
Lamps . . . . . . . . . . . . . . . . . . . . 10-49
Taillamps, Turn Signal, and Stoplamps . . . . . . . . . . . . . . . . 10-50
Replacement Bulbs . . . . . . . . . 10-50
Page 295 of 428
Black plate (11,1)Chevrolet Corvette Owner Manual - 2011
Vehicle Care 10-11
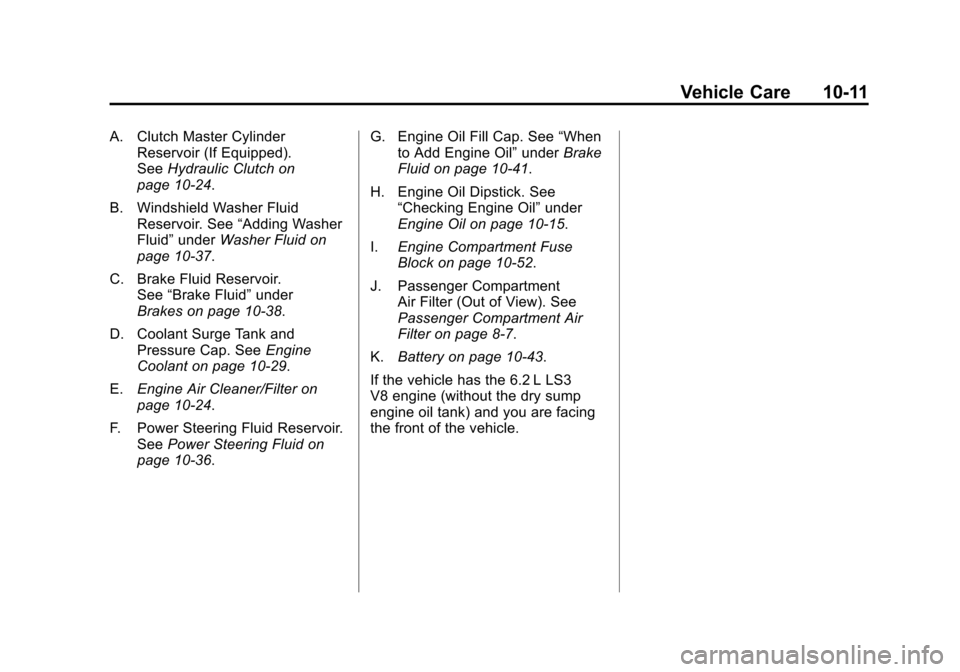
A. Clutch Master CylinderReservoir (If Equipped).
See Hydraulic Clutch on
page 10‑24.
B. Windshield Washer Fluid Reservoir. See “Adding Washer
Fluid” under Washer Fluid on
page 10‑37.
C. Brake Fluid Reservoir. See “Brake Fluid” under
Brakes on page 10‑38.
D. Coolant Surge Tank and Pressure Cap. See Engine
Coolant on page 10‑29.
E. Engine Air Cleaner/Filter on
page 10‑24.
F. Power Steering Fluid Reservoir. See Power Steering Fluid on
page 10‑36. G. Engine Oil Fill Cap. See
“When
to Add Engine Oil” underBrake
Fluid on page 10‑41.
H. Engine Oil Dipstick. See “Checking Engine Oil” under
Engine Oil on page 10‑15.
I. Engine Compartment Fuse
Block on page 10‑52.
J. Passenger Compartment Air Filter (Out of View). See
Passenger Compartment Air
Filter on page 8‑7.
K. Battery on page 10‑43.
If the vehicle has the 6.2 L LS3
V8 engine (without the dry sump
engine oil tank) and you are facing
the front of the vehicle.
Page 297 of 428
Black plate (13,1)Chevrolet Corvette Owner Manual - 2011
Vehicle Care 10-13
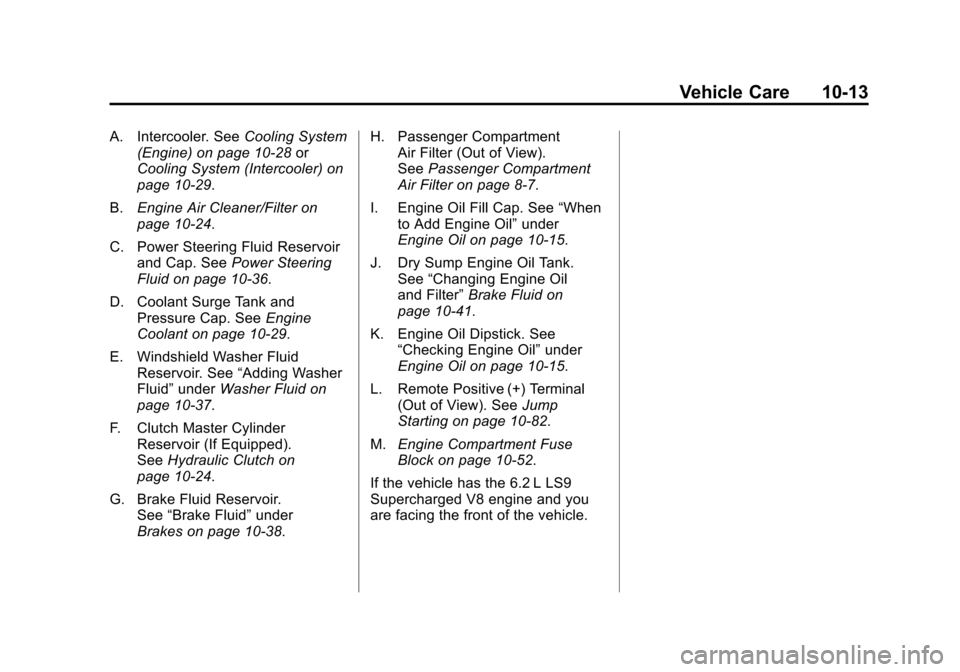
A. Intercooler. SeeCooling System
(Engine) on page 10‑28 or
Cooling System (Intercooler) on
page 10‑29.
B. Engine Air Cleaner/Filter on
page 10‑24.
C. Power Steering Fluid Reservoir and Cap. See Power Steering
Fluid on page 10‑36.
D. Coolant Surge Tank and Pressure Cap. See Engine
Coolant on page 10‑29.
E. Windshield Washer Fluid Reservoir. See “Adding Washer
Fluid” under Washer Fluid on
page 10‑37.
F. Clutch Master Cylinder Reservoir (If Equipped).
See Hydraulic Clutch on
page 10‑24.
G. Brake Fluid Reservoir. See “Brake Fluid” under
Brakes on page 10‑38. H. Passenger Compartment
Air Filter (Out of View).
See Passenger Compartment
Air Filter on page 8‑7.
I. Engine Oil Fill Cap. See “When
to Add Engine Oil” under
Engine Oil on page 10‑15.
J. Dry Sump Engine Oil Tank. See “Changing Engine Oil
and Filter” Brake Fluid on
page 10‑41.
K. Engine Oil Dipstick. See “Checking Engine Oil” under
Engine Oil on page 10‑15.
L. Remote Positive (+) Terminal (Out of View). See Jump
Starting on page 10‑82.
M. Engine Compartment Fuse
Block on page 10‑52.
If the vehicle has the 6.2 L LS9
Supercharged V8 engine and you
are facing the front of the vehicle.
Page 299 of 428
Black plate (15,1)Chevrolet Corvette Owner Manual - 2011
Vehicle Care 10-15
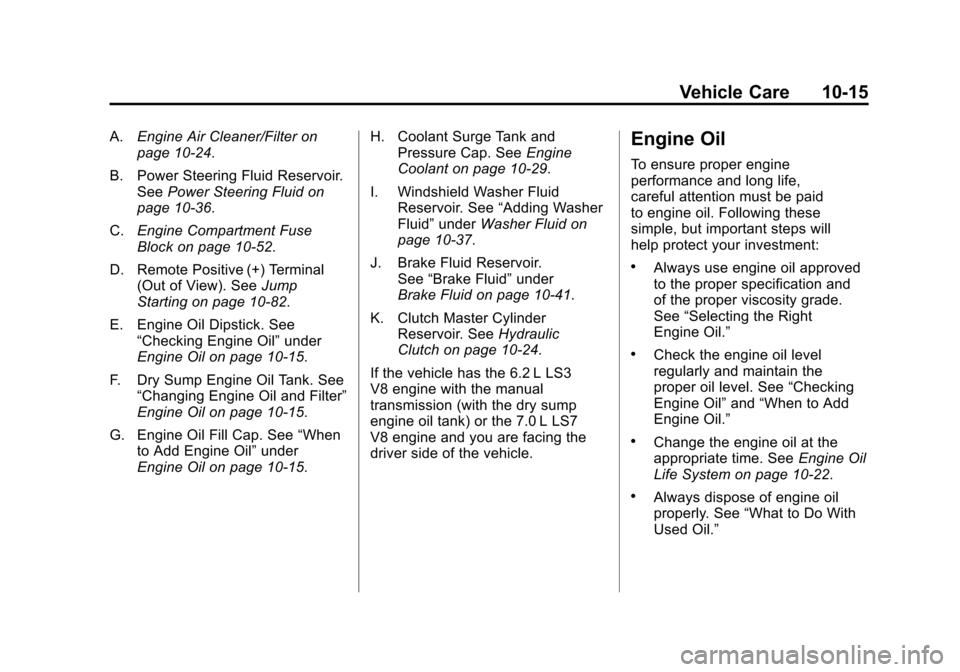
A.Engine Air Cleaner/Filter on
page 10‑24.
B. Power Steering Fluid Reservoir. See Power Steering Fluid on
page 10‑36.
C. Engine Compartment Fuse
Block on page 10‑52.
D. Remote Positive (+) Terminal (Out of View). See Jump
Starting on page 10‑82.
E. Engine Oil Dipstick. See “Checking Engine Oil” under
Engine Oil on page 10‑15.
F. Dry Sump Engine Oil Tank. See “Changing Engine Oil and Filter”
Engine Oil on page 10‑15.
G. Engine Oil Fill Cap. See “When
to Add Engine Oil” under
Engine Oil on page 10‑15. H. Coolant Surge Tank and
Pressure Cap. See Engine
Coolant on page 10‑29.
I. Windshield Washer Fluid Reservoir. See “Adding Washer
Fluid” under Washer Fluid on
page 10‑37.
J. Brake Fluid Reservoir. See “Brake Fluid” under
Brake Fluid on page 10‑41.
K. Clutch Master Cylinder Reservoir. See Hydraulic
Clutch on page 10‑24.
If the vehicle has the 6.2 L LS3
V8 engine with the manual
transmission (with the dry sump
engine oil tank) or the 7.0 L LS7
V8 engine and you are facing the
driver side of the vehicle.Engine Oil
To ensure proper engine
performance and long life,
careful attention must be paid
to engine oil. Following these
simple, but important steps will
help protect your investment:
.Always use engine oil approved
to the proper specification and
of the proper viscosity grade.
See “Selecting the Right
Engine Oil.”
.Check the engine oil level
regularly and maintain the
proper oil level. See “Checking
Engine Oil” and“When to Add
Engine Oil.”
.Change the engine oil at the
appropriate time. See Engine Oil
Life System on page 10‑22.
.Always dispose of engine oil
properly. See “What to Do With
Used Oil.”
Page 325 of 428
Black plate (41,1)Chevrolet Corvette Owner Manual - 2011
Vehicle Care 10-41
Replacing Brake System Parts
The braking system on a vehicle is
complex. Its many parts have to be
of top quality and work well together
if the vehicle is to have really good
braking. The vehicle was designed
and tested with top-quality brake
parts. When parts of the braking
system are replaced—for example,
when the brake linings wear down
and new ones are installed —be
sure to get new approved
replacement parts. If this is not
done, the brakes might not work
properly. For example, if someone
puts in brake linings that are
wrong for the vehicle, the balance
between the front and rear brakes
can change —for the worse.
The braking performance expected
can change in many other ways if
the wrong replacement brake parts
are installed.
Brake Fluid
Brake Fluid
The brake master cylinder reservoir
is filled with DOT 3 brake fluid.
See Engine Compartment Overview
on page 10‑10 for the location of the
reservoir. There are only two reasons why the
brake fluid level in the reservoir
might go down:
.The brake fluid level goes down
because of normal brake lining
wear. When new linings are
installed, the fluid level goes
back up.
.A fluid leak in the brake
hydraulic system can also
cause a low fluid level.
Have the brake hydraulic
system fixed, since a leak
means that sooner or later the
brakes will not work well.
Do not top off the brake fluid.
Adding fluid does not correct
a leak. If fluid is added when
the linings are worn, there
will be too much fluid when
new brake linings are installed.
Page 326 of 428
Black plate (42,1)Chevrolet Corvette Owner Manual - 2011
10-42 Vehicle Care
Add or remove brake fluid, as
necessary, only when work is done
on the brake hydraulic system.
{WARNING
If too much brake fluid is added, it
can spill on the engine and burn,
if the engine is hot enough. You
or others could be burned, and
the vehicle could be damaged.
Add brake fluid only when work
is done on the brake hydraulic
system. See“Checking Brake
Fluid” in this section.
Refer to the Maintenance Schedule
to determine when to check the
brake fluid. See Scheduled
Maintenance on page 11‑2.
Checking Brake Fluid
Check brake fluid by looking at the
brake fluid reservoir. See Engine
Compartment Overview on
page 10‑10.
The fluid level should be above
the MIN mark on the reservoir.
If it is not, have the brake hydraulic
system checked to see if there is
a leak.
After work is done on the brake
hydraulic system, make sure the
level is between the MIN and MAX
marks. What to Add
Use only new DOT 3 brake
fluid from a sealed container.
See
Recommended Fluids and
Lubricants on page 11‑6.
Always clean the brake fluid
reservoir cap and the area around
the cap before removing it. This
helps keep dirt from entering the
reservoir.
{WARNING
With the wrong kind of fluid in
the brake hydraulic system, the
brakes might not work well. This
could cause a crash. Always use
the proper brake fluid.
Page 327 of 428
Black plate (43,1)Chevrolet Corvette Owner Manual - 2011
Vehicle Care 10-43
Notice:
.Using the wrong fluid
can badly damage brake
hydraulic system parts.
For example, just a few
drops of mineral-based oil,
such as engine oil, in the
brake hydraulic system can
damage brake hydraulic
system parts so badly that
they will have to be replaced.
Do not let someone put in
the wrong kind of fluid.
.If brake fluid is spilled on the
vehicle's painted surfaces,
the paint finish can be
damaged. Be careful not
to spill brake fluid on the
vehicle. If you do, wash it
off immediately.
Battery
Refer to the replacement number
on the original battery label when a
new battery is needed.For battery replacement, see
your dealer or the service manual.
To purchase a service manual, see
Service Publications Ordering
Information on page 13‑15.
{DANGER
Battery posts, terminals, and
related accessories contain lead
and lead compounds, chemicals
known to the State of California to
cause cancer and reproductive
harm. Wash hands after handling.
Vehicle Storage
{WARNING
Batteries have acid that can burn
you and gas that can explode.
You can be badly hurt if you are
not careful. See
Jump Starting on
page 10‑82 for tips on working
around a battery without
getting hurt. Some vehicles have a built-in
battery charger that can be
plugged in to keep the battery
charged when the vehicle is not
in use. For vehicles without a
battery charger, see the following
information.
Infrequent Usage: Remove the
black, negative (−) cable from the
battery to keep the battery from
running down.
See
“Power Window Initialization” in
Power Windows on page 2‑17.
Extended Storage: Remove the
black, negative (−) cable from the
battery or use a battery trickle
charger.