2011 CHEVROLET COLORADO radio controls
[x] Cancel search: radio controlsPage 1 of 392

Black plate (1,1)Chevrolet Colorado Owner Manual - 2011
2011 Chevrolet Colorado Owner ManualM
In Brief. . . . . . . . . . . . . . . . . . . . . . . . 1-1
Instrument Panel . . . . . . . . . . . . . . 1-2
Initial Drive Information . . . . . . . . 1-3
Vehicle Features . . . . . . . . . . . . . 1-13
Performance and Maintenance . . . . . . . . . . . . . . . . 1-16
Keys, Doors and Windows . . . 2-1
Keys and Locks . . . . . . . . . . . . . . . 2-2
Doors . . . . . . . . . . . . . . . . . . . . . . . . . . 2-7
Vehicle Security . . . . . . . . . . . . . . . . 2-9
Exterior Mirrors . . . . . . . . . . . . . . . 2-12
Interior Mirrors . . . . . . . . . . . . . . . . 2-14
Windows . . . . . . . . . . . . . . . . . . . . . 2-15 Seats and Restraints
. . . . . . . . . 3-1
Head Restraints . . . . . . . . . . . . . . . 3-2
Front Seats . . . . . . . . . . . . . . . . . . . . 3-3
Rear Seats . . . . . . . . . . . . . . . . . . . . 3-9
Safety Belts . . . . . . . . . . . . . . . . . . 3-12
Airbag System . . . . . . . . . . . . . . . . 3-26
Child Restraints . . . . . . . . . . . . . . 3-39
Storage . . . . . . . . . . . . . . . . . . . . . . . 4-1
Storage Compartments . . . . . . . . 4-1
Instruments and Controls . . . . 5-1
Controls . . . . . . . . . . . . . . . . . . . . . . . 5-2
Warning Lights, Gauges, and Indicators . . . . . . . . . . . . . . . . . . . . 5-6
Information Displays . . . . . . . . . . 5-19
Vehicle Messages . . . . . . . . . . . . 5-22 Lighting
. . . . . . . . . . . . . . . . . . . . . . . 6-1
Exterior Lighting . . . . . . . . . . . . . . . 6-1
Interior Lighting . . . . . . . . . . . . . . . . 6-5
Lighting Features . . . . . . . . . . . . . . 6-6
Infotainment System . . . . . . . . . 7-1
Introduction . . . . . . . . . . . . . . . . . . . . 7-1
Radio . . . . . . . . . . . . . . . . . . . . . . . . . . 7-7
Audio Players . . . . . . . . . . . . . . . . 7-14
Phone . . . . . . . . . . . . . . . . . . . . . . . . 7-20
Climate Controls . . . . . . . . . . . . . 8-1
Climate Control Systems . . . . . . 8-1
Air Vents . . . . . . . . . . . . . . . . . . . . . . . 8-3
Page 7 of 392

Black plate (1,1)Chevrolet Colorado Owner Manual - 2011
In Brief 1-1
In Brief
Instrument Panel
Instrument Panel . . . . . . . . . . . . . . 1-2
Initial Drive Information
Initial Drive Information . . . . . . . . 1-3
Remote Keyless Entry (RKE)System . . . . . . . . . . . . . . . . . . . . . . 1-4
Door Locks . . . . . . . . . . . . . . . . . . . 1-4
Tailgate . . . . . . . . . . . . . . . . . . . . . . . 1-5
Windows . . . . . . . . . . . . . . . . . . . . . . 1-5
Seat Adjustment . . . . . . . . . . . . . . 1-6
Heated Seats . . . . . . . . . . . . . . . . . 1-7
Head Restraint Adjustment . . . . 1-7
Safety Belts . . . . . . . . . . . . . . . . . . . 1-8 Sensing System for Passenger
Airbag . . . . . . . . . . . . . . . . . . . . . . . 1-8
Mirror Adjustment . . . . . . . . . . . . . 1-9
Steering Wheel Adjustment . . . . . . . . . . . . . . . . . 1-10
Interior Lighting . . . . . . . . . . . . . . 1-10
Exterior Lighting . . . . . . . . . . . . . 1-11
Windshield Wiper/Washer . . . . 1-11
Climate Controls . . . . . . . . . . . . . 1-12
Four-Wheel Drive . . . . . . . . . . . . 1-12
Vehicle Features
Radio(s) . . . . . . . . . . . . . . . . . . . . . 1-13
Satellite Radio . . . . . . . . . . . . . . . 1-14
Cruise Control . . . . . . . . . . . . . . . 1-15
Driver Information Center (DIC) . . . . . . . . . . . . . . . 1-15
Power Outlets . . . . . . . . . . . . . . . 1-15
Performance and Maintenance
Traction Control System (TCS) . . . . . . . . . . . . . . 1-16
StabiliTrak
®System . . . . . . . . . 1-16
Tire Pressure Monitor . . . . . . . . 1-16
Engine Oil Life System . . . . . . 1-17
Driving for Better Fuel Economy . . . . . . . . . . . . . . . . . . . 1-17
Roadside Assistance Program . . . . . . . . . . . . . . . . . . . . 1-17
OnStar
®. . . . . . . . . . . . . . . . . . . . . 1-18
Page 9 of 392

Black plate (3,1)Chevrolet Colorado Owner Manual - 2011
In Brief 1-3
A.Air Vents on page 8‑3.
B. Turn and Lane‐Change Lever. See Turn and Lane-Change
Signals on page 6‑4.
Windshield Wiper/Washer on
page 5‑2.
C. Instrument Cluster on page 5‑7.
D. Hazard Warning Flashers on
page 6‑3.
E. Passenger Side Airbag. See Airbag System on page 3‑26.
F. Exterior Lamp Controls on
page 6‑1.
Fog Lamps on page 6‑4
(If Equipped).
Exterior Cargo Lamps on
page 6‑4.
G. Parking Brake on page 9‑44. H. Data Link Connector (DLC).
See Malfunction Indicator Lamp
on page 5‑12.
I. Horn on page 5‑2.
J. StabiliTrak
®System on
page 9‑47.
Four-Wheel Drive on
page 10‑30.
K. AM-FM Radio on page 7‑7.
L. Cigarette Lighter (If Equipped). See Ashtrays on page 5‑6 and
Cigarette Lighter on page 5‑5.
M. Climate Control Systems on
page 8‑1.
N. Power Outlets on page 5‑5.
O. Passenger Airbag Status
Indicator on page 5‑11.
P. Glove Box on page 4‑1.
Initial Drive
Information
This section provides a brief
overview about some of the
important features that may or may
not be on your specific vehicle.
For more detailed information, refer
to each of the features which can be
found later in this owner manual.
Page 28 of 392

Black plate (2,1)Chevrolet Colorado Owner Manual - 2011
2-2 Keys, Doors and Windows
Keys and Locks
Keys
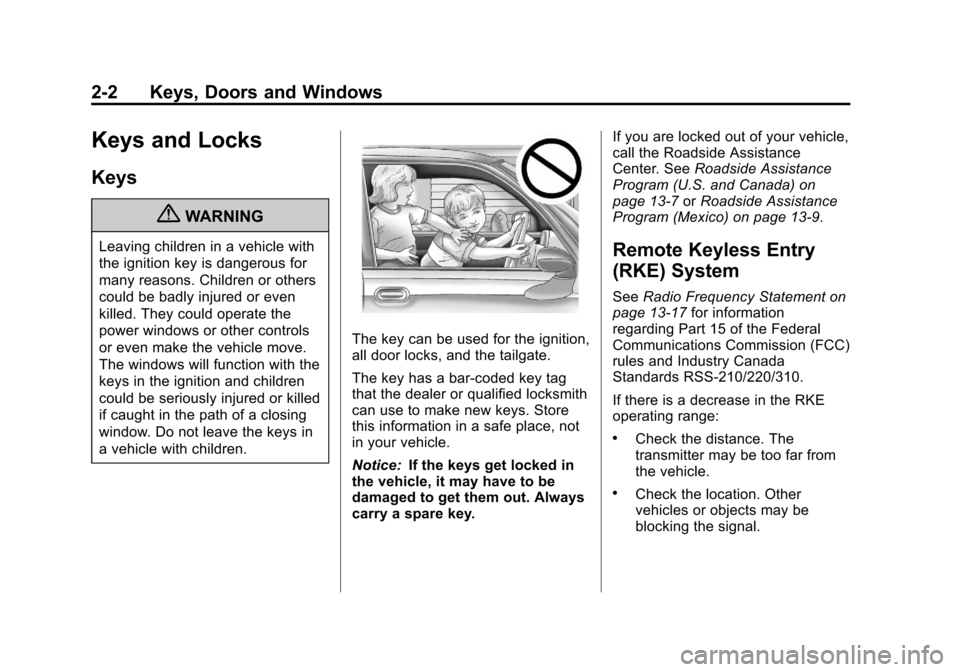
{WARNING
Leaving children in a vehicle with
the ignition key is dangerous for
many reasons. Children or others
could be badly injured or even
killed. They could operate the
power windows or other controls
or even make the vehicle move.
The windows will function with the
keys in the ignition and children
could be seriously injured or killed
if caught in the path of a closing
window. Do not leave the keys in
a vehicle with children.
The key can be used for the ignition,
all door locks, and the tailgate.
The key has a bar-coded key tag
that the dealer or qualified locksmith
can use to make new keys. Store
this information in a safe place, not
in your vehicle.
Notice:If the keys get locked in
the vehicle, it may have to be
damaged to get them out. Always
carry a spare key. If you are locked out of your vehicle,
call the Roadside Assistance
Center. See
Roadside Assistance
Program (U.S. and Canada) on
page 13‑7 orRoadside Assistance
Program (Mexico) on page 13‑9.
Remote Keyless Entry
(RKE) System
See Radio Frequency Statement on
page 13‑17 for information
regarding Part 15 of the Federal
Communications Commission (FCC)
rules and Industry Canada
Standards RSS-210/220/310.
If there is a decrease in the RKE
operating range:
.Check the distance. The
transmitter may be too far from
the vehicle.
.Check the location. Other
vehicles or objects may be
blocking the signal.
Page 116 of 392

Black plate (4,1)Chevrolet Colorado Owner Manual - 2011
5-4 Instruments and Controls
The compass can be calibrated by
driving the vehicle in circles at
8 km/h (5 mph) or less until the
display reads a direction.
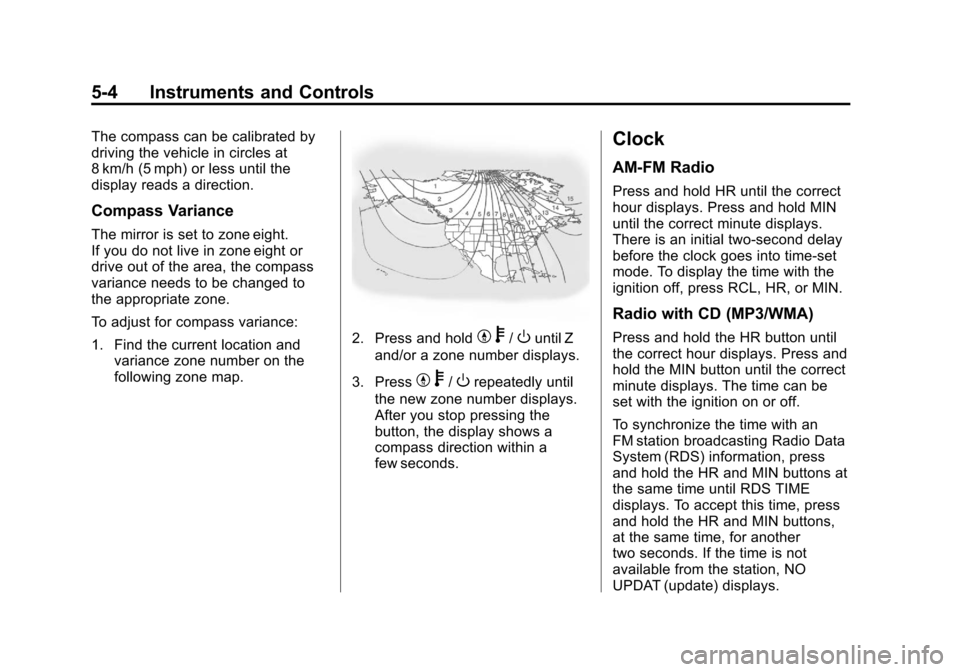
Compass Variance
The mirror is set to zone eight.
If you do not live in zone eight or
drive out of the area, the compass
variance needs to be changed to
the appropriate zone.
To adjust for compass variance:
1. Find the current location andvariance zone number on the
following zone map.
2. Press and holdYb/Ountil Z
and/or a zone number displays.
3. Press
Y b/Orepeatedly until
the new zone number displays.
After you stop pressing the
button, the display shows a
compass direction within a
few seconds.
Clock
AM-FM Radio
Press and hold HR until the correct
hour displays. Press and hold MIN
until the correct minute displays.
There is an initial two-second delay
before the clock goes into time-set
mode. To display the time with the
ignition off, press RCL, HR, or MIN.
Radio with CD (MP3/WMA)
Press and hold the HR button until
the correct hour displays. Press and
hold the MIN button until the correct
minute displays. The time can be
set with the ignition on or off.
To synchronize the time with an
FM station broadcasting Radio Data
System (RDS) information, press
and hold the HR and MIN buttons at
the same time until RDS TIME
displays. To accept this time, press
and hold the HR and MIN buttons,
at the same time, for another
two seconds. If the time is not
available from the station, NO
UPDAT (update) displays.
Page 118 of 392

Black plate (6,1)Chevrolet Colorado Owner Manual - 2011
5-6 Instruments and Controls
Ashtrays
The vehicle may have a removable
ashtray and cigarette lighter.
The ashtray is located in the center
console area. The ashtray can be
removed for cleaning. When the
ashtray is removed, this area can
also be used as a cupholder.
Notice:If papers, pins, or other
flammable items are put in the
ashtray, hot cigarettes or other
smoking materials could ignite
them and possibly damage the
vehicle. Never put flammable
items in the ashtray.
Warning Lights,
Gauges, and
Indicators
Warning lights and gauges can
signal that something is wrong
before it becomes serious enough
to cause an expensive repair or
replacement. Paying attention to the
warning lights and gauges could
prevent injury.
Warning lights come on when there
could be a problem with a vehicle
function. Some warning lights come
on briefly when the engine is started
to indicate they are working.
Gauges can indicate when there
could be a problem with a vehicle
function. Often gauges and warning
lights work together to indicate a
problem with the vehicle.
When one of the warning lights
comes on and stays on while
driving, or when one of the gauges
shows there may be a problem,
check the section that explains what to do. Follow this manual's advice.
Waiting to do repairs can be costly
and even dangerous.Chime Level Adjustment
The radio is used to adjust the
vehicle's chime level. To change the
volume level of the chime, press
and hold pushbutton 6 with the
ignition on and the radio power off.
The volume level will change from
the normal level to loud, and LOUD
will appear on the radio display. To
change back to the default or
normal setting, press and hold
pushbutton 6 again. The volume
level will change from the loud level
to normal, and NORMAL will appear
on the radio display. Each time the
chime volume is changed, three
chimes will sound to indicate the
new volume selected. Removing the
radio and not replacing it with a
factory radio or chime module will
disable vehicle chimes.
Page 124 of 392

Black plate (12,1)Chevrolet Colorado Owner Manual - 2011
5-12 Instruments and Controls
If the word ON or the on symbol is
lit on the passenger airbag status
indicator, it means that the right
front passenger frontal airbag is
enabled (may inflate).
If the word OFF or the off symbol is
lit on the airbag status indicator, it
means that the passenger sensing
system has turned off the right front
passenger frontal airbag.
If, after several seconds, both status
indicator lights remain on, or if there
are no lights at all, there may be a
problem with the lights or the
passenger sensing system. See
your dealer for service.
{WARNING
If the airbag readiness light ever
comes on and stays on, it means
that something may be wrong
with the airbag system. To help
avoid injury to yourself or others,
have the vehicle serviced right
away. SeeAirbag Readiness
(Continued)
WARNING (Continued)
Light on page 5‑10 for more
information, including important
safety information.
Charging System Light
This light comes on briefly when the
ignition key is turned to START, but
the engine is not running, as a
check to show it is working.
If it does not, have the vehicle
serviced by your dealer.
The light should go out once the
engine starts. If it stays on,
or comes on while driving, there
could be a problem with the
charging system. A charging system
message in the Driver Information Center (DIC) can also appear. See
Battery Voltage and Charging
Messages on page 5‑23
for more
information. This light could indicate
that there are problems with a
generator drive belt, or that there is
an electrical problem. Have it
checked right away. If the vehicle
must be driven a short distance with
the light on, turn off accessories,
such as the radio and air
conditioner.
Malfunction
Indicator Lamp
A computer system called OBD II
(On-Board Diagnostics-Second
Generation) monitors operation of
the fuel, ignition, and emission
control systems. It ensures that
emissions are at acceptable levels
for the life of the vehicle, helping to
produce a cleaner environment.
Page 143 of 392

Black plate (5,1)Chevrolet Colorado Owner Manual - 2011
Lighting 6-5
This button is located on the driver
side of the instrument panel near
the exterior lamp control.
Press to turn the cargo lamps on
and off.
The dome lamps must be on for the
cargo lamps to come on. SeeDome
Lamps on page 6‑5.
If the vehicle is equipped with
Bluetooth
®, turning the instrument
panel illumination control
thumbwheel all the way up will turn
on the cargo lamps.
Interior Lighting
Instrument Panel
Illumination Control
D
(Instrument Panel Lights):
Turn the thumbwheel up or down to
brighten or dim the instrument panel
lights and the radio display. The
instrument panel lights, cluster, and
radio display do not dim to complete
darkness. Turning the thumbwheel
all the way up will turn on the dome
lamps and may also turn on the
cargo lamp, if the vehicle is
equipped with Bluetooth.
The instrument panel light
brightness control will only work if
the headlamps or parking lamps are
on. See Exterior Lamp Controls on
page 6‑1.
Dome Lamps
The dome lamps come on when any
door is opened. To manually turn on the dome
lamps, turn the thumbwheel, located
next to the exterior lamps control, all
the way up. The cargo lamps may
come on, if the vehicle is equipped
with Bluetooth. In this position, the
lamps remain on whether a door is
opened or closed.
Reading Lamps
Press the lens on the lamps to turn
each reading lamp on or off.
These lamps will not come on with
the dome lamps.
Dome Lamp Override
The dome lamp override button is
located below the exterior lamps
control.
E(Dome Lamp Override):
Press
this button in to make the dome
lamps remain off when the doors
are open. To return the lamps to
automatic operation, press
Eagain
and return it to the out position.