2011 CHEVROLET CAMARO spare wheel
[x] Cancel search: spare wheelPage 339 of 414

Black plate (77,1)Chevrolet Camaro Owner Manual - 2011
Vehicle Care 10-77
{WARNING
Changing a tire can be
dangerous. The vehicle can
slip off the jack and roll over
or fall on you or other people.
You and they could be badly
injured or even killed. Find a level
place to change the tire. To help
prevent the vehicle from moving:1. Set the parking brake firmly.
2. Put an automatic transmission shift lever in
P (Park), or shift a manual
transmission to 1 (First) or
R (Reverse).
3. Turn off the engine and do not restart while the vehicle
is raised.
4. Do not allow passengers to remain in the vehicle.
(Continued)
WARNING (Continued)
To be certain the vehicle will
not move, put blocks at the front
and rear of the tire farthest away
from the one being changed.
That would be the tire on the
other side, at the opposite end
of the vehicle.
This vehicle may come with a jack
and spare tire or a tire sealant and
compressor kit. To use the jacking
equipment to change a spare
tire safely, follow the instructions
below. Then see Tire Changing on
page 10‑85. To use the tire sealant
and compressor kit, see Tire
Sealant and Compressor Kit on
page 10‑78. When the vehicle has a flat tire (B),
use the following example as a
guide to assist you in the placement
of wheel blocks (A).
A. Wheel Block
B. Flat Tire
The following information explains
how to repair or change a tire.
Page 340 of 414

Black plate (78,1)Chevrolet Camaro Owner Manual - 2011
10-78 Vehicle Care
Tire Sealant and
Compressor Kit
{WARNING
Idling a vehicle in an enclosed
area with poor ventilation is
dangerous. Engine exhaust may
enter the vehicle. Engine exhaust
contains Carbon Monoxide (CO)
which cannot be seen or smelled.
It can cause unconsciousness
and even death. Never run the
engine in an enclosed area
that has no fresh air ventilation.
For more information, seeEngine
Exhaust on page 9‑28.
{WARNING
Overinflating a tire could cause
the tire to rupture and you
or others could be injured.
Be sure to read and follow the
tire sealant and compressor kit
instructions and inflate the tire
to its recommended pressure.
Do not exceed the recommended
pressure.
{WARNING
Storing the tire sealant and
compressor kit or other
equipment in the passenger
compartment of the vehicle could
cause injury. In a sudden stop or
collision, loose equipment could
strike someone. Store the tire
sealant and compressor kit in
its original location. If this vehicle has a tire sealant and
compressor kit, there may not be a
spare tire, tire changing equipment,
and on some vehicles there may not
be a place to store a tire.
The tire sealant and compressor
can be used to temporarily seal
punctures up to 6 mm (¼ in) in the
tread area of the tire. It can also be
used to inflate an under inflated tire.
If the tire has been separated from
the wheel, has damaged sidewalls,
or has a large puncture, the tire is
too severely damaged for the tire
sealant and compressor kit to be
effective. See
Roadside Assistance
Program (U.S. and Canada) on
page 13‑7 orRoadside Assistance
Program (Mexico) on page 13‑10.
Read and follow all of the tire
sealant and compressor kit
instructions.
Page 347 of 414

Black plate (85,1)Chevrolet Camaro Owner Manual - 2011
Vehicle Care 10-85
3. Turn the center retainercounterclockwise to remove
the cover.
4. Remove the tire sealant and compressor kit from the foam
container.
To store the tire sealant and
compressor kit, reverse the steps.
Tire Changing
Removing the Spare Tire and
Tools
Spare Tire
1. Open the trunk. See Trunk on
page 2‑9.
2. Remove the carpet.
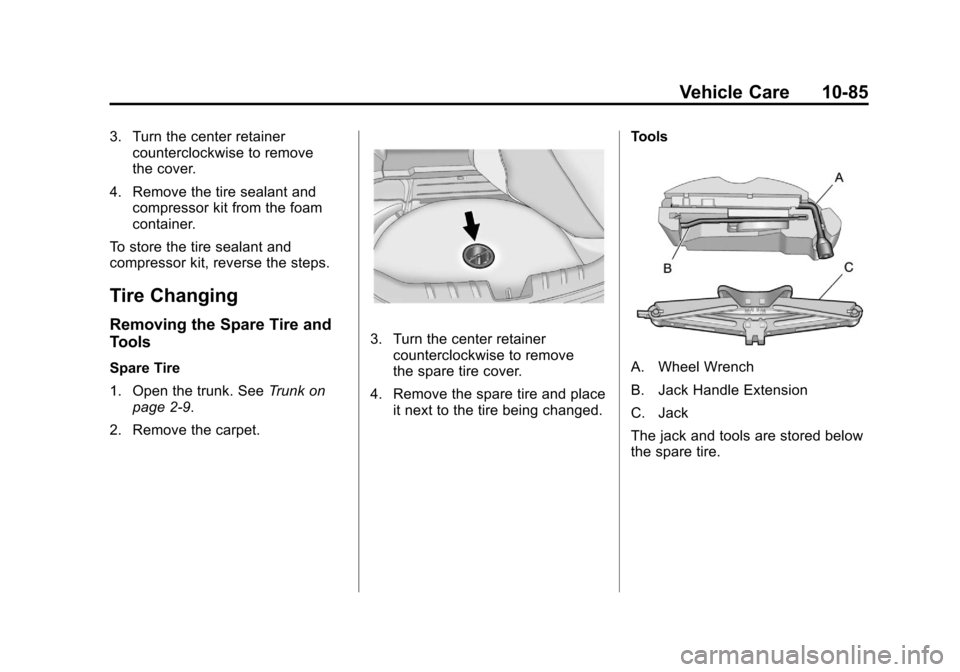
3. Turn the center retainer counterclockwise to remove
the spare tire cover.
4. Remove the spare tire and place it next to the tire being changed. Tools
A. Wheel Wrench
B. Jack Handle Extension
C. Jack
The jack and tools are stored below
the spare tire.
Page 348 of 414

Black plate (86,1)Chevrolet Camaro Owner Manual - 2011
10-86 Vehicle Care
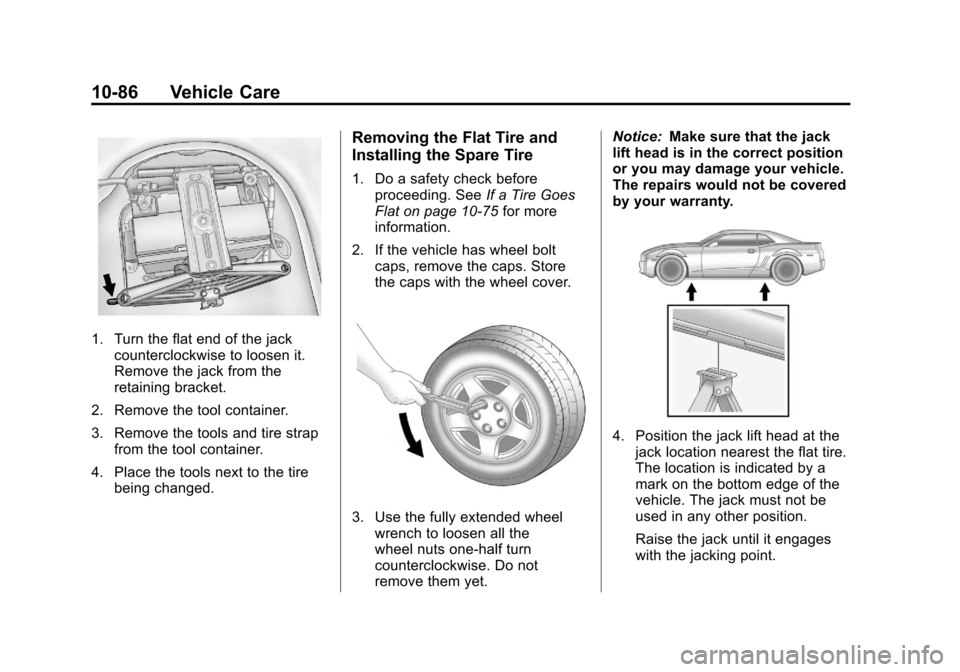
1. Turn the flat end of the jackcounterclockwise to loosen it.
Remove the jack from the
retaining bracket.
2. Remove the tool container.
3. Remove the tools and tire strap from the tool container.
4. Place the tools next to the tire being changed.
Removing the Flat Tire and
Installing the Spare Tire
1. Do a safety check beforeproceeding. See If a Tire Goes
Flat on page 10‑75 for more
information.
2. If the vehicle has wheel bolt caps, remove the caps. Store
the caps with the wheel cover.
3. Use the fully extended wheelwrench to loosen all the
wheel nuts one-half turn
counterclockwise. Do not
remove them yet. Notice:
Make sure that the jack
lift head is in the correct position
or you may damage your vehicle.
The repairs would not be covered
by your warranty.
4. Position the jack lift head at the
jack location nearest the flat tire.
The location is indicated by a
mark on the bottom edge of the
vehicle. The jack must not be
used in any other position.
Raise the jack until it engages
with the jacking point.
Page 350 of 414

Black plate (88,1)Chevrolet Camaro Owner Manual - 2011
10-88 Vehicle Care
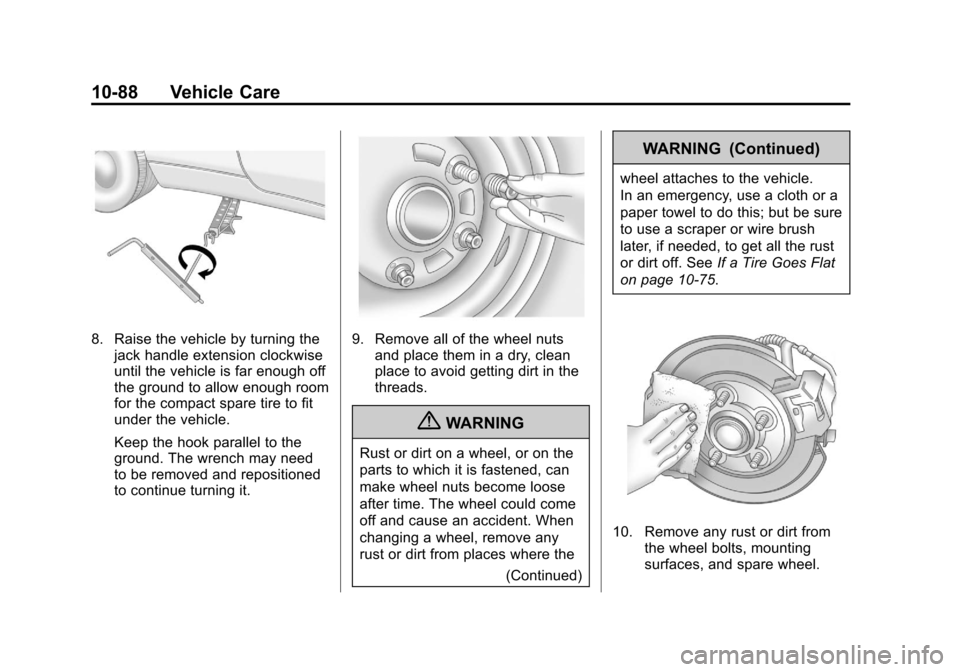
8. Raise the vehicle by turning thejack handle extension clockwise
until the vehicle is far enough off
the ground to allow enough room
for the compact spare tire to fit
under the vehicle.
Keep the hook parallel to the
ground. The wrench may need
to be removed and repositioned
to continue turning it.9. Remove all of the wheel nutsand place them in a dry, clean
place to avoid getting dirt in the
threads.
{WARNING
Rust or dirt on a wheel, or on the
parts to which it is fastened, can
make wheel nuts become loose
after time. The wheel could come
off and cause an accident. When
changing a wheel, remove any
rust or dirt from places where the
(Continued)
WARNING (Continued)
wheel attaches to the vehicle.
In an emergency, use a cloth or a
paper towel to do this; but be sure
to use a scraper or wire brush
later, if needed, to get all the rust
or dirt off. SeeIf a Tire Goes Flat
on page 10‑75.
10. Remove any rust or dirt from the wheel bolts, mounting
surfaces, and spare wheel.
Page 351 of 414

Black plate (89,1)Chevrolet Camaro Owner Manual - 2011
Vehicle Care 10-89
11. Place the compact spare tireon the wheel-mounting surface.
{WARNING
Never use oil or grease on bolts
or nuts because the nuts might
come loose. The vehicle's wheel
could fall off, causing a crash.
12. Reinstall the wheel nuts with the rounded end of the nuts
toward the wheel. Tighten each
nut as much as possible using
the wheel wrench until the
wheel is held firmly against
the hub.
Use your free hand to prevent
the wheel from turning while
you are tightening.
13. Lower the vehicle by turning the jack handle
counterclockwise. Lower
the jack completely.
14. Tighten the wheel nuts firmly ina crisscross sequence, as
shown.
{WARNING
Wheel nuts that are improperly or
incorrectly tightened can cause
the wheels to become loose or
come off. The wheel nuts should
be tightened with a torque wrench
to the proper torque specification
after replacing. Follow the torque
specification supplied by the
(Continued)
WARNING (Continued)
aftermarket manufacturer
when using accessory locking
wheel nuts. SeeCapacities and
Specifications on page 12‑2 for
original equipment wheel nut
torque specifications.
Notice: Improperly tightened
wheel nuts can lead to brake
pulsation and rotor damage.
To avoid expensive brake repairs,
evenly tighten the wheel nuts
in the proper sequence and to
the proper torque specification.
See Capacities and Specifications
on page 12‑2 for the wheel nut
torque specification.
Page 353 of 414

Black plate (91,1)Chevrolet Camaro Owner Manual - 2011
Vehicle Care 10-91
have the full-size tire repaired
or replaced at your convenience.
Of course, it is best to replace the
spare with a full-size tire as soon
as possible. The spare tire will last
longer and be in good shape in
case it is needed again.
Notice:When the compact
spare is installed, do not take
the vehicle through an automatic
car wash with guide rails. The
compact spare can get caught on
the rails which can damage the
tire, wheel and other parts of the
vehicle.
Do not use the compact spare on
other vehicles.
Do not mix the compact spare tire
or wheel with other wheels or tires.
They will not fit. Keep the spare tire
and its wheel together.
Notice: Tire chains will not fit
the compact spare. Using them
can damage the vehicle and can
damage the chains too. Do not
use tire chains on the compact
spare.Jump Starting
For more information about the
vehicle battery, see Battery on
page 10‑31.
If the battery has run down, try to
use another vehicle and some
jumper cables to start your vehicle.
Be sure to use the following steps to
do it safely.
{WARNING
Batteries can hurt you. They can
be dangerous because:
.They contain acid that can
burn you.
.They contain gas that can
explode or ignite.
.They contain enough
electricity to burn you.
If you do not follow these steps
exactly, some or all of these
things can hurt you. Notice:
Ignoring these steps
could result in costly damage to
the vehicle that would not be
covered by the warranty.
Trying to start the vehicle by
pushing or pulling it will not
work, and it could damage the
vehicle.
Page 412 of 414

Black plate (10,1)Chevrolet Camaro Owner Manual - 2011
i-10 INDEX
SeatsAdjustment, Front . . . . . . . . . . . . . . 3-3
Head Restraints . . . . . . . . . . . . . . . 3-2
Heated Front . . . . . . . . . . . . . . . . . . 3-6
Power Adjustment, Front . . . . . . 3-4
Rear . . . . . . . . . . . . . . . . . . . . . . . . . . . 3-7
Reclining Seatbacks . . . . . . . . . . . 3-4
Securing Child Restraints . . . . . . . . . . . . . . 3-52, 3-54
Security Vehicle . . . . . . . . . . . . . . . . . . . . . . . 2-10
Service Accessories andModifications . . . . . . . . . . . . . . . . 10-3
Doing Your Own Work . . . . . . . . 10-4
Engine Soon Light . . . . . . . . . . . . 5-18
Maintenance Records . . . . . . .11-10
Maintenance, General Information . . . . . . . . . . . . . . . . . . 11-1
Parts Identification Label . . . . . 12-1
Publications Ordering Information . . . . . . . . . . . . . . . . 13-15
Scheduling Appointments . . . 13-10
Vehicle Messages . . . . . . . . . . . . 5-39 Servicing the Airbag . . . . . . . . . . . 3-36
Shift Lock Control Function
Check, Automatic
Transmission . . . . . . . . . . . . . . . . 10-33
Shifting Into Park . . . . . . . . . . . . . . . . . . . . . . 9-24
Out of Park . . . . . . . . . . . . . . . . . . . 9-25
Signals, Turn and Lane-Change . . . . . . . . . . . . . . . . . 6-5
Spare Tire Compact . . . . . . . . . . . . . . . . . . . . 10-90
Specifications and Capacities . . . . . . . . . . . . . . . . . . . . 12-2
Speedometer . . . . . . . . . . . . . . . . . . . 5-8
StabiliTrak OFF Light . . . . . . . . . . . . . . . . . . . . . 5-23
StabiliTrak
®System . . . . . . . . . . . 9-39
Start Vehicle, Remote . . . . . . . . . . 2-5
Starter Switch Check . . . . . . . . . 10-32
Starting the Engine . . . . . . . . . . . . 9-21
Steering . . . . . . . . . . . . . . . . . . . . . . . . 9-5 Fluid, Power . . . . . . . . . . . . . . . . 10-27
Wheel Adjustment . . . . . . . . . . . . . 5-2
Wheel Controls . . . . . . . . . . . . . . . . 5-2 Storage Areas
Center Console . . . . . . . . . . . . . . . . 4-1
Convenience Net . . . . . . . . . . . . . . 4-1
Glove Box . . . . . . . . . . . . . . . . . . . . . 4-1
Storing the Tire Sealant and Compressor Kit . . . . . . . . . 10-84
Stuck Vehicle . . . . . . . . . . . . . . . . . . 9-12
Sun Visors . . . . . . . . . . . . . . . . . . . . . 2-17
Sunroof . . . . . . . . . . . . . . . . . . . . . . . . 2-17
Symbols . . . . . . . . . . . . . . . . . . . . . . . . . . iv
System
Infotainment . . . . . . . . . . . . . . . . . . . 7-1
T
Tachometer . . . . . . . . . . . . . . . . . . . . . 5-8
Taillamp Indicator Light . . . . . . . . 5-25
TaillampsTurn Signal, and
Stoplamps . . . . . . . . . . . . . . . . 10-42
Text Telephone (TTY) Users . . . 13-6
Theater Dimming . . . . . . . . . . . . . . . 6-6
Theft-Deterrent Systems . . . . . . . 2-12 Immobilizer . . . . . . . . . . . . . . . . . . . 2-11
Time . . . . . . . . . . . . . . . . . . . . . . . . . . . . 5-4