2011 CHEVROLET AVEO warning light
[x] Cancel search: warning lightPage 1 of 328

Black plate (1,1)Chevrolet Aveo Owner Manual - 2011
2011 Chevrolet Aveo Owner ManualM
In Brief. . . . . . . . . . . . . . . . . . . . . . . . 1-1
Instrument Panel . . . . . . . . . . . . . . 1-2
Initial Drive Information . . . . . . . . 1-3
Vehicle Features . . . . . . . . . . . . . 1-16
Performance and Maintenance . . . . . . . . . . . . . . . . 1-21
Keys, Doors and Windows . . . 2-1
Keys and Locks . . . . . . . . . . . . . . . 2-2
Doors . . . . . . . . . . . . . . . . . . . . . . . . . . 2-7
Vehicle Security . . . . . . . . . . . . . . 2-10
Exterior Mirrors . . . . . . . . . . . . . . . 2-13
Interior Mirrors . . . . . . . . . . . . . . . . 2-14
Windows . . . . . . . . . . . . . . . . . . . . . 2-14
Roof . . . . . . . . . . . . . . . . . . . . . . . . . . 2-16
Seats and Restraints . . . . . . . . . 3-1
Head Restraints . . . . . . . . . . . . . . . 3-2
Front Seats . . . . . . . . . . . . . . . . . . . . 3-3
Rear Seats . . . . . . . . . . . . . . . . . . . . 3-6
Safety Belts . . . . . . . . . . . . . . . . . . 3-11
Airbag System . . . . . . . . . . . . . . . . 3-24
Child Restraints . . . . . . . . . . . . . . 3-38 Storage
. . . . . . . . . . . . . . . . . . . . . . . 4-1
Storage Compartments . . . . . . . . 4-1
Instruments and Controls . . . . 5-1
Controls . . . . . . . . . . . . . . . . . . . . . . . 5-1
Warning Lights, Gauges, and Indicators . . . . . . . . . . . . . . . . . . . . 5-7
Trip Computer . . . . . . . . . . . . . . . . 5-21
Lighting . . . . . . . . . . . . . . . . . . . . . . . 6-1
Exterior Lighting . . . . . . . . . . . . . . . 6-1
Interior Lighting . . . . . . . . . . . . . . . . 6-4
Lighting Features . . . . . . . . . . . . . . 6-5
Infotainment System . . . . . . . . . 7-1
Introduction . . . . . . . . . . . . . . . . . . . . 7-1
Radio . . . . . . . . . . . . . . . . . . . . . . . . . . 7-3
Audio Players . . . . . . . . . . . . . . . . 7-10
Climate Controls . . . . . . . . . . . . . 8-1
Climate Control Systems . . . . . . 8-1
Air Vents . . . . . . . . . . . . . . . . . . . . . . . 8-4
Maintenance . . . . . . . . . . . . . . . . . . . 8-5 Driving and Operating
. . . . . . . . 9-1
Driving Information . . . . . . . . . . . . . 9-2
Starting and Operating . . . . . . . 9-17
Engine Exhaust . . . . . . . . . . . . . . 9-24
Automatic Transmission . . . . . . 9-25
Manual Transmission . . . . . . . . . 9-29
Brakes . . . . . . . . . . . . . . . . . . . . . . . 9-30
Cruise Control . . . . . . . . . . . . . . . . 9-32
Fuel . . . . . . . . . . . . . . . . . . . . . . . . . . 9-34
Towing . . . . . . . . . . . . . . . . . . . . . . . 9-39
Conversions and Add-Ons . . . 9-40
Vehicle Care . . . . . . . . . . . . . . . . . 10-1
General Information . . . . . . . . . . 10-3
Vehicle Checks . . . . . . . . . . . . . . . 10-5
Headlamp Aiming . . . . . . . . . . . 10-30
Bulb Replacement . . . . . . . . . . 10-31
Electrical System . . . . . . . . . . . . 10-36
Wheels and Tires . . . . . . . . . . . 10-42
Jump Starting . . . . . . . . . . . . . . . 10-70
Towing . . . . . . . . . . . . . . . . . . . . . . 10-74
Appearance Care . . . . . . . . . . . 10-76
Page 5 of 328

Black plate (5,1)Chevrolet Aveo Owner Manual - 2011
Introduction v
Vehicle Symbol Chart
Here are some additional symbols
that may be found on the vehicle
and what they mean. For more
information on the symbol, refer to
the Index.
9:Airbag Readiness Light
#:Air Conditioning
!:Antilock Brake System (ABS)
g:Audio Steering Wheel Controls
or OnStar®
$: Brake System Warning Light
":Charging System
I:Cruise Control
B: Engine Coolant Temperature
O:Exterior Lamps
#:Fog Lamps
.: Fuel Gauge
+:Fuses
3: Headlamp High/Low-Beam
Changer
j: LATCH System Child
Restraints
*: Malfunction Indicator Lamp
::Oil Pressure
}:Power
/:Remote Vehicle Start
>:Safety Belt Reminders
7:Tire Pressure Monitor
d:Traction Control
M:Windshield Washer Fluid
Page 9 of 328
Black plate (3,1)Chevrolet Aveo Owner Manual - 2011
In Brief 1-3
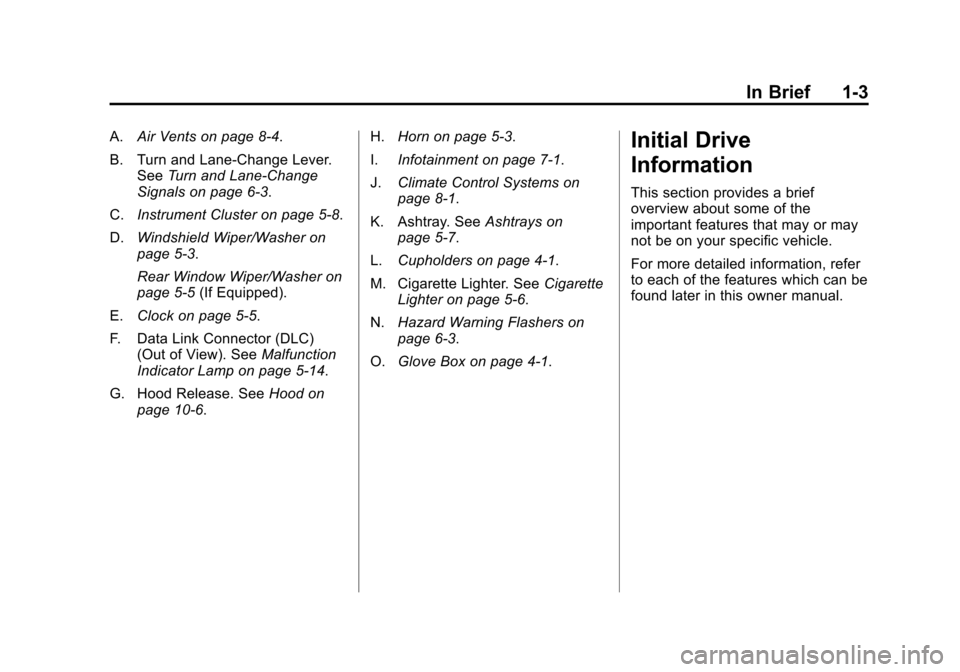
A.Air Vents on page 8‑4.
B. Turn and Lane‐Change Lever. See Turn and Lane-Change
Signals on page 6‑3.
C. Instrument Cluster on page 5‑8.
D. Windshield Wiper/Washer on
page 5‑3.
Rear Window Wiper/Washer on
page 5‑5 (If Equipped).
E. Clock on page 5‑5.
F. Data Link Connector (DLC) (Out of View). See Malfunction
Indicator Lamp on page 5‑14.
G. Hood Release. See Hood on
page 10‑6. H.
Horn on page 5‑3.
I. Infotainment on page 7‑1.
J. Climate Control Systems on
page 8‑1.
K. Ashtray. See Ashtrays on
page 5‑7.
L. Cupholders on page 4‑1.
M. Cigarette Lighter. See Cigarette
Lighter on page 5‑6.
N. Hazard Warning Flashers on
page 6‑3.
O. Glove Box on page 4‑1.Initial Drive
Information
This section provides a brief
overview about some of the
important features that may or may
not be on your specific vehicle.
For more detailed information, refer
to each of the features which can be
found later in this owner manual.
Page 27 of 328
Black plate (21,1)Chevrolet Aveo Owner Manual - 2011
In Brief 1-21
Performance and
Maintenance
Tire Pressure Monitor
This vehicle may have a Tire
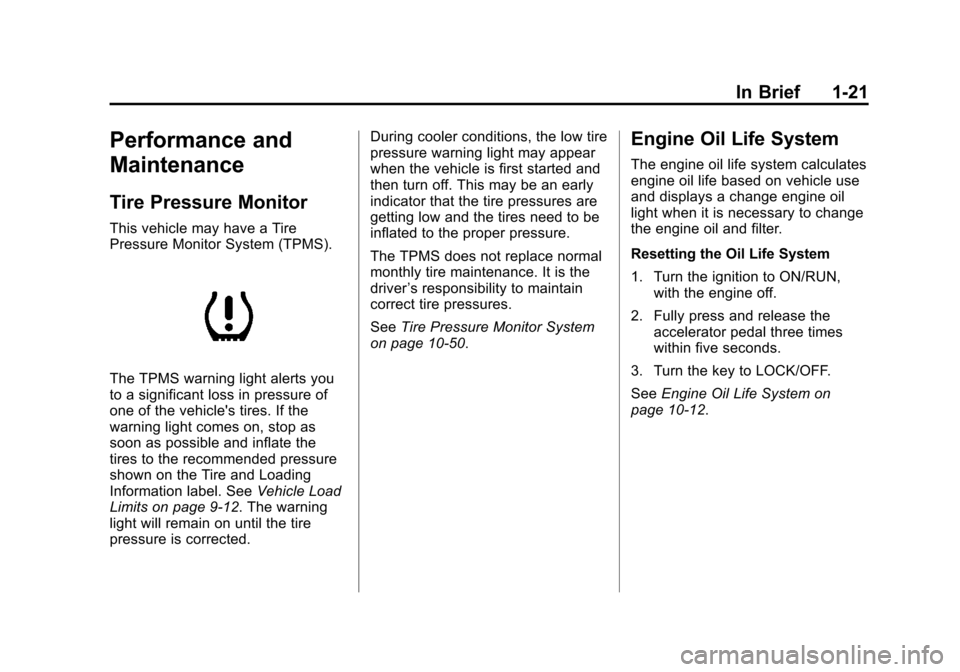
Pressure Monitor System (TPMS).
The TPMS warning light alerts you
to a significant loss in pressure of
one of the vehicle's tires. If the
warning light comes on, stop as
soon as possible and inflate the
tires to the recommended pressure
shown on the Tire and Loading
Information label. SeeVehicle Load
Limits on page 9‑12. The warning
light will remain on until the tire
pressure is corrected. During cooler conditions, the low tire
pressure warning light may appear
when the vehicle is first started and
then turn off. This may be an early
indicator that the tire pressures are
getting low and the tires need to be
inflated to the proper pressure.
The TPMS does not replace normal
monthly tire maintenance. It is the
driver
’s responsibility to maintain
correct tire pressures.
See Tire Pressure Monitor System
on page 10‑50.
Engine Oil Life System
The engine oil life system calculates
engine oil life based on vehicle use
and displays a change engine oil
light when it is necessary to change
the engine oil and filter.
Resetting the Oil Life System
1. Turn the ignition to ON/RUN, with the engine off.
2. Fully press and release the accelerator pedal three times
within five seconds.
3. Turn the key to LOCK/OFF.
See Engine Oil Life System on
page 10‑12.
Page 42 of 328
Black plate (10,1)Chevrolet Aveo Owner Manual - 2011
2-10 Keys, Doors and Windows
When closing the liftgate, close from
the center to ensure that it fully
latches.
To lock the liftgate, insert the key
into the lock cylinder and turn it
clockwise or use the RKE
transmitter, if equipped.
The liftgate can also be locked or
unlocked by the central door
unlocking system or RKE
transmitter, if equipped. See
Central Door Unlocking System on
page 2‑6andRemote Keyless Entry
(RKE) System Operation on
page 2‑3.Vehicle Security
This vehicle has theft-deterrent
features; however, they do not make
it impossible to steal.
Anti-Theft Alarm System
Your vehicle may have a content
theft-deterrent system.
The theft-deterrent system will not
arm when you lock the doors using
the key or the manual door lock.
It arms only when you use the
Remote Keyless Entry (RKE)
transmitter.
Arming the System
To arm the system, do the following:
1. Close the doors, the windows, the hood, and the trunk or
liftgate.
Make sure that the windows are
closed, as the system can be
armed even if the windows
are open. 2. Turn the key to LOCK/OFF and
remove the key from the ignition.
If the key is inserted in the
ignition, the transmitter will not
arm the theft-deterrent system.
3. Lock the doors by pressing the lock button on the RKE
transmitter.
.The LED light on the
transmitter will flash once.
.All of the doors will lock.
.The hazard warning lamps
will flash once and the horn
will sound.
.The security light will flash
continuously to indicate that
the theft-deterrent system is
armed. The security light is
located on the center of the
instrument panel near the
clock.
Page 43 of 328
Black plate (11,1)Chevrolet Aveo Owner Manual - 2011
Keys, Doors and Windows 2-11
To avoid activating the alarm by
accident, do one of the following:
.Unlock the driver or passenger
front door using the key.
.Press the unlock button on the
RKE transmitter.
Unlocking a door any other way will
activate the alarm when a door or
the trunk or liftgate is opened.
If you do not want to arm the
theft-deterrent system, lock the
vehicle using the key or the manual
door locks.
Disarming the System
To disarm the system, do one of the
following:
.Unlock the driver or passenger
front door using the key.
.Press the unlock button on the
RKE transmitter.
‐ The LED light on the
transmitter will flash once.
‐ All of the doors will unlock.
‐ The hazard warning lamps will
flash twice.
If the door is not opened or if the
engine is not started within
30 seconds after disarming the
system using the transmitter, all of
the doors will automatically lock and
the theft-deterrent mode will re-arm.
How the System Alarm is
Activated
If a door or the trunk or liftgate is
opened without using the key or the
RKE transmitter, the horn will sound
and the lamps will flash for up to
30 seconds.
How to Turn Off the System
Alarm
If the system alarm is active, it can
be deactivated using one of the
following methods:
.Press one of the buttons on the
RKE transmitter.
.Unlock the driver or passenger
front door using the key.
Otherwise, the alarm will
automatically stop after 30 seconds.
The system will then lock the doors
and re-arm the theft-deterrent
system.
Page 44 of 328

Black plate (12,1)Chevrolet Aveo Owner Manual - 2011
2-12 Keys, Doors and Windows
How to Detect a Tamper
Condition
If the hazard warning lamps
flash once when you press the lock
button on the RKE transmitter, the
theft-deterrent system alarm was
activated while you were away.
Immobilizer
SeeRadio Frequency Statement on
page 13‑16 for information
regarding Part 15 of the Federal
Communications Commission (FCC)
rules and Industry Canada
Standards RSS-210/220/310.
Immobilizer Operation
The vehicle may have a passive
theft-deterrent system.
The immobilizer system prevents
the vehicle from being started by an
unauthorized person by isolating the
power supply to the ignition system,
the fuel pump, and the fuel injectors. The system is automatically armed
when the key is removed from
the ignition. You do not have to
manually arm or disarm the system.
The vehicle has a special key that
works with the theft-deterrent
system. There is a transponder in
the key head that is electronically
coded. The correct key will start the
vehicle. An invalid key immobilizes
the engine. If the key is ever
damaged, you may not be able to
start the vehicle.
When trying to start the vehicle,
if the engine does not start and the
security light flashes or comes on,
there may be a problem with the
theft-deterrent system. Turn the
ignition off and try again.
If the engine still does not start, and
the key appears to be undamaged,
try another key. At this time, you
may also want to check the fuse.
See
Fuses and Circuit Breakers on
page 10‑36. If the engine still does
not start with the other key, your
vehicle needs service. If the vehicle
does start, the first key may be
faulty. See your dealer who can
have a new key made.
Up to 10 keys may be programmed
for the vehicle. If you lose or
damage your keys, only a dealer
can have new keys made.
If you are ever driving and the
security light comes on and stays
on, you will be able to restart
the engine if you turn it off. The
theft-deterrent system, however, is
not working properly and must be
serviced by your dealer. Your
vehicle is not protected by the
theft-deterrent system at this time.
In an emergency, contact Roadside
Assistance. See Roadside
Assistance Program on page 13‑6.
Page 73 of 328
Black plate (23,1)Chevrolet Aveo Owner Manual - 2011
Seats and Restraints 3-23
Safety System Check
Now and then, check that the safety
belt reminder light, safety belts,
buckles, latch plates, retractors, and
anchorages are working properly.
Look for any other loose or
damaged safety belt system parts
that might keep a safety belt system
from doing its job. See your dealer
to have it repaired. Torn or frayed
safety belts may not protect you in a
crash. They can rip apart under
impact forces. If a belt is torn or
frayed, get a new one right away.
Make sure the safety belt reminder
light is working. SeeSafety Belt
Reminders on page 5‑11 for more
information.
Keep safety belts clean and dry.
See Safety Belt Care on page 3‑23.
Safety Belt Care
Keep belts clean and dry.
{WARNING
Do not bleach or dye safety belts.
It may severely weaken them. In
a crash, they might not be able to
provide adequate protection.
Clean safety belts only with mild
soap and lukewarm water.
Replacing Safety Belt
System Parts After a
Crash
{WARNING
A crash can damage the safety
belt system in the vehicle.
A damaged safety belt system
may not properly protect the
person using it, resulting in
serious injury or even death in a
crash. To help make sure the
safety belt systems are working
properly after a crash, have them
inspected and any necessary
replacements made as soon as
possible.
After a minor crash, replacement of
safety belts may not be necessary.
But the safety belt assemblies that
were used during any crash may
have been stressed or damaged.