2011 CHEVROLET AVEO change wheel
[x] Cancel search: change wheelPage 194 of 328

Black plate (32,1)Chevrolet Aveo Owner Manual - 2011
9-32 Driving and Operating
To release the parking brake, hold
the brake pedal down. Pull the
parking brake lever up until you can
press the release button. Hold the
release button in as you move the
brake lever all the way down.
Notice:Driving with the parking
brake on can overheat the brake
system and cause premature
wear or damage to brake system
parts. Make sure that the parking
brake is fully released and the
brake warning light is off before
driving.Cruise Control
For vehicles with cruise control, a
speed of about 39 km/h (24 mph)
or more can be maintained
without keeping your foot on the
accelerator. Cruise control does not
work at speeds below 39 km/h
(24 mph).
When the brakes are applied, or the
clutch pedal if you have a manual
transmission, the cruise control
turns off.
{WARNING
Cruise control can be dangerous
where you cannot drive safely at
a steady speed. So, do not use
the cruise control on winding
roads or in heavy traffic.
Cruise control can be dangerous
on slippery roads. On such roads,
fast changes in tire traction can
cause excessive wheel slip, and
you could lose control. Do not use
cruise control on slippery roads.
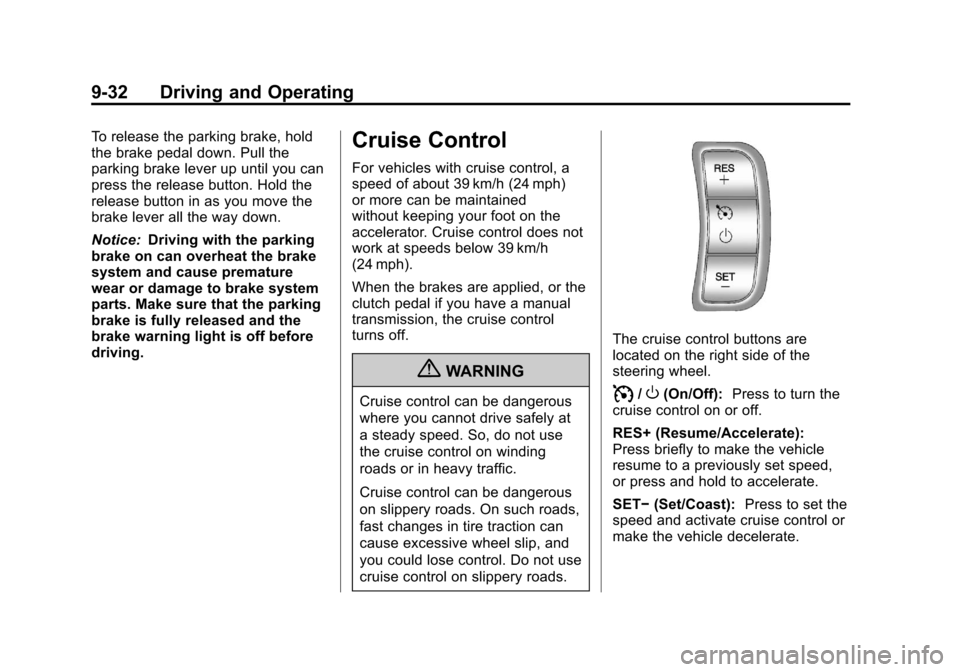
The cruise control buttons are
located on the right side of the
steering wheel.
I/O(On/Off): Press to turn the
cruise control on or off.
RES+ (Resume/Accelerate):
Press briefly to make the vehicle
resume to a previously set speed,
or press and hold to accelerate.
SET− (Set/Coast): Press to set the
speed and activate cruise control or
make the vehicle decelerate.
Page 227 of 328

Black plate (25,1)Chevrolet Aveo Owner Manual - 2011
Vehicle Care 10-25
Some driving conditions or climates
can cause a brake squeal when the
brakes are first applied or lightly
applied. This does not mean
something is wrong with the brakes.
Properly torqued wheel nuts are
necessary to help prevent brake
pulsation. When tires are rotated,
inspect brake pads for wear and
evenly tighten wheel nuts in the
proper sequence to torque
specifications inCapacities and
Specifications on page 12‑2.
If the vehicle has rear drum brakes,
they do not have wear indicators,
but if a rear brake rubbing noise is
heard, have the rear brake linings
inspected immediately. Rear brake
drums should be removed and
inspected each time the tires are
removed for rotation or changing.
Drum brakes have an inspection
hole to inspect lining wear during
scheduled maintenance. When the
front brake pads are replaced, have
the rear brakes inspected, too. Brake linings should always be
replaced as complete axle sets.
Brake Pedal Travel
See your dealer if the brake pedal
does not return to normal height,
or if there is a rapid increase in
pedal travel. This could be a sign
that brake service might be
required.
Brake Adjustment
Every moderate brake stop, the disc
brakes adjust for wear. If rarely
making moderate or heavier brake
stops, the brakes might not adjust
correctly. Very carefully making a
few moderate brake stops about
every 1 600 km (1,000 miles) will
adjust the brakes properly.
If the vehicle has rear drum brakes
and the brake pedal goes down
farther than normal, the rear drum
brakes might need adjustment.
Adjust them by backing up and
firmly applying the brakes a few
times.
Replacing Brake System Parts
The braking system on a vehicle is
complex. Its many parts have to be
of top quality and work well together
if the vehicle is to have really good
braking. The vehicle was designed
and tested with top-quality brake
parts. When parts of the braking
system are replaced, be sure to get
new, approved replacement parts.
If this is not done, the brakes might
not work properly. For example,
installing disc brake pads that are
wrong for the vehicle, can change
the balance between the front and
rear brakes
—for the worse. The
braking performance expected can
change in many other ways if the
wrong replacement brake parts are
installed.
Page 257 of 328

Black plate (55,1)Chevrolet Aveo Owner Manual - 2011
Vehicle Care 10-55
WARNING (Continued)
wheel attaches to the vehicle. In
an emergency, use a cloth or a
paper towel to do this; but be sure
to use a scraper or wire brush
later, if needed, to get all the rust
or dirt off. SeeIf a Tire Goes Flat
on page 10‑61.
Lightly coat the center of the
wheel hub with wheel bearing
grease after a wheel change or
tire rotation to prevent corrosion
or rust build-up. Do not get
grease on the flat wheel
mounting surface or on the
wheel nuts or bolts.
When It Is Time for New
Tires
Various factors, such as
maintenance, temperatures, driving
speeds, vehicle loading, and road
conditions influence when you need
new tires.
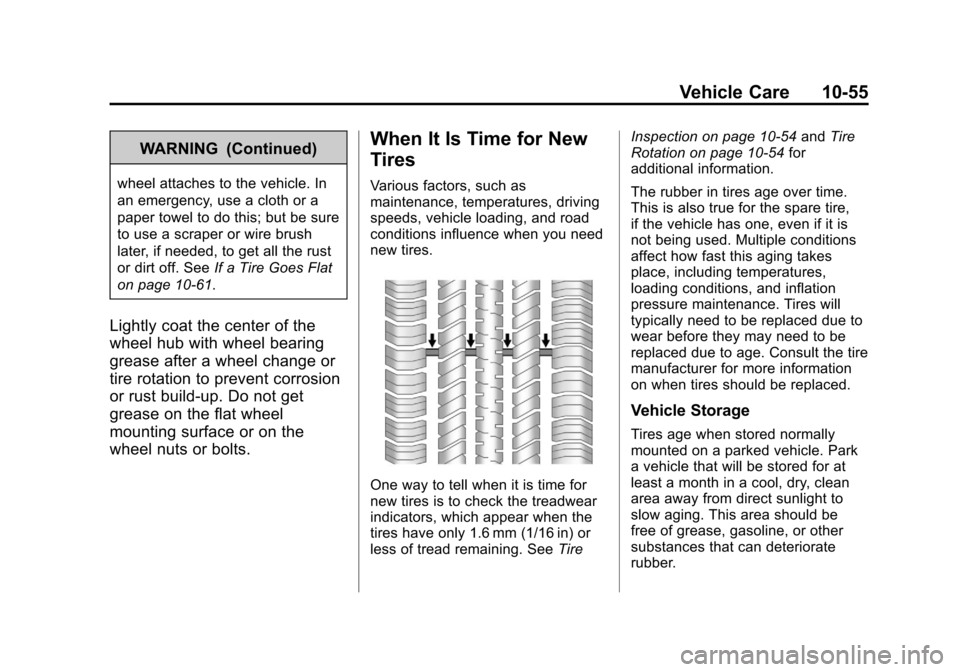
One way to tell when it is time for
new tires is to check the treadwear
indicators, which appear when the
tires have only 1.6 mm (1/16 in) or
less of tread remaining. See TireInspection on page 10‑54
andTire
Rotation on page 10‑54 for
additional information.
The rubber in tires age over time.
This is also true for the spare tire,
if the vehicle has one, even if it is
not being used. Multiple conditions
affect how fast this aging takes
place, including temperatures,
loading conditions, and inflation
pressure maintenance. Tires will
typically need to be replaced due to
wear before they may need to be
replaced due to age. Consult the tire
manufacturer for more information
on when tires should be replaced.
Vehicle Storage
Tires age when stored normally
mounted on a parked vehicle. Park
a vehicle that will be stored for at
least a month in a cool, dry, clean
area away from direct sunlight to
slow aging. This area should be
free of grease, gasoline, or other
substances that can deteriorate
rubber.
Page 265 of 328

Black plate (63,1)Chevrolet Aveo Owner Manual - 2011
Vehicle Care 10-63
{WARNING
Changing a tire can be
dangerous. The vehicle can slip
off the jack and roll over or fall on
you or other people. You and they
could be badly injured or even
killed. Find a level place to
change the tire. To help prevent
the vehicle from moving:1. Set the parking brake firmly.
2. Put an automatic transmission shift lever in
P (Park), or shift a manual
transmission to 1 (First) or
R (Reverse).
(Continued)
WARNING (Continued)
3. Turn off the engine and donot restart while the vehicle
is raised.
4. Do not allow passengers to remain in the vehicle.
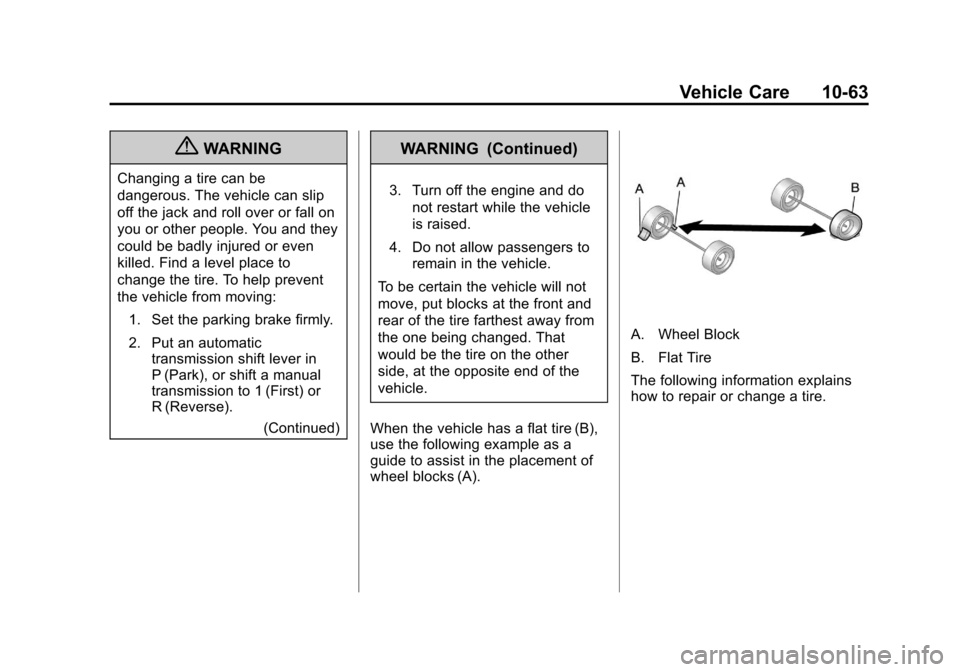
To be certain the vehicle will not
move, put blocks at the front and
rear of the tire farthest away from
the one being changed. That
would be the tire on the other
side, at the opposite end of the
vehicle.
When the vehicle has a flat tire (B),
use the following example as a
guide to assist in the placement of
wheel blocks (A).
A. Wheel Block
B. Flat Tire
The following information explains
how to repair or change a tire.
Page 327 of 328

Black plate (9,1)Chevrolet Aveo Owner Manual - 2011
INDEX i-9
Steering . . . . . . . . . . . . . . . . . . . . . . . . 9-4Fluid, Power . . . . . . . . . . . . . . . . 10-23
Wheel Adjustment . . . . . . . . . . . . . 5-1
Wheel Controls . . . . . . . . . . . . . . . . 5-2
Stoplamps and Back-Up Lamps Bulb Replacement . . . . . . . . . . 10-33
Storage Areas
Front . . . . . . . . . . . . . . . . . . . . . . . . . . 4-1
Glove Box . . . . . . . . . . . . . . . . . . . . . 4-1
Stuck Vehicle . . . . . . . . . . . . . . . . . . 9-11
Sun Visors . . . . . . . . . . . . . . . . . . . . . 2-16
Sunroof . . . . . . . . . . . . . . . . . . . . . . . . 2-16
Symbols . . . . . . . . . . . . . . . . . . . . . . . . . . iv
System Infotainment . . . . . . . . . . . . . . . . . . . 7-1
T
Tachometer . . . . . . . . . . . . . . . . . . . . . 5-9
TaillampsBulb Replacement . . . . . . . . . . 10-33
Text Telephone (TTY) Users . . . 13-4
Theft-Deterrent Systems . . . . . . . 2-12 Immobilizer . . . . . . . . . . . . . . . . . . . 2-12
Time . . . . . . . . . . . . . . . . . . . . . . . . . . . . 5-5 Tires
Buying New Tires . . . . . . . . . . . 10-56
Chains . . . . . . . . . . . . . . . . . . . . . . 10-61
Changing . . . . . . . . . . . . . . . . . . . 10-64
Compact Spare . . . . . . . . . . . . . 10-69
Designations . . . . . . . . . . . . . . . 10-45
Different Size . . . . . . . . . . . . . . . 10-57
If a Tire Goes Flat . . . . . . . . . . 10-61
Inflation Monitor System . . . . 10-51
Inspection . . . . . . . . . . . . . . . . . . 10-53
Pressure Light . . . . . . . . . . . . . . . . 5-18
Pressure Monitor System . . . 10-50
Rotation . . . . . . . . . . . . . . . . . . . . 10-54
Sidewall Labeling . . . . . . . . . . . 10-42
Terminology andDefinitions . . . . . . . . . . . . . . . . . 10-45
Uniform Tire Quality Grading . . . . . . . . . . . . . . . . . . . 10-57
Wheel Alignment and Tire Balance . . . . . . . . . . . . . . . . . . . 10-59
Wheel Replacement . . . . . . . . 10-60
When It Is Time for New
Tires . . . . . . . . . . . . . . . . . . . . . . 10-55 Towing
General Information . . . . . . . . . . 9-39
Recreational Vehicle . . . . . . . . 10-74
Vehicle . . . . . . . . . . . . . . . . . . . . . 10-74
Transmission Automatic . . . . . . . . . . . . . . . . . . . . . 9-25
Fluid, Automatic . . . . . . . . . . . . 10-13
Fluid, Manual . . . . . . . . . . . . . . . 10-15
Transportation Program, Courtesy . . . . . . . . . . . . . . . . . . . . . 13-8
Trip Computer . . . . . . . . . . . . . . . . . 5-21
Trip Odometer . . . . . . . . . . . . . . . . . . 5-9
Trunk . . . . . . . . . . . . . . . . . . . . . . . . . . . 2-7
Turn and Lane-Change
Signals . . . . . . . . . . . . . . . . . . . . . . . . 6-3
Turn Signal
Bulb Replacement . . . . . . . . . . 10-33U
Uniform Tire QualityGrading . . . . . . . . . . . . . . . . . . . . . 10-57
Up-Shift Light . . . . . . . . . . . . . . . . . . 5-17
Using this Manual . . . . . . . . . . . . . . . . iv