Page 73 of 94
Cadillac Escalade Hybrid - 2011
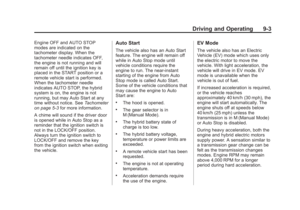
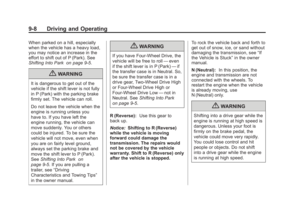
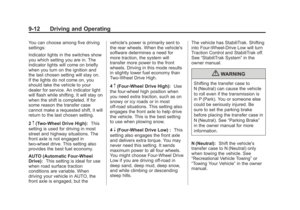
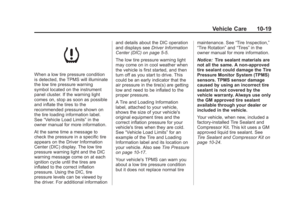
Vehicle Care 10-296. Remove the tire valve stem cap
by turning it counterclockwise.
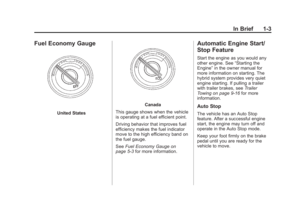
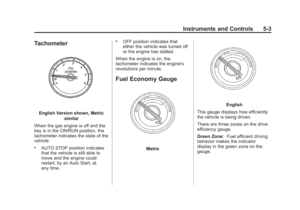
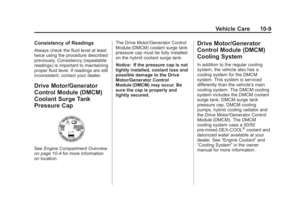
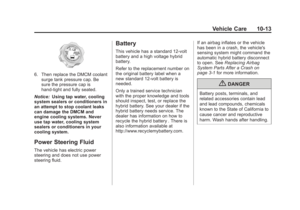
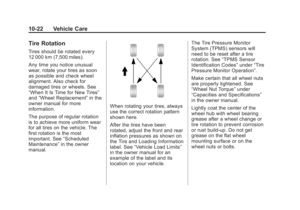
7. Attach the air only hose (F) onto
the tire valve stem and press")
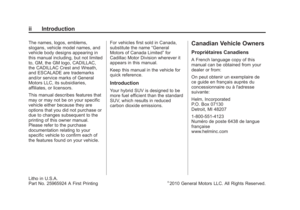
Black plate (29,1)Cadillac Escalade Hybrid - 2011
Vehicle Care 10-296. Remove the tire valve stem cap
by turning it counterclockwise.
7. Attach the air only hose (F) onto
the tire valve stem and press the
lever down to secure it.
8. Plug the power plug (C) into the
accessory power outlet in the
vehicle. Unplug all items from
other accessory power outlets.
See “ Power Outlets ” in the
owner manual.
If the vehicle has an accessory
power outlet, do not use the
cigarette lighter.
If the vehicle only has a cigarette
lighter, use the cigarette lighter.
Do not pinch the power plug
cord in the door or window.
9. Start the vehicle. The vehicle
must be running while using the
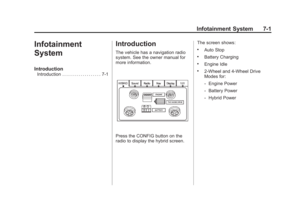
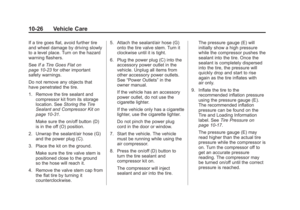
air compressor. 10. Press the on/off (D) button to
turn the compressor on.
The compressor will inflate the
tire with air only.
11. Inflate the tire to the
recommended inflation
pressure using the pressure
gauge (E). The recommended
inflation pressure can be found
on the Tire and Loading
Information label. See Tire
Pressure on page 10 ‑ 17 .
The pressure gauge (E) may
read higher than the actual tire
pressure while the compressor
is on. Turn the compressor off
to get an accurate reading. The
compressor may be turned on/
off until the correct pressure is
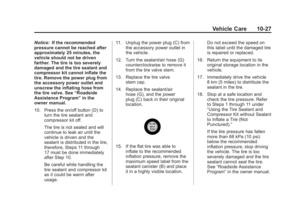
reached. 12. Press the on/off button (D) to
turn the tire sealant and
compressor kit off.
Be careful while handling the
tire sealant and compressor kit
as it could be warm after
usage.
13. Unplug the power plug (C) from
the accessory power outlet in
the vehicle.
14. Disconnect the air only
hose (C) from the tire valve
stem, by turning it
counterclockwise, and replace
the tire valve stem cap.
15. Replace the air only hose (F)
and the power plug (C) back in
its original location.
16. Place the equipment in the
original storage location in the
vehicle.
Page 74 of 94
Black plate (30,1)Cadillac Escalade Hybrid - 2011
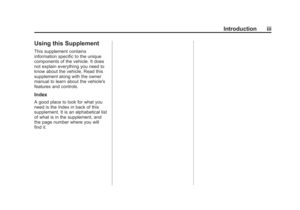
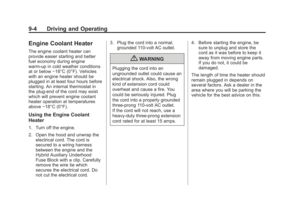
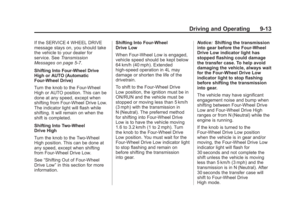
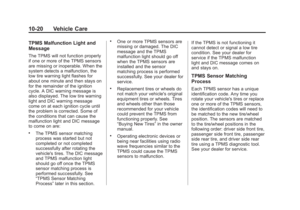
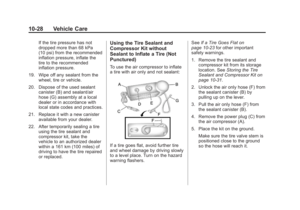
10-30 Vehicle Care Removal and Installation of the
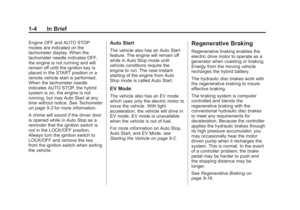
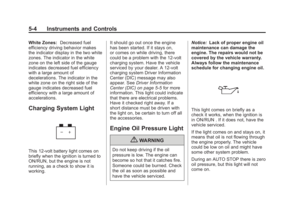
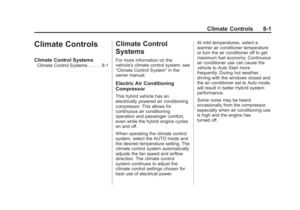
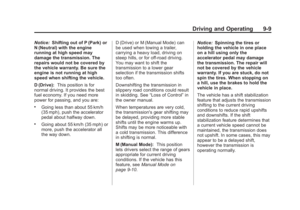
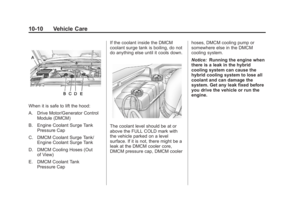
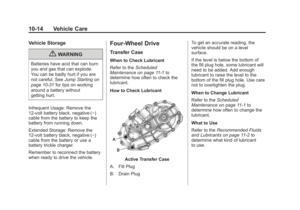
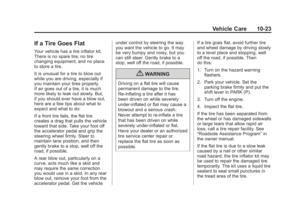
Sealant Canister To remove the sealant canister:
1. Unlock the air only hose (F) from
the sealant canister (B) by
pulling up on the lever.
2. Pull the air only hose (F) from
the sealant canister (B).
3. Unwrap the sealant/air hose (G)
from the compressor (A). 4. Turn the sealant canister (B) so
the inflator filling hose is aligned
with the slot in the compressor.
5. Lift the sealant canister (B) from
the compressor and replace with
a new sealant canister. See your
dealer for more information. To install a new sealant canister:
1. Align the sealant/air hose (G)
with the slot in the air
compressor.
2. Push the sealant canister (B)
down and turn it clockwise.
3. Wrap the sealant/air hose (G)
around the air compressor
channel to stow it in its original
location.
4. Push the air compressor inflator
hose (F) onto the sealant
canister inlet and push the
lever down.
Page 75 of 94
Black plate (31,1)Cadillac Escalade Hybrid - 2011
Vehicle Care 10-31
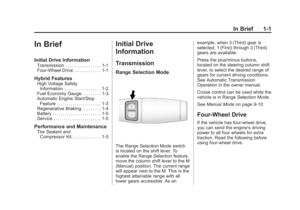
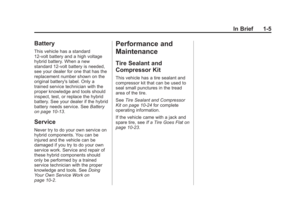
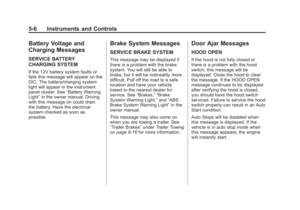
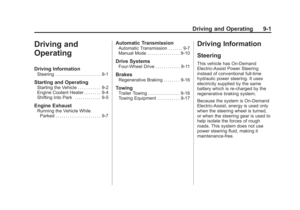
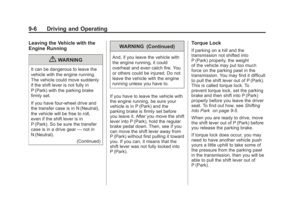
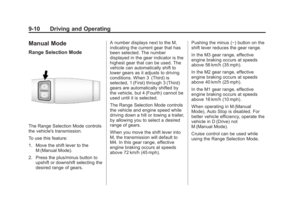
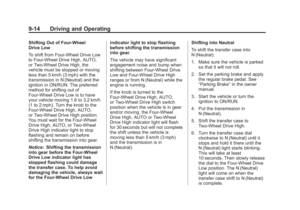
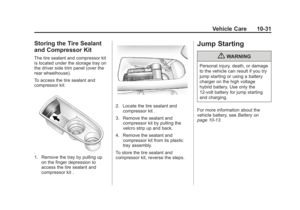
Storing the Tire Sealant
and Compressor Kit The tire sealant and compressor kit
is located under the storage tray on
the driver side trim panel (over the
rear wheelhouse).
To access the tire sealant and
compressor kit:
1. Remove the tray by pulling up
on the finger depression to
access the tire sealant and
compressor kit . 2. Locate the tire sealant and
compressor kit .
3. Remove the sealant and
compressor kit by pulling the
velcro strip up and back.
4. Remove the sealant and
compressor kit from its plastic
tray assembly.
To store the tire sealant and
compressor kit, reverse the steps. Jump Starting
{ WARNINGPersonal injury, death, or damage
to the vehicle can result if you try
jump starting or using a battery
charger on the high voltage
hybrid battery. Use only the
12-volt battery for jump starting
and charging.
For more information about the
vehicle battery, see Battery on
page 10 ‑ 13 .
Page 76 of 94
Cadillac Escalade Hybrid - 2011
10-32 Vehicle Care If the vehicle's 12 ‐ volt battery has
run down, you may want to use
another vehicle and some jumper
cables to start your veh")
Black plate (32,1)Cadillac Escalade Hybrid - 2011
10-32 Vehicle Care If the vehicle's 12 ‐ volt battery has
run down, you may want to use
another vehicle and some jumper
cables to start your vehicle. Use the
following steps to do it safely.
{ WARNINGBatteries can hurt you. They can
be dangerous because: .
They contain acid that can
burn you. .
They contain gas that can
explode or ignite. .
They contain enough
electricity to burn you.
If you do not follow these steps
exactly, some or all of these
things can hurt you. Notice: Ignoring these steps
could result in costly damage to
the vehicle that would not be
covered by the warranty.
Trying to start the vehicle by
pushing or pulling it will not
work, and it could damage the
vehicle.
1. Check the other vehicle. It must
have a 12 ‐ volt battery with a
negative ground system.
Notice: Only use vehicles with
12-volt systems with negative
grounds to jump start your
vehicle. If the other vehicle's
system is not a 12-volt system
with a negative ground, both
vehicles can be damaged. 2. Get the vehicles close enough
so the jumper cables can reach,
but be sure the vehicles are not
touching each other. It could
cause a ground connection you
do not want. You would not be
able to start your vehicle, and
the bad grounding could damage
the electrical systems.
To avoid the possibility of the
vehicles rolling, set the parking
brake firmly on both vehicles
involved in the jump start
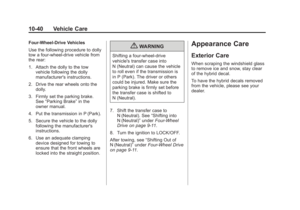
procedure. Put the automatic
transmission in P (Park) or a
manual transmission in
N (Neutral) before setting the
parking brake. If you have a
four-wheel-drive vehicle, be sure
the transfer case is in a drive
gear, not in N (Neutral).
Page 77 of 94
Cadillac Escalade Hybrid - 2011
Vehicle Care 10-33Notice: If you leave the radio or
other accessories on during the
jump starting procedure, they
could be damaged. The repairs
would")
Black plate (33,1)Cadillac Escalade Hybrid - 2011
Vehicle Care 10-33Notice: If you leave the radio or
other accessories on during the
jump starting procedure, they
could be damaged. The repairs
would not be covered by the
warranty. Always turn off the
radio and other accessories when
jump starting the vehicle.
3. Turn off the ignition on both
vehicles. Unplug unnecessary
accessories plugged into the
cigarette lighter or the accessory
power outlets. Turn off the radio
and all the lamps that are not
needed.
This avoids sparks and helps
save both batteries. It could
save the radio!
4. Open the hood on the other
vehicle and locate the
positive (+) and negative ( − )
terminal locations on that
vehicle.
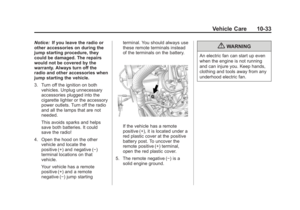
Your vehicle has a remote
positive (+) and a remote
negative ( − ) jump starting terminal. You should always use
these remote terminals instead
of the terminals on the battery.
If the vehicle has a remote
positive (+), it is located under a
red plastic cover at the positive
battery post. To uncover the
remote positive (+) terminal,
open the red plastic cover.
5. The remote negative ( − ) is a
solid engine ground.{ WARNINGAn electric fan can start up even
when the engine is not running
and can injure you. Keep hands,
clothing and tools away from any
underhood electric fan.
Page 78 of 94
Cadillac Escalade Hybrid - 2011
10-34 Vehicle Care
{ WARNINGUsing an open flame near a
battery can cause battery gas to
explode. People have been hurt
doing this, and some have been")
Black plate (34,1)Cadillac Escalade Hybrid - 2011
10-34 Vehicle Care
{ WARNINGUsing an open flame near a
battery can cause battery gas to
explode. People have been hurt
doing this, and some have been
blinded. Use a flashlight if you
need more light.
Be sure the battery has enough
water. You do not need to add
water to the battery installed in
your new vehicle. But if a battery
has filler caps, be sure the right
amount of fluid is there. If it is low,
add water to take care of that
first. If you do not, explosive gas
could be present.
Battery fluid contains acid that
can burn you. Do not get it on
you. If you accidentally get it in
your eyes or on your skin, flush
the place with water and get
medical help immediately. { WARNINGFans or other moving engine
parts can injure you badly. Keep
your hands away from moving
parts once the engine is running.
6. Check that the jumper cables do
not have loose or missing
insulation. If they do, you could
get a shock. The vehicles could
be damaged too.
Before you connect the cables,
here are some basic things you
should know. Positive (+) goes to
positive (+) or to a remote
positive (+) terminal if the vehicle
has one. Negative ( − ) will go to a
heavy, unpainted metal engine
part or a solid engine ground.
Do not connect positive (+) to
negative ( − ) or you will get a
short that would damage the
battery and maybe other parts
too. Do not connect the
negative ( − ) cable to the negative ( − ) terminal on the dead
battery because this can cause
sparks.
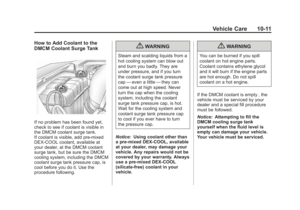
7. Connect the red positive (+)
cable to the positive (+) terminal
of the vehicle with the dead
battery. Use a remote
positive (+) if the vehicle
has one.
8. Do not let the other end touch
metal. Connect it to the
positive (+) terminal of the good
battery. Use a remote
positive (+) if the vehicle
has one.
9. Now connect the black
negative ( − ) cable to the
negative ( − ) terminal of the good
battery. Use a remote
negative ( − ) if the vehicle
has one.
Do not let the other end touch
anything until the next step. The
other end of the negative ( − )
cable does not go to the dead
battery. It goes to a heavy,
unpainted metal engine part or
Page 79 of 94
Cadillac Escalade Hybrid - 2011
Vehicle Care 10-35to the remote negative ( − )
terminal on the vehicle with the
dead battery.
10. Connect the other end of the
negative ( − ) cabl")
Black plate (35,1)Cadillac Escalade Hybrid - 2011
Vehicle Care 10-35to the remote negative ( − )
terminal on the vehicle with the
dead battery.
10. Connect the other end of the
negative ( − ) cable to the
remote negative ( − ) terminal,
on the vehicle with the dead
battery.
11. Now start the vehicle with the
good battery and run the
engine for a while.
12. Try to start the vehicle that had
the dead battery. If it will not
start after a few tries, it
probably needs service.
Notice: If the jumper cables are
connected or removed in the
wrong order, electrical shorting
may occur and damage the
vehicle. The repairs would not be
covered by the vehicle warranty.
Always connect and remove the
jumper cables in the correct
order, making sure that the
cables do not touch each other or
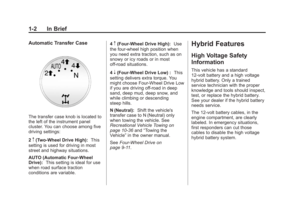
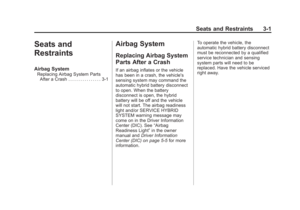
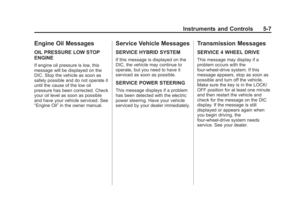
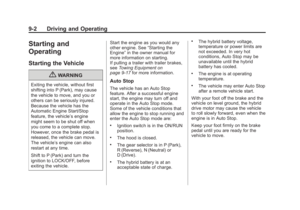
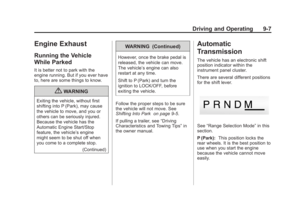
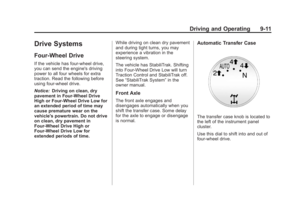
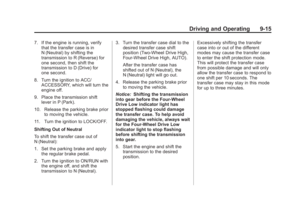
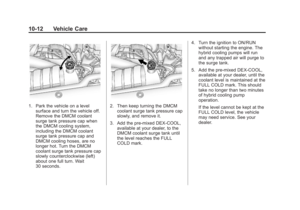
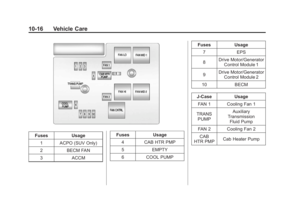
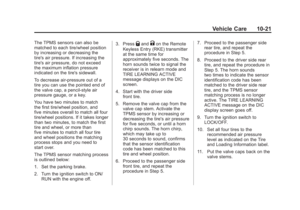
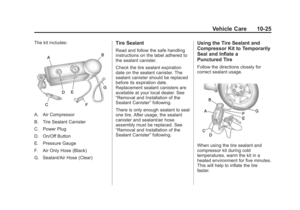
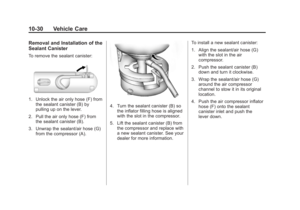
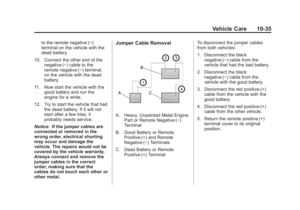
other metal. Jumper Cable Removal
A. Heavy, Unpainted Metal Engine
Part or Remote Negative ( − )
Terminal
B. Good Battery or Remote
Positive (+) and Remote
Negative ( − ) Terminals
C. Dead Battery or Remote
Positive (+) Terminal To disconnect the jumper cables
from both vehicles:
1. Disconnect the black
negative ( − ) cable from the
vehicle that had the bad battery.
2. Disconnect the black
negative ( − ) cable from the
vehicle with the good battery.
3. Disconnect the red positive (+)
cable from the vehicle with the
good battery.
4. Disconnect the red positive (+)
cable from the other vehicle.
5. Return the remote positive (+)
terminal cover to its original
position.
Page 80 of 94

10-36 Vehicle Care
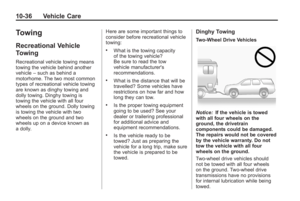
Towing Recreational Vehicle
Towing Recreational vehicle towing means
towing the vehicle behind another
vehicle – such as behind a
motorhome. The two most common
types of recreational vehicle towing
are known as dinghy towing and
dolly towing. Dinghy towing is
towing the vehicle with all four
wheels on the ground. Dolly towing
is towing the vehicle with two
wheels on the ground and two
wheels up on a device known as
a dolly. Here are some important things to
consider before recreational vehicle
towing: .
What is the towing capacity
of the towing vehicle?
Be sure to read the tow
vehicle manufacturer's
recommendations. .
What is the distance that will be
travelled? Some vehicles have
restrictions on how far and how
long they can tow. .
Is the proper towing equipment
going to be used? See your
dealer or trailering professional
for additional advice and
equipment recommendations. .
Is the vehicle ready to be
towed? Just as preparing the
vehicle for a long trip, make sure
the vehicle is prepared to be
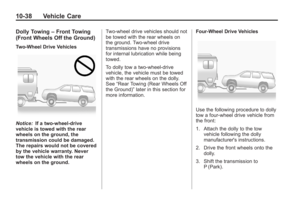
towed. Dinghy Towing Two-Wheel Drive Vehicles
Notice: If the vehicle is towed
with all four wheels on the
ground, the drivetrain
components could be damaged.
The repairs would not be covered
by the vehicle warranty. Do not
tow the vehicle with all four
wheels on the ground.
Two-wheel drive vehicles should
not be towed with all four wheels
on the ground. Two-wheel drive
transmissions have no provisions
for internal lubrication while being
towed.


Cadillac Escalade Hybrid - 2011
10-30 Vehicle Care Removal and Installation of the
Sealant Canister To remove the sealant canister:
1. Unlock the air only hose (F) from
the sealant c")
Cadillac Escalade Hybrid - 2011
Vehicle Care 10-31
Storing the Tire Sealant
and Compressor Kit The tire sealant and compressor kit
is located under the storage tray on
the driver sid")