Page 113 of 462
Black plate (59,1)Buick LaCrosse Owner Manual - 2011
Seats and Restraints 3-59
.If the position you are using
has an adjustable headrest
or head restraint and you
are using a dual tether
route the tether around the
headrest or head restraint.
3. Before placing a child in the child restraint, make sure it is
securely held in place. To check,
grasp the child restraint at the
LATCH path and attempt to
move it side to side and back
and forth. There should be
no more than 2.5 cm (1 in)
of movement, for proper
installation.
Head Restraint Removal and
Reinstallation
The rear outboard head restraints
can be removed if they interfere with
the proper installation of the child
restraint.
To remove the head restraint:
1. Partially fold the seatbackforward. See Rear Seats on
page 3‑11 for additional
information.
2. Press both buttons on the head restraint posts at the same
time, and pull up on the head
restraint.
Page 114 of 462
Black plate (60,1)Buick LaCrosse Owner Manual - 2011
3-60 Seats and Restraints
3. Store the head restraint in thetrunk of the vehicle.
4. When the child restraint is removed, reinstall the head
restraint before the seating
position is used.
{WARNING
With head restraints that are
not installed and adjusted
properly, there is a greater
chance that occupants will suffer
a neck/spinal injury in a crash.
Do not drive until the head
restraints for all occupants are
installed and adjusted properly. To reinstall the head restraint:
1. Insert the head restraint posts
into the holes in the top of the
seatback. The notches (A) on
the posts must face the driver
side of the vehicle. 2. Push the head restraint down.
If necessary, press the height
adjustment release button to
further lower the head restraint.
See Head Restraints on
page 3‑2.
3. Try to move the head restraint to make sure that it is locked in
place.
Page 115 of 462

Black plate (61,1)Buick LaCrosse Owner Manual - 2011
Seats and Restraints 3-61
Replacing LATCH System
Parts After a Crash
{WARNING
A crash can damage the
LATCH system in the vehicle.
A damaged LATCH system may
not properly secure the child
restraint, resulting in serious
injury or even death in a crash.
To help make sure the LATCH
system is working properly after
a crash, see your dealer to have
the system inspected and any
necessary replacements made
as soon as possible.
If the vehicle has the LATCH system
and it was being used during a
crash, new LATCH system parts
may be needed.
New parts and repairs may be
necessary even if the LATCH
system was not being used at
the time of the crash.
Securing Child Restraints
(Rear Seat)
When securing a child restraint in
a rear seating position, study the
instructions that came with the
child restraint to make sure it is
compatible with this vehicle.
If the child restraint has the
LATCH system, see Lower Anchors
and Tethers for Children (LATCH
System) on page 3‑52 for how and
where to install the child restraint
using LATCH. If a child restraint
is secured in the vehicle using a
safety belt and it uses a top tether,
see Lower Anchors and Tethers
for Children (LATCH System) on
page 3‑52 for top tether anchor
locations.
Do not secure a child seat in a
position without a top tether anchor
if a national or local law requires
that the top tether be anchored,
or if the instructions that come
with the child restraint say that
the top strap must be anchored. If the child restraint does not have
the LATCH system, you will be
using the safety belt to secure
the child restraint in this position.
Be sure to follow the instructions
that came with the child restraint.
Secure the child in the child restraint
when and as the instructions say.
If more than one child restraint
needs to be installed in the rear
seat, be sure to read
Where to Put
the Restraint on page 3‑51.
1. Put the child restraint on the seat.
If the head restraint interferes
with the proper installation
of the child restraint, the head
restraint may be removed.
See “Head Restraint Removal
and Reinstallation” under
Lower Anchors and Tethers for
Children (LATCH System) on
page 3‑52.
Page 117 of 462

Black plate (63,1)Buick LaCrosse Owner Manual - 2011
Seats and Restraints 3-63
6. If the child restraint has a toptether, follow the child restraint
manufacturer's instructions
regarding the use of the top
tether. See Lower Anchors and
Tethers for Children (LATCH
System) on page 3‑52 for
more information.
7. Before placing a child in the child restraint, make sure
it is securely held in place.
To check, grasp the child
restraint at the safety belt
path and attempt to move it
side‐to‐side and back‐and‐forth.
When the child restraint is
properly installed, there should
be no more than 2.5 cm (1 in)
of movement. To remove the child restraint,
unbuckle the vehicle safety belt
and let it return to the stowed
position. If the top tether is
attached to a top tether anchor,
disconnect it. If the head restraint
was removed, reinstall it before
the seating position is used.
See
“Head Restraint Removal and
Reinstallation” underLower Anchors
and Tethers for Children (LATCH
System) on page 3‑52 for additional
information on installing the head
restraint properly.Securing Child Restraints
(Front Passenger Seat)
This vehicle has airbags. A rear
seat is a safer place to secure
a forward-facing child restraint.
See Where to Put the Restraint on
page 3‑51.
In addition, the vehicle has a
passenger sensing system which
is designed to turn off the right
front passenger frontal airbag
and seat‐mounted side impact
airbag under certain conditions.
See Passenger Sensing System on
page 3‑37 andPassenger Airbag
Status Indicator on page 5‑15
for more information, including
important safety information.
Page 120 of 462

Black plate (66,1)Buick LaCrosse Owner Manual - 2011
3-66 Seats and Restraints
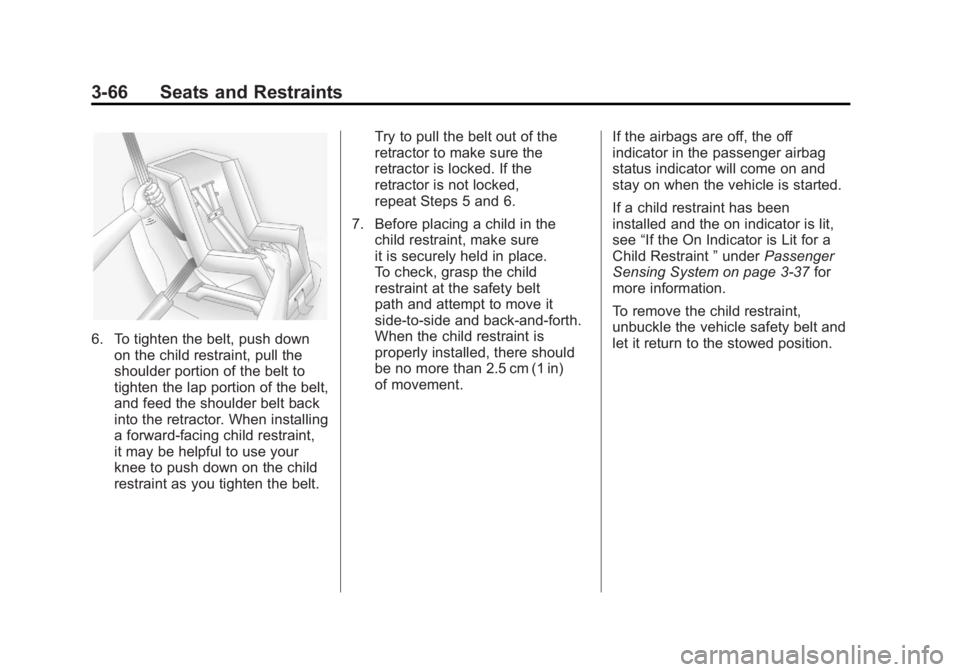
6. To tighten the belt, push downon the child restraint, pull the
shoulder portion of the belt to
tighten the lap portion of the belt,
and feed the shoulder belt back
into the retractor. When installing
a forward-facing child restraint,
it may be helpful to use your
knee to push down on the child
restraint as you tighten the belt. Try to pull the belt out of the
retractor to make sure the
retractor is locked. If the
retractor is not locked,
repeat Steps 5 and 6.
7. Before placing a child in the child restraint, make sure
it is securely held in place.
To check, grasp the child
restraint at the safety belt
path and attempt to move it
side‐to‐side and back‐and‐forth.
When the child restraint is
properly installed, there should
be no more than 2.5 cm (1 in)
of movement. If the airbags are off, the off
indicator in the passenger airbag
status indicator will come on and
stay on when the vehicle is started.
If a child restraint has been
installed and the on indicator is lit,
see
“If the On Indicator is Lit for a
Child Restraint ”under Passenger
Sensing System on page 3‑37 for
more information.
To remove the child restraint,
unbuckle the vehicle safety belt and
let it return to the stowed position.
Page 248 of 462

Black plate (8,1)Buick LaCrosse Owner Manual - 2011
8-8 Climate Controls
Air Vents
Use the louvers located on the air
vents to change the direction of the
airflow.
To open the vent, move the
thumbwheel to
R. To close the vent,
move the thumbwheel to
(.
Operation Tips
.Keep all outlets open whenever
possible for best system
performance.
.Keep the path under all seats
clear of objects to help circulate
the air inside the vehicle more
effectively.
.Use of non-GM approved hood
deflectors can adversely affect
the performance of the system.
Maintenance
Air Intake
Clear away any ice, snow, or leaves
from the air intake at the base of the
windshield that can block the flow of
air into the vehicle.
Passenger Compartment
Air Filter
The filter removes dust, pollen, and
other airborne irritants from outside
air that is pulled into the vehicle.
The filter should be replaced as part
of routine scheduled maintenance.
See Scheduled Maintenance on
page 11‑2 for replacement intervals.
To find out what type of filter to use,
see Maintenance Replacement
Parts on page 11‑9. The passenger compartment air
filter can be accessed by removing
the entire glove box.
1. Open the passenger side door.
Remove the end cover located
on the side of the instrument
panel in the top right corner.
Remove the screw affixed to
the side of the glove box.
2. Open the glove box door and remove the attached screws
from around the glove box.
3. Lower the loosened glove box housing.
4. Unplug both wire cables and remove the glove box.