Page 9 of 16

9
Audio System
Note: Avoid extended searching for specific items or configuring system settings while driving.
Setting the Time
1. Turn on the audio system.
2. Press the Clockbutton.
3. Press the MENUknob chrome ring to highlight the desired time.
4. Turn the MENUknob to change the value; press the chrome ring to confirm the set
value. Press the BACK button to return to the Time Settings menu.
Note:Open the Time and Date Settings in the Configuration menu to make other time and date
adjustments.
Storing Favorite Stations
Radio stations from all bands (AM, FM or XM
✦) can be stored, in any order, on up to six
pages of favorites.
1. Tune in the desired radio station.
2. Press the FAVbutton to display the page where the station is to be stored.
3. Press and hold one of the six numeric pushbuttons until a beep is heard.
4. Repeat the steps for each pushbutton on each page.
Portable Audio Devices
A 3.5mm auxiliary input jack (A) and a
USB port
✦(B) are located in the center
console. Route the device wires through
the wire exit (C) of the console lid.
A portable audio device connected to the
auxiliary input jack can be controlled only
by using the portable device controls. To
optimize speaker volume, fully increase
the volume level of the portable device.
Compatible devices connected to the USB
port can be controlled by the audio sys-
tem. Not all devices may be supported.
Use the MENUknob and the audio
steering wheel controls to access various
functions and to disconnect a USB device.
Note: Some supported devices can be
recharged when connected to the USB port✦.
✦optional equipmentSee Infotainment System in your Owner Manual.
IntelliLink✦
IntelliLink uses a Bluetooth or USB connection to link a smartphone, cell phone, USB
flash drive or digital audio player to the touch screen infotainment display. It offers a
variety of entertainment options, including streaming audio from the Internet through a
smartphone, and features enhanced hands-free voice control and music information.
Not all features may be available with the navigation system
✦.
A
CB
Page 10 of 16

10
Bluetooth® System
The in-vehicle Bluetooth system allows users with a Bluetooth-enabled cell phone to make
and receive hands-free calls in the vehicle. The Bluetooth-enabled cell phone must be
paired with the vehicle’s Bluetooth system. Not all phones will support all functions.
Pair a Device
1. Turn on the radio; press the CONFIGbutton.
2. Use the MENUknob to open the Phone Settings menu.
3. Select Bluetooth.
4. Select Pair Device. A four-digit PIN appears on the display.
5. Start the pairing process on the device. Locate the device named Your Vehicle on the
device list. Follow the instructions to enter the PIN.
6. The system prompts for a name for the device.
7. When complete, the system responds that the device has been successfully paired.
Visit www.gm.com/bluetooth and see Infotainment System in your Owner Manual.
A. NAV Navigation
Press to view the vehicle’s current position
on the map screen.
B. DEST/NAV Destination/Navigation
Press to access the Destination Entry
screen to plan a destination.
C. RPT/NAV Repeat/Navigation
Press to repeat the voice guidance prompt.
To select various functions, touch the highlight-
ed touch screen buttons in the on-screen
menus or use the TUNE/MENU knob.
Use the 4-way control in the center of the
TUNE/MENUknob to move in each direction
on the map screen.
Navigation System✦
Note: When the vehicle is moving, various
on-screen functions are disabled to reduce
driver distraction.
Entering a Destination
1. Press the DEST/NAVbutton.
2. Touch the Address Entryscreen button to enter a specific address. The Destination
Entry menu also lists other options to plan a route.
3. Select State/Province, City or Street and enter the information. Touch the List
button to select the desired name from the generated list for each entry.
4. Enter the house number. Touch the Donescreen button.
5. The entered address is displayed.
6. Select the Route Options and touch the Start Guidancescreen button.
See your Navigation System Owner Manual.✦optional equipment
ABC
Page 11 of 16

11
Audio Steering Wheel Controls
Volume
Press +or –to adjust the volume.
SRC Source
Press to select an audio source.
Next/Previous
Toggle up or down to go to the next or pre-
vious favorite radio station, track, or file.
Push to Talk
Press to interact with the OnStar
®or
Bluetooth system.
End Call/Mute
Press to end or reject an OnStar or a
Bluetooth call.
Press to mute the vehicle speakers.
See Instruments and Controls in your Owner Manual.
Vehicle Personalization
Customize Settings
1. Press the CONFIGbutton (A) to enter
the Configuration menu.
2. Turn the MENUknob (B) to highlight
Vehicle Settings; press the MENU knob
chrome ring to select it.
3. Turn the MENUknob to highlight the
desired menus and settings; press the
MENUknob chrome ring to select the
highlighted item.
4. Press the BACKbutton (C) to move
back within a menu.
See Instruments and Controls in your Owner Manual.
Some vehicle features can be customized using the audio controls and menus.
Personalization menus may include Climate and Air Quality, Comfort and Convenience,
Collision/Detection Systems, Exterior Ambient Lighting, Power Door Locks, Remote
Lock/Unlock/Start, and Restore Factory Settings.
CBA
Page 12 of 16
 on the instrument cluster displays a variety of vehicle
system information and warning messages.
DIC Controls
A. MENU
Press to display")
12
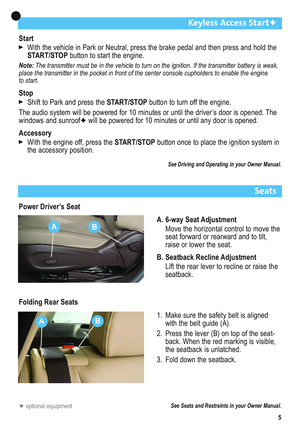
Driver Information Center
The Driver Information Center (DIC) on the instrument cluster displays a variety of vehicle
system information and warning messages.
DIC Controls
A. MENU
Press to display the Vehicle Information
menu (units, tire pressure, remaining oil
life, battery voltage) or the Trip/Fuel
Information menu (digital speedometer,
trip odometers, fuel range, average fuel
economy, instantaneous fuel economy,
average vehicle speed, time, OnStar
Turn-by-Turn guidance navigation).
B.
Rotate the switch to scroll through the
items of each menu.
C. SET/CLR
Press and hold the button on the end of
the lever to set or clear a menu item or
warning message.
See Instruments and Controls in your Owner Manual.
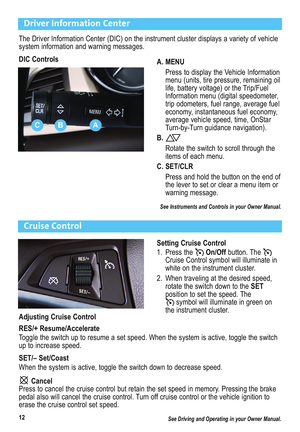
Cruise Control
Setting Cruise Control
1. Press the On/Off button. The
Cruise Control symbol will illuminate in
white on the instrument cluster.
2. When traveling at the desired speed,
rotate the switch down to the SET
position to set the speed. The
symbol will illuminate in green on
the instrument cluster.
ABC
Adjusting Cruise Control
RES/+ Resume/Accelerate
Toggle the switch up to resume a set speed. When the system is active, toggle the switch
up to increase speed.
SET/– Set/Coast
When the system is active, toggle the switch down to decrease speed.
Cancel
Press to cancel the cruise control but retain the set speed in memory. Pressing the brake
pedal also will cancel the cruise control. Turn off cruise control or the vehicle ignition to
erase the cruise control set speed.
See Driving and Operating in your Owner Manual.
Page 13 of 16

13
Automatic Transmission
Manual Mode
Manual Mode allows the driver to shift
gears manually. This feature can be used
to drive the vehicle in a sportier manner, or
to downshift when driving on a downhill
grade to provide engine braking.
1. Move the shift lever left to the
+/–position.
2. Tap the shift lever forward (+) to
upshift or rearward (–) to downshift.
The current gear will be displayed on
the Driver Information Center.
If vehicle speed is too high or too low for
the requested gear, the shift will not occur.
When coming to a stop, the transmission
will downshift automatically.
See Driving and Operating in your Owner Manual.
Turning the Systems Off/On
To turn off traction control, press the
Traction Control/StabiliTrak Off
button. TheTraction Control Off
light will illuminate on the instrument
cluster. Turn off traction control if the
vehicle is stuck and rocking the vehicle
is required.
To turn off both traction control and
StabiliTrak, press and hold the
button. The Traction Control Off
light and StabiliTrak Off light will
illuminate on the instrument cluster.
Press the button again to turn on both
systems.
See Driving and Operating in your Owner Manual.
Traction Control and StabiliTrak® Systems
The traction control system limits wheelspin and the StabiliTrak stability control system
assists with directional control of the vehicle in difficult driving conditions. Both systems
turn on automatically every time the vehicle is started.
Page 14 of 16

14
Electric Parking Brake
To apply the parking brake, pull up theParking Brakeswitch by the shift lever.
To release the parking brake, turn on the ignition, press the brake pedal and press
down theParking Brakeswitch.
Note: The parking brake will automatically release if the vehicle is running, placed into gear, and an
attempt is made to drive away.
See Driving and Operating in your Owner Manual.
Door Locks
Pull the inside door handle of a locked door to unlock it; pull the inside handle again to
open the door.
To prevent a rear door from opening from the inside and to disable the rear window
controls, press the Safety Locksbutton located on the driver’s door. The button
indicator will illuminate when activated.
See Keys, Doors and Windows in your Owner Manual.
Pen Holder
A convenient pen holder is located at the
front of the glove box.
See Storage in your Owner Manual.
Sunroof✦
The sunroof controls are located on the overhead console.
Tilt/ Close
Press the top of the switch to tilt the
sunroof.
Press the bottom of the switch to close
the sunroof.
See Keys, Doors and Windows in your Owner Manual.✦optional equipment
Express Open/ Close
Fully press the top of the switch to
express open the sunroof. Gently press
and hold the switch to partially open the
sunroof.
Fully press the bottom of the switch to
express close the sunroof. Gently press
and hold the switch to partially close the
sunroof.
Page 15 of 16

15
Ultrasonic Rear Parking Assist✦
Detected objects are indicated by audible beeps when the vehicle is in Reverse. The
interval between beeps becomes shorter as the vehicle gets closer to an object. When the
distance is less than 12 in. (30cm), the beeps are continuous. The system operates only
at speeds less than 5 mph.
To turn the system off/on, open the Collision Detection menu in the Vehicle Settings
menu by using the audio system controls.
When the system is on, a beep sounds when shifting into Reverse.
Note: The system may be disabled if dirt, snow or ice builds up on the sensors. Keep the vehicle
clean for proper operation.
See Driving and Operating in your Owner Manual.
Tire Pressure Monitor
TheLow Tire Pressurewarning light on the instrument cluster illuminates when a sig-
nificant reduction in pressure occurs in one or more of the vehicle’s tires. The warning light
will remain on until the tire pressure is corrected. The proper tire pressures for the vehicle
are listed on the Tire and Loading Information label, located below the driver’s door latch.
Tire pressure is affected by cold weather and distance driven. If the low tire pressure
warning light illuminates when the vehicle is first started and then turns off as the vehicle
is driven in cooler temperatures, check for the proper tire pressures.
Note:The Tire Pressure Monitor can alert you about low tire pressure, but it doesn’t replace normal
monthly tire maintenance. It is the driver’s responsibility to maintain correct tire pressures.
See Vehicle Care in your Owner Manual.
Engine Oil Life System
The Oil Life System calculates engine oil life based on vehicle use and displays Change
Engine Oil Soon on the Driver Information Center (DIC) when it’s necessary to change the
engine oil and filter. The system should be reset to 100% only following an oil change.
Resetting the Oil Life System
1. Turn the ignition to the On position, but do not start the engine.
2. Press the MENUbutton to display the Vehicle Information menu on the DIC.
3. Rotate the switch to view Remaining Oil Life.
4. Press the SET/CLRbutton until 100% is displayed.
5. Turn off the ignition.
See Vehicle Care in your Owner Manual.
Page 16 of 16

16
Roadside Assistance
1-800-252-1112 TTY Users: 1-888-889-2438
As the owner of a new Buick, you are automatically enrolled in the Buick Roadside Assistance
program for 5 years/100,000 miles at no expense to you. This value-added service is intended
to provide you with peace of mind as you drive across town or travel the open road.
Buick’s Roadside Assistance toll-free number is staffed by a team of trained advisors who are
available 24 hours a day, 365 days a year, to contact a service provider for light services (fuel
delivery, jump-starts, flat tire and lock-outs) or make arrangements to tow your vehicle to the
nearest Buick dealer.
Roadside Assistance and OnStar
®
If you require roadside service and have a current OnStar subscription, press the OnStar but-
ton and the vehicle will send your current GPS location to an OnStar Advisor who will speak to
you, assess your problem, contact Roadside Assistance and relay your exact location so you
will get the help you need.
Buick Owner Center
The Buick Owner Center, a complimentary service for Buick owners, is a one-stop resource
designed to enhance your Buick ownership experience. Exclusive member benefits include
online service reminders, vehicle maintenance tips, online owner manual, special privileges
and more.
Sign up today at www.gmownercenter.com/buick.
Certain restrictions, precautions and safety procedures apply to your vehicle. Please read your Owner Manual
for complete instructions. All information contained herein is based on the latest information available at the time
of printing and is subject to change without notice. Copyright 2011 General Motors. All rights reserved.
Always demand genuine GM Parts
myBuick and OnStar® Mobile Apps
The myBuick and OnStar RemoteLink mobile apps connect owners to a
variety of vehicle information and services, such as a searchable Owner
Manual, real-time fuel information and Roadside Assistance, as well as
enabling users to perform Remote Keyless Entry transmitter commands,
including locking and unlocking the doors and starting the vehicle.
An active OnStar account is required to use the OnStar mobile app. Visit OnStar.comfor more
information. Download the mobile apps from your iPhone®or Android™ device’s app store.
To learn more about OnStar services, press the OnStar button, refer to the OnStar Owner
Guide, call 1-888-466-7827 or visit OnStar.com.
22824089 A
!22824089!