2011 BMW X5 XDRIVE 35I SPORT ACTIVITY turn signal
[x] Cancel search: turn signalPage 86 of 312
Controls Overview
84
Displaying stored Check Control
messages
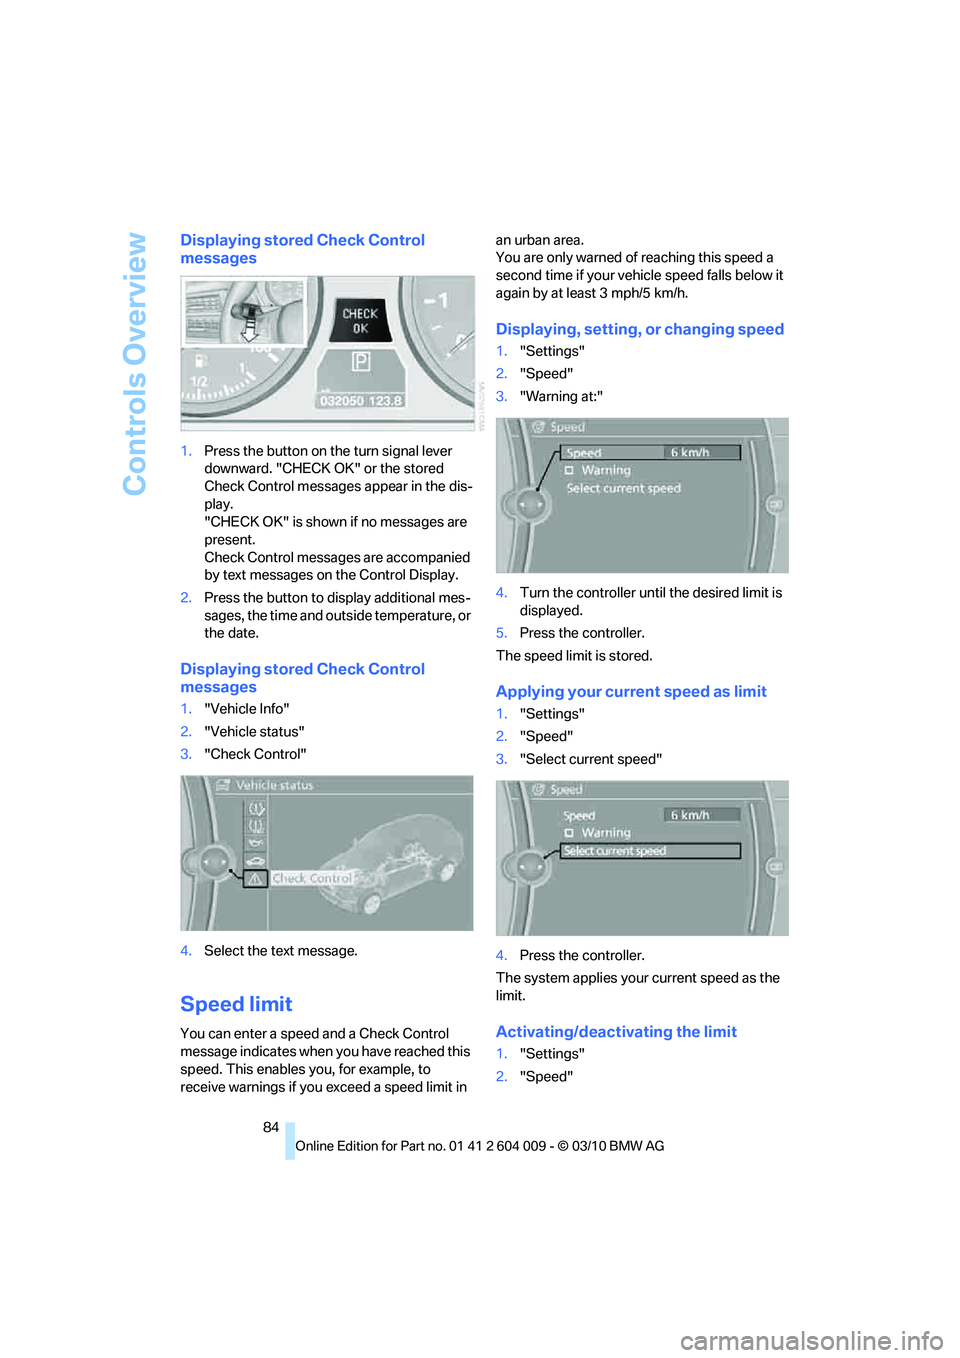
1.Press the button on the turn signal lever
downward. "CHECK OK" or the stored
Check Control messages appear in the dis-
play.
"CHECK OK" is shown if no messages are
present.
Check Control messages are accompanied
by text messages on the Control Display.
2.Press the button to display additional mes-
sages, the time and outside temperature, or
the date.
Displaying stored Check Control
messages
1."Vehicle Info"
2."Vehicle status"
3."Check Control"
4.Select the text message.
Speed limit
You can enter a speed and a Check Control
message indicates when you have reached this
speed. This enables you, for example, to
receive warnings if you exceed a speed limit in an urban area.
You are only warned of reaching this speed a
second time if your vehicle speed falls below it
again by at least 3 mph/5 km/h.
Displaying, setting, or changing speed
1."Settings"
2."Speed"
3."Warning at:"
4.Turn the controller until the desired limit is
displayed.
5.Press the controller.
The speed limit is stored.
Applying your current speed as limit
1."Settings"
2."Speed"
3."Select current speed"
4.Press the controller.
The system applies your current speed as the
limit.
Activating/deactivating the limit
1."Settings"
2."Speed"
Page 106 of 312
Technology for comfort, convenience and safety
104 possible, and inflate them to the proper pres-
sure. Driving on a significantly underinflated tire
causes the tire to overheat and can lead to tire
failure. Underinflation also reduces fuel effi-
ciency and tire tread life, and may affect the
vehicle's handling and stopping ability.
Please note that the TPMS is not a substitute
for proper tire maintenance, and it is the driver's
responsibility to maintain correct tire pressure,
even if underinflation has not reached the level
to trigger illumination of the TPMS low tire
pressure telltale.
Your vehicle has also been equipped with a
TPMS malfunction indicator to indicate when
the system is not operating properly. The
TPMS malfunction indicator is combined with
the low tire pressure telltale. When the system
detects a malfunction, the telltale will flash for
approximately one minute and then remain con-
tinuously illuminated. This sequence will con-
tinue upon subsequent vehicle startups as long
as the malfunction exists. When the malfunc-
tion indicator is illuminated, the system may not
be able to detect or signal low tire pressure as
intended. TPMS malfunctions may occur for a
variety of reasons, including the installation of
replacement or alternate tires or wheels on the
vehicle that prevent the TPMS from functioning
properly. Always check the TPMS malfunction
telltale after replacing one or more tires or
wheels on your vehicle to ensure that the
replacement or alternate tires and wheels allow
the TPMS to continue to function properly.
Lane departure warning*
The concept
On roads with lane markings, this system warns
you at speeds exceeding approx. 40 mph/
65 km/h when the vehicle is about to leave the
lane.
The steering wheel begins vibrating lightly.
The system does not issue a warning if the turn
signal is set before leaving the lane.
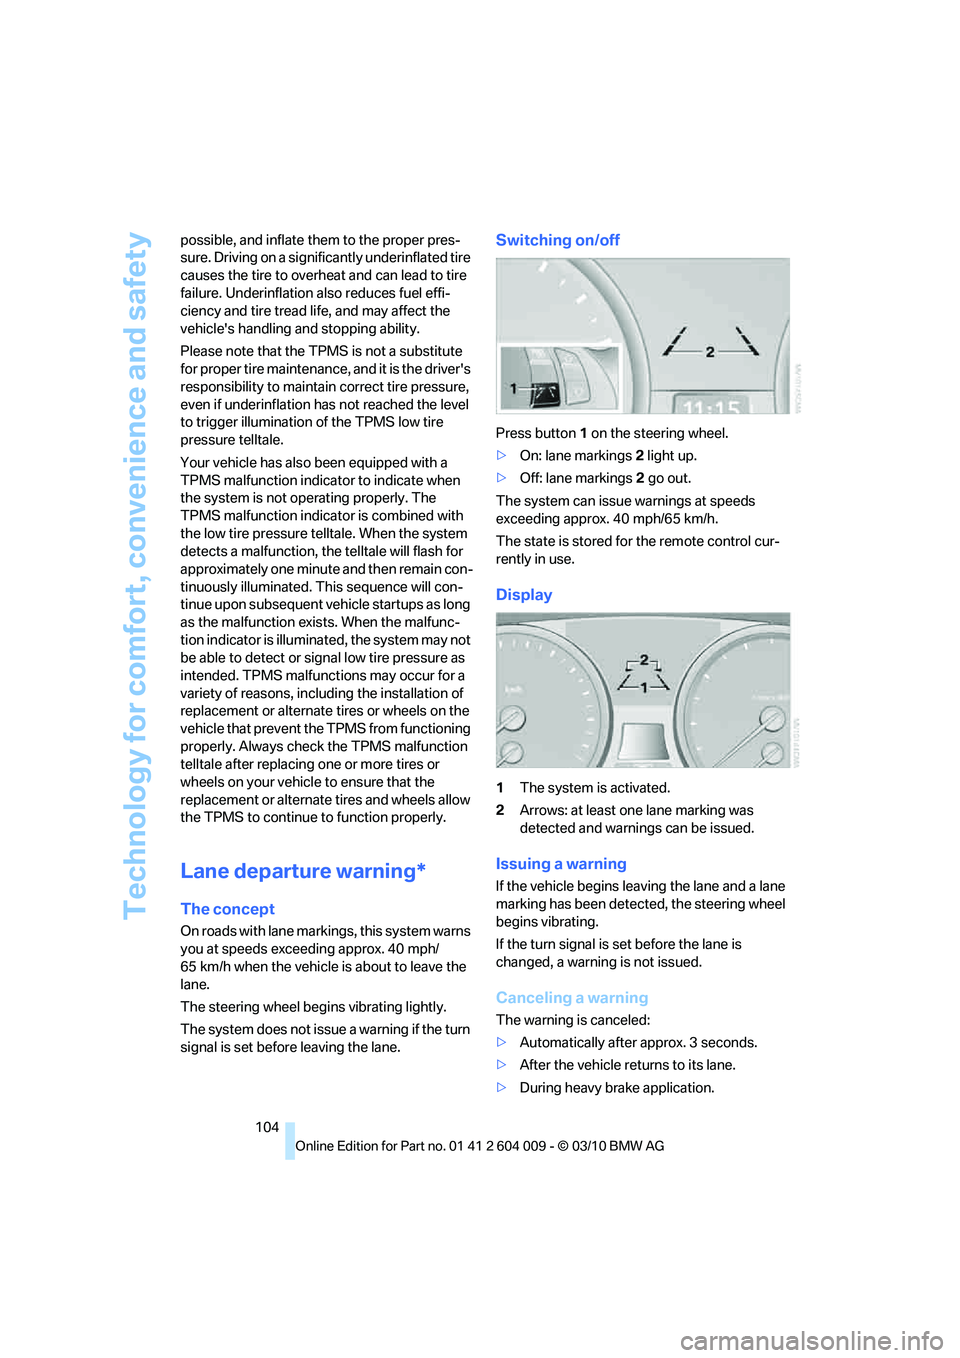
Switching on/off
Press button 1 on the steering wheel.
>On: lane markings 2 light up.
>Off: lane markings 2 go out.
The system can issue warnings at speeds
exceeding approx. 40 mph/65 km/h.
The state is stored for the remote control cur-
rently in use.
Display
1The system is activated.
2Arrows: at least one lane marking was
detected and warnings can be issued.
Issuing a warning
If the vehicle begins leaving the lane and a lane
marking has been detected, the steering wheel
begins vibrating.
If the turn signal is set before the lane is
changed, a warning is not issued.
Canceling a warning
The warning is canceled:
>Automatically after approx. 3 seconds.
>After the vehicle returns to its lane.
>During heavy brake application.
Page 107 of 312
Controls
105Reference
At a glance
Driving tips
Communications
Navigation
Entertainment
Mobility
>When the turn signal flashes.
System limits
The system cannot replace the driver's
personal judgment of the course of the
road and the traffic situation.
In the event of a warning, do not jerk the steer-
ing wheel; otherwise, you may lose control over
the vehicle.<
The system may not be fully functional in the
following situations:
>In heavy fog, rain or snowfall.
>When the lane markings are worn away,
poorly visible, convergent, divergent or
unclear, as in road construction areas.
>When the limit lines are covered by snow,
ice, dirt or water.
>In tight curves or on narrow lanes.
>When the limit lines are not white.
>When the limit lines are covered by objects.
>When driving very close to the vehicle in
front of you.
>When driving toward bright lights.
>When the windshield is fogged over, dirty or
covered by a sticker, etc., in front of the
interior rearview mirror.
Malfunctions
Steering wheel vibration
Frequent activation of the steering wheel vibra-
tion causes the system to overheat.
This causes the lane departure warning to
become deactivated.
Let the system cool and reactivate it by press-
ing the button.
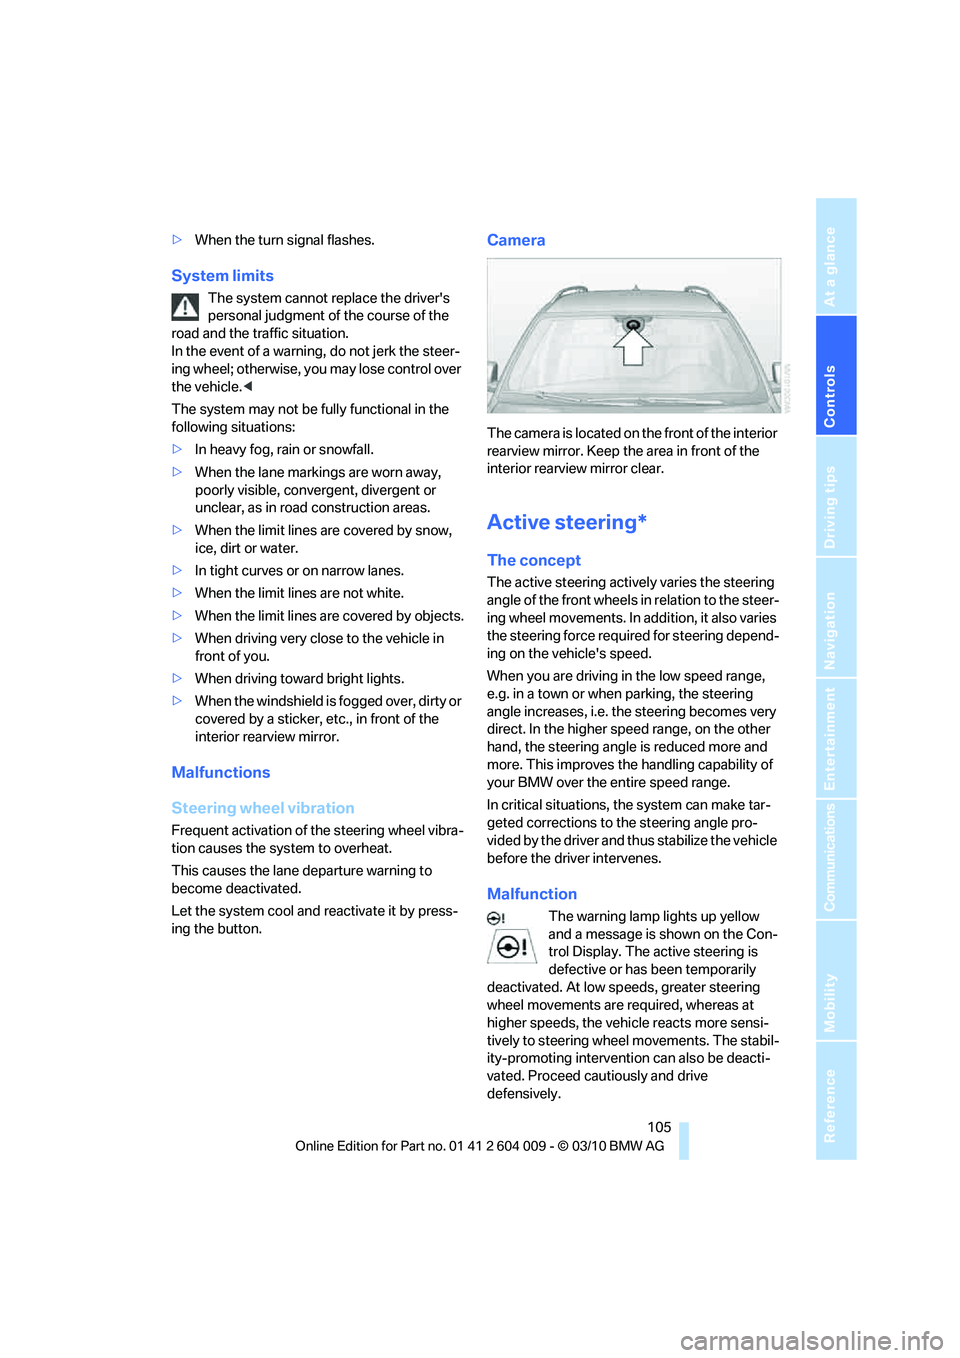
Camera
The camera is located on the front of the interior
rearview mirror. Keep the area in front of the
interior rearview mirror clear.
Active steering*
The concept
The active steering actively varies the steering
angle of the front wheels in relation to the steer-
ing wheel movements. In addition, it also varies
the steering force required for steering depend-
ing on the vehicle's speed.
When you are driving in the low speed range,
e.g. in a town or when parking, the steering
angle increases, i.e. the steering becomes very
direct. In the higher speed range, on the other
hand, the steering angle is reduced more and
more. This improves the handling capability of
your BMW over the entire speed range.
In critical situations, the system can make tar-
geted corrections to the steering angle pro-
vided by the driver and thus stabilize the vehicle
before the driver intervenes.
Malfunction
The warning lamp lights up yellow
and a message is shown on the Con-
trol Display. The active steering is
defective or has been temporarily
deactivated. At low speeds, greater steering
wheel movements are required, whereas at
higher speeds, the vehicle reacts more sensi-
tively to steering wheel movements. The stabil-
ity-promoting intervention can also be deacti-
vated. Proceed cautiously and drive
defensively.
Page 114 of 312
Lamps
112 Welcome lamps are activated and are
stored for the remote control currently in use.
Pathway lighting
If you activate the headlamp flasher after
switching off the ignition with the lamps
switched off, the low beams come on and
remain on for a certain time.
Setting the duration or deactivating
1."Settings"
2."Lighting"
3."Pathway light.:"
4.Set a time of duration or 0 s to deactivate
the function.
The setting is stored for the remote control cur-
rently in use.
Daytime driving lamps*
The daytime driving lamps light up in position0,
1 and 3. If the light switch remains in position1,
the parking lamps light up after the ignition is
switched off.
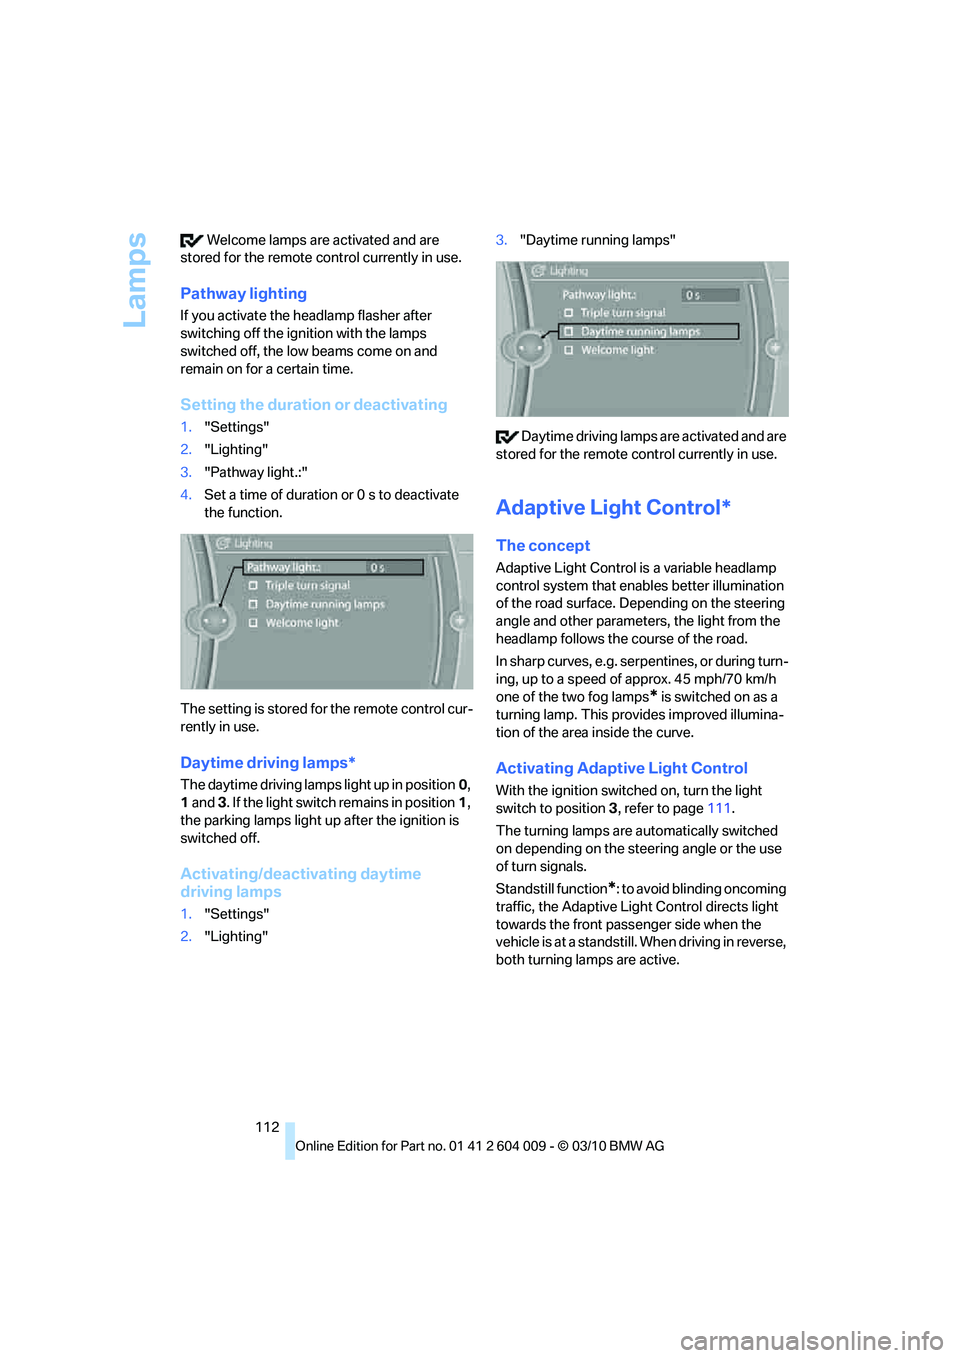
Activating/deactivating daytime
driving lamps
1."Settings"
2."Lighting"3."Daytime running lamps"
Daytime driving lamps are activated and are
stored for the remote control currently in use.
Adaptive Light Control*
The concept
Adaptive Light Control is a variable headlamp
control system that enables better illumination
of the road surface. Depending on the steering
angle and other parameters, the light from the
headlamp follows the course of the road.
In sharp curves, e.g. serpentines, or during turn-
ing, up to a speed of approx. 45 mph/70 km/h
one of the two fog lamps
* is switched on as a
turning lamp. This provides improved illumina-
tion of the area inside the curve.
Activating Adaptive Light Control
With the ignition switched on, turn the light
switch to position 3, refer to page111.
The turning lamps are automatically switched
on depending on the steering angle or the use
of turn signals.
Standstill function
*: to avoid blinding oncoming
traffic, the Adaptive Light Control directs light
towards the front passenger side when the
vehicle is at a standstill. When driving in reverse,
both turning lamps are active.
Page 115 of 312
Controls
113Reference
At a glance
Driving tips
Communications
Navigation
Entertainment
Mobility
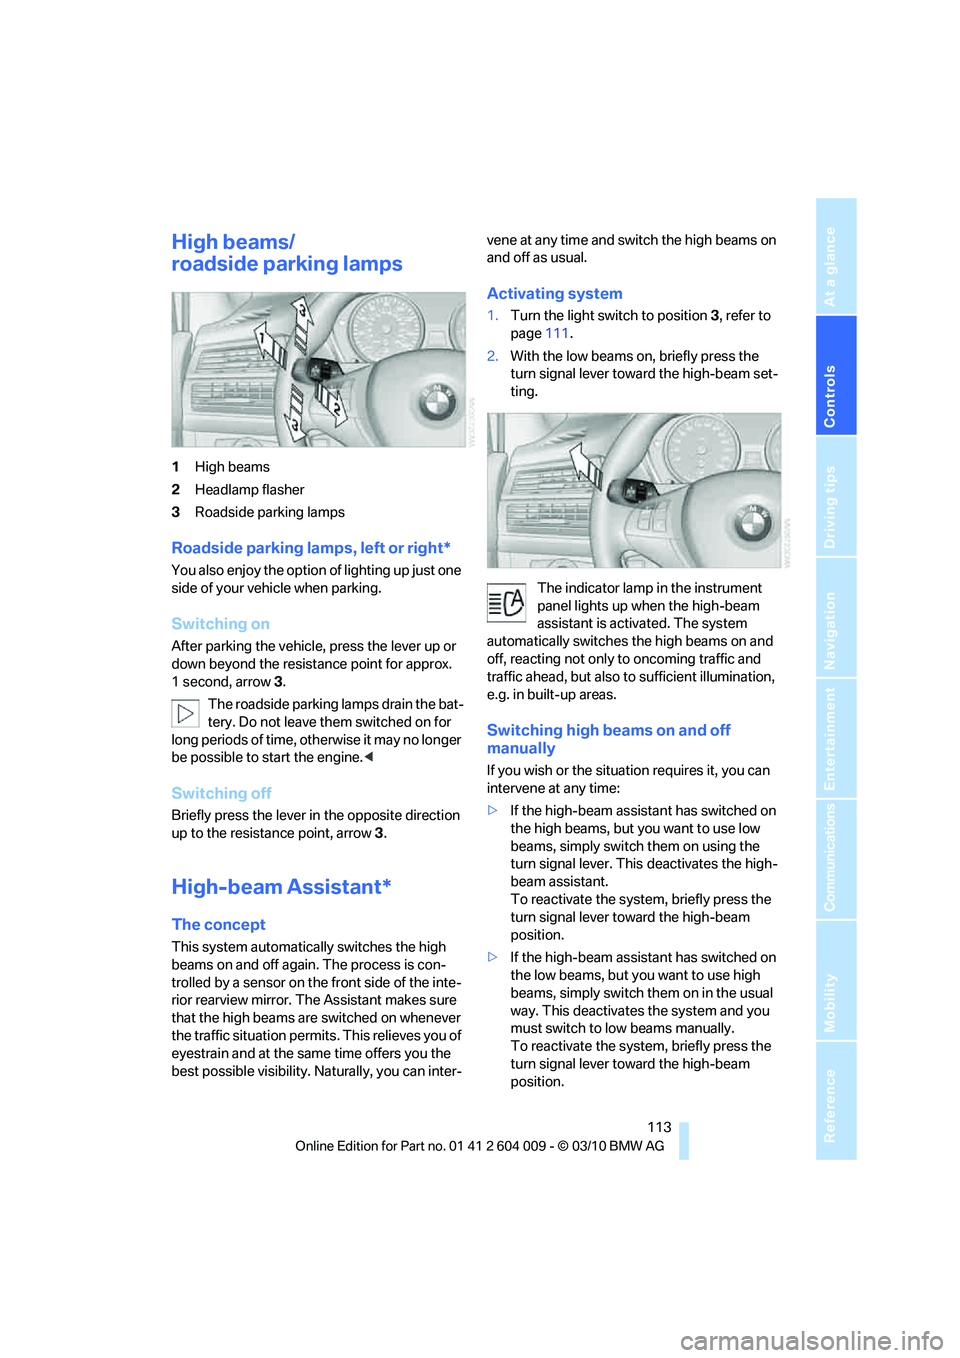
High beams/
roadside parking lamps
1High beams
2Headlamp flasher
3Roadside parking lamps
Roadside parking lamps, left or right*
You also enjoy the option of lighting up just one
side of your vehicle when parking.
Switching on
After parking the vehicle, press the lever up or
down beyond the resistance point for approx.
1 second, arrow3.
The roadside parking lamps drain the bat-
tery. Do not leave them switched on for
long periods of time, otherwise it may no longer
be possible to start the engine.<
Switching off
Briefly press the lever in the opposite direction
up to the resistance point, arrow 3.
High-beam Assistant*
The concept
This system automatically switches the high
beams on and off again. The process is con-
trolled by a sensor on the front side of the inte-
rior rearview mirror. The Assistant makes sure
that the high beams are switched on whenever
the traffic situation permits. This relieves you of
eyestrain and at the same time offers you the
best possible visibility. Naturally, you can inter-vene at any time and switch the high beams on
and off as usual.
Activating system
1.Turn the light switch to position3, refer to
page111.
2.With the low beams on, briefly press the
turn signal lever toward the high-beam set-
ting.
The indicator lamp in the instrument
panel lights up when the high-beam
assistant is activated. The system
automatically switches the high beams on and
off, reacting not only to oncoming traffic and
traffic ahead, but also to sufficient illumination,
e.g. in built-up areas.
Switching high beams on and off
manually
If you wish or the situation requires it, you can
intervene at any time:
>If the high-beam assistant has switched on
the high beams, but you want to use low
beams, simply switch them on using the
turn signal lever. This deactivates the high-
beam assistant.
To reactivate the system, briefly press the
turn signal lever toward the high-beam
position.
>If the high-beam assistant has switched on
the low beams, but you want to use high
beams, simply switch them on in the usual
way. This deactivates the system and you
must switch to low beams manually.
To reactivate the system, briefly press the
turn signal lever toward the high-beam
position.
Page 171 of 312
Navigation
Entertainment
Driving tips
169Reference
At a glance
Controls
Communications
Mobility
>"Fader": front/rear volume distribution
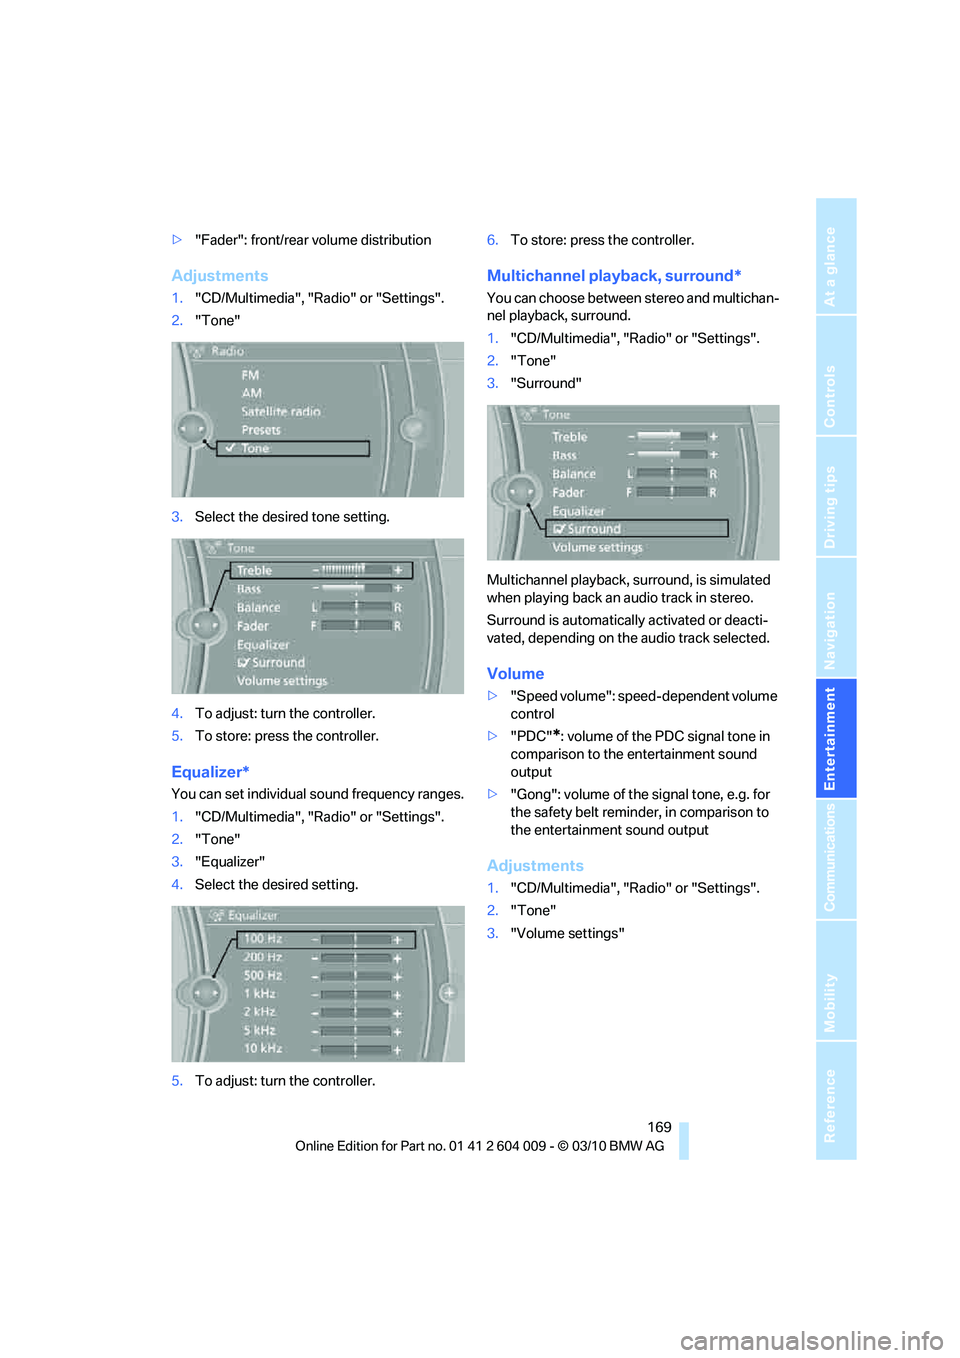
Adjustments
1."CD/Multimedia", "Radio" or "Settings".
2."Tone"
3.Select the desired tone setting.
4.To adjust: turn the controller.
5.To store: press the controller.
Equalizer*
You can set individual sound frequency ranges.
1."CD/Multimedia", "Radio" or "Settings".
2."Tone"
3."Equalizer"
4.Select the desired setting.
5.To adjust: turn the controller.6.To store: press the controller.
Multichannel playback, surround*
You can choose between stereo and multichan-
nel playback, surround.
1."CD/Multimedia", "Radio" or "Settings".
2."Tone"
3."Surround"
Multichannel playback, surround, is simulated
when playing back an audio track in stereo.
Surround is automatically activated or deacti-
vated, depending on the audio track selected.
Volume
>"Speed volume": speed-dependent volume
control
>"PDC"
*: volume of the PDC signal tone in
comparison to the entertainment sound
output
>"Gong": volume of the signal tone, e.g. for
the safety belt reminder, in comparison to
the entertainment sound output
Adjustments
1."CD/Multimedia", "Radio" or "Settings".
2."Tone"
3."Volume settings"
Page 222 of 312

Telephone
220
Requirements
The same prerequisites as for operation via
iDrive apply, refer to page215.
Voice commands
Activating voice activation system
1.Briefly press the button on the steering
wheel.
An acoustic signal indicates that you can
say commands.
2.Say the command.
Ending/canceling operation by voice
commands
Press the button on the steering wheel
briefly
orIn dialogs where text is spoken, e.g. a name
rather than a command, canceling is only possi-
ble using the button on the steering wheel.
Having possible commands read aloud
The system understands default commands
that must be spoken word for word.
You can have the possible commands spoken
by the system at any point:
The system recognizes digits from zero to nine.
You can say each digit individually or group
them into a sequence to accelerate the input.
Using alternative commands
There are often a number of commands to run a
function, e.g.:
Example: dialing phone numbers
To start the dialog:
Press the button on the steering wheel.
Adjusting the volume of the
instructions
You can adjust the volume for the instructions
from the system:
Turn the button during an instruction.This volume for the instructions is maintained,
even if the other audio sources are set to mini-
mum volume.
The setting is stored for the remote control cur-
rently in use. {Cancel}.
{Help}.
{Dial name} or {Name}.
You sayThe voice control answers
{Dial number}{{Please say the number}}
For example: {123 456 7890}Depending on equipment:
{{123 456 7890. Continue ?}}
{Dial}{{Dialing number}}
Page 265 of 312
Mobility
263Reference
At a glance
Controls
Driving tips
Communications
Navigation
Entertainment
When performing care and maintenance on the
headlamps, please observe the information on
page259.
For bulbs for which replacement is not
described and for checking and adjusting
headlamp aim, please contact your BMW
Sports Activity Vehicle Center.<
Light-emitting diodes LEDs
Light-emitting diodes installed behind translu-
c e n t l e n s e s s e r v e a s t h e l i g h t s o u r c e f o r m a n y o f
the controls and displays in your vehicle. These
light-emitting diodes, which operate using a
concept similar to that applied in conventional
lasers, are officially designated as Class 1 light-
emitting diodes.
Do not remove the covers, and never
stare into the unfiltered light for several
hours, as irritation of the retina could result.<
Headlamp glass
Condensation can form on the inside of the
external lamps in cool or humid weather. When
the light is switched on, the condensation evap-
orates after a short time. The headlamp glasses
do not need to be changed.
If there is a large amount of moisture, for exam-
ple if water droplets form in the lamp, have it
checked by your BMW Sports Activity Vehicle
Center.
BMW X5: changing lamps
Xenon lamps
These bulbs have a very long service life and
the probability of a failure is very low. If a lamp
should nevertheless fail, you can continue driv-
ing cautiously with fog lamps
* provided that
this is permitted by the country-specific laws.
Have work on the xenon light unit includ-
ing changing the bulb carried out only by
your BMW Sports Activity Vehicle Center or a
workshop that works according to BMW repair
procedures with correspondingly trained per-
sonnel. Due to the high voltage present in the system, there is a danger of fatal injuries when
work is carried out improperly.<
Halogen bulbs:
Parking lamps and roadside parking
lamps, daytime driving lamps
35-Watt bulb, H8
The bulb is pressurized. Therefore, wear
safety glasses and protective gloves.
Otherwise there is a danger of injuries if the
bulb is accidentally damaged during replace-
ment.<
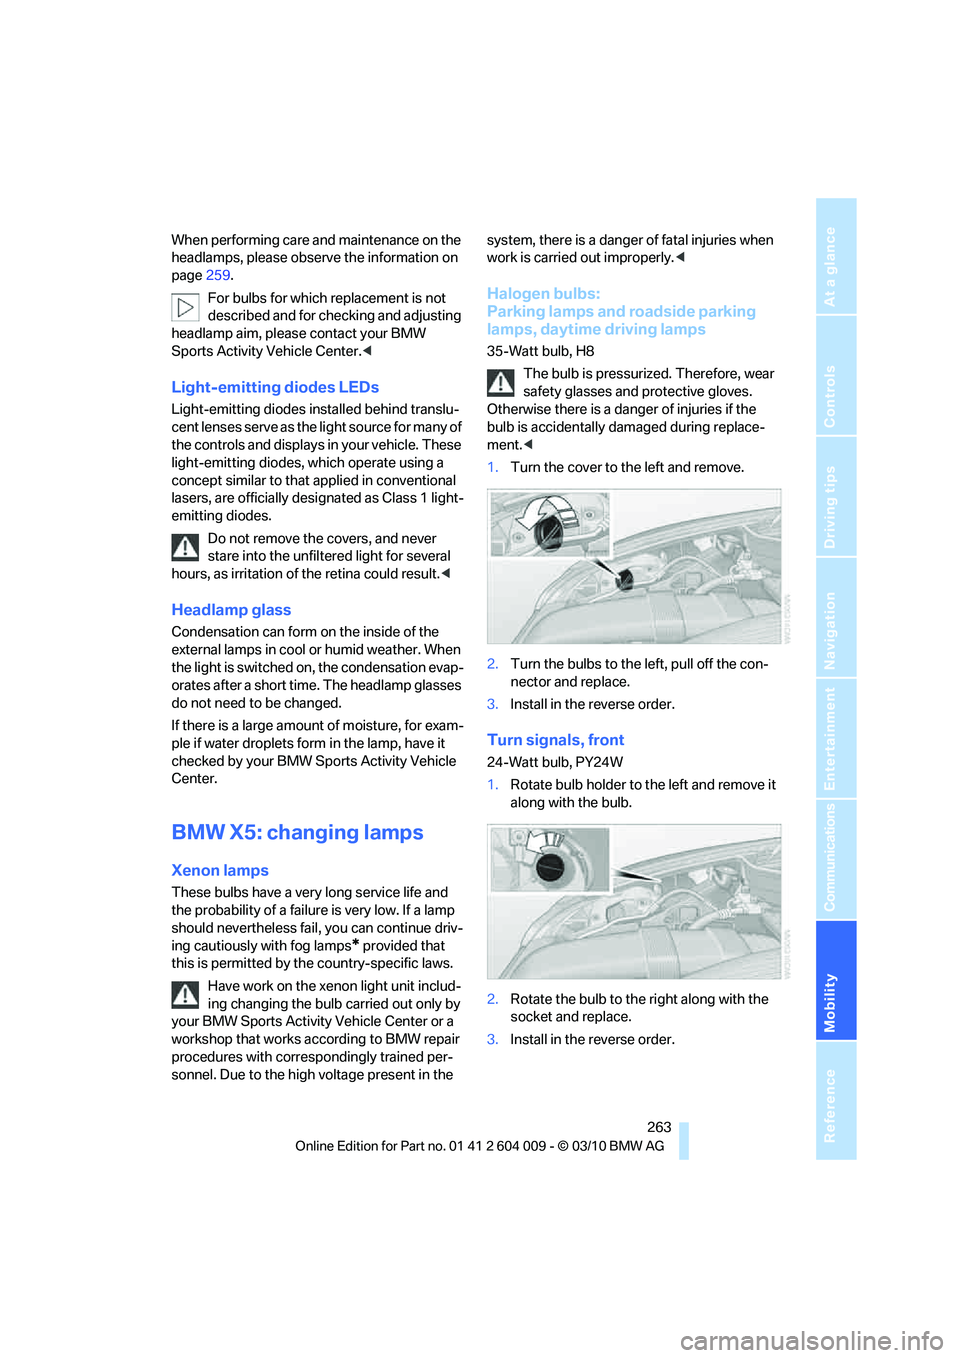
1.Turn the cover to the left and remove.
2.Turn the bulbs to the left, pull off the con-
nector and replace.
3.Install in the reverse order.
Turn signals, front
24-Watt bulb, PY24W
1.Rotate bulb holder to the left and remove it
along with the bulb.
2.Rotate the bulb to the right along with the
socket and replace.
3.Install in the reverse order.