2011 BMW X3 XDRIVE 28I sat nav
[x] Cancel search: sat navPage 122 of 262

Avoid load on the brakes
Avoid placing excessive load on the brake
system. Light but consistent brake pressure can
lead to high temperatures, brake wear and pos‐
sibly even brake failure.◀
Do not drive in neutral
Do not drive in neutral or with the engine
stopped, as doing so disables engine braking. In
addition, steering and brake assist is unavailable
with the engine stopped.◀
Brake disc corrosion
Corrosion on the brake discs and contamination
on the brake pads are furthered by:▷Low mileage.▷Extended periods when the vehicle is not
used at all.▷Infrequent use of the brakes.
Corrosion occurs when the minimum pressure
that must be exerted by the pads during brake
applications to clean the discs is not reached.
Should corrosion form on the brake discs, the
brakes will tend to respond with a pulsating ef‐
fect that generally cannot be corrected.
Condensation under the parked vehicle
When using the automatic climate control, con‐
densation water develops that exits underneath
the vehicle.
Therefore, traces of condensed water under the
vehicle are normal.
Loading Overloading the vehicle
To avoid exceeding the approved carrying
capacity of the tires, never overload the vehicle.
Overloading can lead to overheating and in‐
creases the rate at which damage develops in‐
side the tires. This could result in a sudden loss
of tire inflation pressure.◀
No fluids in the trunk
Make sure that fluids do not leak into the
trunk; otherwise, the vehicle may be damaged. ◀
Determining the load limit1.Locate the following statement on your ve‐
hicle’s placard*:▷The combined weight of occupants and
cargo should never exceed XXX kg or
YYY lbs. Otherwise, damage to the ve‐
hicle and unstable driving situations may
result.2.Determine the combined weight of the
driver and passengers that will be riding in
your vehicle.3.Subtract the combined weight of the driver
and passengers from XXX kilograms or YYY
pounds.4.The resulting figure equals the available
amount of cargo and luggage load capacity.
For example, if the YYY amount equals
1,400 lbs and there will be five 150 lbs pas‐
sengers in your vehicle, the amount of avail‐
able cargo and luggage load capacity is
650 lbs: 1,400 lbs minus 750 lbs = 650 lbs.5.Determine the combined weight of luggage
and cargo being loaded on the vehicle. That
weight may not safely exceed the available
cargo and luggage load capacity calculated
in Step 4.Seite 122122
Online Edition for Part no. 01 40 2 606 190 - 12 10 500Things to remember when driving
Page 123 of 262

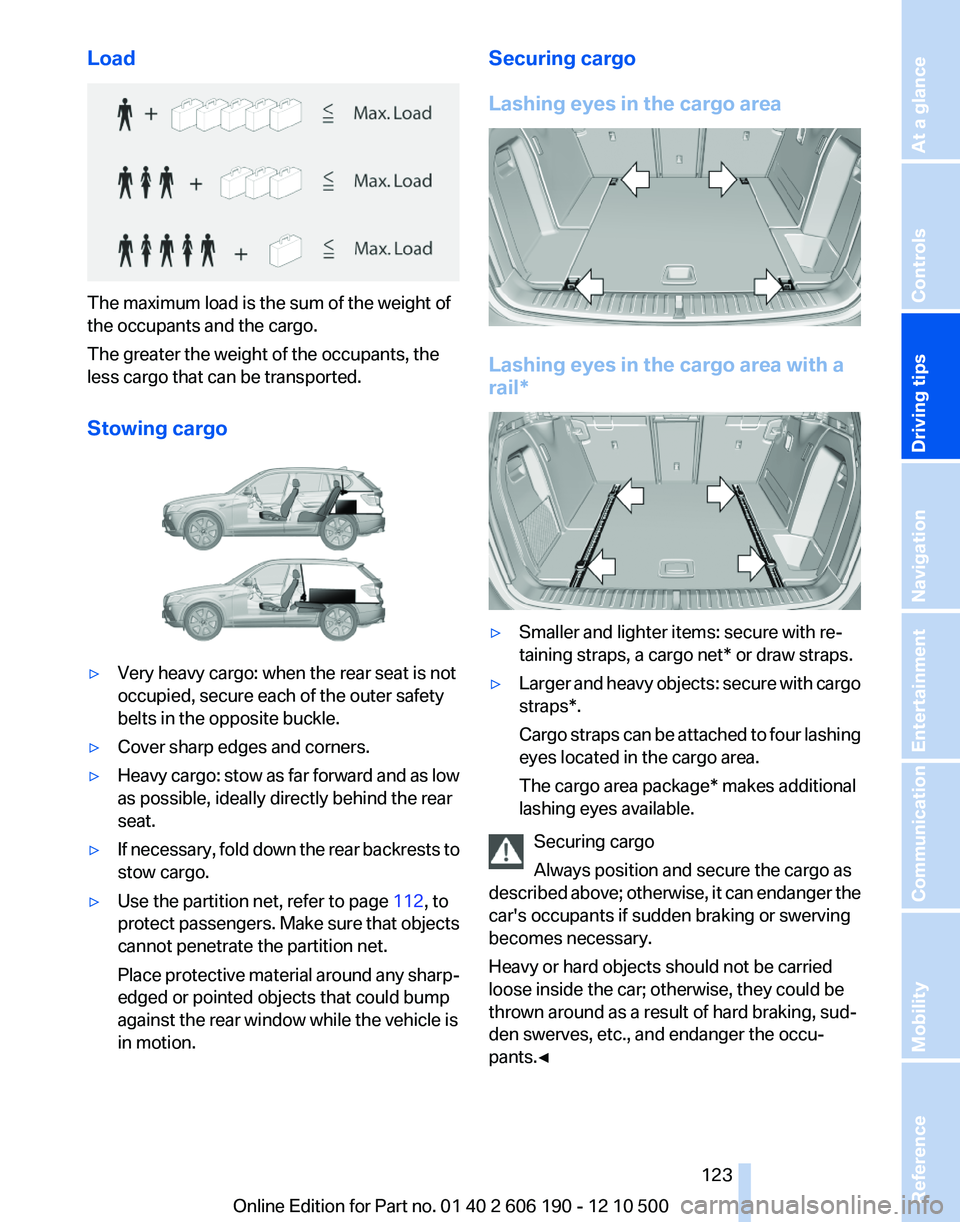
Load
The maximum load is the sum of the weight of
the occupants and the cargo.
The greater the weight of the occupants, the
less cargo that can be transported.
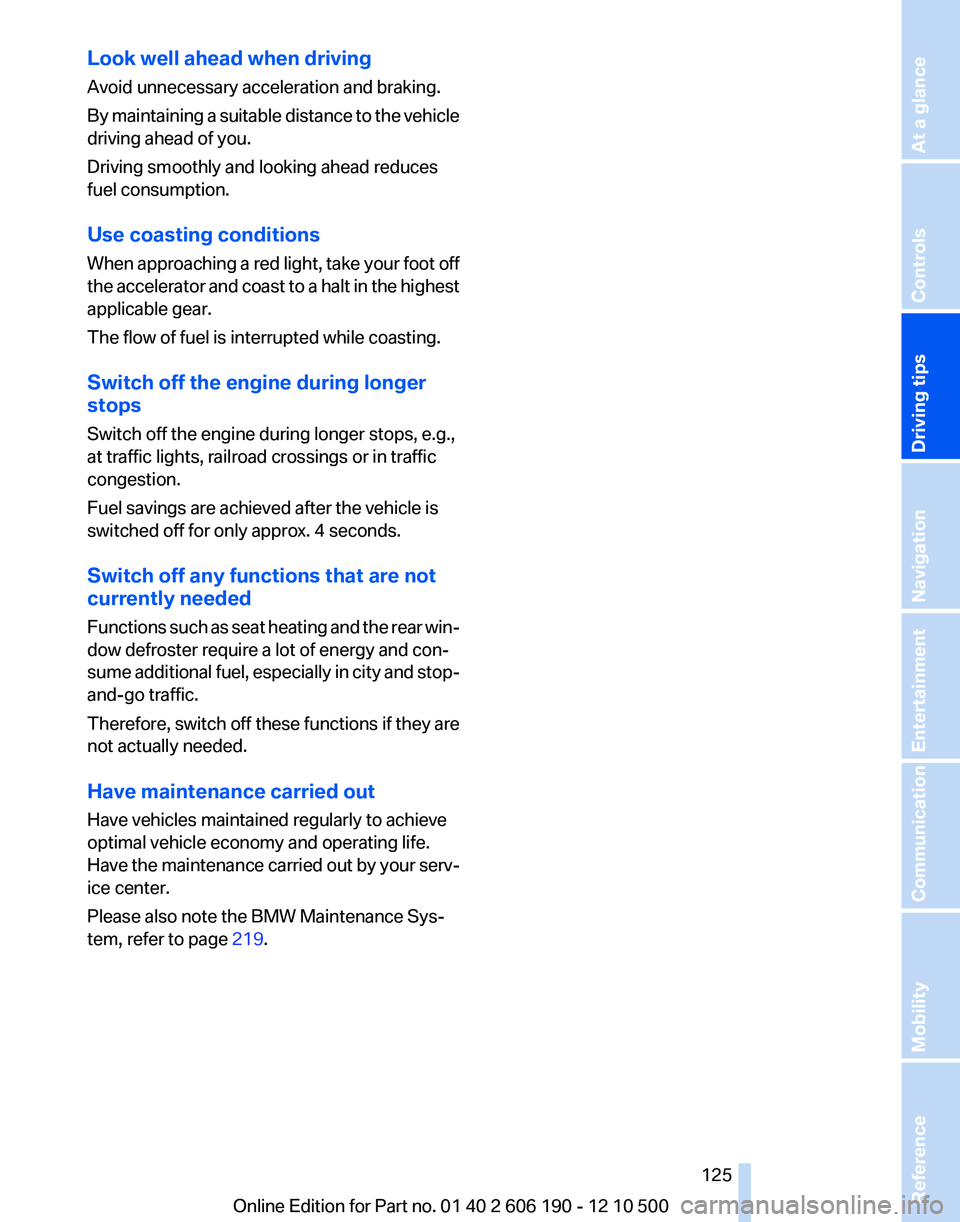
Stowing cargo
▷Very heavy cargo: when the rear seat is not
occupied, secure each of the outer safety
belts in the opposite buckle.▷Cover sharp edges and corners.▷Heavy cargo: stow as far forward and as low
as possible, ideally directly behind the rear
seat.▷If necessary, fold down the rear backrests to
stow cargo.▷Use the partition net, refer to page 112, to
protect passengers. Make sure that objects
cannot penetrate the partition net.
Place protective material around any sharp-
edged or pointed objects that could bump
against the rear window while the vehicle is
in motion.Securing cargo
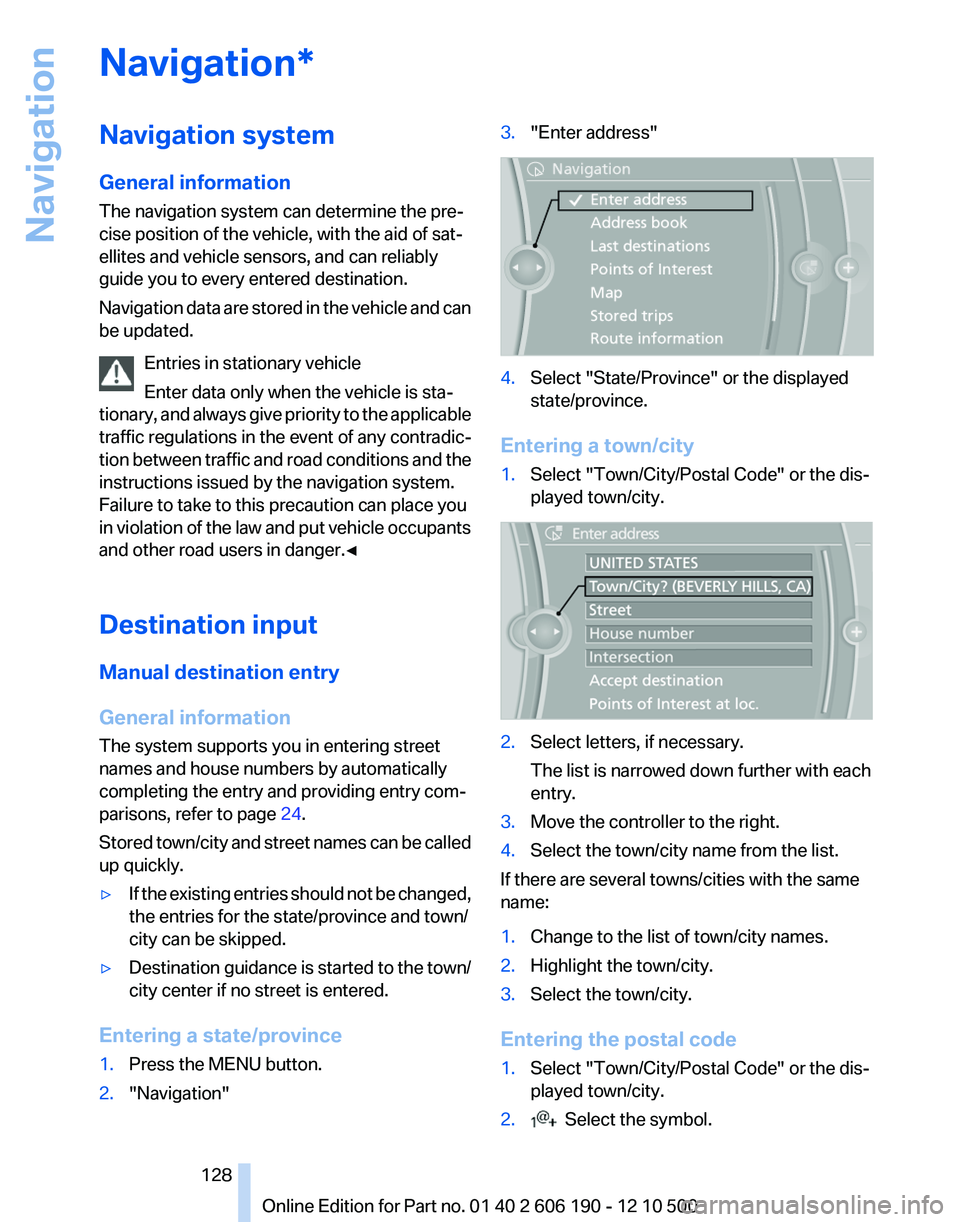
Lashing eyes in the cargo area
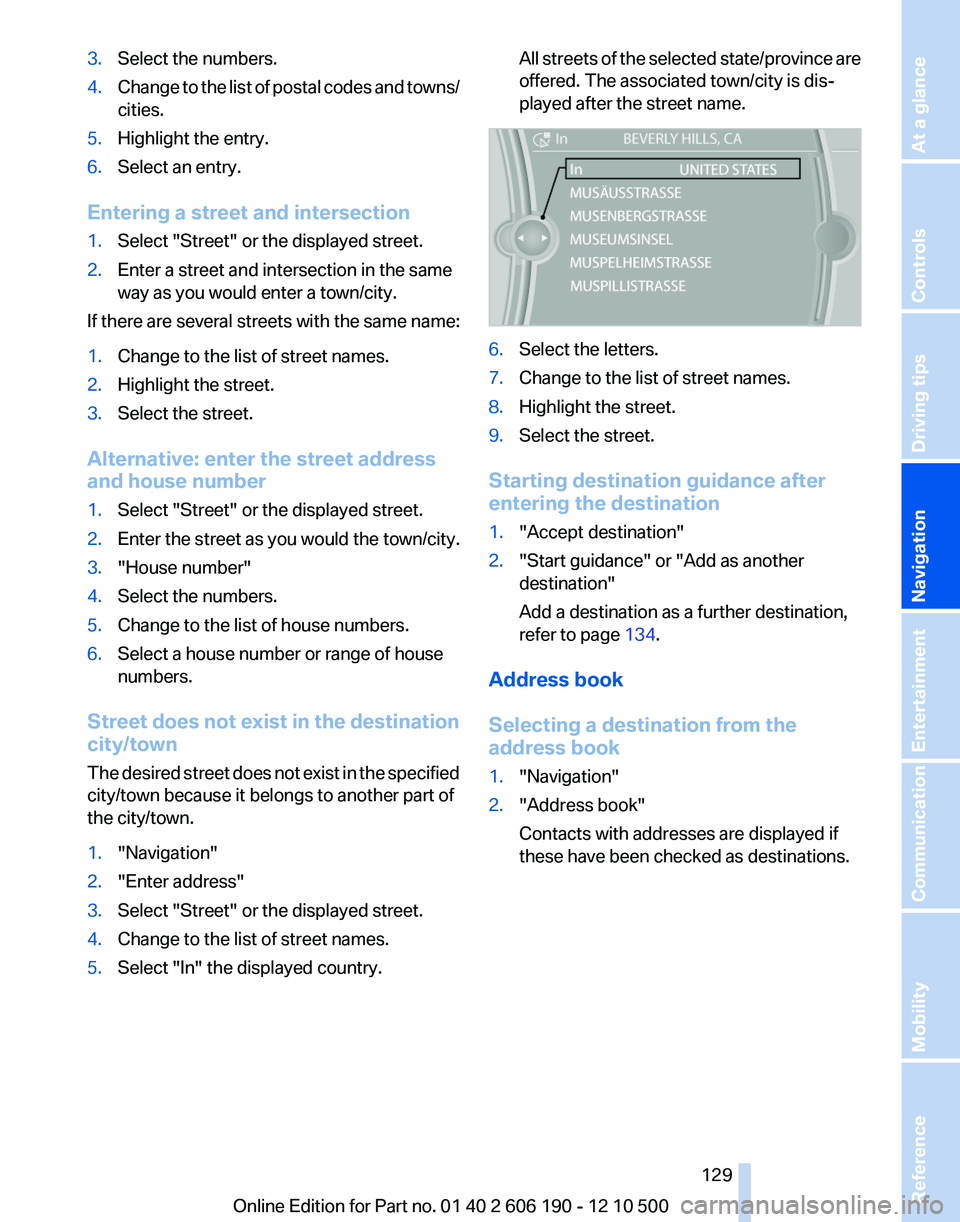
Lashing eyes in the cargo area with a
rail*
▷Smaller and lighter items: secure with re‐
taining straps, a cargo net* or draw straps.▷Larger and heavy objects: secure with cargo
straps*.
Cargo straps can be attached to four lashing
eyes located in the cargo area.
The cargo area package* makes additional
lashing eyes available.
Securing cargo
Always position and secure the cargo as
described above; otherwise, it can endanger the
car's occupants if sudden braking or swerving
becomes necessary.
Heavy or hard objects should not be carried
loose inside the car; otherwise, they could be
thrown around as a result of hard braking, sud‐
den swerves, etc., and endanger the occu‐
pants.◀
Seite 123123
Online Edition for Part no. 01 40 2 606 190 - 12 10 500
ReferenceMobilityCommunicationEntertainmentNavigationDriving tipsControlsAt a glance
Page 125 of 262

Look well ahead when driving
Avoid unnecessary acceleration and braking.
By maintaining a suitable distance to the vehicle
driving ahead of you.
Driving smoothly and looking ahead reduces
fuel consumption.
Use coasting conditions
When approaching a red light, take your foot off
the accelerator and coast to a halt in the highest
applicable gear.
The flow of fuel is interrupted while coasting.
Switch off the engine during longer
stops
Switch off the engine during longer stops, e.g.,
at traffic lights, railroad crossings or in traffic
congestion.
Fuel savings are achieved after the vehicle is
switched off for only approx. 4 seconds.
Switch off any functions that are not
currently needed
Functions such as seat heating and the rear win‐
dow defroster require a lot of energy and con‐
sume additional fuel, especially in city and stop-
and-go traffic.
Therefore, switch off these functions if they are
not actually needed.
Have maintenance carried out
Have vehicles maintained regularly to achieve
optimal vehicle economy and operating life.
Have the maintenance carried out by your serv‐
ice center.
Please also note the BMW Maintenance Sys‐
tem, refer to page 219.Seite 125125
Online Edition for Part no. 01 40 2 606 190 - 12 10 500
ReferenceMobilityCommunicationEntertainmentNavigationDriving tipsControlsAt a glance
Page 128 of 262

Navigation*Navigation system
General information
The navigation system can determine the pre‐
cise position of the vehicle, with the aid of sat‐
ellites and vehicle sensors, and can reliably
guide you to every entered destination.
Navigation data are stored in the vehicle and can
be updated.
Entries in stationary vehicle
Enter data only when the vehicle is sta‐
tionary, and always give priority to the applicable
traffic regulations in the event of any contradic‐
tion between traffic and road conditions and the
instructions issued by the navigation system.
Failure to take to this precaution can place you
in violation of the law and put vehicle occupants
and other road users in danger.◀
Destination input
Manual destination entry
General information
The system supports you in entering street
names and house numbers by automatically
completing the entry and providing entry com‐
parisons, refer to page 24.
Stored town/city and street names can be called
up quickly.▷If the existing entries should not be changed,
the entries for the state/province and town/
city can be skipped.▷Destination guidance is started to the town/
city center if no street is entered.
Entering a state/province
1.Press the MENU button.2."Navigation"3."Enter address"4.Select "State/Province" or the displayed
state/province.
Entering a town/city
1.Select "Town/City/Postal Code" or the dis‐
played town/city.2.Select letters, if necessary.
The list is narrowed down further with each
entry.3.Move the controller to the right.4.Select the town/city name from the list.
If there are several towns/cities with the same
name:
1.Change to the list of town/city names.2.Highlight the town/city.3.Select the town/city.
Entering the postal code
1.Select "Town/City/Postal Code" or the dis‐
played town/city.2. Select the symbol.Seite 128128
Online Edition for Part no. 01 40 2 606 190 - 12 10 500Navigation
Page 129 of 262

3.Select the numbers.4.Change to the list of postal codes and towns/
cities.5.Highlight the entry.6.Select an entry.
Entering a street and intersection
1.Select "Street" or the displayed street.2.Enter a street and intersection in the same
way as you would enter a town/city.
If there are several streets with the same name:
1.Change to the list of street names.2.Highlight the street.3.Select the street.
Alternative: enter the street address
and house number
1.Select "Street" or the displayed street.2.Enter the street as you would the town/city.3."House number"4.Select the numbers.5.Change to the list of house numbers.6.Select a house number or range of house
numbers.
Street does not exist in the destination
city/town
The desired street does not exist in the specified
city/town because it belongs to another part of
the city/town.
1."Navigation"2."Enter address"3.Select "Street" or the displayed street.4.Change to the list of street names.5.Select "In" the displayed country.All streets of the selected state/province are
offered. The associated town/city is dis‐
played after the street name.6.Select the letters.7.Change to the list of street names.8.Highlight the street.9.Select the street.
Starting destination guidance after
entering the destination
1."Accept destination"2."Start guidance" or "Add as another
destination"
Add a destination as a further destination,
refer to page 134.
Address book
Selecting a destination from the
address book
1."Navigation"2."Address book"
Contacts with addresses are displayed if
these have been checked as destinations.Seite 129129
Online Edition for Part no. 01 40 2 606 190 - 12 10 500
ReferenceMobilityCommunicationEntertainmentNavigationDriving tipsControlsAt a glance
Page 131 of 262

Last destinations
At a glance
The destinations previously entered are stored
automatically.
The destinations can be called up and used as a
destination for destination guidance.
Calling up the last destination1."Navigation"2."Last destinations"
Starting destination guidance
1."Navigation"2."Last destinations"3.Select the destination.4."Start guidance"
Editing the destination
1."Navigation"2."Last destinations"3.Highlight the destination.4.Open "Options".5."Edit destination"
Deleting the last destinations
1."Navigation"2."Last destinations"3.Highlight the destination.4.Open "Options".5."Delete entry" or "Delete all last
destinations"Special destinations
Opening the search for special
destinations
To select special destinations, e.g., hotels or
tourist attractions:1."Navigation"2."Points of Interest"3.Select the search function.
Online Search*
1."Google™ Search"2.Select a special destination.3. Select the symbol.4."Start guidance"
A-Z search
1."A-Z search"2."Town/City"
Select or enter the town/city.3."Category"4.Select the category.5."Category details"
For some special destinations, multiple cat‐
egory details can be selected. Move the
controller to the left to leave the category
details.6."Keyword"7.Enter the keyword.
A list of the special destinations is displayed.8.Select a special destination.
Details are displayed.
If multiple details are stored, you can leaf
through the pages.
If a phone number is available, a connection
can be established if necessary.9. Select the symbol.
"Start guidance" or "Add as another
destination"
Add a destination as a further destination,
refer to page 134.Seite 131131
Online Edition for Part no. 01 40 2 606 190 - 12 10 500
ReferenceMobilityCommunicationEntertainmentNavigationDriving tipsControlsAt a glance
Page 133 of 262

▷To change the scale: turn the controller.▷To shift the map: move the controller in
the required direction.▷To shift the map diagonally: move the
controller in the required direction and
turn it.
Specifying the street
If the system does not recognize a street, one of
the following is displayed:
▷The name of a street in the vicinity.▷The county.▷The coordinates of the destination.
Additional functions
Additional functions are available on the inter‐
active map after the controller is pressed.
▷ Select the symbol.
"Start guidance" or "Add as another
destination"
Add a destination as a further destination,
refer to page 134.▷"Exit interactive map": return to the map
view.▷"View in northern direction"▷"Display destination": the map section
around the destination is displayed.▷"Display current location": the map section
around your current location is displayed.▷" Find points of interest": the search for spe‐
cial destinations is started.Destination entry by voice*
General information▷Instructions for voice activation system, re‐
fer to page 25.▷When making a destination entry by voice,
you can change between voice operation
and iDrive.▷To have the available spoken instructions
read out loud: ›Voice commands‹
Saying the entries
▷the town/city, street, and house number can
be entered as a single command*.▷Countries, towns and cities, streets, and in‐
tersections can be said as whole words* or
spelled in the language of the system, refer
to page 73.
Example: to enter a town/city in a US state
as a whole word, the language of the system
must be English.▷Spell the entry if the spoken language and
the language of the system differ.▷Say the letters smoothly, and avoid exag‐
gerating the pronunciation and inserting
lengthy pauses between the letters.▷The options available for entering data de‐
pend on the navigation data and the country
and language settings.
entering an address using a command*
1. Press the button on the steering
wheel.2.›Enter address‹3.Wait for a request from the system.4.Say the address in the suggested order.5.Continue making the entry as prompted by
the system.
If necessary, individually name the separate
components of the address, e.g., the town/city.
Seite 133133
Online Edition for Part no. 01 40 2 606 190 - 12 10 500
ReferenceMobilityCommunicationEntertainmentNavigationDriving tipsControlsAt a glance
Page 135 of 262

Starting the trip1.After all intermediate destinations are en‐
tered, highlight the first destination.
If the second destination, for example, is
highlighted when destination guidance is
started, the first destination is skipped.2."Start guidance"
This symbol marks the active leg of the
trip.
Store the trip
Up to 30 trips can be stored in the trip list. If
necessary, delete existing trips to be able to
store new trips.
1.Open "Options".2."Store trip"3.Enter the name.4."OK"
Select the stored trip
1."Navigation"2."Stored trips"3.Select a stored trip.4."Start guidance"
Reversing the direction of travel
Intermediate destinations are displayed in re‐
verse order in the list.
1."Map"2. "Guidance"3.Open "Options".4."Reverse order of trip dest."
Intermediate destination options
1."Map"2. "Guidance"3."Display all trip destinations"4.Select an intermediate destination.▷"Edit destination"▷"Reposition dest. in the trip": move an
intermediate destination to another po‐
sition in the list.▷"Delete dest. in the trip"▷"Go to next dest. in the trip"
Some options are not available for certain trips.
Delete the stored trip
1."Stored trips"2.Highlight the desired trip.3.Open "Options".4."Delete all trips" or "Delete trip"
With the Professional navigation
system: Open the last trip
1."Navigation"2."Stored trips"3."Last trip"4."Start guidance"
Destination guidance
Starting destination guidance
1."Navigation"2.Make a destination entry, refer to page 128.3."Accept destination"4."Start guidance"▷The route is shown on the Control Display.▷The distance to the destination/intermedi‐
ate destination and the estimated time of ar‐
rival are displayed in the map view.▷The arrow view is shown in the instrument
cluster, in the Head-up Display *, and on the
Control Display where appropriate.
Terminating destination guidance
1."Navigation"2."Map"3. "Guidance"4."Stop guidance"Seite 135135
Online Edition for Part no. 01 40 2 606 190 - 12 10 500
ReferenceMobilityCommunicationEntertainmentNavigationDriving tipsControlsAt a glance