2011 BMW X3 XDRIVE 28I ECU
[x] Cancel search: ECUPage 124 of 262

Roof-mounted luggage rack
Note
Roof-mounted luggage racks are only available
for vehicles with roof rails*.
Special rack system as optional
accessory
A special rack system is available as an optional
accessory.
Follow the directions given in the installation in‐
structions.
Anchorage points
The roof rails* provide mounting points for the
roof-mounted luggage rack.
Follow the directions given in the installation in‐
structions.
Mounting
Be sure that adequate clearance is maintained
for raising and opening the glass sunroof*.
Loading
Because roof racks raise the vehicle's center of
gravity when loaded, they have a major effect on
vehicle handling and steering response.
Therefore, note the following when loading and
driving:▷Do not exceed the approved roof/axle loads
and the approved gross vehicle weight.▷Distribute the roof load uniformly.▷The roof load should not be too large in area.▷Always load the heaviest pieces on the bot‐
tom.▷Secure the roof luggage firmly, e. g., tie with
ratchet straps.▷Do not let objects project into the opening
path of the tailgate.▷Drive smoothly. Avoid sudden acceleration
and braking maneuvers. Take corners gen‐
tly.Saving fuel
General information
Your vehicle contains advanced technology for
the reduction of fuel consumption and emis‐
sions.
Fuel consumption depends on a number of dif‐
ferent factors.
The implementation of certain measures, driv‐
ing style and regular maintenance, refer to
page 219, can have an influence on fuel con‐
sumption and on the environmental impact.
Remove unnecessary cargo
Additional weight increases fuel consumption.
Remove attached parts following use
Remove auxiliary mirrors, roof or rear luggage
racks which are no longer required following
use.
Attached parts on the vehicle impair the aero‐
dynamics and increase the fuel consumption.
Close the windows and glass sunroof*
Driving with the glass sunroof and windows
open results in increased air resistance and
raises fuel consumption.
Check the tire inflation pressure
regularly
Check and, if necessary, correct the tire inflation
pressure, refer to page 207, at least twice a
month and before starting on a long trip.
Low tire inflation pressure increases rolling re‐
sistance and thus raises fuel consumption and
tire wear.
Drive away without delay
Do not wait for the engine to warm up while the
vehicle remains stationary. Start driving right
away, but at moderate engine speeds.
This is the fastest way for the cold engine to
reach its operating temperature.Seite 124124
Online Edition for Part no. 01 40 2 606 190 - 12 10 500Things to remember when driving
Page 199 of 262

▷To select an element: move the mouse
pointer onto the element and press the
controller.▷To scroll: turn the controller.
Status display
A symbol at the top left of the screen shows the
following statuses:
SymbolMeaning No connection possible. Data transfer/connection. Secure connection.
Entering an Internet address
1. Select the symbol.2.Enter the address and select "OK".
Move the controller up to change between
upper and lower case letters.
Bookmarks/favorites
Adding a bookmark
The page currently being displayed is stored as
a bookmark.
1. Select the symbol.2."Add to bookmarks"
Selecting a bookmark
1. Select the symbol.2.Select the desired bookmark.
Deleting a bookmark
1. Select the symbol.2.Highlight the bookmark that is to be deleted.3.Open "Options".4."Delete bookmark" or "Delete all
bookmarks"
Defining a bookmark as the start page
1. Select the symbol.2.Highlight the desired bookmark.3.Open "Options".4."Set as home URL"
Disconnecting the connection
1.Open "Options".2."Bluetooth data transfer"Seite 199199
Online Edition for Part no. 01 40 2 606 190 - 12 10 500
ReferenceMobilityCommunicationEntertainmentNavigationDriving tipsControlsAt a glance
Page 216 of 262

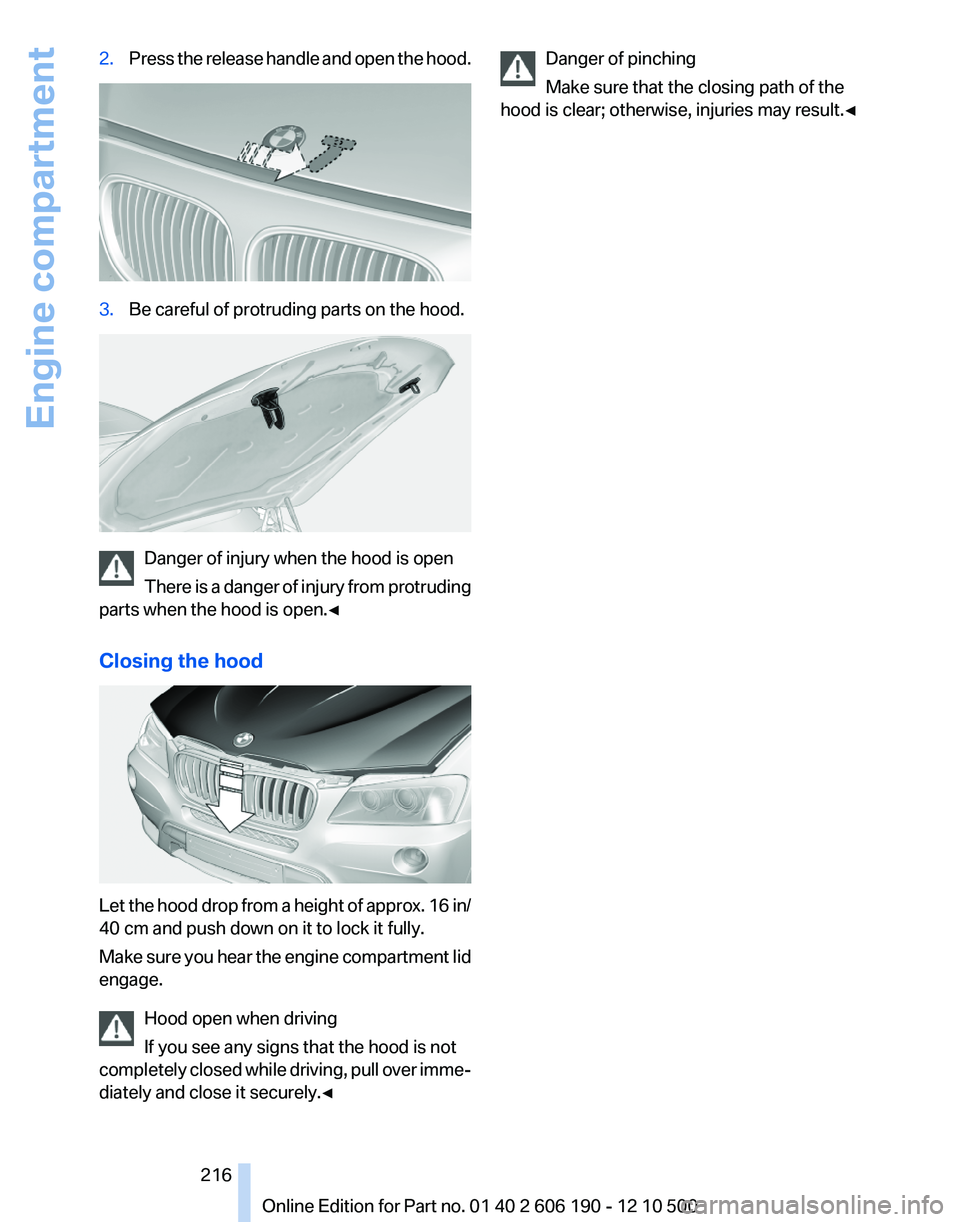
2.Press the release handle and open the hood.3.Be careful of protruding parts on the hood.
Danger of injury when the hood is open
There is a danger of injury from protruding
parts when the hood is open.◀
Closing the hood
Let the hood drop from a height of approx. 16 in/
40 cm and push down on it to lock it fully.
Make sure you hear the engine compartment lid
engage.
Hood open when driving
If you see any signs that the hood is not
completely closed while driving, pull over imme‐
diately and close it securely.◀
Danger of pinching
Make sure that the closing path of the
hood is clear; otherwise, injuries may result.◀Seite 216216
Online Edition for Part no. 01 40 2 606 190 - 12 10 500Engine compartment
Page 227 of 262

Vehicle battery
Maintenance
The battery is maintenance-free, i.e., the elec‐
trolyte will last for the life of the battery.
Your service center will be glad to advise you on
questions regarding the battery.
Battery replacement Use approved vehicle batteries only.
Only use vehicle batteries that have been
approved for your vehicle by the manufacturer;
otherwise, the vehicle could be damaged and
systems or functions may not be fully availa‐
ble.◀
After a battery replacement, have the battery
registered on the vehicle by your service center
to ensure that all comfort functions are fully
available.
Charging the battery
In the vehicle, only charge the battery via the
terminals, refer to page 230, in the engine com‐
partment with the engine off.
Power failure
After a temporary power loss, some equipment
needs to be reinitialized.
Individual settings need to be reprogrammed:▷Seat and mirror memory: store the positions
again.▷Time: update.▷Date: update.▷Radio station: save again.▷Navigation system: wait for the operability of
the navigation.
Disposing of old batteries
Have old batteries disposed of by your
service center or bring them to a recy‐
cling center.
Maintain the battery in an upright position for
transport and storage. Secure the battery so
that it does not tip over during transport.
Fuses
Notes Replacing fuses
Never attempt to repair a blown fuse and
do not replace a defective fuse with a substitute
of another color or amperage rating; this could
lead to a circuit overload, ultimately resulting in
a fire in the vehicle.◀
Plastic tweezers and information on the fuse
types and locations are stored in the fuse box in
the cargo area.
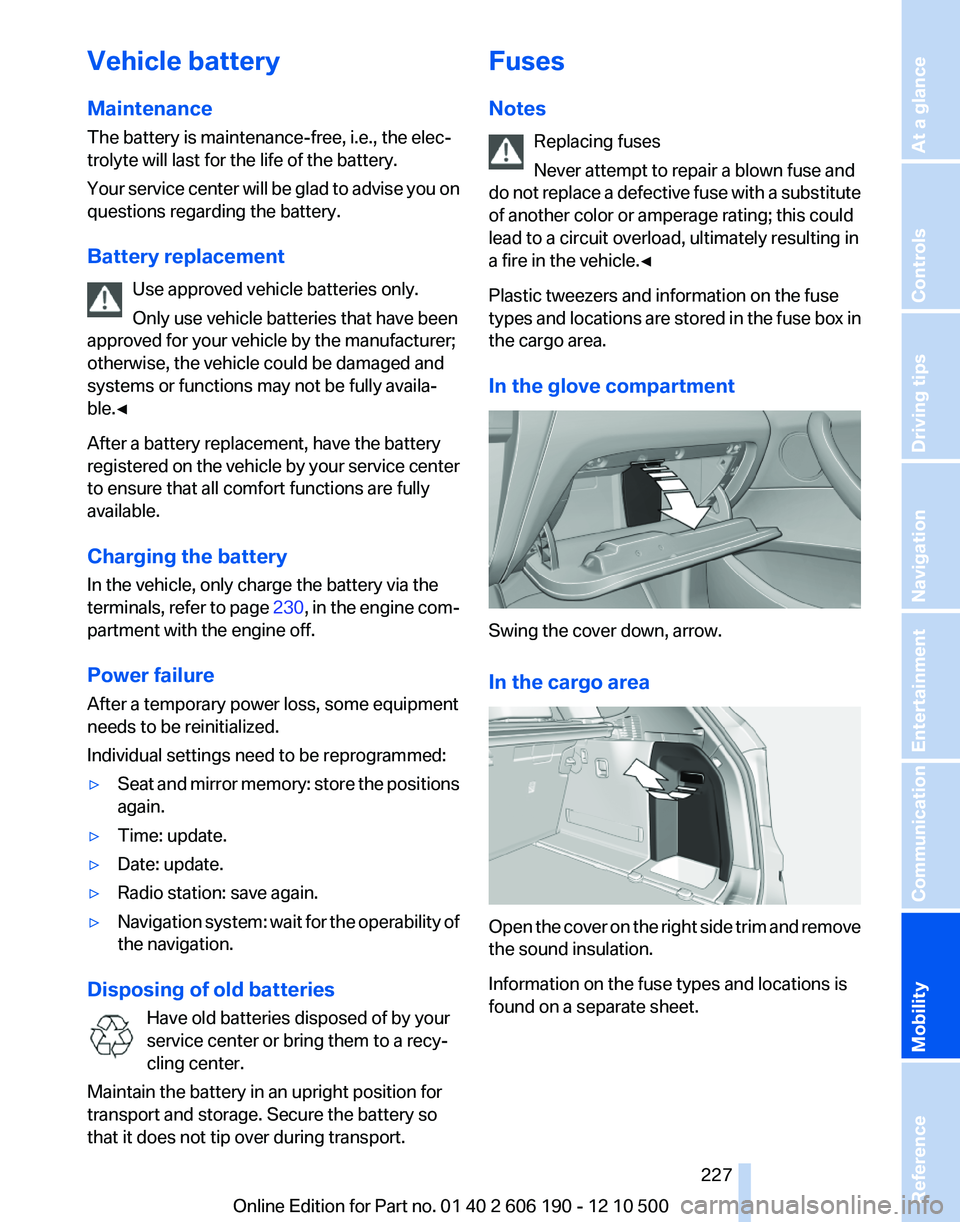
In the glove compartment
Swing the cover down, arrow.
In the cargo area
Open the cover on the right side trim and remove
the sound insulation.
Information on the fuse types and locations is
found on a separate sheet.
Seite 227227
Online Edition for Part no. 01 40 2 606 190 - 12 10 500
ReferenceMobilityCommunicationEntertainmentNavigationDriving tipsControlsAt a glance
Page 231 of 262

Tow truck
Do not lift the vehicle
Do not lift the vehicle by the tow fitting or
body and chassis parts; otherwise, damage may
result.◀
Use the tow fitting screwed in at the front for
maneuvering the vehicle only.
Towing other vehicles
General information Light towing vehicle
Your vehicle must not be lighter than the
vehicle being towed; otherwise, it will not be
possible to control vehicle response.◀
Attaching the tow bar/tow rope correctly
Attach the tow bar or tow rope to the tow
fitting; connecting it to other vehicle parts may
cause damage.◀
▷Switch on the hazard warning system, de‐
pending on local regulations.▷If the electrical system has failed, clearly
identify the vehicle being towed by placing
a sign or a warning triangle in the rear win‐
dow.
Tow bar
The tow fittings used should be on the same
side on both vehicles.
Should it prove impossible to avoid mounting
the tow bar at an offset angle, please observe
the following:
▷Maneuvering capability is limited during cor‐
nering.▷The tow bar will generate lateral forces if it
is secured with an offset.
Tow rope
When starting to tow the vehicle, make sure that
the tow rope is taut.
To avoid jerking and the associated stresses on
the vehicle components when towing, always
use nylon ropes or nylon straps.
Attaching the tow rope correctly
Only secure the tow rope on the tow fit‐
ting; otherwise, damage can occur when it is se‐
cured on other parts of the vehicle.◀
Tow fitting
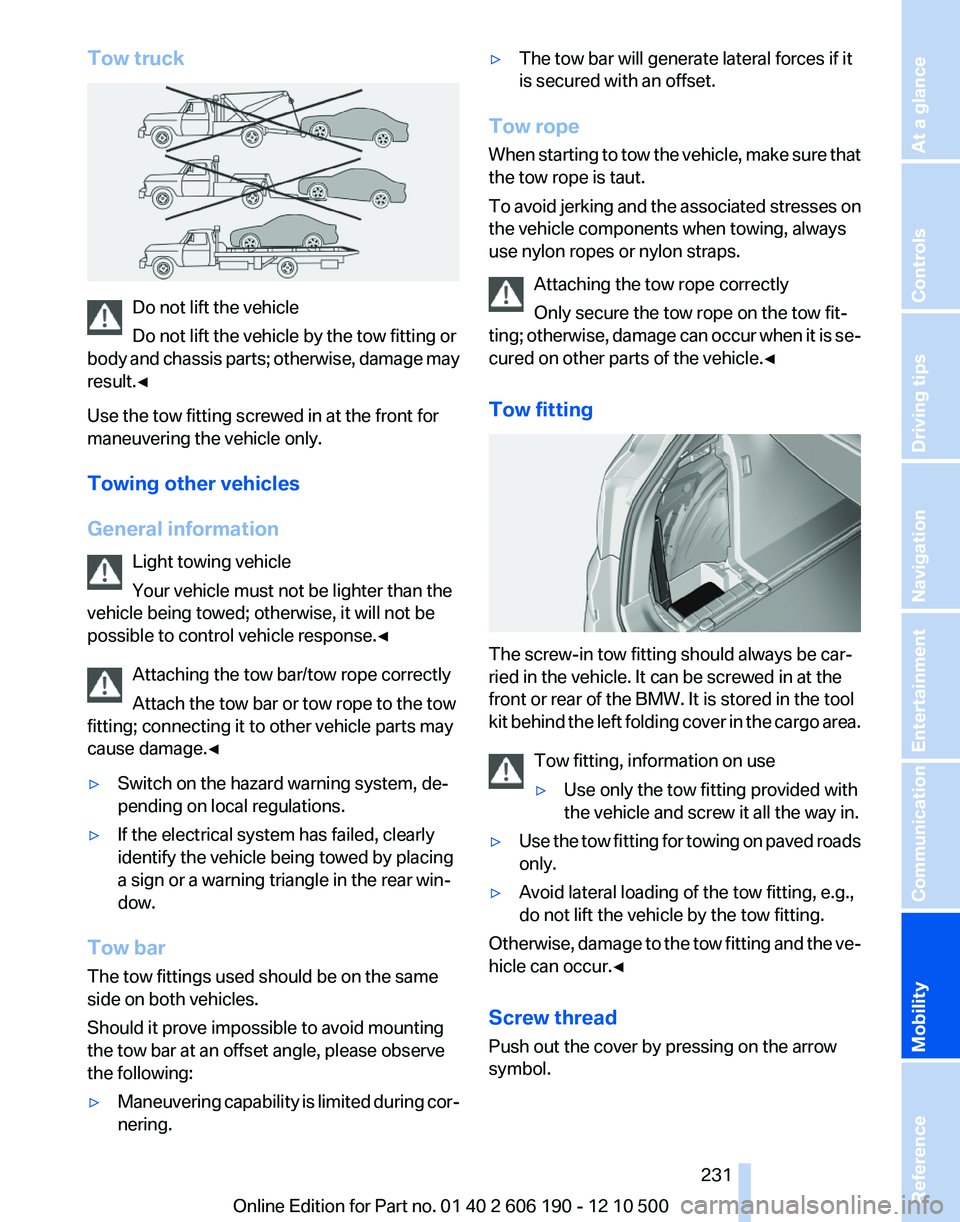
The screw-in tow fitting should always be car‐
ried in the vehicle. It can be screwed in at the
front or rear of the BMW. It is stored in the tool
kit behind the left folding cover in the cargo area.
Tow fitting, information on use
▷Use only the tow fitting provided with
the vehicle and screw it all the way in.▷Use the tow fitting for towing on paved roads
only.▷Avoid lateral loading of the tow fitting, e.g.,
do not lift the vehicle by the tow fitting.
Otherwise, damage to the tow fitting and the ve‐
hicle can occur.◀
Screw thread
Push out the cover by pressing on the arrow
symbol.
Seite 231231
Online Edition for Part no. 01 40 2 606 190 - 12 10 500
ReferenceMobilityCommunicationEntertainmentNavigationDriving tipsControlsAt a glance
Page 235 of 262

Rubber components
Aside from water, treat only with rubber cleans‐
ers.
When cleaning rubber seals, do not use any sil‐
icon-containing car care products in order to
avoid damage or reduced noise damping.
Fine wood parts*
Clean fine wood facing and fine wood compo‐
nents only with a moist rag. Then dry with a soft
cloth.
Plastic components
These include:▷Headliner.▷Lamp lenses.▷Instrument cluster cover.▷Matte black spray-coated components.
Clean with a microfiber cloth.
Moisten the cloth lightly and use plastic
cleanser, if necessary.
Do not soak the headliner.
Do not use cleansers that contain alcohol
or solvents
Do not use cleansers that contain alcohol or sol‐
vents, such as lacquer thinners, heavy-duty
grease removers, fuel, or such; this could lead to
surface damage.◀
Safety belts
Dirty belt straps impede the reeling action and
thus have a negative impact on safety.
Chemical cleaning
Do not clean chemically; this can destroy
the webbing.◀
Use only a mild soapy solution, with the safety
belts clipped into their buckles.
Do not allow the reels to retract the safety belts
until they are dry.
Floor carpets and floor mats*
No objects in the area around the pedals
Keep floor mats, carpets, and any other
objects out of the area of motion of the pedals;
otherwise, the function of the pedals could be
impeded while driving
Do not place additional floor mats over existing
mats or other objects.
Only use floor mats that have been approved for
the vehicle and can be properly fixed in place.
Ensure that the floor mats are securely fastened
again after they were removed for cleaning, for
example.◀
Floor mats can be removed from the passenger
compartment for cleaning.
If the floor carpets are very dirty, clean with a
microfiber cloth and water or a textile cleaner. To
prevent matting of the carpet, rub back and forth
in the direction of travel only.
Sensors/cameras
To clean sensors and cameras, use a cloth mois‐
tened with a small amount of glass cleaner.
Displays/screens
Clean the displays with a microfiber cloth.
Cleaning displays
Do not use chemical or household cleans‐
ers.
Keep all fluids and moisture away from the unit.
Otherwise, they could affect or damage surfa‐
ces or electrical components.
Avoid pressing too hard when cleaning and do
not use abrasive materials; otherwise, damage
can result.◀
Long-term vehicle storage
Your service center can advise you on what to
consider when storing the vehicle for longer
than three months.Seite 235235
Online Edition for Part no. 01 40 2 606 190 - 12 10 500
ReferenceMobilityCommunicationEntertainmentNavigationDriving tipsControlsAt a glance
Page 253 of 262

Brake force display 85
Brake lamps, brake force dis‐ play 85
Brake lights, adaptive 85
Brake pads, breaking in 120
Braking, notes 121
Breakdown assis‐ tance 228, 229
Breaking in 120
Brightness of Control Dis‐ play 73
Bulb replacement 221
Bulb replacement, front 222
Bulb replacement, rear 225
Bulbs and lamps 221
Button, Start/Stop 58
C
Calendar 189
California Proposition 65 Warning 7
Camera, backup camera 97
Camera, care 235
Camera, Top View 99
Can holder, refer to Cu‐ pholder 115
Car battery 227
Car care products 234
Care, displays 235
Care, vehicle 234
Cargo 122
Cargo area 110
Cargo area, enlarg‐ ing 110 , 111
Cargo area lid 39
Cargo area, storage compart‐ ments 116
Cargo straps, securing cargo 123
Car key, refer to Remote con‐ trol 32
Carpet, care 235
Car wash 233
Catalytic converter, refer to Hot exhaust system 120
CBS Condition Based Serv‐ ice 219 CD/DVD 155
CDs, storing 162
Cell phone 176
Center armrest 114
Center console 17
Central locking system 35
Central screen, refer to Control Display 19
Changes, technical, refer to Safety 6
Changing parts 221
Changing wheels/tires 212
Check Control 74
Children, seating position 55
Children, transporting safely 55
Child restraint fixing sys‐ tem 55
Child restraint fixing system LATCH 56
Child restraint fixing systems, mounting 55
Child-safety locks 57
Child seat, mounting 55
Child seats 55
Chrome parts, care 234
Cigarette lighter 108
Cleaning, displays 235
Climate control 101, 103
Clock 69
Closing/opening from in‐ side 38
Closing/opening via door lock 38
Closing/opening with remote control 36
Clothes hooks 115
Combination instrument 13
Combination instrument, elec‐ tronic displays 15
Combination switch, refer to Turn signals 61
Combination switch, refer to Wiper system 62
Comfort Access 41
Computer 70
Concierge service 196 Condensation on win‐
dows 102, 105
Condensation under the vehi‐ cle 122
Condition Based Service CBS 219
Confirmation signal 37
Contacts 185
Control Display 19
Control Display, settings 72
Controller 19
Control systems, driving sta‐ bility 86
Convenient opening 36
Coolant 218
Cooling function 102, 105
Cooling, maximum 104
Cooling system 218
Corrosion on brake discs 122
Cruise control 91
Cruising range 67
Cupholder 115
Current fuel consumption 68
Current location, storing 130
Customer Relations 200
D
Damage, tires 211
Damping control, dynamic 88
Data, technical 238
Date 69
Daytime running lights 77
Defrosting, refer to Windows, defrosting 102, 105
Destination distance 70
Destination guidance 135
Destination guidance with in‐ termediate destinations 134
Destination input, naviga‐ tion 128
Digital clock 69
Digital radio 149
Dimensions 238
Dimmable mirrors 54
Direction indicator, refer to Turn signals 61
Displacement, engine 240 Seite 253253
Online Edition for Part no. 01 40 2 606 190 - 12 10 500
ReferenceMobilityCommunicationEntertainmentNavigationDriving tipsControlsAt a glance
Page 254 of 262

Display in front windshield 99
Display, instrument cluster 67
Display lighting, refer to Instru‐ ment lighting 79
Displays 13
Displays, cleaning 235
Disposal, coolant 218
Disposal, vehicle battery 227
Distance control, refer to PDC 93
Distance to destination 70
Divided screen view, split screen 23
Door lock, refer to Remote control 32
Downhill control 87
Drive-off assistant, refer to DSC 86
Driving instructions, breaking in 120
Driving notes, general 120
Driving stability control sys‐ tems 86
Driving tips 120
DSC Dynamic Stability Con‐ trol 86
DTC Dynamic Traction Con‐ trol 86
DTMF suffix dialing 181
DVD/CD 155
DVD/CD notes 161
DVD changer 159
DVD settings 158
DVDs, storing 162
DVD, video 157
Dynamic Damping Control 88
Dynamic destination guid‐ ance 141
Dynamic Driving Control 89
Dynamic Stability Control DSC 86
Dynamic Traction Control DTC 86
E
EfficientDynamics, refer to Saving fuel 124 Electronic displays, instru‐
ment cluster 15
Electronic engine oil level check 217
Electronic Stability Program ESP, refer to DSC 86
Emergency detection, remote control 33
Emergency release, door lock 38
Emergency release, fuel filler flap 204
Emergency Request 228
Emergency service, refer to Roadside Assistance 229
Emergency start function, en‐ gine start 33
Energy Control 68
Energy recovery 68
Engine compartment 215
Engine compartment, working in 215
Engine coolant 218
Engine oil 217
Engine oil, adding 217
Engine oil additives 217
Engine oil filler neck 217
Engine oil temperature 68
Engine oil types, alterna‐ tive 218
Engine oil types, ap‐ proved 217
Engine specifications 240
Engine start, assistance 229
Engine start during malfunc‐ tion 33
Engine start, refer to Starting the engine 58
Engine stop 59
Engine temperature 68
Equalizer 146
Equipment, interior 107
ESP Electronic Stability Pro‐ gram, refer to DSC 86
Exchanging wheels/tires 212
Exhaust system 120
Exterior mirrors 53
External devices 166 External temperature dis‐
play 69
External temperature warn‐ ing 69
Eyes for securing cargo 123
F
Fader 146
Failure message, refer to Check Control 74
False alarm, refer to Uninten‐ tional alarm 43
Fan, refer to Air vol‐ ume 101, 104
Fault displays, refer to Check Control 74
Filler neck for engine oil 217
Fine wood, care 235
First aid kit 229
Fitting for towing, refer to Tow fitting 231
Flat tire, Tire Pressure Monitor TPM 82
Flat tire, warning lamp 83
Flat tire, wheel change 226
Flooding 121
Floor carpet, care 235
Floor mats, care 235
FM/AM station 148
Fold-out position, windshield wipers 64
Foot brake 121
Front airbags 80
Front fog lamps 79
Front fog lamps, front, bulb re‐ placement 223
Front lamps 222
Front passenger airbags, au‐ tomatic deactivation 81
Front passenger airbags, indi‐ cator lamp 82
Front seats, adjusting 47
Fuel cap 204
Fuel consumption, current 68
Fuel consumption, refer to Average fuel consump‐
tion 70 Seite 254254
Online Edition for Part no. 01 40 2 606 190 - 12 10 500Everything from A to Z