2011 BMW ACTIVEHYBRID X6 light
[x] Cancel search: lightPage 74 of 312

Driving
72 1.Select the desired speed using the lever,
arrow 1 or arrow 2, or press button 4 to
retrieve a stored speed.
2.Release the brake pedal.
3.When the vehicle ahead of you drives away,
press on the accelerator briefly or press
button 4.
Deactivating the system
>When driving, press the lever up or down
twice.
>When stationary, do the same while
depressing the brake pedal.
>Switch off the ignition.
The displays go out, and the stored desired
speed and distance are deleted.
Displays in instrument cluster
1Stored desired speed
>Green: the system is active.
>Orange: the system is interrupted.
2Lights up yellow: vehicle detected ahead
Display also used for warnings, please read
all information on warnings.
3Selected distance to vehicle ahead
The indicator lights up as soon as the sys-
tem is activated
The bars roll: the vehicle in front of you has
driven off
4Brief display of stored desired speed
If the display --- mph/---km/h appears
briefly, the conditions necessary for oper-
ation may currently not be met.<
Warning lamps
Display 2 flashes red and a signal
sounds.
The system requests that the you
intervene by braking and carrying
out evasive maneuvers, if neces-
sary. The system cannot independently restore
the distance to the vehicle ahead.
This display does not relieve the driver of the
responsibility to adapt his or her desired driving
speed and style to the traffic conditions.
Display 2 flashes yellow.
The conditions necessary for
operation of the system are no
longer met, e. g. due to ABS or
DSC intervention. The system
applies the brakes until you actively assume
control.
Radar sensor
Position
The radar sensor is integrated in the bumper.
Dirty or covered sensor
A dirty or covered sensor may hinder the detec-
tion of vehicles.
>If necessary, clean the radar sensor.
Remove layers of snow and ice carefully.
>Do not cover the view field of the radar sen-
sor.
Malfunction
The system cannot be activated if the radar
sensor is not aligned correctly. This may be
Page 75 of 312
Controls
73Reference
At a glance
Driving tips
Communications
Navigation
Entertainment
Mobility
caused by damage incurred during parking, for
example.
For US owners only
The transmitter and receiver units comply with
part 15 of the FCC/Federal Communications
Commission regulations. Operation is gov-
erned by the following:
FCC ID:
>OAYARS3-A
Compliance statement:
This device complies with part 15 of the FCC
Rules. Operation is subject to the following two
conditions:
>This device must not cause harmful inter-
ference, and
>This device must accept any interference
received, including interference that may
cause undesired operation.
Any unauthorized modifications or changes to
these devices could void the user's authority to
operate this equipment.
System limits
Speed range
Best results are achieved when using the sys-
tem on well-developed roads and highways.
The desired speed can be selected between
20 mph/30 km/h and 110 mph/180 km/h.
The system can also be activated when station-
ary.
Comply with the legal speed limit in every situa-
tion when using the system.
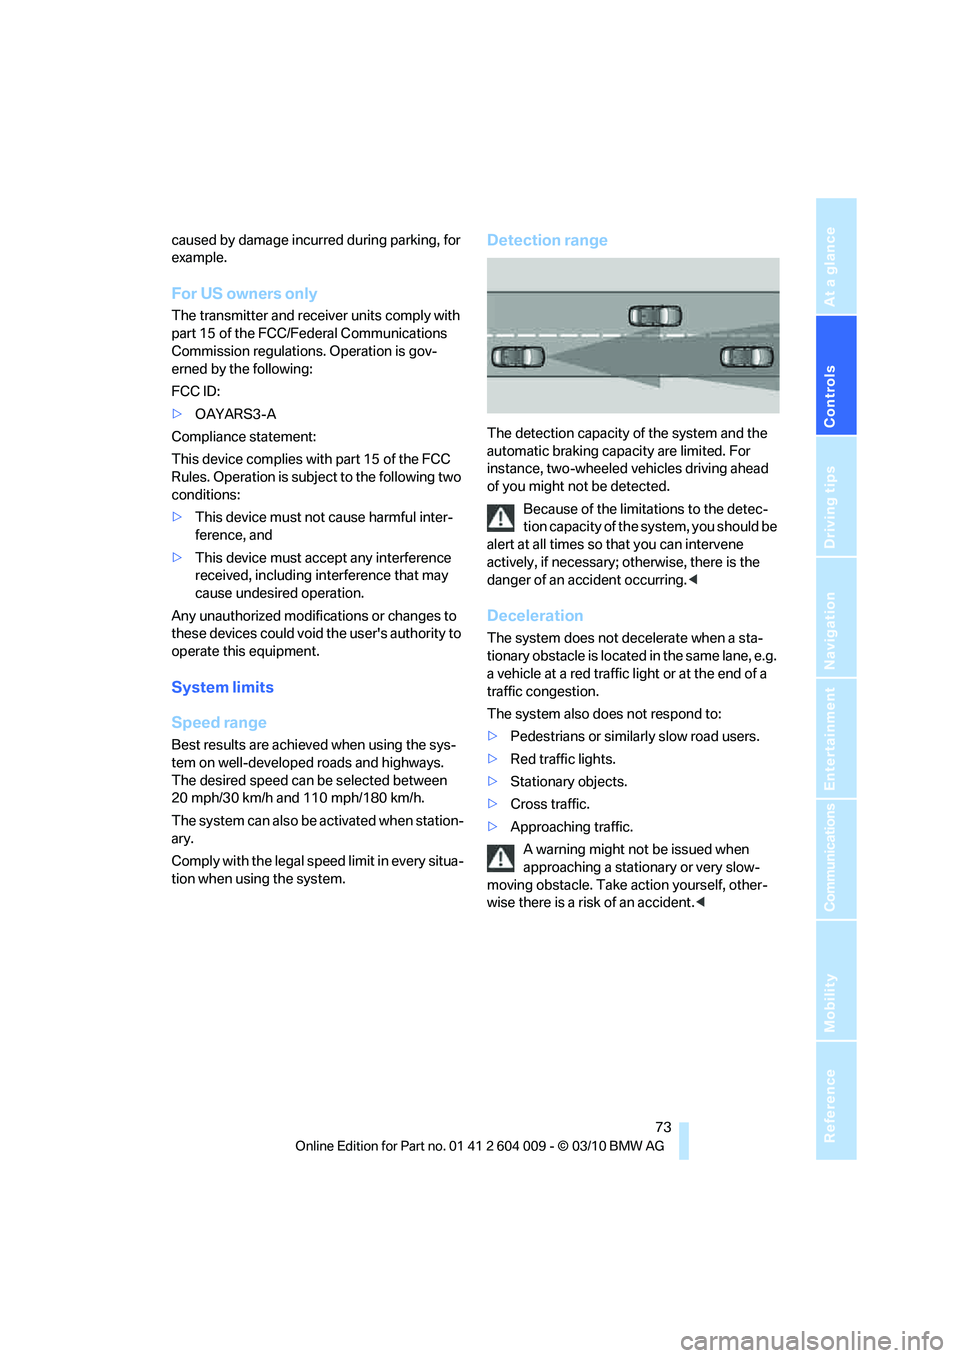
Detection range
The detection capacity of the system and the
automatic braking capacity are limited. For
instance, two-wheeled vehicles driving ahead
of you might not be detected.
Because of the limitations to the detec-
tion capacity of the system, you should be
alert at all times so that you can intervene
actively, if necessary; otherwise, there is the
danger of an accident occurring.<
Deceleration
The system does not decelerate when a sta-
tionary obstacle is located in the same lane, e.g.
a vehicle at a red traffic light or at the end of a
traffic congestion.
The system also does not respond to:
>Pedestrians or similarly slow road users.
>Red traffic lights.
>Stationary objects.
>Cross traffic.
>Approaching traffic.
A warning might not be issued when
approaching a stationary or very slow-
moving obstacle. Take action yourself, other-
wise there is a risk of an accident.<
Page 76 of 312
Driving
74
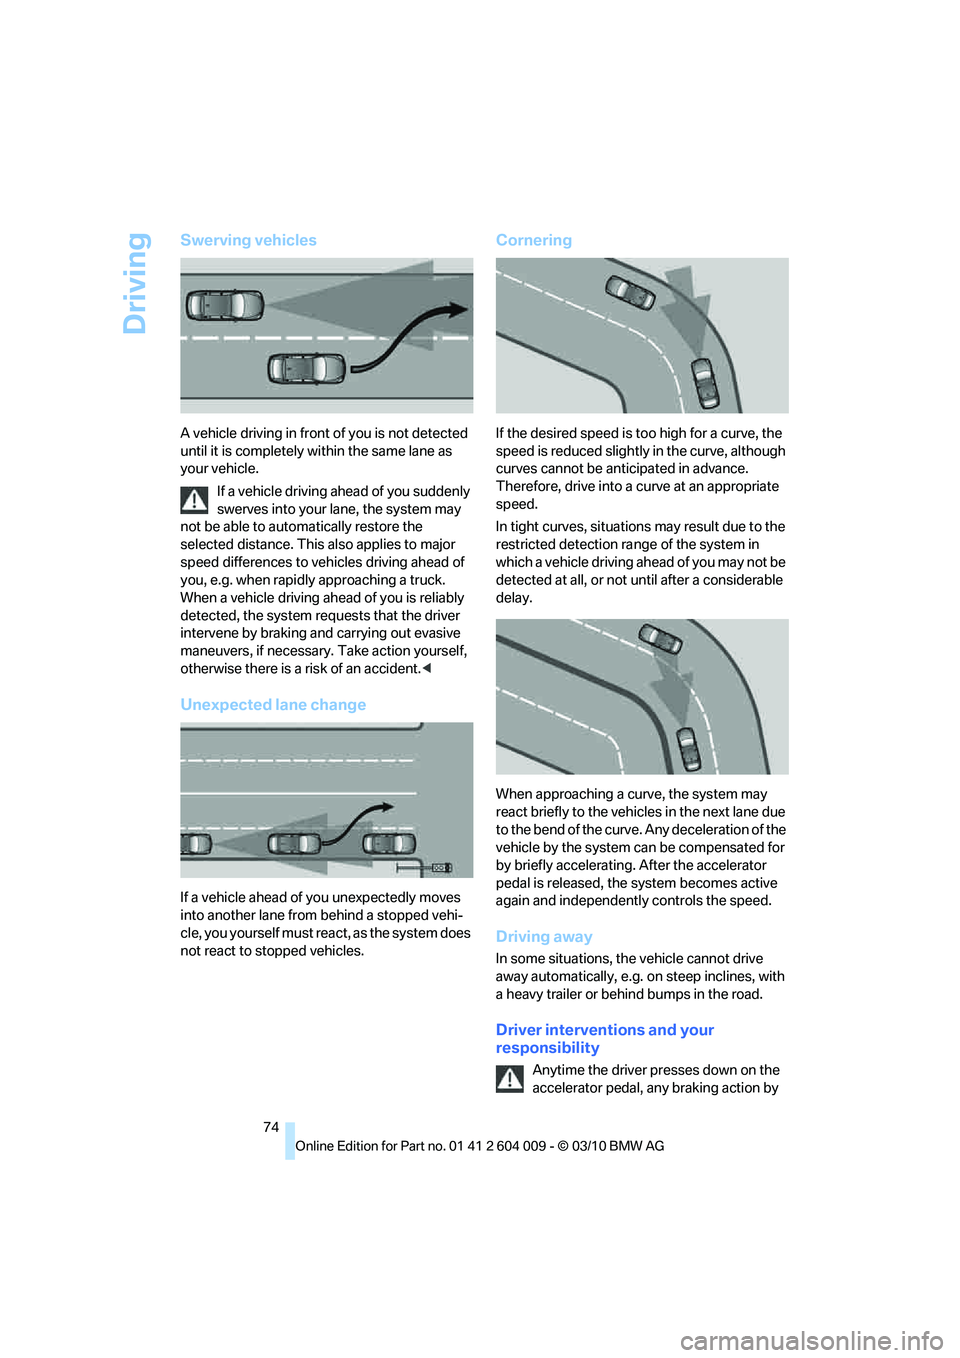
Swerving vehicles
A vehicle driving in front of you is not detected
until it is completely within the same lane as
your vehicle.
If a vehicle driving ahead of you suddenly
swerves into your lane, the system may
not be able to automatically restore the
selected distance. This also applies to major
speed differences to vehicles driving ahead of
you, e.g. when rapidly approaching a truck.
When a vehicle driving ahead of you is reliably
detected, the system requests that the driver
intervene by braking and carrying out evasive
maneuvers, if necessary. Take action yourself,
otherwise there is a risk of an accident.<
Unexpected lane change
If a vehicle ahead of you unexpectedly moves
into another lane from behind a stopped vehi-
cle, you yourself must react, as the system does
not react to stopped vehicles.
Cornering
If the desired speed is too high for a curve, the
speed is reduced slightly in the curve, although
curves cannot be anticipated in advance.
Therefore, drive into a curve at an appropriate
speed.
In tight curves, situations may result due to the
restricted detection range of the system in
which a vehicle driving ahead of you may not be
detected at all, or not until after a considerable
delay.
When approaching a curve, the system may
react briefly to the vehicles in the next lane due
to the bend of the curve. Any deceleration of the
vehicle by the system can be compensated for
by briefly accelerating. After the accelerator
pedal is released, the system becomes active
again and independently controls the speed.
Driving away
In some situations, the vehicle cannot drive
away automatically, e.g. on steep inclines, with
a heavy trailer or behind bumps in the road.
Driver interventions and your
responsibility
Anytime the driver presses down on the
accelerator pedal, any braking action by
Page 78 of 312

Controls Overview
76
Controls Overview
Odometer, outside
temperature display, clock
1Knob in the instrument cluster
2Time, outside temperature, and date
3Odometer and trip odometer
Knob in the instrument panel
>With ignition switched on
Press knob:
Resetting trip odometer
Press the knob for approx. 5 seconds:
Displaying service requirements, refer to
page79
>With ignition switched off
Press knob:
Briefly displaying time, outside temperature
and odometer
Units of measure
To select the respective units of measure, miles
or km for the odometer as well as 7 or 6 for
the outside temperature, refer to page86.
The setting is stored for the remote control cur-
rently in use.
Time, date, outside temperature
From radio readiness the outside temperature
and the time are displayed.
Setting the time, refer to page85.
Retrieving date
Press the button on turn signal lever upward;
the date appears.
To set the date, refer to page85.
Pressing the button upward or downward sev-
eral times changes the display between clock,
outside temperature, date, and Check Control
messages, refer to page84.
Outside temperature warning
If the display drops to +377/+36, a signal
sounds and a warning lamp lights up. A mes-
sage appears on the Control Display. There is
an increased danger of ice.
Even at temperatures above +377/
+36 ice can form. Therefore, drive care-
fully, e.g. on bridges and sections of road in the
shade, otherwise there is an increased accident
risk.<
Odometer and trip odometer
Resetting trip odometer:
Press knob 1 in the instrument panel with the
ignition switched on.
When vehicle is parked
To briefly display the time, outside temperature
and mileage after the remote control has been
removed from the ignition lock:
Press knob 1 in the instrument panel.
Page 79 of 312

Controls
77Reference
At a glance
Driving tips
Communications
Navigation
Entertainment
Mobility
Tachometer
Do not operate the engine with the needle in the
red overspeed zone of the gauge, refer to arrow.
At high revs in this range, the flow of fuel is
interrupted to protect the engine.
Coolant temperature
Should the coolant, and with it the engine
become too hot, a warning lamp lights up. In
addition, a message appears on the Control
Display.
Checking coolant level, refer to page255.
Engine oil temperature*
When the engine is at operating temperature,
the engine oil temperature is between approx.
1707/806 and approx. 2507/1206.
When the engine oil temperature is too high, a
warning lamp lights up in the instrument panel.
Energy control*
Displays the current fuel consumption. This
allows you to see whether your current driving
style is conducive to fuel economy with mini-
mum exhaust emissions.
Page 80 of 312
Controls Overview
78
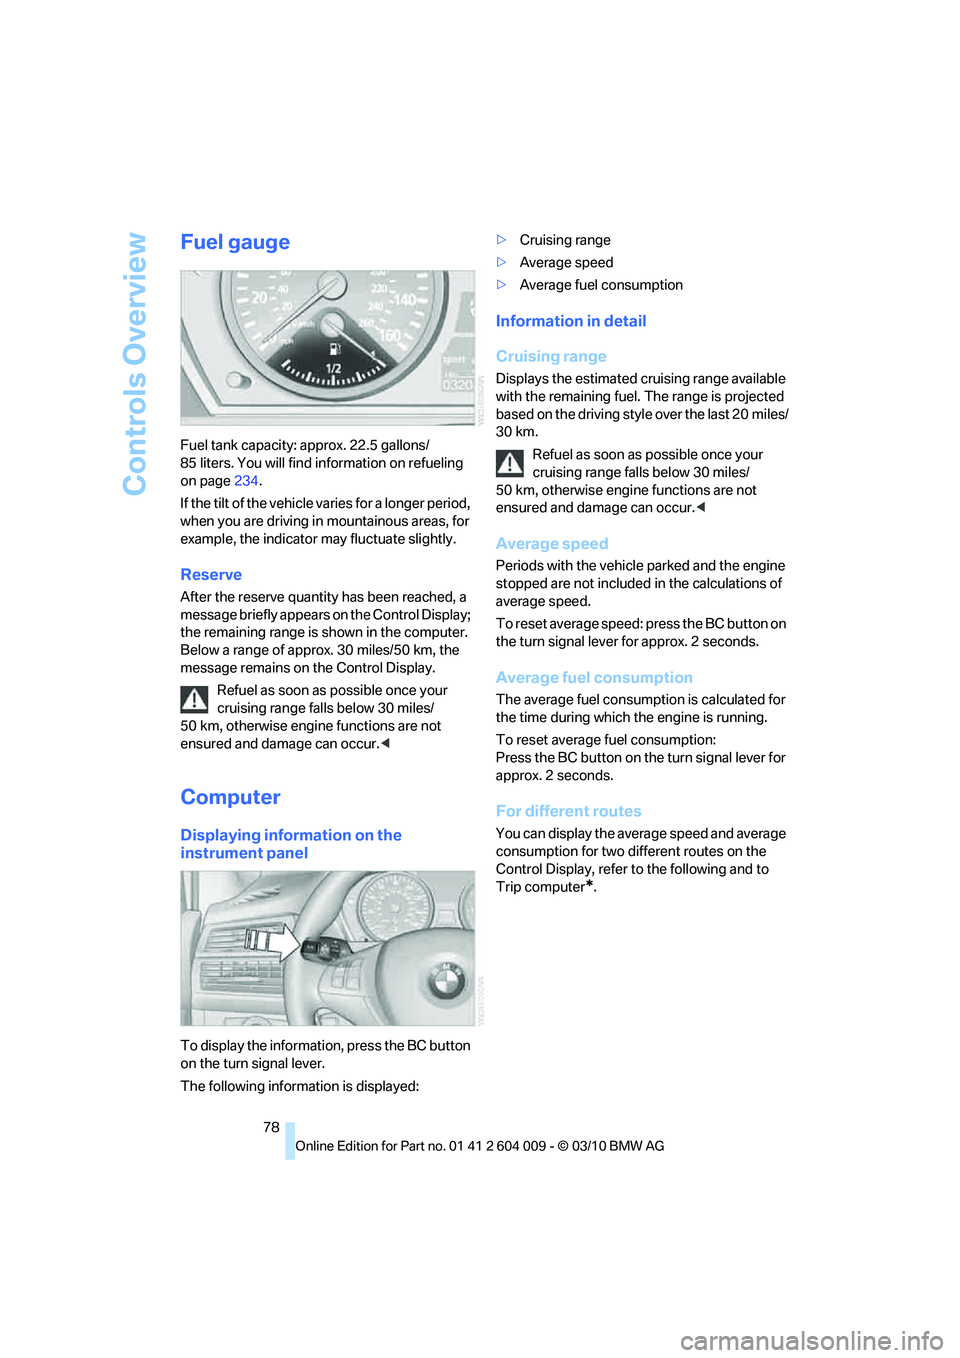
Fuel gauge
Fuel tank capacity: approx. 22.5 gallons/
85 liters. You will find information on refueling
on page234.
If the tilt of the vehicle varies for a longer period,
when you are driving in mountainous areas, for
example, the indicator may fluctuate slightly.
Reserve
After the reserve quantity has been reached, a
message briefly appears on the Control Display;
the remaining range is shown in the computer.
Below a range of approx. 30 miles/50 km, the
message remains on the Control Display.
Refuel as soon as possible once your
cruising range falls below 30 miles/
50 km, otherwise engine functions are not
ensured and damage can occur.<
Computer
Displaying information on the
instrument panel
To display the information, press the BC button
on the turn signal lever.
The following information is displayed:>Cruising range
>Average speed
>Average fuel consumption
Information in detail
Cruising range
Displays the estimated cruising range available
with the remaining fuel. The range is projected
based on the driving style over the last 20 miles/
30 km.
Refuel as soon as possible once your
cruising range falls below 30 miles/
50 km, otherwise engine functions are not
ensured and damage can occur.<
Average speed
Periods with the vehicle parked and the engine
stopped are not included in the calculations of
average speed.
To reset average speed: press the BC button on
the turn signal lever for approx. 2 seconds.
Average fuel consumption
The average fuel consumption is calculated for
the time during which the engine is running.
To reset average fuel consumption:
Press the BC button on the turn signal lever for
approx. 2 seconds.
For different routes
You can display the average speed and average
consumption for two different routes on the
Control Display, refer to the following and to
Trip computer
*.
Page 84 of 312
Controls Overview
82
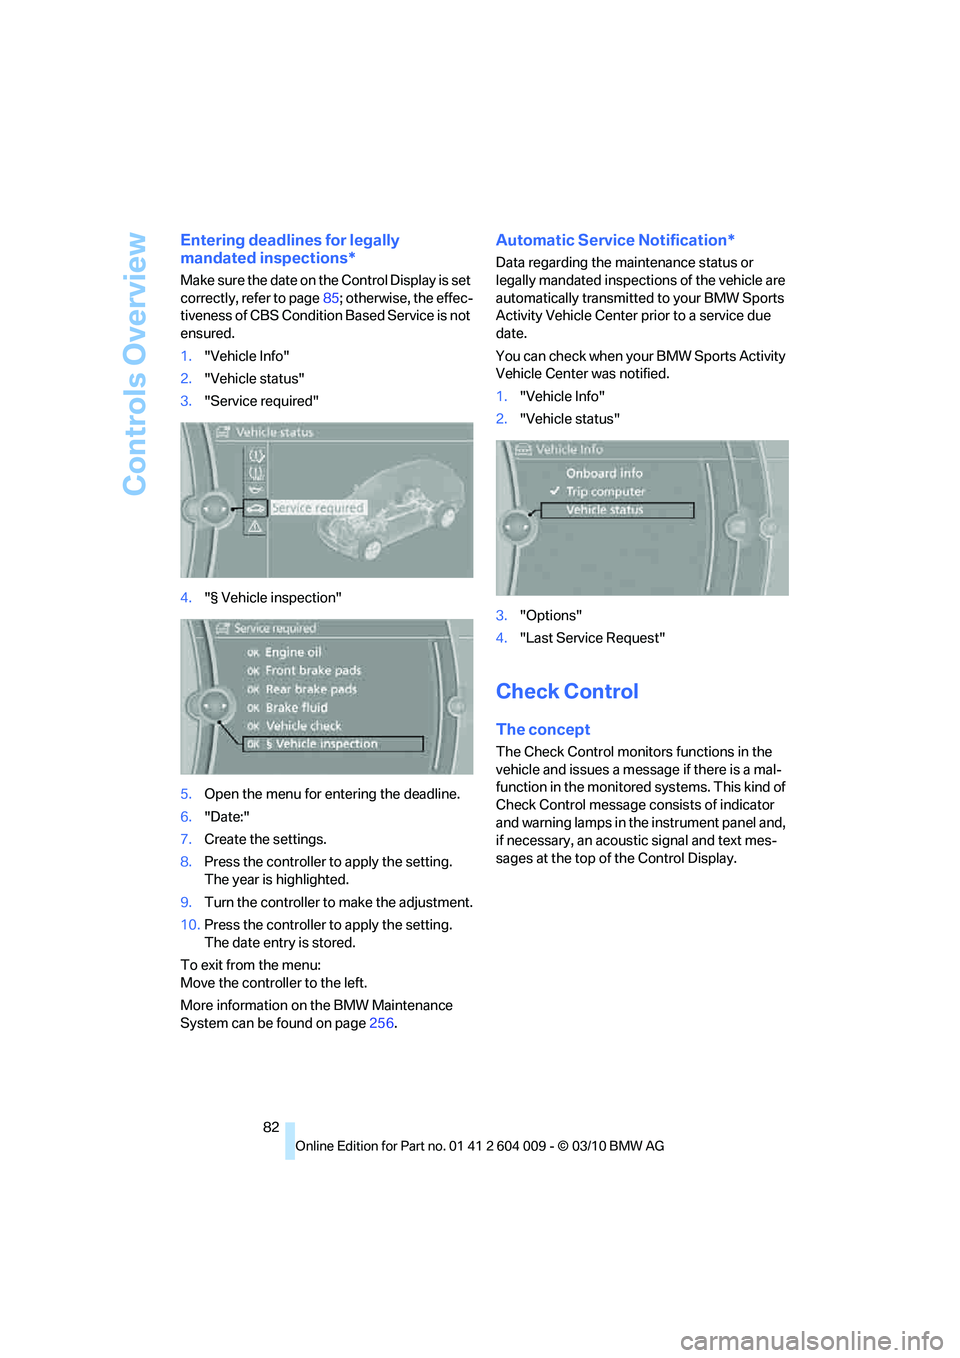
Entering deadlines for legally
mandated inspections*
Make sure the date on the Control Display is set
correctly, refer to page85; otherwise, the effec-
tiveness of CBS Condition Based Service is not
ensured.
1."Vehicle Info"
2."Vehicle status"
3."Service required"
4."§ Vehicle inspection"
5.Open the menu for entering the deadline.
6."Date:"
7.Create the settings.
8.Press the controller to apply the setting.
The year is highlighted.
9.Turn the controller to make the adjustment.
10.Press the controller to apply the setting.
The date entry is stored.
To exit from the menu:
Move the controller to the left.
More information on the BMW Maintenance
System can be found on page256.
Automatic Service Notification*
Data regarding the maintenance status or
legally mandated inspections of the vehicle are
automatically transmitted to your BMW Sports
Activity Vehicle Center prior to a service due
date.
You can check when your BMW Sports Activity
Vehicle Center was notified.
1."Vehicle Info"
2."Vehicle status"
3."Options"
4."Last Service Request"
Check Control
The concept
The Check Control monitors functions in the
vehicle and issues a message if there is a mal-
function in the monitored systems. This kind of
Check Control message consists of indicator
and warning lamps in the instrument panel and,
if necessary, an acoustic signal and text mes-
sages at the top of the Control Display.
Page 85 of 312
Controls
83Reference
At a glance
Driving tips
Communications
Navigation
Entertainment
Mobility
Indicator and warning lamps
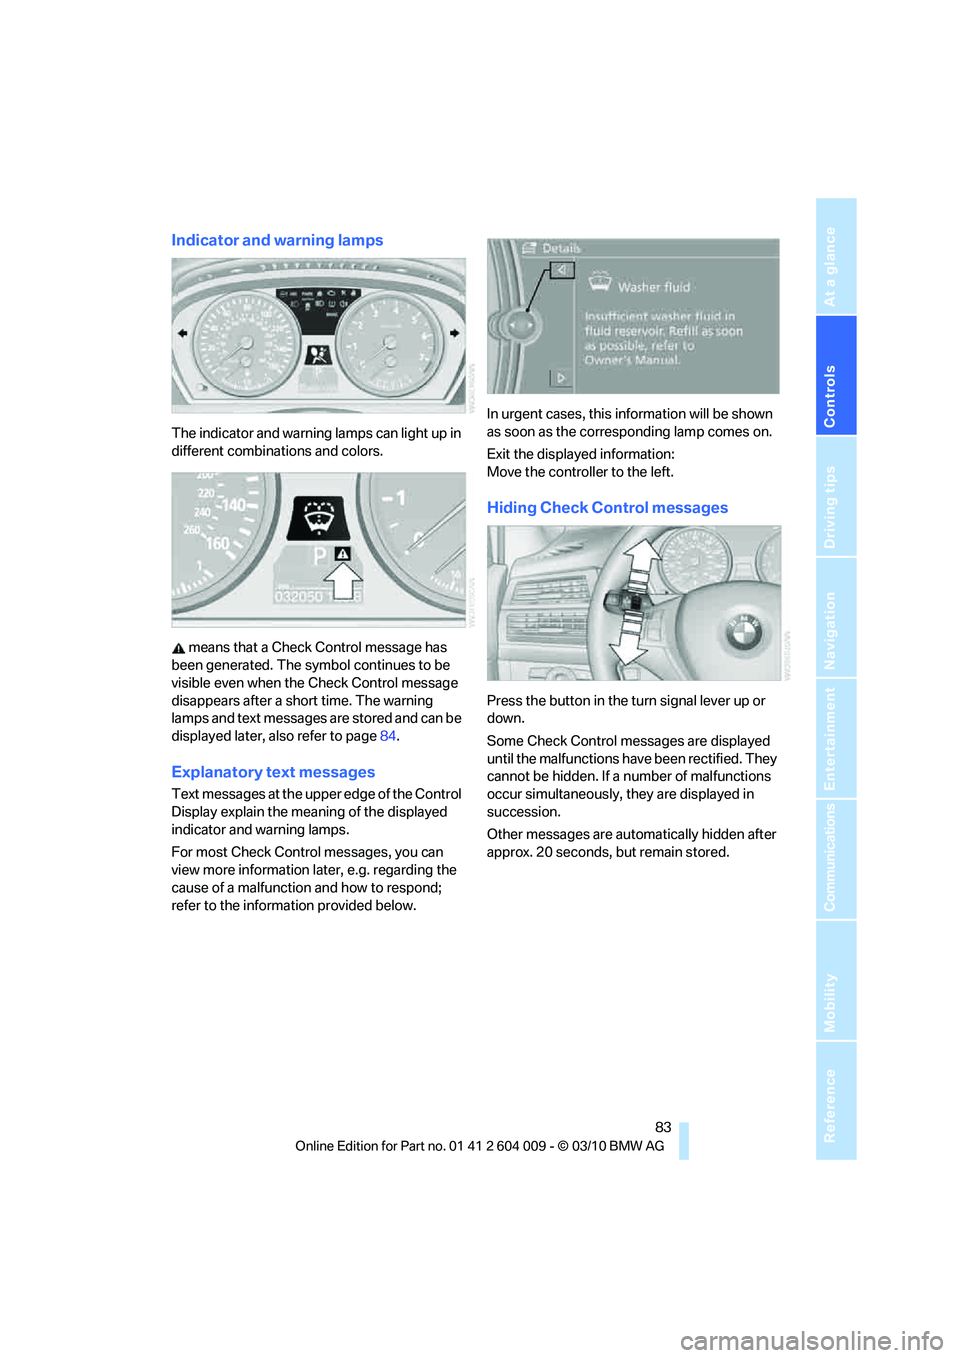
The indicator and warning lamps can light up in
different combinations and colors.
means that a Check Control message has
been generated. The symbol continues to be
visible even when the Check Control message
disappears after a short time. The warning
lamps and text messages are stored and can be
displayed later, also refer to page84.
Explanatory text messages
Text messages at the upper edge of the Control
Display explain the meaning of the displayed
indicator and warning lamps.
For most Check Control messages, you can
view more information later, e.g. regarding the
cause of a malfunction and how to respond;
refer to the information provided below.In urgent cases, this information will be shown
as soon as the corresponding lamp comes on.
Exit the displayed information:
Move the controller to the left.
Hiding Check Control messages
Press the button in the turn signal lever up or
down.
Some Check Control messages are displayed
until the malfunctions have been rectified. They
cannot be hidden. If a number of malfunctions
occur simultaneously, they are displayed in
succession.
Other messages are automatically hidden after
approx. 20 seconds, but remain stored.