2011 BMW ACTIVEHYBRID X6 remove seats
[x] Cancel search: remove seatsPage 49 of 312
Controls
47Reference
At a glance
Driving tips
Communications
Navigation
Entertainment
Mobility
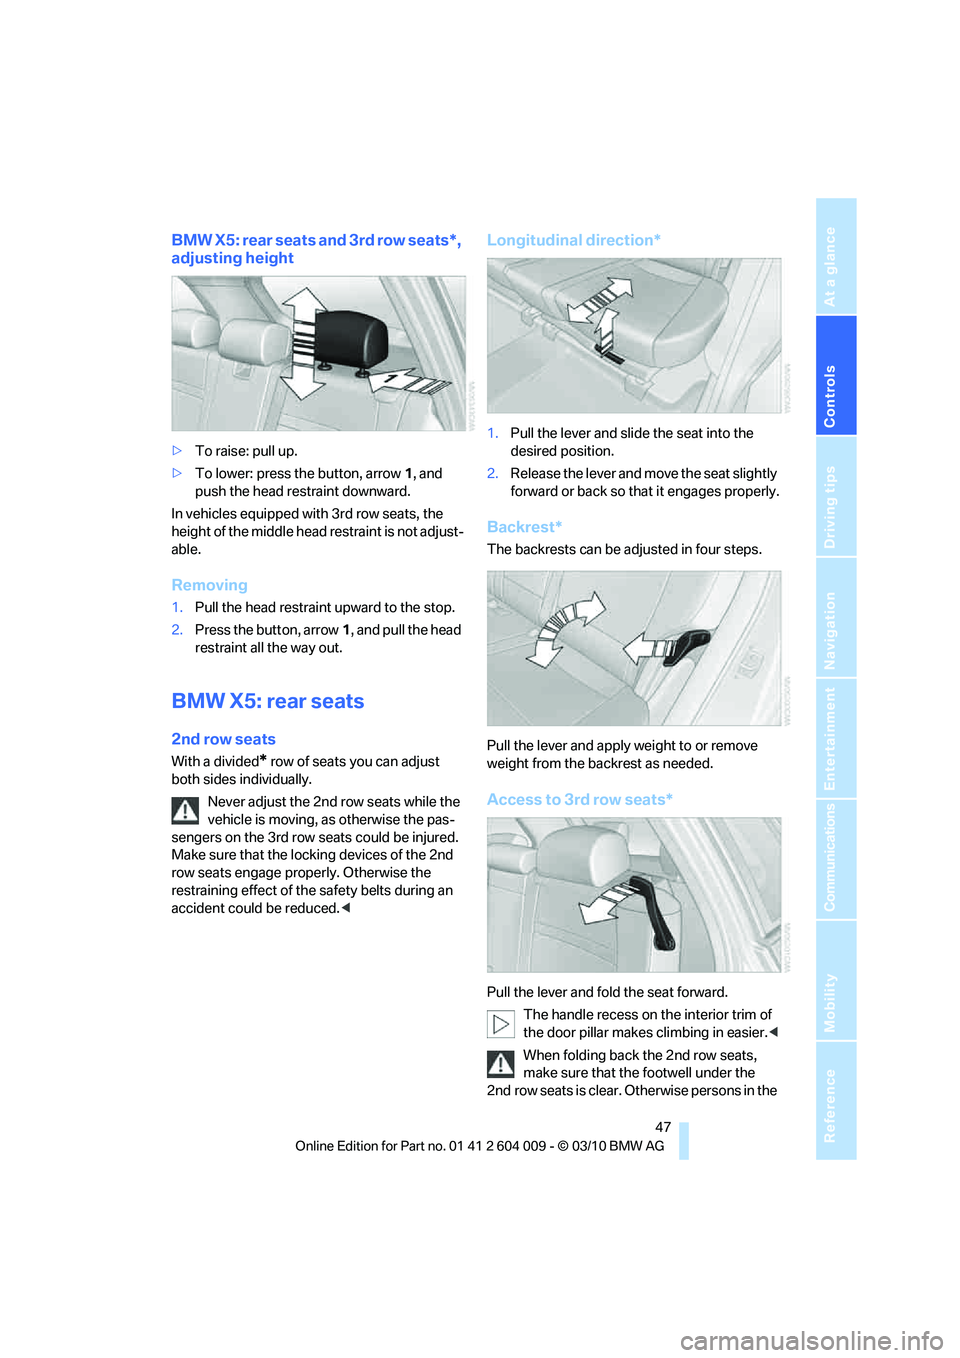
BMW X5: rear seats and 3rd row seats*,
adjusting height
>To raise: pull up.
>To lower: press the button, arrow1, and
push the head restraint downward.
In vehicles equipped with 3rd row seats, the
height of the middle head restraint is not adjust-
able.
Removing
1.Pull the head restraint upward to the stop.
2.Press the button, arrow1, and pull the head
restraint all the way out.
BMW X5: rear seats
2nd row seats
With a divided* row of seats you can adjust
both sides individually.
Never adjust the 2nd row seats while the
vehicle is moving, as otherwise the pas-
sengers on the 3rd row seats could be injured.
Make sure that the locking devices of the 2nd
row seats engage properly. Otherwise the
restraining effect of the safety belts during an
accident could be reduced.<
Longitudinal direction*
1.Pull the lever and slide the seat into the
desired position.
2.Release the lever and move the seat slightly
forward or back so that it engages properly.
Backrest*
The backrests can be adjusted in four steps.
Pull the lever and apply weight to or remove
weight from the backrest as needed.
Access to 3rd row seats*
Pull the lever and fold the seat forward.
The handle recess on the interior trim of
the door pillar makes climbing in easier.<
When folding back the 2nd row seats,
make sure that the footwell under the
2nd row seats is clear. Otherwise persons in the
Page 50 of 312
Adjusting
48 3rd row seats could be injured or objects dam-
aged.<
Warning lamp for 2nd row seats:
lights up when the 2nd row seats are
not locked. A message also appears
on the Control Display.
3rd row seats*
The 3rd row seats are divided and offer space
for two persons.
Folding up backrest
Before folding the seats up, remove the lug-
gage compartment roller cover, refer to
page131, and if need be, slide the 2nd row
seats slightly forward.
1.Pull the lever, refer to arrow. The backrest is
unlocked.
2.Fold up and engage the backrest.
Make sure that the catch engages
securely. If it is not properly engaged,
transported cargo could enter the passen-
ger compartment during braking or evasive
maneuvers and endanger the vehicle occu-
pants.<
3.Push the head restraints into the top posi-
tion.
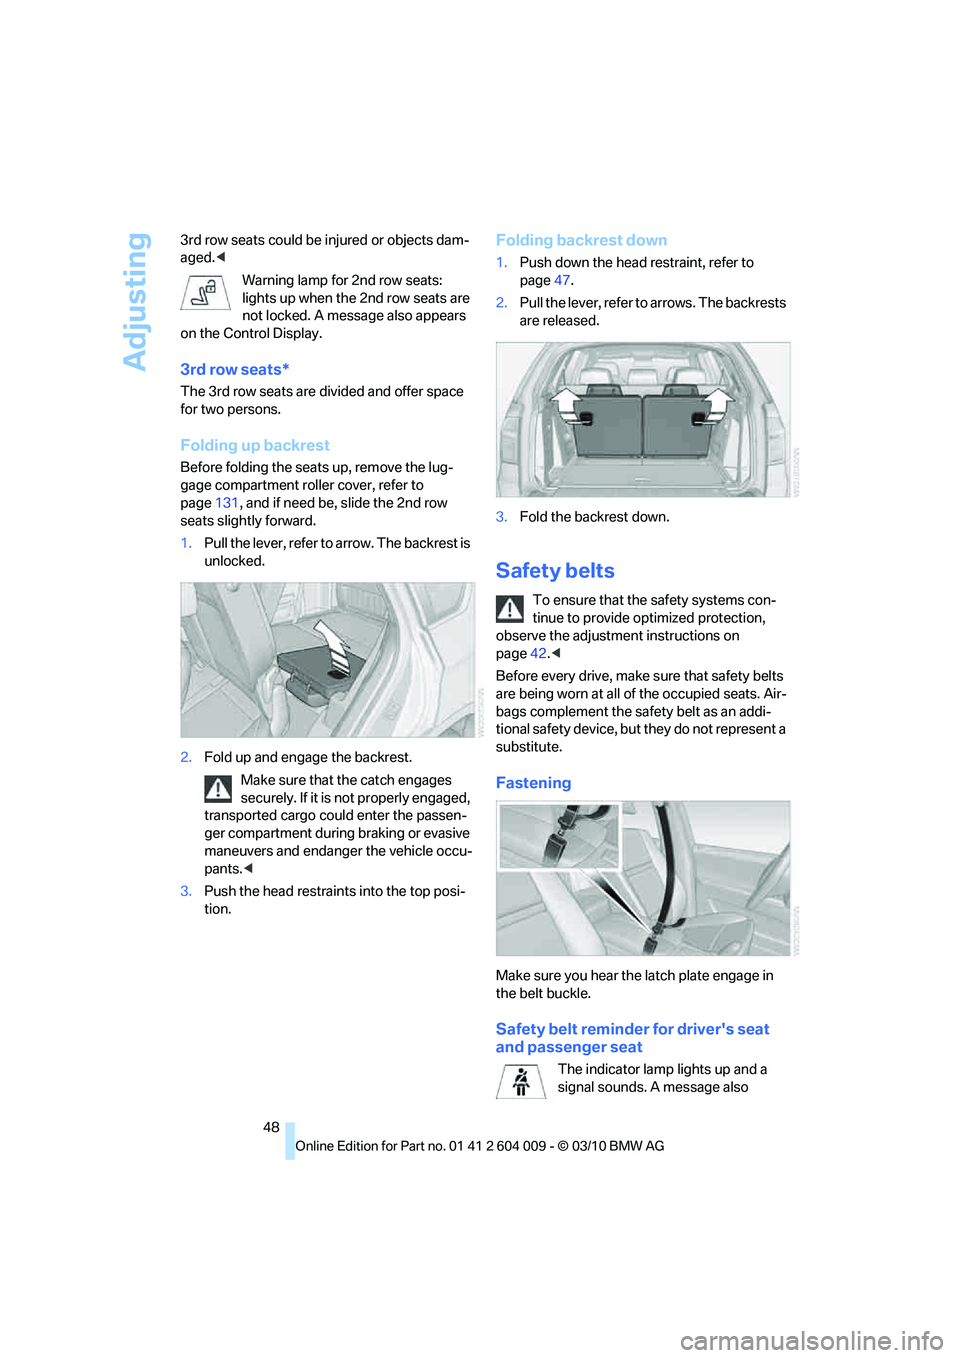
Folding backrest down
1.Push down the head restraint, refer to
page47.
2.Pull the lever, refer to arrows. The backrests
are released.
3.Fold the backrest down.
Safety belts
To ensure that the safety systems con-
tinue to provide optimized protection,
observe the adjustment instructions on
page42.<
Before every drive, make sure that safety belts
are being worn at all of the occupied seats. Air-
bags complement the safety belt as an addi-
tional safety device, but they do not represent a
substitute.
Fastening
Make sure you hear the latch plate engage in
the belt buckle.
Safety belt reminder for driver's seat
and passenger seat
The indicator lamp lights up and a
signal sounds. A message also
Page 57 of 312
Controls
55Reference
At a glance
Driving tips
Communications
Navigation
Entertainment
Mobility
Child seat security
The rear safety belts
>BMW X5: all safety belts of the 2nd and
3rd
* row seats
>BMW X6: all safety belts of the 2nd row
seats
And the safety belt for the front passenger can
be locked to prevent extension in order to per-
mit attachment of child restraint devices.
Locking safety belt
1.Secure the child restraint device with the
belt.
2.Pull out the belt webbing completely.
3.Allow the belt webbing to be pulled in and
pull taut against the child restraint device.
The safety belt is locked.
Unlocking safety belt
1.Open the belt buckle.
2.Remove the child restraint device.
3.Allow the belt webbing to be pulled in com-
pletely.
LATCH child restraint fixing
system
LATCH: Lower Anchor and Tethers for CHil-
dren.
Follow the system manufacturer's
instructions on installation and use of
LATCH child restraint devices; otherwise, their
protective function may be reduced.
system.
Make sure that the LATCH mounts have
properly clicked into place and that the
child restraint device is resting snugly against
the backrest. Otherwise, the protective action
may be reduced.<
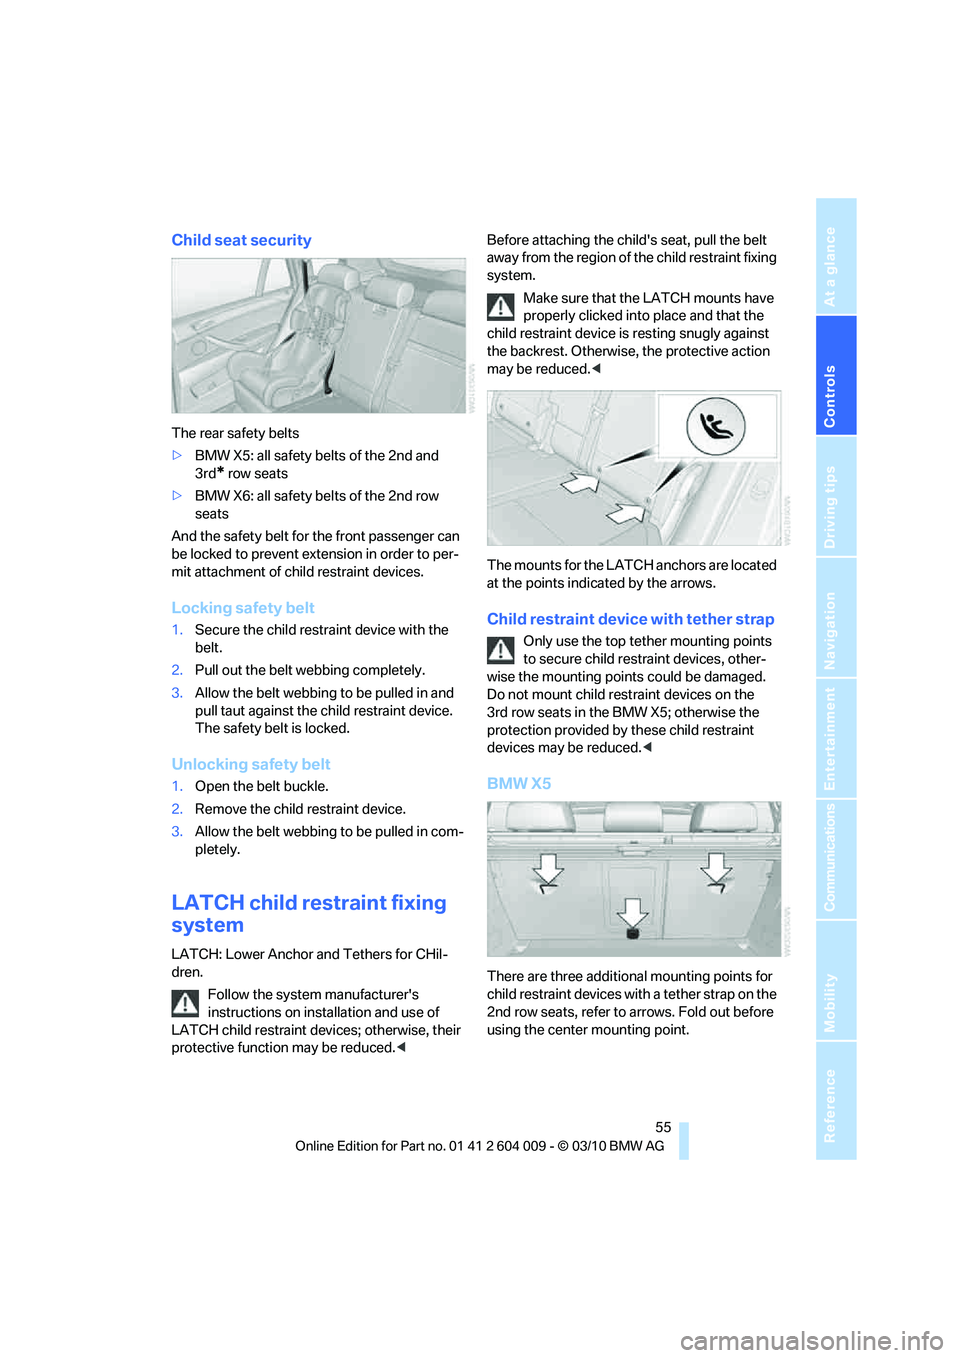
The mounts for the LATCH anchors are located
at the points indicated by the arrows.
Child restraint device with tether strap
Only use the top tether mounting points
to secure child restraint devices, other-
wise the mounting points could be damaged.
Do not mount child restraint devices on the
3rd row seats in the BMW X5; otherwise the
protection provided by these child restraint
devices may be reduced.<
BMW X5
There are three additional mounting points for
child restraint devices with a tether strap on the
2nd row seats, refer to arrows. Fold out before
using the center mounting point.
Page 109 of 312
Controls
107Reference
At a glance
Driving tips
Communications
Navigation
Entertainment
Mobility
Airbags
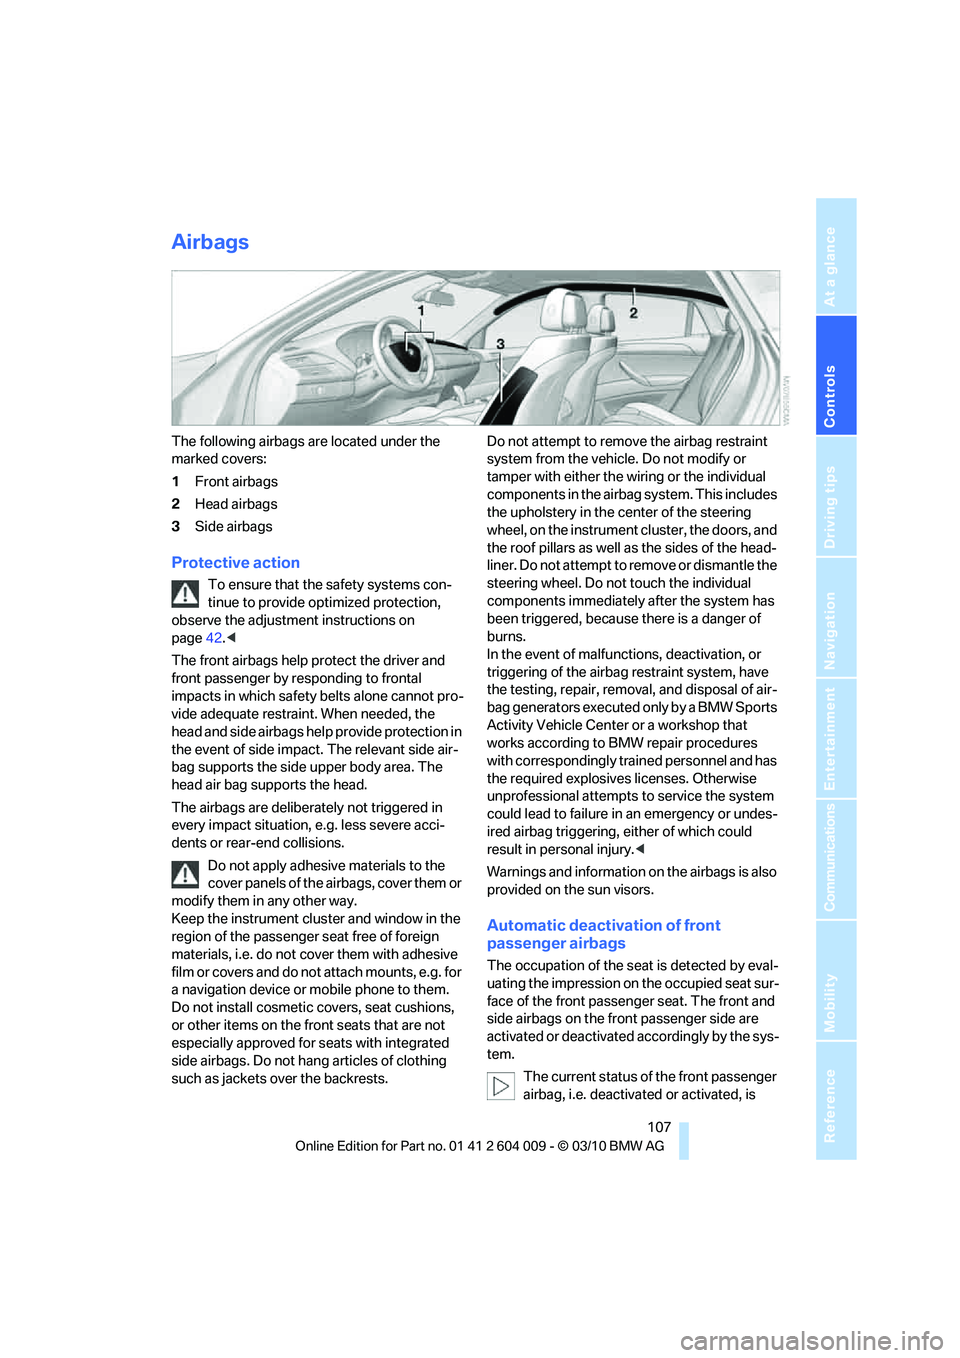
The following airbags are located under the
marked covers:
1Front airbags
2Head airbags
3Side airbags
Protective action
To ensure that the safety systems con-
tinue to provide optimized protection,
observe the adjustment instructions on
page42.<
The front airbags help protect the driver and
front passenger by responding to frontal
impacts in which safety belts alone cannot pro-
vide adequate restraint. When needed, the
head and side airbags help provide protection in
the event of side impact. The relevant side air-
bag supports the side upper body area. The
head air bag supports the head.
The airbags are deliberately not triggered in
every impact situation, e.g. less severe acci-
dents or rear-end collisions.
Do not apply adhesive materials to the
cover panels of the airbags, cover them or
modify them in any other way.
Keep the instrument cluster and window in the
region of the passenger seat free of foreign
materials, i.e. do not cover them with adhesive
film or covers and do not attach mounts, e.g. for
a navigation device or mobile phone to them.
Do not install cosmetic covers, seat cushions,
or other items on the front seats that are not
especially approved for seats with integrated
side airbags. Do not hang articles of clothing
such as jackets over the backrests.Do not attempt to remove the airbag restraint
system from the vehicle. Do not modify or
tamper with either the wiring or the individual
components in the airbag system. This includes
the upholstery in the center of the steering
wheel, on the instrument cluster, the doors, and
the roof pillars as well as the sides of the head-
liner. Do not attempt to remove or dismantle the
steering wheel. Do not touch the individual
components immediately after the system has
been triggered, because there is a danger of
burns.
In the event of malfunctions, deactivation, or
triggering of the airbag restraint system, have
the testing, repair, removal, and disposal of air-
bag generators executed only by a BMW Sports
Activity Vehicle Center or a workshop that
works according to BMW repair procedures
with correspondingly trained personnel and has
the required explosives licenses. Otherwise
unprofessional attempts to service the system
could lead to failure in an emergency or undes-
ired airbag triggering, either of which could
result in personal injury.<
Warnings and information on the airbags is also
provided on the sun visors.
Automatic deactivation of front
passenger airbags
The occupation of the seat is detected by eval-
uating the impression on the occupied seat sur-
face of the front passenger seat. The front and
side airbags on the front passenger side are
activated or deactivated accordingly by the sys-
tem.
The current status of the front passenger
airbag, i.e. deactivated or activated, is
Page 131 of 312

Controls
129Reference
At a glance
Driving tips
Communications
Navigation
Entertainment
Mobility
Rear
BMW X5
Unlock the center armrest with the button in the
lower section of the opening and fold down.
Press the button; the cover folds forward.
With the 3rd row seats
*:
Fold down the center armrest.
Press the button; the cupholders are opened.
The cupholders of the 3rd row seats are located
in the center console between the seats.
BMW X6
Slide the cover forward.
Remove the beverage container before
folding the rear seat backrest forward or
using the ski bag; otherwise it may cause dam-
age.<
Ashtray
Front
To open the cover, slide it forward.
Rear
BMW X6
Slide the cover back.
Remove the insert to empty.
Page 133 of 312

Controls
131Reference
At a glance
Driving tips
Communications
Navigation
Entertainment
Mobility
BMW X6: in rear console
Slide the cover back.
Access to socket:
Pull off the cover.
Rear center armrest
BMW X6 and BMW X5 with 3rd row
seats*
Pull on the loop and fold down the center arm-
rest.
BMW X5 without 3rd row seats*
Unlock the center armrest with the button in the
lower section of the opening and fold down.
Cargo area
BMW X5: luggage compartment roller
cover
Pull out the luggage compartment roller cover
and hook it into the brackets.
Do not place heavy or hard objects on the
luggage compartment roller cover. If you
do so, they may already pose a danger to vehi-
cle occupants during braking or evasive maneu-
vers.
Do not allow the luggage compartment roller
cover to snap back, otherwise it can be dam-
aged.<
Removing
1.Unlock the case with the button, arrow1.
2.Swing the case somewhat to the left,
arrow2, and remove.
Installing
When installing, proceed in the opposite order
of removal.
Page 136 of 312
Practical interior accessories
134 1.Insert the brackets at the respective notch
in the rail on the cargo area floor.
2.Press down the brackets to push them into
the desired position.
3.Check the firm seating of the brackets.
They must be clearly heard to engage.
Do not lay cargo on the brackets, as oth-
erwise they could be unlocked.<
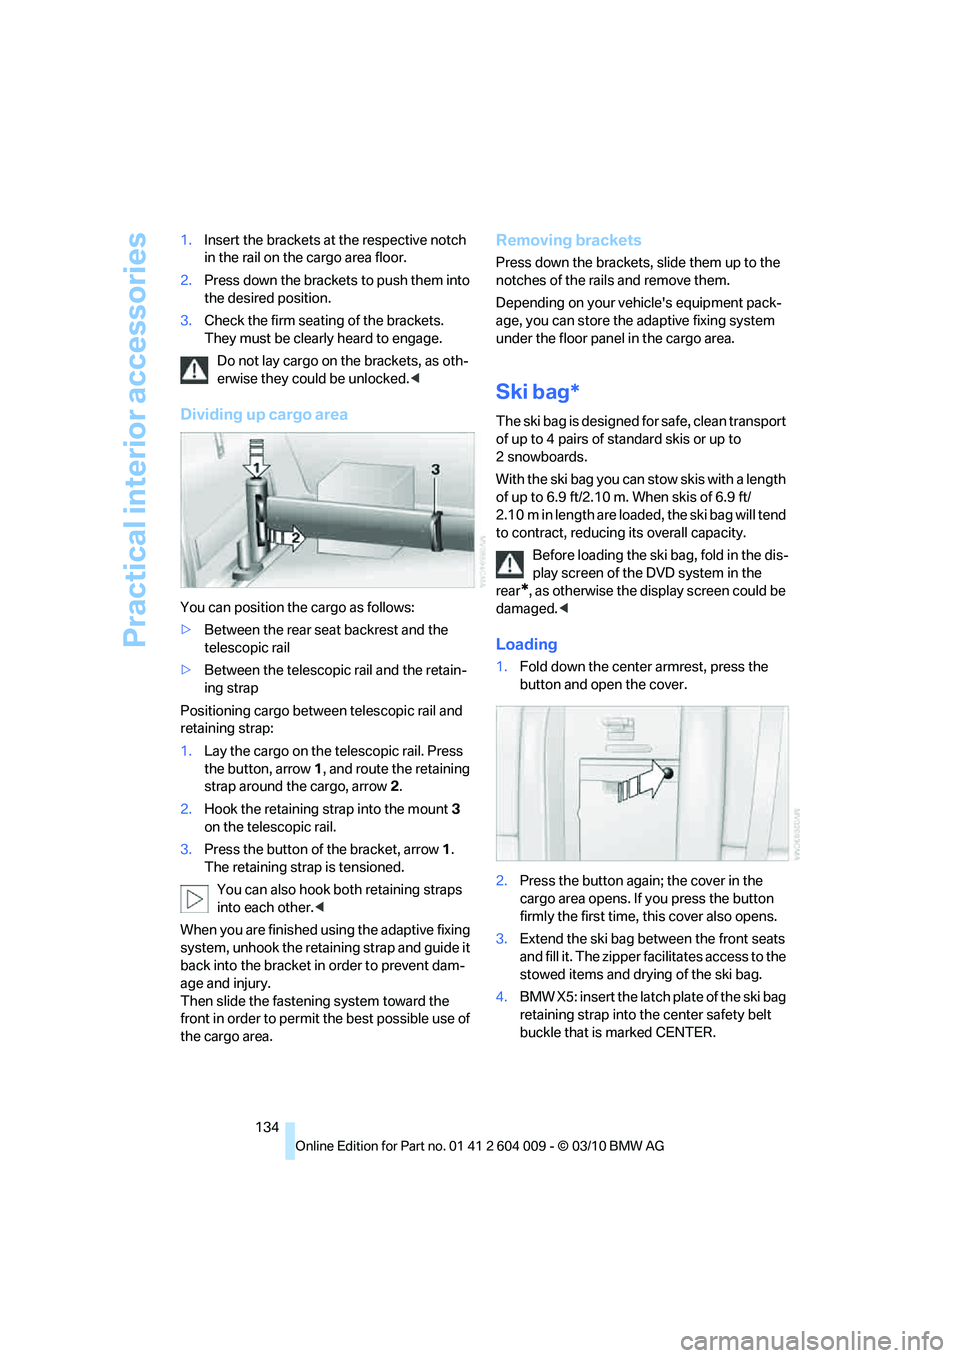
Dividing up cargo area
You can position the cargo as follows:
>Between the rear seat backrest and the
telescopic rail
>Between the telescopic rail and the retain-
ing strap
Positioning cargo between telescopic rail and
retaining strap:
1.Lay the cargo on the telescopic rail. Press
the button, arrow1, and route the retaining
strap around the cargo, arrow2.
2.Hook the retaining strap into the mount3
on the telescopic rail.
3.Press the button of the bracket, arrow1.
The retaining strap is tensioned.
You can also hook both retaining straps
into each other.<
When you are finished using the adaptive fixing
system, unhook the retaining strap and guide it
back into the bracket in order to prevent dam-
age and injury.
Then slide the fastening system toward the
front in order to permit the best possible use of
the cargo area.
Removing brackets
Press down the brackets, slide them up to the
notches of the rails and remove them.
Depending on your vehicle's equipment pack-
age, you can store the adaptive fixing system
under the floor panel in the cargo area.
Ski bag*
The ski bag is designed for safe, clean transport
of up to 4 pairs of standard skis or up to
2snowboards.
With the ski bag you can stow skis with a length
of up to 6.9 ft/2.10 m. When skis of 6.9 ft/
2.10 m in length are loaded, the ski bag will tend
to contract, reducing its overall capacity.
Before loading the ski bag, fold in the dis-
play screen of the DVD system in the
rear
*, as otherwise the display screen could be
damaged.<
Loading
1.Fold down the center armrest, press the
button and open the cover.
2.Press the button again; the cover in the
cargo area opens. If you press the button
firmly the first time, this cover also opens.
3.Extend the ski bag between the front seats
and fill it. The zipper facilitates access to the
stowed items and drying of the ski bag.
4.BMW X5: insert the latch plate of the ski bag
retaining strap into the center safety belt
buckle that is marked CENTER.