2011 BMW 550I display
[x] Cancel search: displayPage 228 of 304

Using contact data
At a glance
Contact data from calendar entries, appoint‐
ments,
tasks, emails and notes can be stored or
selected*.
Displaying contact or selecting phone
number
1. "Use contact data"
2. Display the contact or select the phone
number:
▷Select the contact to display contact de‐
tails.
▷ Select the phone number to establish a
connection directly.
Storing contact data
1. "Use contact data"
2. Highlight the phone number or e-mail ad‐
dress.
3. Open "Options".
4. "Add to existing contact" or "Store as new
contact"
Reading out loud*
Text messages, e-mails, appointment entries,
tasks, and notes can be read out loud.
1. Select the desired message, appointment,
task, or note.
2. Select the symbol.
The following options are available during read‐
ing:
▷ "Pause"
Interrupt reading. Select again to restart
reading.
▷ "Back to beginning"
Start reading message again from the be‐
ginning.
▷ Select the symbol.
Skip a paragraph. ▷ Select the symbol.
Go back one paragraph.
▷ To end reading, tilt the controller to the left.
What to do if...
Information on suitable mobile phones, refer to
page 210.
Appointments, tasks, notes, text messages, or
e-mails from the mobile phone are not dis‐
played.
▷ The mobile phone is not capable of the
missing function or is not connected cor‐
rectly.
▷ The Office function is deactivated.
▷ The mobile phone is connected as an addi‐
tional phone.
▷ Appointments are older than 20 days or are
more than 50 days in the future.
▷ The tasks have been marked as completed
or have a due date that lies more than
90 days in the future.
▷ Depending on the number of stored ap‐
pointments, task notes, and messages in
the
mobile phone, not all are displayed in the
vehicle.
Not all appointments and tasks from the mobile
phone are displayed at the right time?
▷ The time zone, time or date is incorrectly set
on the Control Display and mobile phone.
The e-mail attachment is not displayed.
▷ E-mails are transmitted without an attach‐
ment.
Entries are not displayed in full length.
▷ Text were already transmitted from the mo‐
bile phone in a shortened form.
▷ Synchronization between the mobile phone
and vehicle may take several minutes.
The contact pictures are not being displayed?
▷ A max. of 200 contact pictures can be stored
in the vehicle.
The E-mail is displayed with a delay?
Seite 228
228 Online Edition for Part no. 01 40 2 606 469 - 03 11 490
Office
Page 230 of 304

Contacts*
General information
Contacts
can be created and edited and the ad‐
dresses can be adopted as destinations for nav‐
igation.
New contact
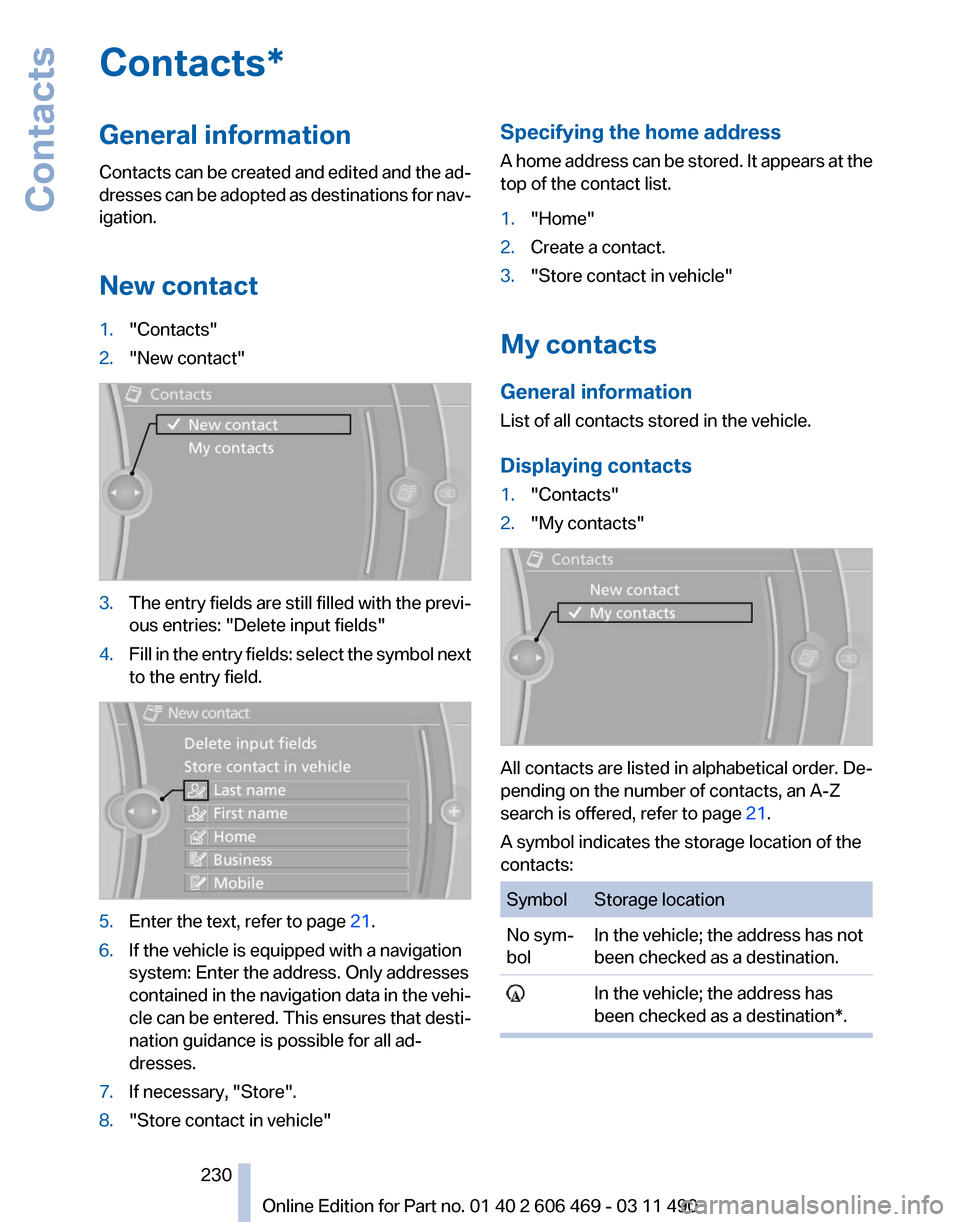
1. "Contacts"
2. "New contact" 3.
The entry fields are still filled with the previ‐
ous entries: "Delete input fields"
4. Fill in the entry fields: select the symbol next
to the entry field. 5.
Enter the text, refer to page 21.
6. If the vehicle is equipped with a navigation
system: Enter the address. Only addresses
contained
in the navigation data in the vehi‐
cle can be entered. This ensures that desti‐
nation guidance is possible for all ad‐
dresses.
7. If necessary, "Store".
8. "Store contact in vehicle" Specifying the home address
A
home address can be stored. It appears at the
top of the contact list.
1. "Home"
2. Create a contact.
3. "Store contact in vehicle"
My contacts
General information
List of all contacts stored in the vehicle.
Displaying contacts
1. "Contacts"
2. "My contacts" All contacts are listed in alphabetical order. De‐
pending on the number of contacts, an A-Z
search is offered, refer to page
21.
A symbol indicates the storage location of the
contacts: Symbol Storage location
No sym‐
bol
In the vehicle; the address has not
been checked as a destination. In the vehicle; the address has
been checked as a destination*. Seite 230
230 Online Edition for Part no. 01 40 2 606 469 - 03 11 490
Contacts
Page 231 of 304

Editing a contact
1.
Select the desired contact.
2. "Edit contact" 3.
Change the entries.
4. Move the controller to the left.
5. "Yes"
Selecting the contact as a navigation
destination*
1. Select the desired contact.
2. Select the address.
3. "Start guidance" or "Add as another
destination"
Checking the address as a destination*
An address that is to be used for destination
guidance must match the navigation data con‐
tained in the vehicle. The address can be
checked for this purpose.
1. Select the desired contact and highlight the
address.
2. Open "Options".
3. "Check as destination"
4. Correct and store the address if necessary.
Selecting the sorting order of the
names
Names can be displayed in a different order.
1. "My contacts"
2. Highlight the contact.
3. Open "Options".
4. "Display: last, first name" or "Display: first,
last name" Exporting/importing contacts
Contacts can be exported and imported via the
Personal Profile, refer to page
29.
Deleting contacts
1. "My contacts"
2. Highlight the contact.
3. Open "Options".
4. "Delete contact" or "Delete all contacts"
Seite 231
231Online Edition for Part no. 01 40 2 606 469 - 03 11 490
Reference Mobility
Communication Entertainment Navigation Driving tips Controls At a glance
Page 234 of 304

Vehicles equipped with BMW Assist or
BMW TeleService
1.
"ConnectedDrive"
2. "Roadside Assistance"
3. "Start service" TeleService Diagnosis*
TeleService Diagnosis enables the wireless
transmission of detailed vehicle data that are
important for vehicle diagnosis. These data are
transmitted automatically.
After the data are transmitted, the voice con‐
nection to Roadside Assistance is re-estab‐
lished.
TeleService Help
*
TeleService Help enables an in-depth diagnosis
of the vehicle by Roadside Assistance via wire‐
less transmission.
TeleService Help can be started after a prompt
by Roadside Assistance and the termination of
the voice connection.
Starting TeleService Help
1. Park the vehicle in a safe place.
2. Set the parking brake.
3. The engine is running.
4. "TeleService Help"
After completion of TeleService Help, a voice
connection is established to Roadside Assis‐
tance. BMW Online*
At a glance
A
business search can be opened via BMW On‐
line.
License conditions
This product contains NetFront Browser soft‐
ware of ACCESS Co., Ltd. Copyright © 2007
ACCESS Co., Ltd. All rights reserved.
NetFront is a trademark or registered trademark
of ACCESS CO., LTD., in Japan and other coun‐
tries.
This software is based in part on the work of the
Independent JPEG Group.
Requirements
▷ Subscription to the optional Convenience
Plan.
▷ The date setting, refer to page 78, on the
Control Display is current.
▷ The vehicle is located within wireless net‐
work coverage.
Starting BMW Online
1. "ConnectedDrive"
2. "BMW Online" 3.
If necessary, "OK".
The BMW Online home page is displayed.
Operating BMW Online
To start a search:
▷ Turn the controller to highlight an element.
▷ Press the controller to display an element.
Seite 234
234 Online Edition for Part no. 01 40 2 606 469 - 03 11 490
BMW ConnectedDrive
Page 235 of 304

Opening the start page
1.
Open "Options".
2. "Display start page" Loading a new page
1.
Open "Options".
2. "Reload"
Cancel
1. Open "Options".
2. "Cancel loading"
Customer Relations
At a glance
Contact Customer Relations for information on
all aspects of your vehicle.
Calling Customer Relations
Vehicles not equipped with BMW
Assist or BMW TeleService
1. "ConnectedDrive"
2. "Customer Relations"
The Customer Relations phone number is dis‐
played. If the mobile phone* is paired, a con‐
nection is established to Customer Relations. Vehicles equipped with BMW Assist or
BMW TeleService
1.
"ConnectedDrive"
2. "Customer Relations"
3. "Start service"
Service Request*
At a glance
Sends
information to your service partner to re‐
quest the arrangement of a service appoint‐
ment. The TeleService data is transmitted dur‐
ing a Service Request. If possible, your service
partner will establish contact with you.
Starting a Service Request
1. "ConnectedDrive"
2. "Service Request"
3. "Start service" A Service Request can be started via a Check
Control message, refer to page
71.
Seite 235
235Online Edition for Part no. 01 40 2 606 469 - 03 11 490
Reference Mobility
Communication Entertainment Navigation Driving tips Controls At a glance
Page 236 of 304

Automatic Service Request*
The TeleService data necessary for servicing
the
vehicle are automatically sent to your service
partner prior to the service deadline. If possible,
the service partner will contact you and a service
appointment can be arranged.
To check when your service partner was noti‐
fied:
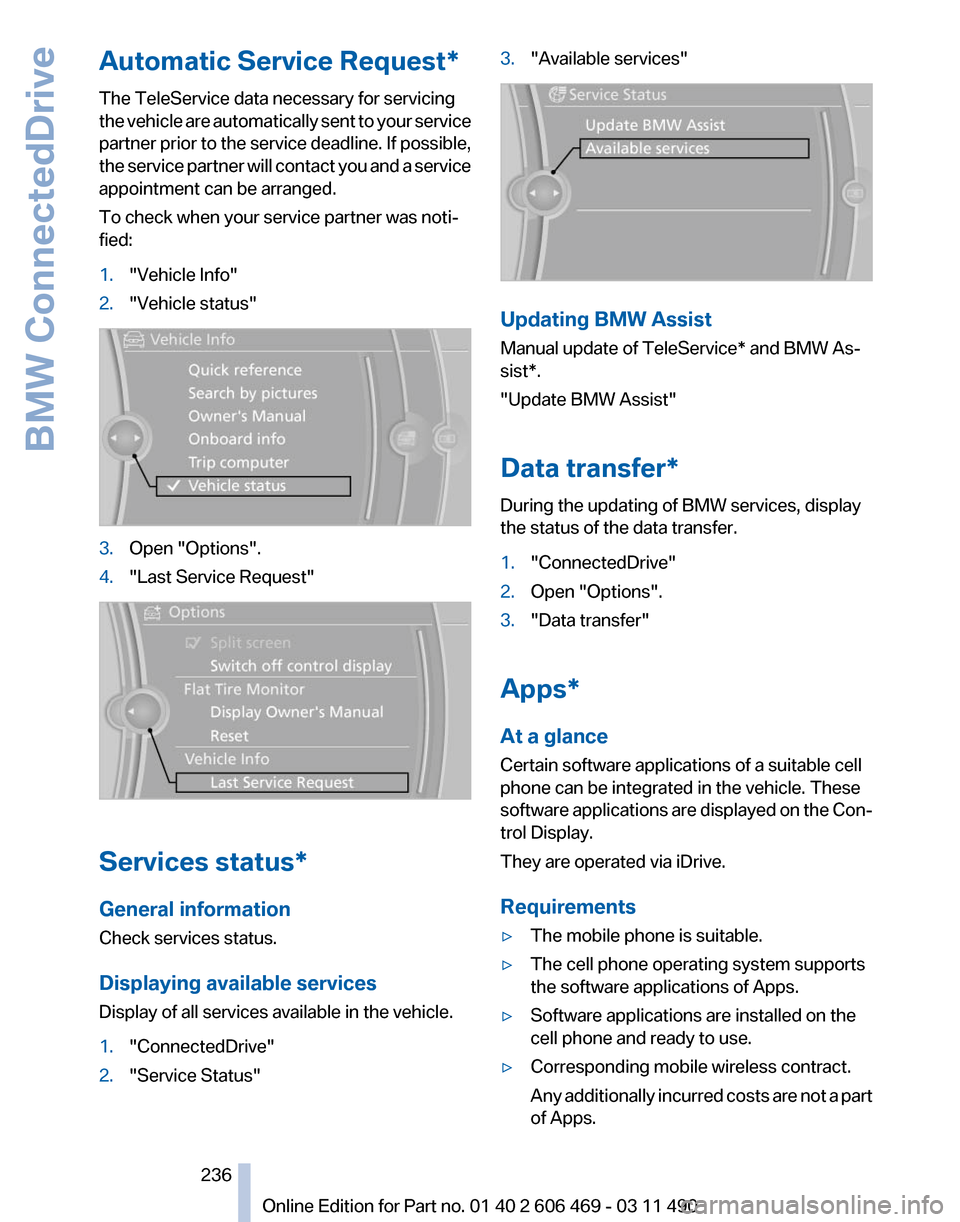
1. "Vehicle Info"
2. "Vehicle status" 3.
Open "Options".
4. "Last Service Request" Services status*
General information
Check services status.
Displaying available services
Display of all services available in the vehicle.
1.
"ConnectedDrive"
2. "Service Status" 3.
"Available services" Updating BMW Assist
Manual update of
TeleService* and BMW As‐
sist*.
"Update BMW Assist"
Data transfer*
During the updating of BMW services, display
the status of the data transfer.
1. "ConnectedDrive"
2. Open "Options".
3. "Data transfer"
Apps*
At a glance
Certain software applications of a suitable cell
phone can be integrated in the vehicle. These
software
applications are displayed on the Con‐
trol Display.
They are operated via iDrive.
Requirements
▷ The mobile phone is suitable.
▷ The cell phone operating system supports
the software applications of Apps.
▷ Software applications are installed on the
cell phone and ready to use.
▷ Corresponding mobile wireless contract.
Any
additionally incurred costs are not a part
of Apps.
Seite 236
236 Online Edition for Part no. 01 40 2 606 469 - 03 11 490
BMW ConnectedDrive
Page 237 of 304

▷
Use only BMW approved software applica‐
tions; otherwise, it may result in malfunc‐
tions.
Information about suitable cell phones, available
software applications and their installation can
be found at www.bmw.com/connectivity or at
the service center.
Create the entries.
Make entries only when traffic and road
conditions allow. Otherwise, the vehicle occu‐
pants
and other road users may be put in danger
because of the distraction from driving.
For reasons of safety, some software applica‐
tions are usable only while the vehicle is station‐
ary.◀
Operate Apps
1. Connect the cell phone via the snap-in
adapter or via the USB audio interface.
2. "ConnectedDrive"
3. Select the desired software application.
Displaying status
Information about the currently available soft‐
ware applications can be displayed.
1. "ConnectedDrive"
2. "BMW apps"
PlugIn*
Selected functions of the cell phone are dis‐
played on the Control Display. They can be op‐
erated via iDrive.
1. Connect cell phone via the snap-in adapter.
2. "ConnectedDrive"
3. "PlugIn"
4. "Activate PlugIn"
5. Navigate to the displayed functions via the
controller
and select, for example, a desired
category or track.
Press button to switch within the cell
phone functions to a higher level or back. Press button twice to switch back to the
main menu.
Notes
▷ The ranges of Apps that can be displayed on
the Control Display depend on the range of
installed software applications on the cell
phone.
▷ The data transmission of the software ap‐
plications
from the cell phone to the vehicle
can last some time. Some software applica‐
tions depend on the speed of the available
Internet connection of the cell phone.
▷ Some cell phones cannot simultaneously
use
Apps and the Bluetooth hands-free sys‐
tem.
If necessary, restart the software application
on the cell phone after a phone conversa‐
tion.
TeleService Report*
Transmits
technical data that is evaluated for the
ongoing development of BMW products from
your vehicle to BMW in regular intervals if nec‐
essary.
TeleService Report is activated in vehicles that
meet certain technical requirements and have a
valid Assist contract; this feature is free of
charge.
Neither personal data nor position data is trans‐
mitted.
Indicate when the last Teleservice Report was
transmitted:
1. "Vehicle Info"
2. "Vehicle status"
3. Open "Options".
4. "Last Teleservice Info" Seite 237
237Online Edition for Part no. 01 40 2 606 469 - 03 11 490
Reference Mobility
Communication Entertainment Navigation Driving tips Controls At a glance
Page 240 of 304

Refueling
Fuel cap
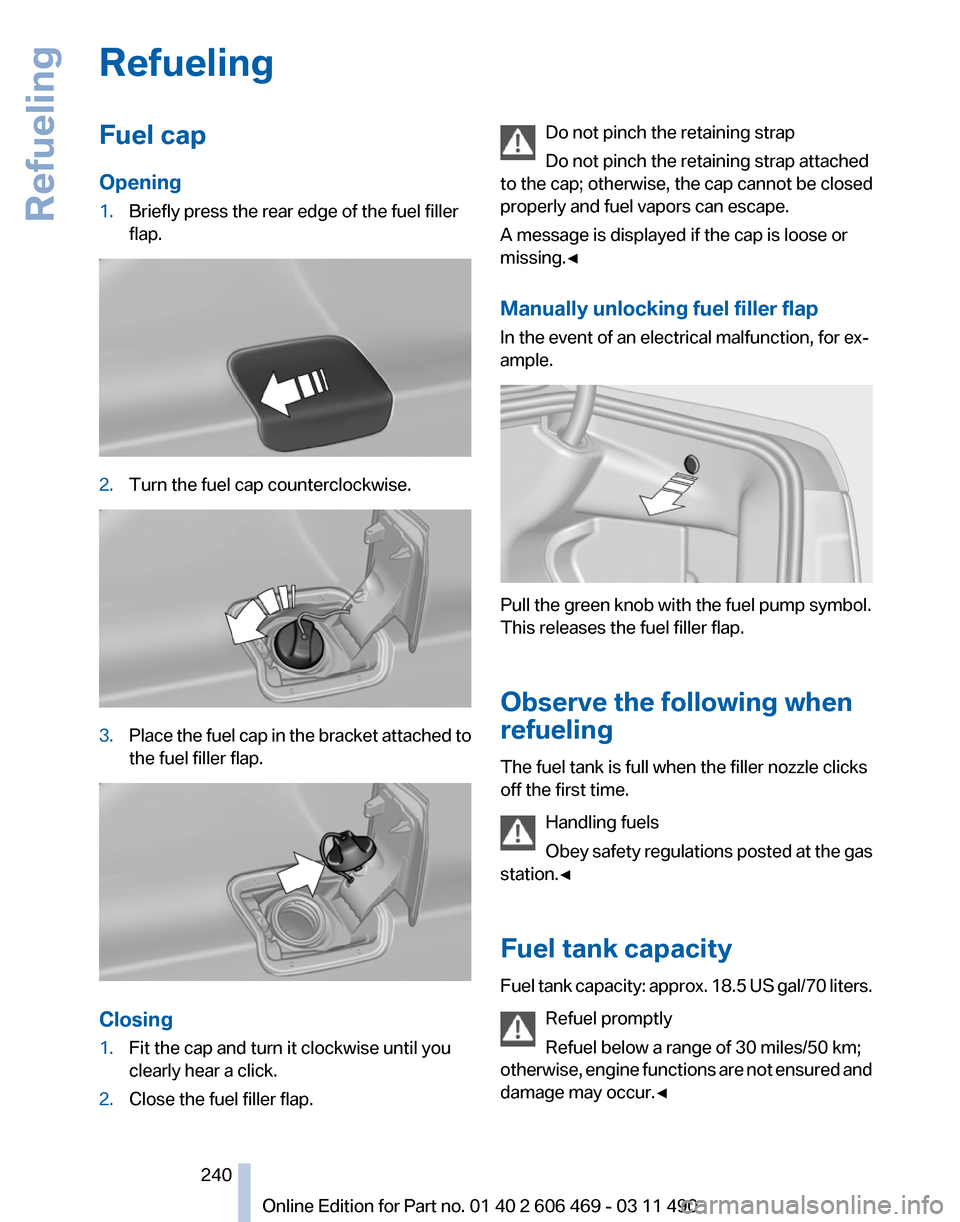
Opening
1.
Briefly press the rear edge of the fuel filler
flap. 2.
Turn the fuel cap counterclockwise. 3.
Place the fuel cap in the bracket attached to
the fuel filler flap. Closing
1.
Fit the cap and turn it clockwise until you
clearly hear a click.
2. Close the fuel filler flap. Do not pinch the retaining strap
Do not pinch the retaining strap attached
to the cap; otherwise, the cap cannot be closed
properly and fuel vapors can escape.
A message is displayed if the cap is loose or
missing.◀
Manually unlocking fuel filler flap
In the event of an electrical malfunction, for ex‐
ample. Pull the green knob with the fuel pump symbol.
This releases the fuel filler flap.
Observe the following when
refueling
The fuel tank is full when the filler nozzle clicks
off the first time.
Handling fuels
Obey
safety regulations posted at the gas
station.◀
Fuel tank capacity
Fuel tank capacity: approx. 18.5 US gal/70 liters.
Refuel promptly
Refuel below a range of 30 miles/50 km;
otherwise, engine functions are not ensured and
damage may occur.◀ Seite 240
240 Online Edition for Part no. 01 40 2 606 469 - 03 11 490
Refueling