2011 BMW 535I XDRIVE SEDAN manual radio set
[x] Cancel search: manual radio setPage 17 of 304
3.
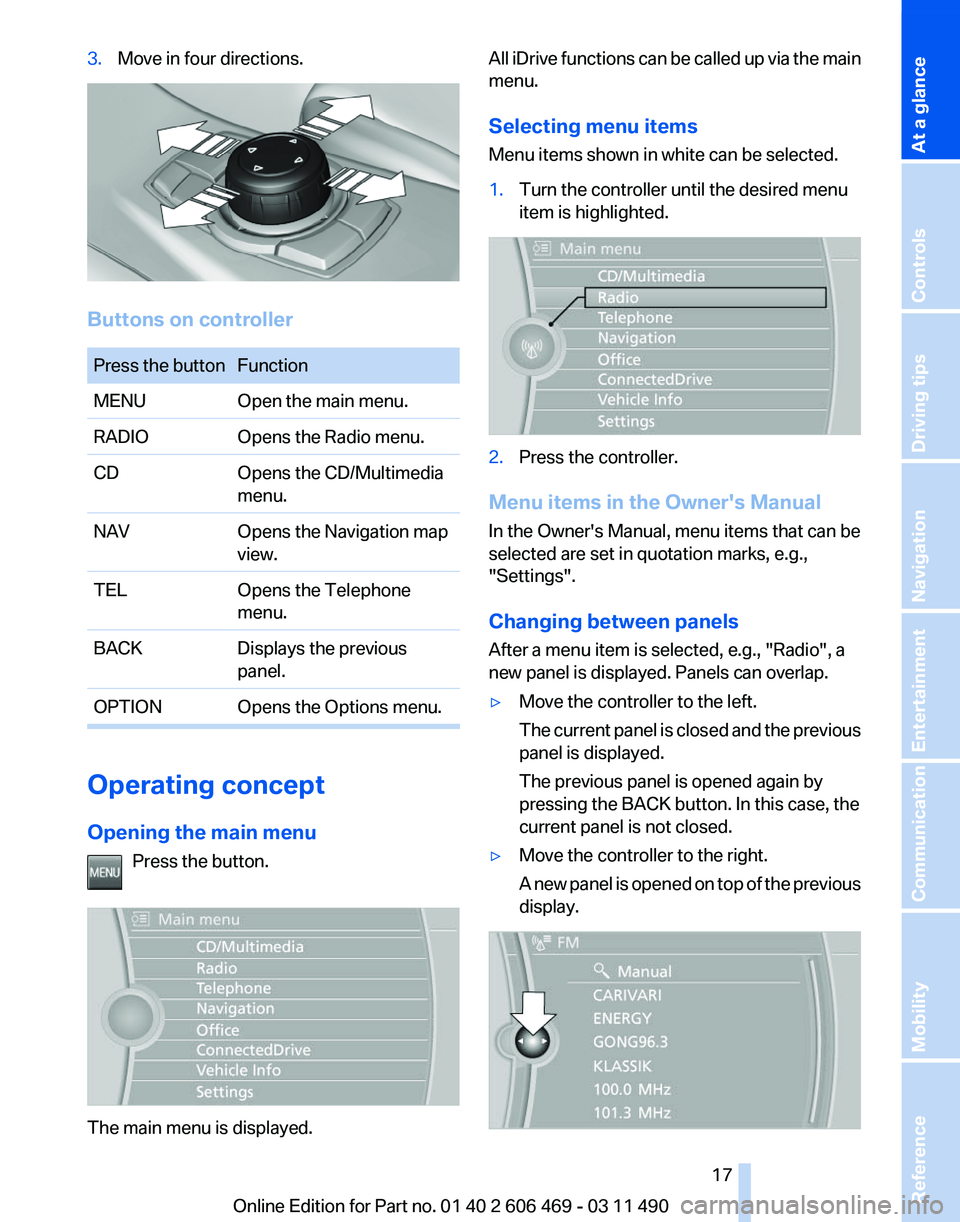
Move in four directions. Buttons on controller
Press the button Function
MENU
Open the main menu.
RADIO Opens the Radio menu.
CD Opens the CD/Multimedia
menu.
NAV Opens the Navigation map
view.
TEL Opens the Telephone
menu.
BACK Displays the previous
panel.
OPTION Opens the Options menu. Operating concept
Opening the main menu
Press the button. The main menu is displayed. All iDrive functions can be called up via the main
menu.
Selecting menu items
Menu items shown in white can be selected.
1.
Turn the controller until the desired menu
item is highlighted. 2.
Press the controller.
Menu items in the Owner's Manual
In the Owner's Manual, menu items that can be
selected are set in quotation marks, e.g.,
"Settings".
Changing between panels
After a menu item is selected, e.g.,
"Radio", a
new panel is displayed. Panels can overlap.
▷ Move the controller to the left.
The
current panel is closed and the previous
panel is displayed.
The previous panel is opened again by
pressing the BACK button. In this case, the
current panel is not closed.
▷ Move the controller to the right.
A
new panel is opened on top of the previous
display. Seite 17
17Online Edition for Part no. 01 40 2 606 469 - 03 11 490
Reference Mobility Communication Entertainment Navigation Driving tips Controls
At a glance
Page 29 of 304
New remote controls
You can obtain new remote controls from your
service center.
Loss of the remote controls
Lost remote controls can be blocked by your
service center.
Emergency
detection of remote control
It is possible to switch on the ignition or start the
engine in situations such as the following:
▷ Interference of radio transmission to remote
control by external sources.
▷ Discharged battery in the remote control.
A Check Control message is displayed if an at‐
tempt is made to switch on the ignition or start
the engine.
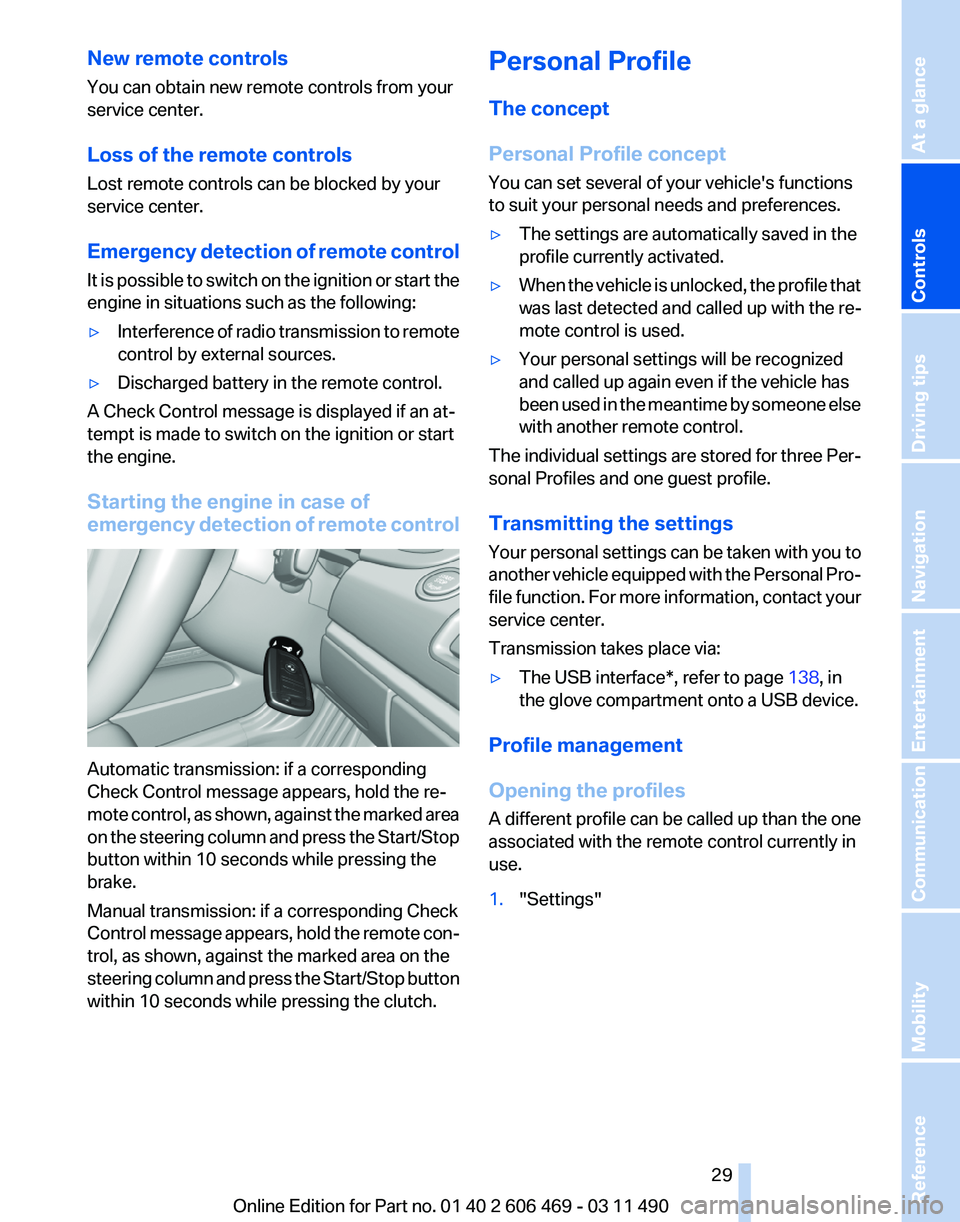
Starting the engine in case of
emergency
detection of remote controlAutomatic transmission: if a corresponding
Check Control message appears, hold the re‐
mote
control, as shown, against the marked area
on the steering column and press the Start/Stop
button within 10 seconds while pressing the
brake.
Manual transmission: if a corresponding Check
Control message appears, hold the remote con‐
trol, as shown, against the marked area on the
steering column and press the Start/Stop button
within 10 seconds while pressing the clutch. Personal Profile
The concept
Personal Profile concept
You can set several of your vehicle's functions
to suit your personal needs and preferences.
▷
The settings are automatically saved in the
profile currently activated.
▷ When the vehicle is unlocked, the profile that
was last detected and called up with the re‐
mote control is used.
▷ Your personal settings will be recognized
and called up again even if the vehicle has
been
used in the meantime by someone else
with another remote control.
The individual settings are stored for three Per‐
sonal Profiles and one guest profile.
Transmitting the settings
Your
personal settings can be taken with you to
another vehicle equipped with the Personal Pro‐
file function. For more information, contact your
service center.
Transmission takes place via:
▷ The USB interface*, refer to page 138, in
the glove compartment onto a USB device.
Profile management
Opening the profiles
A
different profile can be called up than the one
associated with the remote control currently in
use.
1. "Settings"
Seite 29
29Online Edition for Part no. 01 40 2 606 469 - 03 11 490
Reference Mobility Communication Entertainment Navigation Driving tips
Controls At a glance
Page 59 of 304
Starting the engine
General information
Enclosed areas
Do not let the engine run in enclosed
areas; otherwise, breathing of exhaust fumes
may lead to loss of consciousness and death.
The
exhaust gases contain carbon monoxide, an
odorless and colorless but highly toxic gas.◀
Unattended vehicle
Do not leave the car unattended with the
engine running; otherwise, it presents a poten‐
tial source of danger.
Before leaving the car with the engine running,
set the parking brake and place the transmission
in position P or neutral to prevent the car from
moving.◀
Frequent starting in quick succession
Avoid repeated futile attempts at starting
the car and avoid starting the car frequently in
quick succession. Otherwise, the fuel is not
burned or is inadequately burned, and there is
the danger of overheating and damaging the
catalytic converter.◀
Do not wait for the engine to warm up while the
vehicle remains stationary. Start driving at mod‐
erate engine speeds.
Manual transmission
Starting the engine
1. Depress the brake pedal.
2. Press on the clutch and shift to neutral.
3. Press the Start/Stop button.
The ignition is activated automatically for a cer‐
tain time and is stopped as soon as the engine
starts.
Automatic transmission
*
Starting the engine
1. Depress the brake pedal.
2. Press the Start/Stop button. The ignition is activated automatically for a cer‐
tain time and is stopped as soon as the engine
starts.
Engine stop
General information
Take the remote control with you
Take the remote control with you when
leaving
the vehicle so that children, for example,
cannot operate the windows and injure them‐
selves.◀
Set the parking brake and further secure
the vehicle as required
Set the parking brake firmly when parking; oth‐
erwise, the vehicle could roll. On steep upward
and downward inclines, further secure the vehi‐
cle, for example, by turning the steering wheel in
the direction of the curb. ◀
Before driving into a car wash
In order for the vehicle to be able to roll into a car
wash, heed the information regarding Washing
in automatic car washes, refer to page 274.
Manual transmission
Switching off the engine
1. With the vehicle at a standstill, press the
Start/Stop button.
2. Shift into first gear or reverse.
3. Set the parking brake.
Automatic transmission*
Switching off the engine
1. Engage transmission position P with the ve‐
hicle stopped.
2. Press the Start/Stop button.
The engine is switched off.
The radio ready state is switched on.
3. Set the parking brake. Seite 59
59Online Edition for Part no. 01 40 2 606 469 - 03 11 490
Reference Mobility Communication Entertainment Navigation Driving tips
Controls At a glance
Page 175 of 304
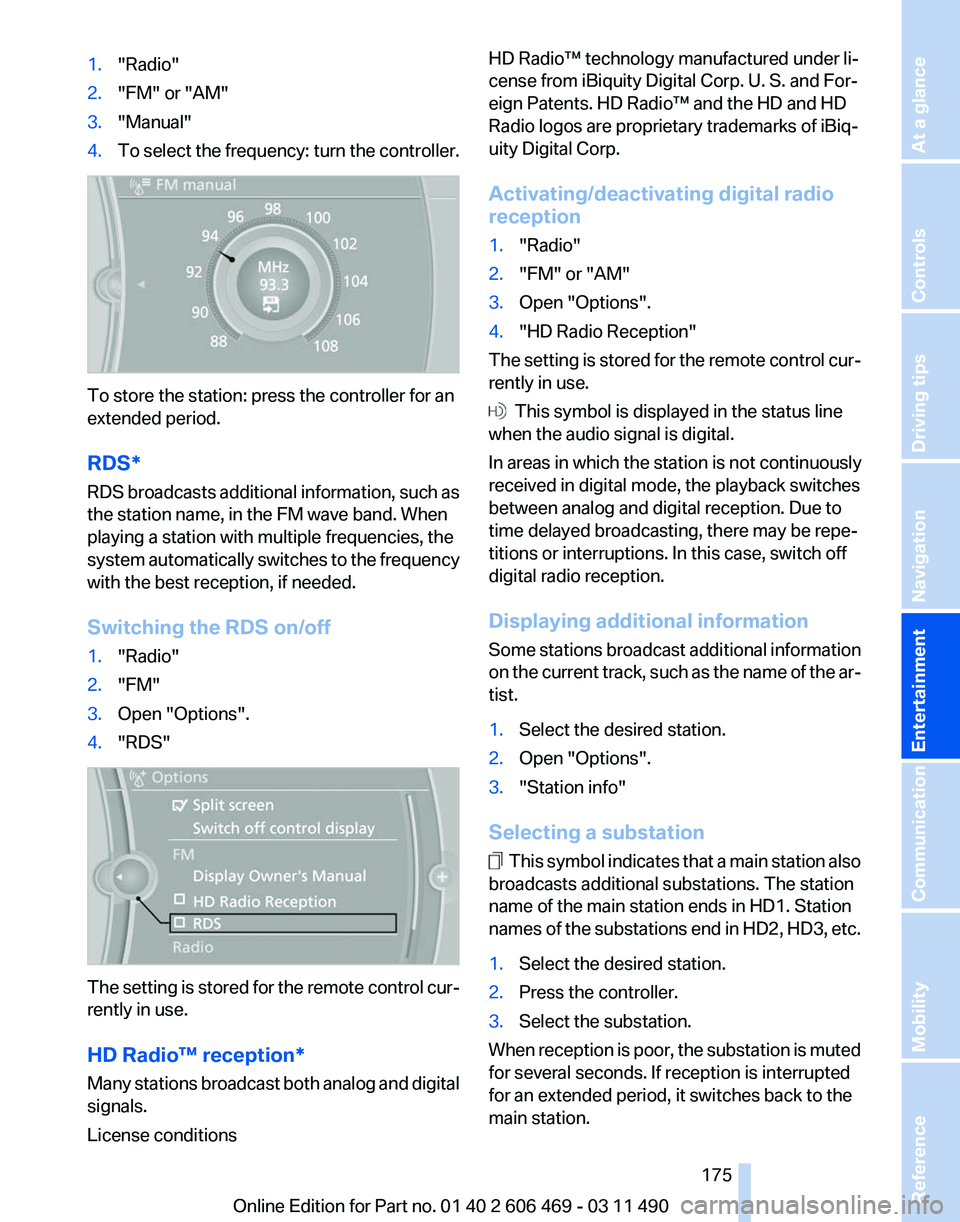
1.
"Radio"
2. "FM" or "AM"
3. "Manual"
4. To select the frequency: turn the controller. To store the station: press the controller for an
extended period.
RDS*
RDS
broadcasts additional information, such as
the station name, in the FM wave band. When
playing a station with multiple frequencies, the
system automatically switches to the frequency
with the best reception, if needed.
Switching the RDS on/off
1. "Radio"
2. "FM"
3. Open "Options".
4. "RDS" The setting is stored for the remote control cur‐
rently in use.
HD Radio™ reception
*
Many stations broadcast both analog and digital
signals.
License conditions HD Radio™ technology manufactured under li‐
cense from iBiquity Digital Corp. U. S. and For‐
eign Patents. HD Radio™ and the HD and HD
Radio logos are proprietary trademarks of iBiq‐
uity Digital Corp.
Activating/deactivating digital radio
reception
1.
"Radio"
2. "FM" or "AM"
3. Open "Options".
4. "HD Radio Reception"
The setting is stored for the remote control cur‐
rently in use. This symbol is displayed in the status line
when the audio signal is digital.
In areas in which the station is not continuously
received in digital mode, the playback switches
between analog and digital reception. Due to
time delayed broadcasting, there may be repe‐
titions or interruptions. In this case, switch off
digital radio reception.
Displaying additional information
Some
stations broadcast additional information
on the current track, such as the name of the ar‐
tist.
1. Select the desired station.
2. Open "Options".
3. "Station info"
Selecting a substation This symbol indicates that a main station also
broadcasts additional substations. The station
name of the main station ends in HD1. Station
names
of the substations end in HD2, HD3, etc.
1. Select the desired station.
2. Press the controller.
3. Select the substation.
When reception is poor, the substation is muted
for several seconds. If reception is interrupted
for an extended period, it switches back to the
main station.
Seite 175
175Online Edition for Part no. 01 40 2 606 469 - 03 11 490
Reference Mobility Communication
Entertainment Navigation Driving tips Controls At a glance
Page 204 of 304
Vehicle information*
Computer content can be displayed. Operation
is only possible in the front.
Options menu
The split screen is not available and there is no
Integrated Owner's Manual.
Operation
is the same as for the front menu op‐
tions, refer to page 18.
Enabling
Enabling operation in the rear
Only possible via the iDrive in the front.
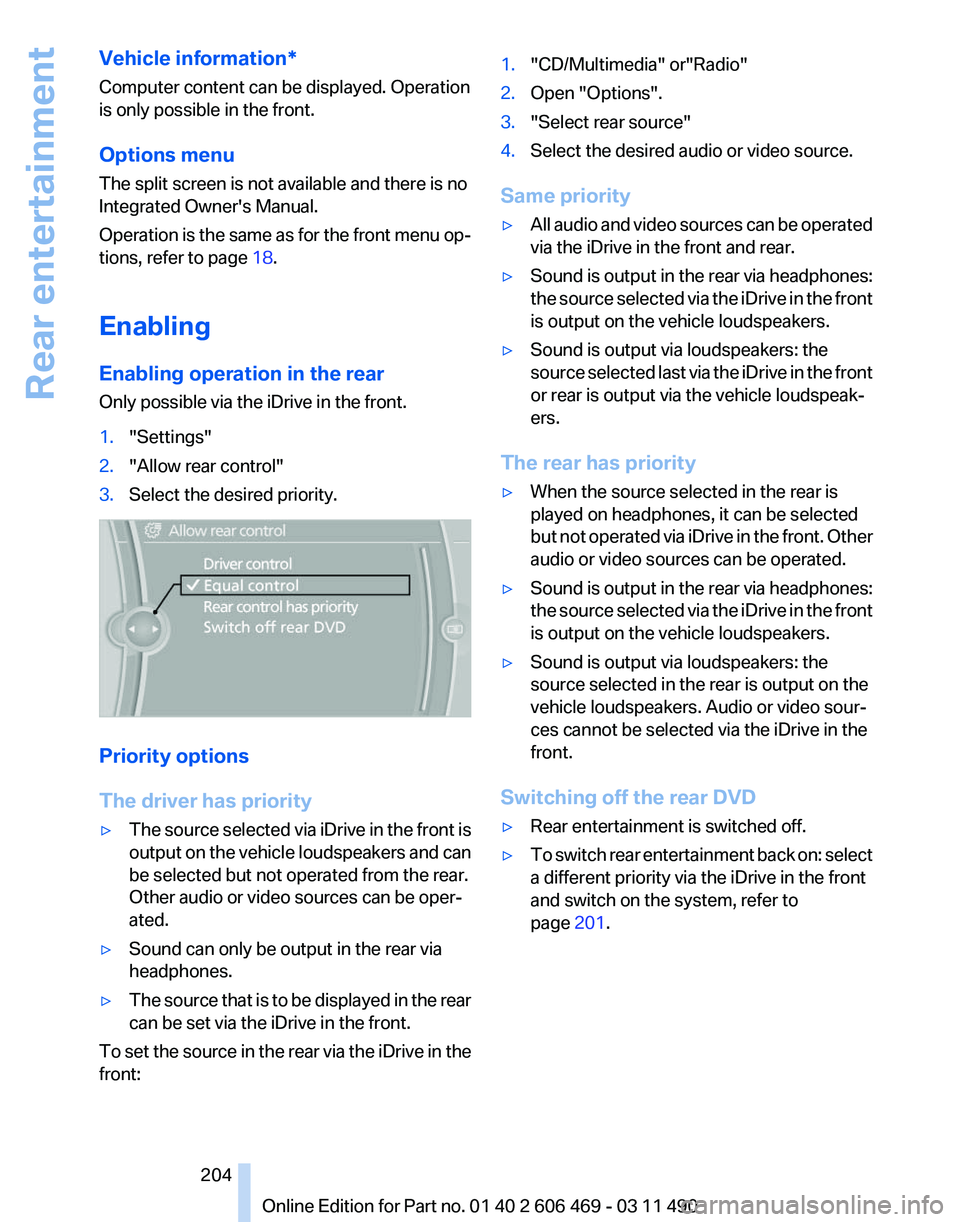
1. "Settings"
2. "Allow rear control"
3. Select the desired priority. Priority options
The driver has priority
▷
The source selected via iDrive in the front is
output
on the vehicle loudspeakers and can
be selected but not operated from the rear.
Other audio or video sources can be oper‐
ated.
▷ Sound can only be output in the rear via
headphones.
▷ The source that is to be displayed in the rear
can be set via the iDrive in the front.
To set the source in the rear via the iDrive in the
front: 1.
"CD/Multimedia" or"Radio"
2. Open "Options".
3. "Select rear source"
4. Select the desired audio or video source.
Same priority
▷ All audio and video sources can be operated
via the iDrive in the front and rear.
▷ Sound is output in the rear via headphones:
the
source selected via the iDrive in the front
is output on the vehicle loudspeakers.
▷ Sound is output via loudspeakers: the
source
selected last via the iDrive in the front
or rear is output via the vehicle loudspeak‐
ers.
The rear has priority
▷ When the source selected in the rear is
played on headphones, it can be selected
but
not operated via iDrive in the front. Other
audio or video sources can be operated.
▷ Sound is output in the rear via headphones:
the
source selected via the iDrive in the front
is output on the vehicle loudspeakers.
▷ Sound is output via loudspeakers: the
source selected in the rear is output on the
vehicle loudspeakers. Audio or video sour‐
ces cannot be selected via the iDrive in the
front.
Switching off the rear DVD
▷ Rear entertainment is switched off.
▷ To switch rear entertainment back on: select
a different priority via the iDrive in the front
and switch on the system, refer to
page 201.
Seite 204
204 Online Edition for Part no. 01 40 2 606 469 - 03 11 490
Rear entertainment
Page 289 of 304
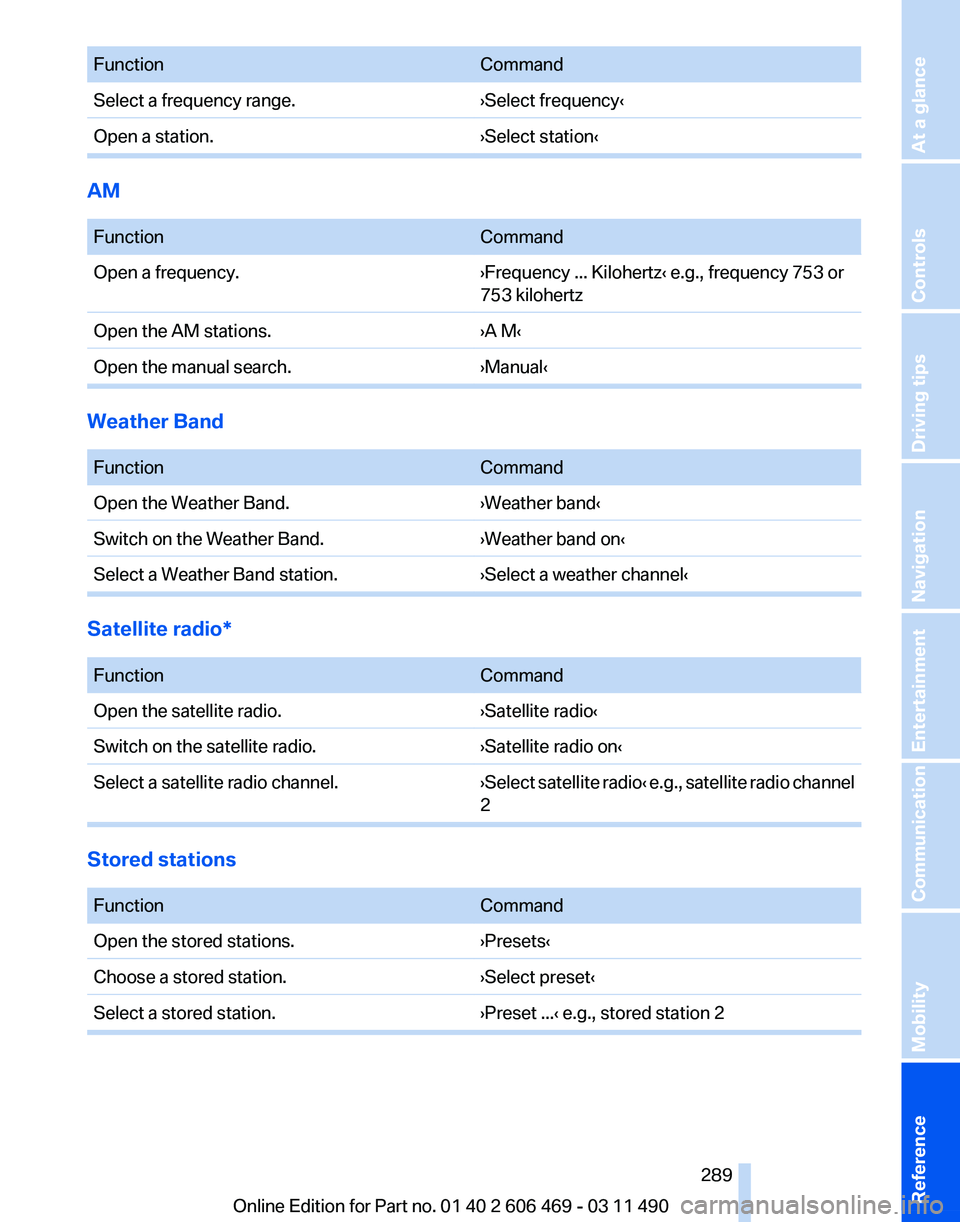
Function
Command
Select a frequency range. ›Select frequency‹
Open a station. ›Select station‹AM
Function
Command
Open a frequency. ›Frequency ... Kilohertz‹ e.g., frequency 753 or
753 kilohertz
Open the AM stations. ›A M‹
Open the manual search. ›Manual‹Weather Band
Function
Command
Open the Weather Band. ›Weather band‹
Switch on the Weather Band. ›Weather band on‹
Select a Weather Band station. ›Select a weather channel‹Satellite radio*
Function
Command
Open the satellite radio. ›Satellite radio‹
Switch on the satellite radio. ›Satellite radio on‹
Select a satellite radio channel. ›Select satellite radio‹ e.g., satellite radio channel
2Stored stations
Function
Command
Open the stored stations. ›Presets‹
Choose a stored station. ›Select preset‹
Select a stored station. ›Preset ...‹ e.g., stored station 2 Seite 289
289Online Edition for Part no. 01 40 2 606 469 - 03 11 490
Reference Mobility Communication Entertainment Navigation Driving tips Controls At a glance
Page 300 of 304
Power sunroof, glass 41
Power windows
40
Pressure, tire air pres‐ sure 242
Profile, refer to Personal Pro‐ file 29
Programmable memory but‐ tons, iDrive 20
Protective
function, glass sun‐
roof 42
Protective function, win‐ dows 40
Push-and-turn switch, refer to Controller 16
R
Radiator fluid 258
Radio 174
Radio-operated key, refer to Remote control 28
Radio ready state 58
Rain sensor 63
Random 182
Random playback 182
RDS 175
Reading out loud 228
Rear automatic climate con‐ trol 130
Rear axle steering 98
Rear entertainment 201
Rear lamps 265
Rear socket 136
Rear source, selecting for rear entertainment 204
Rearview mirror 51
Rear window defroster 128
Recirculated-air mode 127
Recommended tire brands 252
Refueling 240
Remaining range 73
Reminders 227
Remote control/key 28
Remote control, malfunc‐ tion 33
Remote control, rear enter‐ tainment 202 Remote control, universal
132
Replacement fuse 268
Replacing parts 262
Replacing wheels/tires 251
Reporting safety defects 8
RES button 104
Reserve warning, refer to Range 73
Resetting,
Tire Pressure Mon‐
itor TPM 89
Residual heat, automatic cli‐ mate control 128
Retaining straps, securing cargo 149
Retreaded tires 252
Roadside Assistance 233
Roadside parking lamps 81
Roller sunblinds 41
Roll stabilization, refer to Adaptive Drive 97
Roll stabilization, refer to Dy‐ namic Drive 98
Roof load capacity 283
Roof-mounted luggage rack 150
Rope for tow-starting/tow‐ ing 273
Route 162
Route criteria, route 161
Route, displaying 162
Routes, avoiding 162
Route section, bypassing 163
RPM, engine 281
RSC Runflat System Compo‐ nent, refer to Run-flat
tires 252
Rubber components, care 276
Run-flat tires 252
S
Safe braking 147
Safety 7
Safety belt reminder 48
Safety belts 48
Safety belts, care 276
Safety switch, windows 41 Safety systems, airbags
85
Satellite radio 176
Saving fuel 150
Scale, changing during navi‐ gation 164
Screen, refer to Control Dis‐ play 16
Screwdriver 262
Screw thread for tow fit‐ ting 273
Seat belts, refer to Safety belts 48
Seat heating, front 47
Seat heating, rear 47
Seating position for chil‐ dren 54
Seat, mirror, and steering wheel memory 51
Seats 44
Seat ventilation, front 47
Selection list in instrument cluster 75
Selector lever, automatic transmission 65
Sensors, care 276
Service and warranty 7
Service requirements, CBS Condition Based Serv‐
ice 260
Service requirements, dis‐ play 74
Service, Roadside Assis‐ tance 270
Settings on Control Dis‐ play 78
Settings, storing for seat, mir‐ rors, steering wheel 51
Shifting, automatic transmis‐ sion 65
Shifting, manual transmis‐ sion 64
Shift paddles on steering wheel 66
Short commands 285
Shoulder support 46
Side airbags 85
Side View 117
Signaling, horn 12
Seite 300
300 Online Edition for Part no. 01 40 2 606 469 - 03 11 490
Everything from A to Z