2011 BMW 535I XDRIVE SEDAN bulb
[x] Cancel search: bulbPage 62 of 304
Turn signal, high beams,
headlamp flasher
Turn signal
Using turn signals
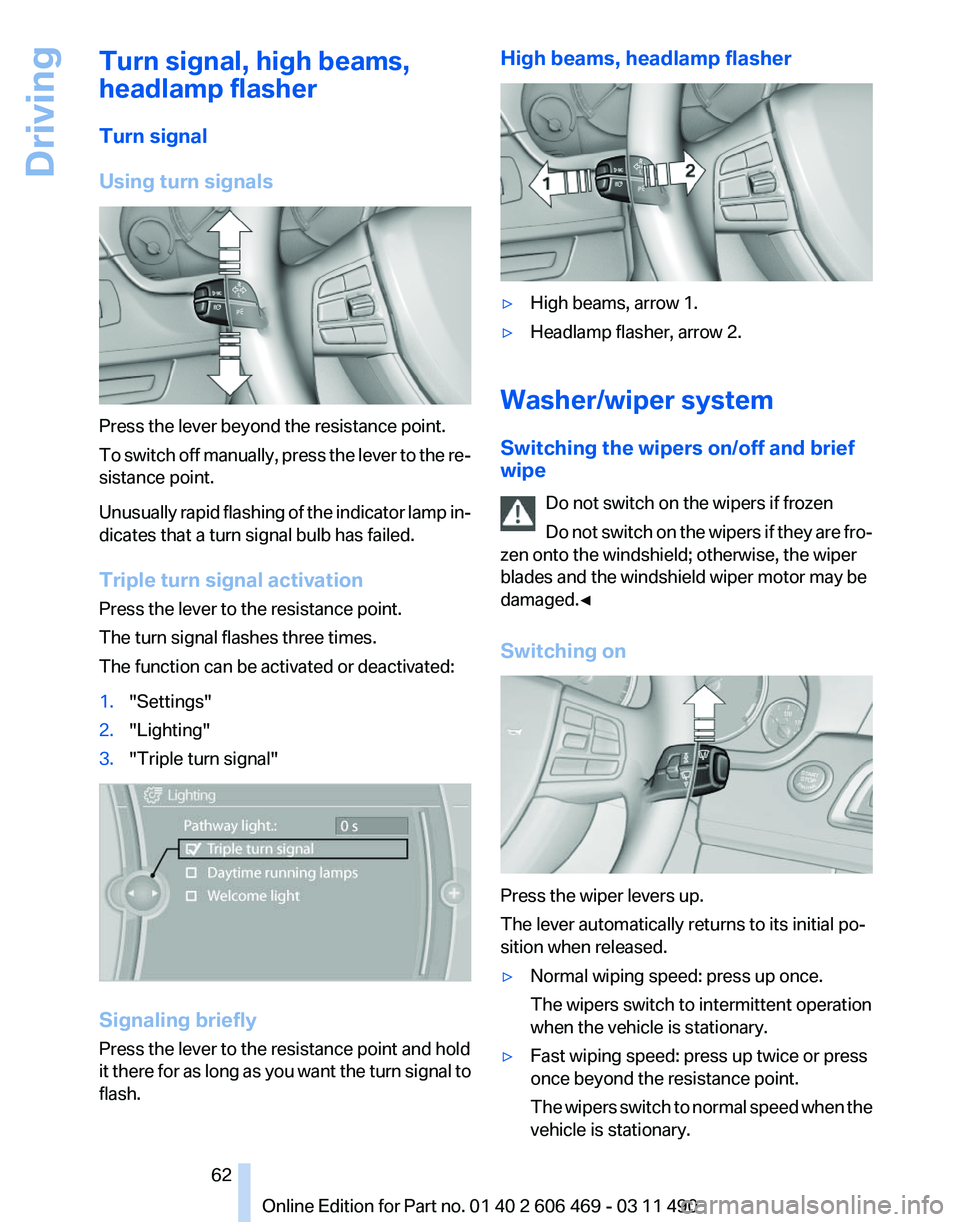
Press the lever beyond the resistance point.
To
switch off manually, press the lever to the re‐
sistance point.
Unusually rapid flashing of the indicator lamp in‐
dicates that a turn signal bulb has failed.
Triple turn signal activation
Press the lever to the resistance point.
The turn signal flashes three times.
The function can be activated or deactivated:
1. "Settings"
2. "Lighting"
3. "Triple turn signal" Signaling briefly
Press the lever to the resistance point and hold
it
there for as long as you want the turn signal to
flash. High beams, headlamp flasher
▷
High beams, arrow 1.
▷ Headlamp flasher, arrow 2.
Washer/wiper system
Switching the wipers on/off and brief
wipe Do not switch on the wipers if frozen
Do
not switch on the wipers if they are fro‐
zen onto the windshield; otherwise, the wiper
blades and the windshield wiper motor may be
damaged.◀
Switching on Press the wiper levers up.
The lever automatically returns to its initial po‐
sition when released.
▷
Normal wiping speed: press up once.
The wipers switch to intermittent operation
when the vehicle is stationary.
▷ Fast wiping speed: press up twice or press
once beyond the resistance point.
The
wipers switch to normal speed when the
vehicle is stationary. Seite 62
62 Online Edition for Part no. 01 40 2 606 469 - 03 11 490
Driving
Page 262 of 304
Replacing components
Tool kit
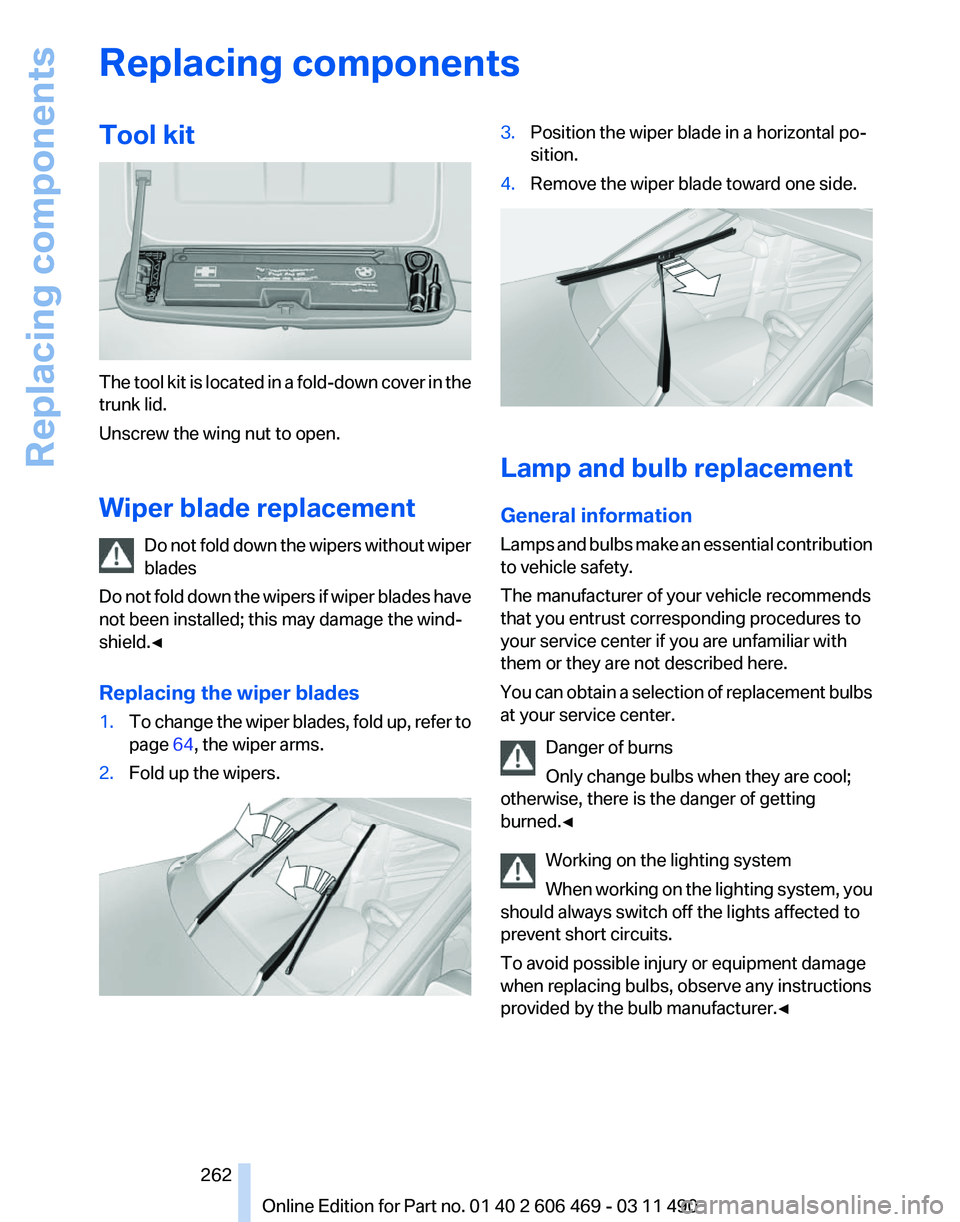
The tool kit is located in a fold-down cover in the
trunk lid.
Unscrew the wing nut to open.
Wiper blade replacement
Do
not fold down the wipers without wiper
blades
Do not fold down the wipers if wiper blades have
not been installed; this may damage the wind‐
shield.◀
Replacing the wiper blades
1. To change the wiper blades, fold up, refer to
page 64, the wiper arms.
2. Fold up the wipers. 3.
Position the wiper blade in a horizontal po‐
sition.
4. Remove the wiper blade toward one side. Lamp and bulb replacement
General information
Lamps
and bulbs make an essential contribution
to vehicle safety.
The manufacturer of your vehicle recommends
that you entrust corresponding procedures to
your service center if you are unfamiliar with
them or they are not described here.
You can obtain a selection of replacement bulbs
at your service center.
Danger of burns
Only change bulbs when they are cool;
otherwise, there is the danger of getting
burned.◀
Working on the lighting system
When working on the lighting system, you
should always switch off the lights affected to
prevent short circuits.
To avoid possible injury or equipment damage
when replacing bulbs, observe any instructions
provided by the bulb manufacturer.◀ Seite 262
262 Online Edition for Part no. 01 40 2 606 469 - 03 11 490Replacing components
Page 263 of 304
Do not touch the bulbs
Do not touch the glass of new bulbs with
your bare hands, as even minute amounts of
contamination will burn into the bulb's surface
and reduce its service life.
Use
a clean tissue, cloth or something similar, or
hold the bulb by its base.◀
Light-emitting diodes (LEDs)
Light-emitting diodes installed behind a cover
serve as the light source for controls, display el‐
ements and other equipment.
These light-emitting diodes, which are related
to conventional lasers, are officially designated
as Class 1 light-emitting diodes.
Do not remove the covers
Do not remove the covers, and never stare
into the unfiltered light for several hours; other‐
wise, irritation of the retina could result.◀
Headlamp glass
Condensation can form on the inside of the ex‐
ternal lamps in cool or humid weather. When the
light is switched on, the condensation evapo‐
rates after a short time. The headlamp glasses
do not need to be changed.
If there is a large amount of moisture, e.g., water
droplets form in the lamp, have it checked by
your service center.
Front lamps, bulb replacement
Halogen headlamps
Parking lamps and roadside parking lamps,
turn signal lamp
These lights are made using LED technology.
Contact your service center in the event of a
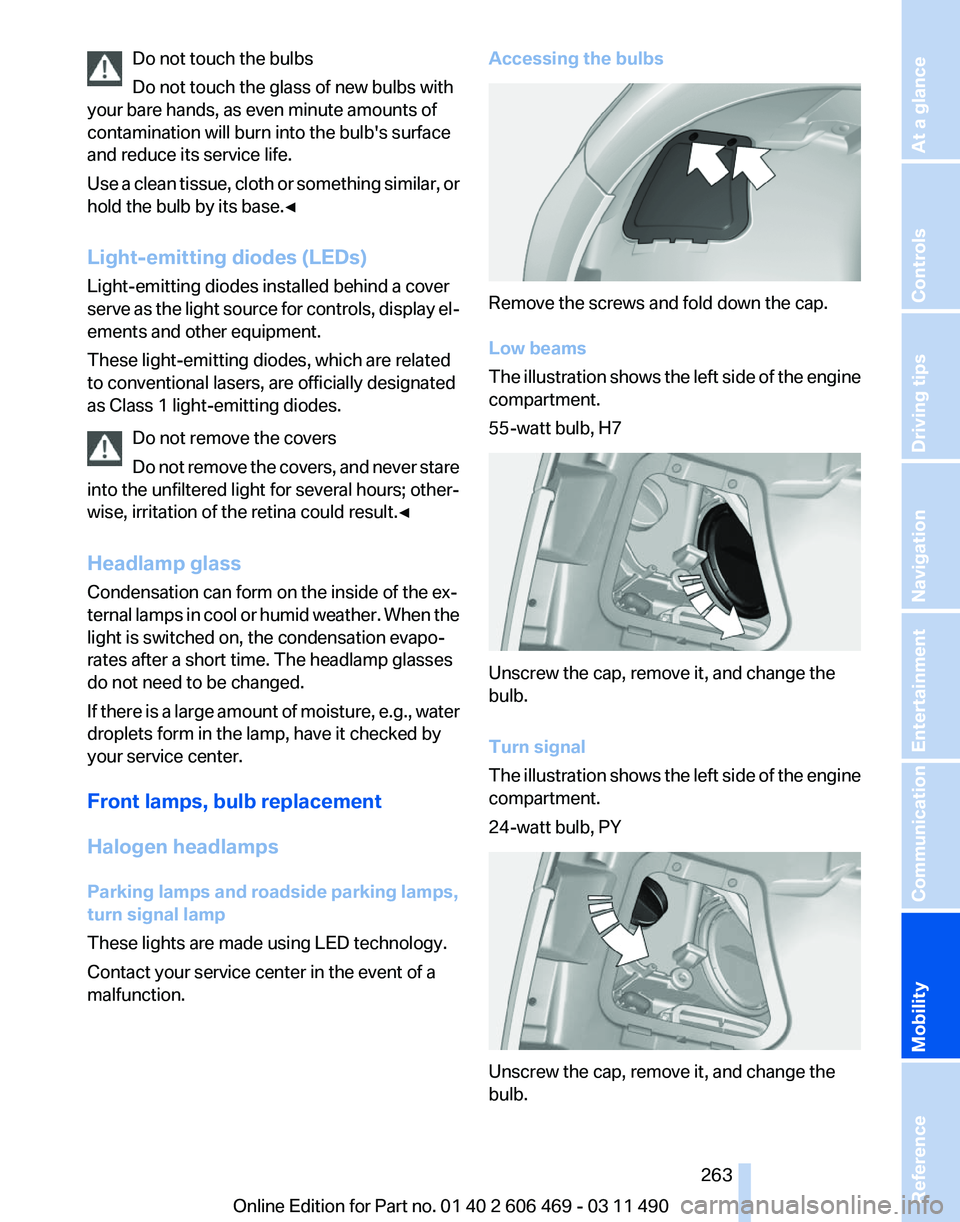
malfunction. Accessing the bulbs
Remove the screws and fold down the cap.
Low beams
The
illustration shows the left side of the engine
compartment.
55-watt bulb, H7 Unscrew the cap, remove it, and change the
bulb.
Turn signal
The
illustration shows the left side of the engine
compartment.
24-watt bulb, PY Unscrew the cap, remove it, and change the
bulb.
Seite 263
263Online Edition for Part no. 01 40 2 606 469 - 03 11 490
Reference
Mobility Communication Entertainment Navigation Driving tips Controls At a glance
Page 264 of 304
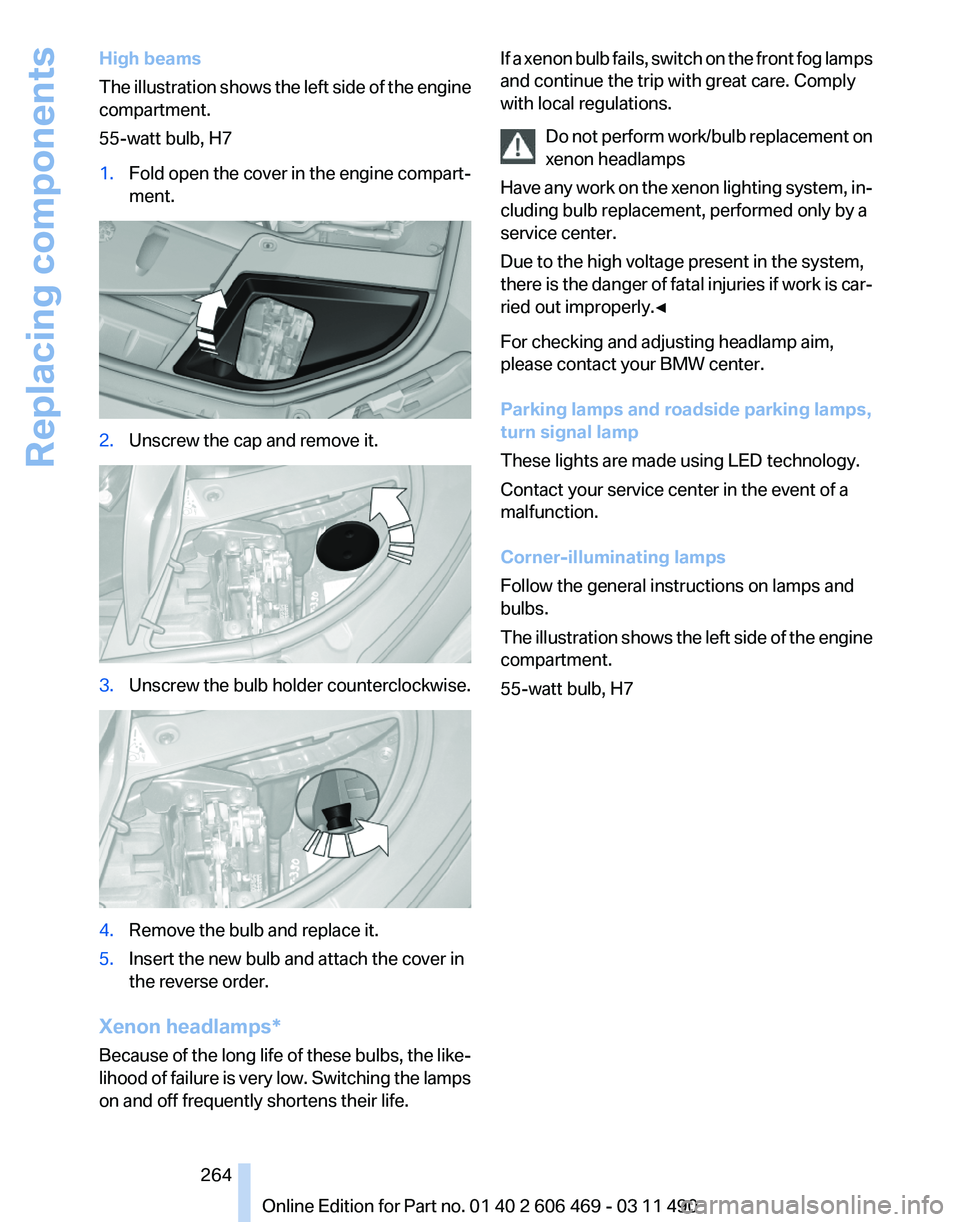
High beams
The
illustration shows the left side of the engine
compartment.
55-watt bulb, H7
1. Fold open the cover in the engine compart‐
ment. 2.
Unscrew the cap and remove it. 3.
Unscrew the bulb holder counterclockwise. 4.
Remove the bulb and replace it.
5. Insert the new bulb and attach the cover in
the reverse order.
Xenon headlamps*
Because
of the long life of these bulbs, the like‐
lihood of failure is very low. Switching the lamps
on and off frequently shortens their life. If a xenon bulb fails, switch on the front fog lamps
and continue the trip with great care. Comply
with local regulations.
Do
not perform work/bulb replacement on
xenon headlamps
Have any work on the xenon lighting system, in‐
cluding bulb replacement, performed only by a
service center.
Due to the high voltage present in the system,
there is the danger of fatal injuries if work is car‐
ried out improperly.◀
For checking and adjusting headlamp aim,
please contact your BMW center.
Parking lamps and roadside parking lamps,
turn signal lamp
These lights are made using LED technology.
Contact your service center in the event of a
malfunction.
Corner-illuminating lamps
Follow the general instructions on lamps and
bulbs.
The illustration shows the left side of the engine
compartment.
55-watt bulb, H7 Seite 264
264 Online Edition for Part no. 01 40 2 606 469 - 03 11 490
Replacing components
Page 265 of 304
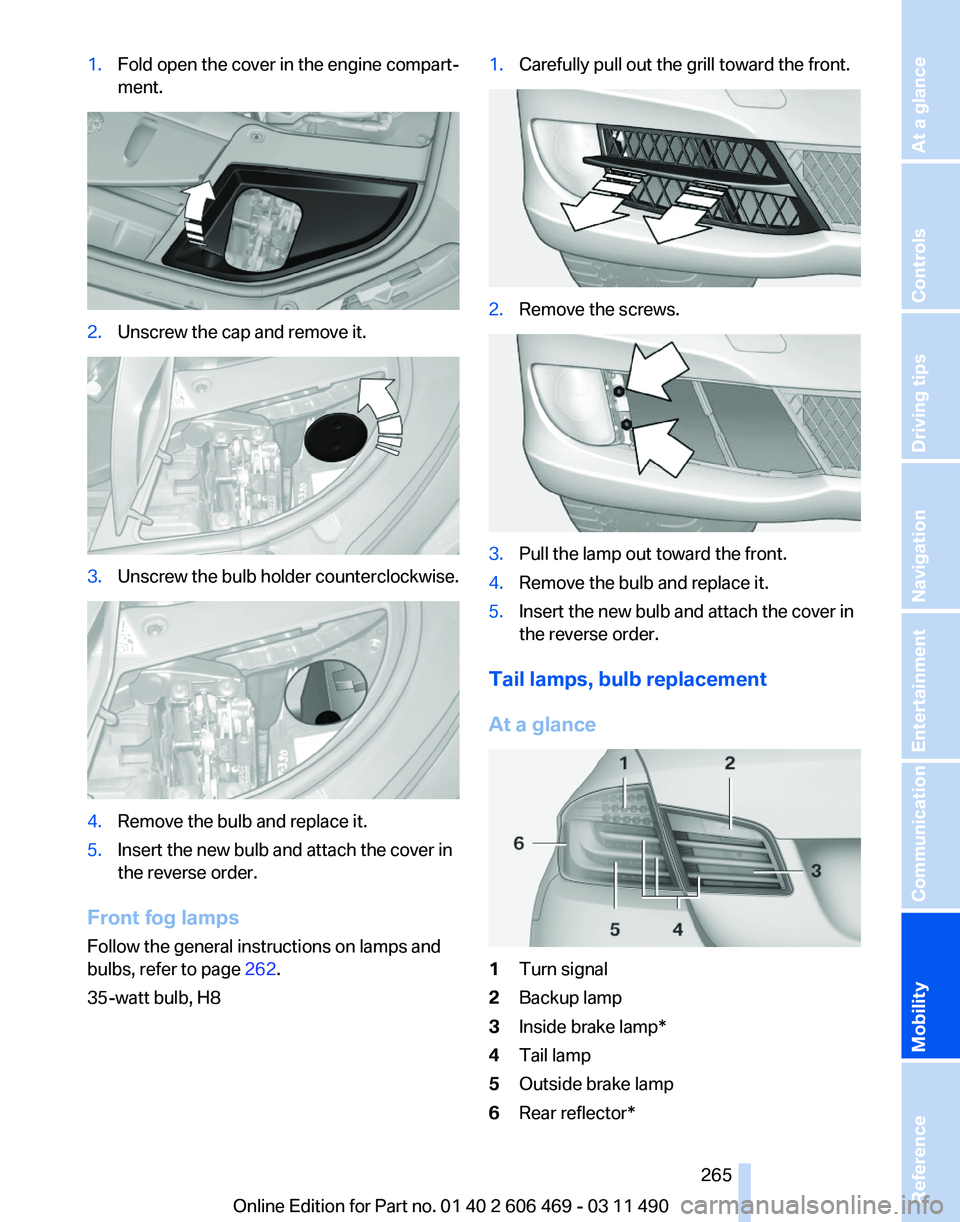
1.
Fold open the cover in the engine compart‐
ment. 2.
Unscrew the cap and remove it. 3.
Unscrew the bulb holder counterclockwise. 4.
Remove the bulb and replace it.
5. Insert the new bulb and attach the cover in
the reverse order.
Front fog lamps
Follow the general instructions on lamps and
bulbs, refer to page 262.
35-watt bulb, H8 1.
Carefully pull out the grill toward the front. 2.
Remove the screws. 3.
Pull the lamp out toward the front.
4. Remove the bulb and replace it.
5. Insert the new bulb and attach the cover in
the reverse order.
Tail lamps, bulb replacement
At a glance 1
Turn signal
2 Backup lamp
3 Inside brake lamp*
4 Tail lamp
5 Outside brake lamp
6 Rear reflector*
Seite 265
265Online Edition for Part no. 01 40 2 606 469 - 03 11 490
Reference
Mobility Communication Entertainment Navigation Driving tips Controls At a glance
Page 266 of 304
Turn signal, outer brake, tail, and
license plate lamps
Follow the general instructions on lamps and
bulbs, refer to page
262.
These lights are made using LED technology.
Contact your service center in the event of a
malfunction.
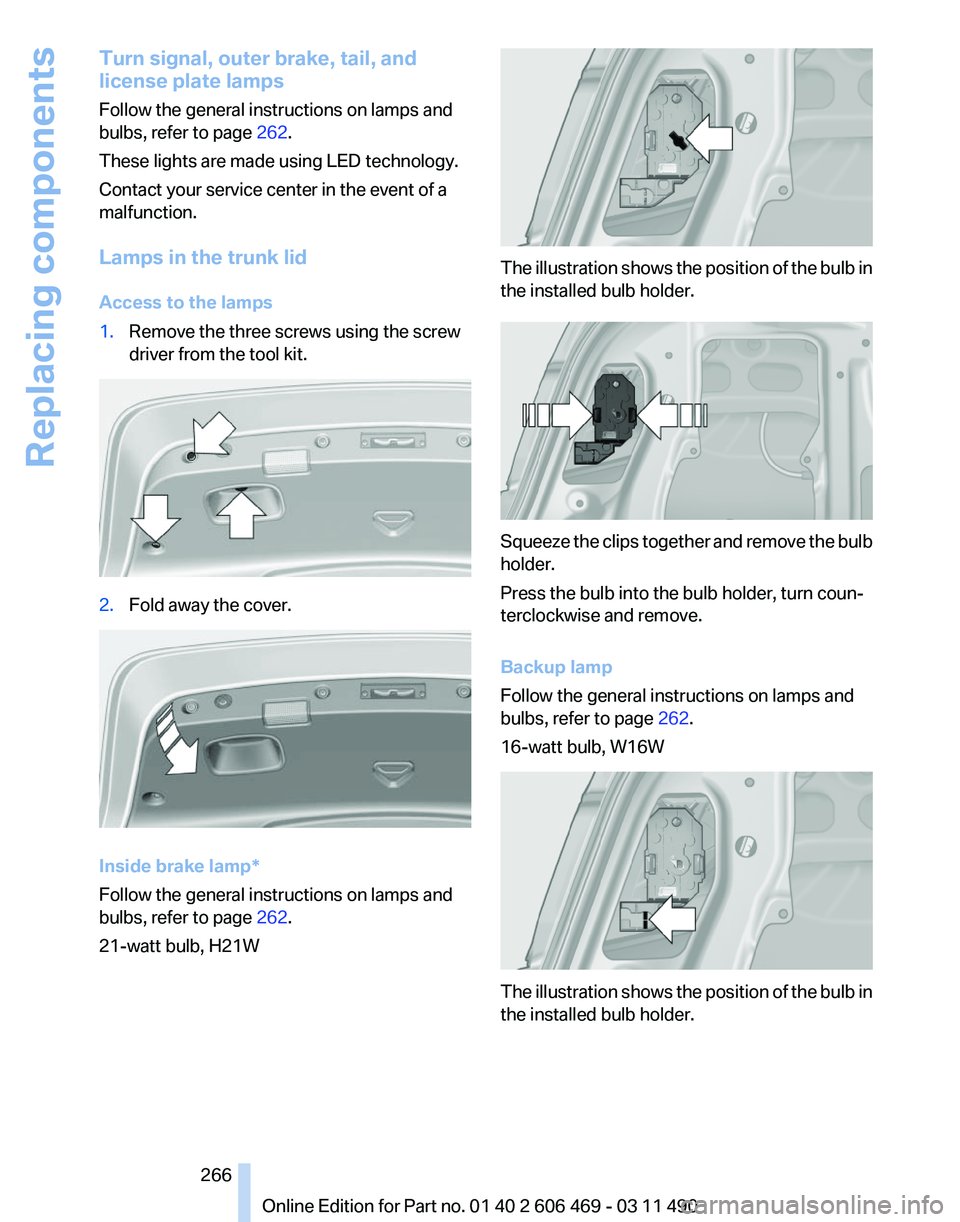
Lamps in the trunk lid
Access to the lamps
1. Remove the three screws using the screw
driver from the tool kit. 2.
Fold away the cover. Inside brake lamp*
Follow the general instructions on lamps and
bulbs, refer to page
262.
21-watt bulb, H21W The illustration shows the position of the bulb in
the installed bulb holder.
Squeeze the clips together and remove the bulb
holder.
Press the bulb into the bulb holder, turn coun‐
terclockwise and remove.
Backup lamp
Follow the general instructions on lamps and
bulbs, refer to page
262.
16-watt bulb, W16W The illustration shows the position of the bulb in
the installed bulb holder.
Seite 266
266 Online Edition for Part no. 01 40 2 606 469 - 03 11 490Replacing components
Page 267 of 304
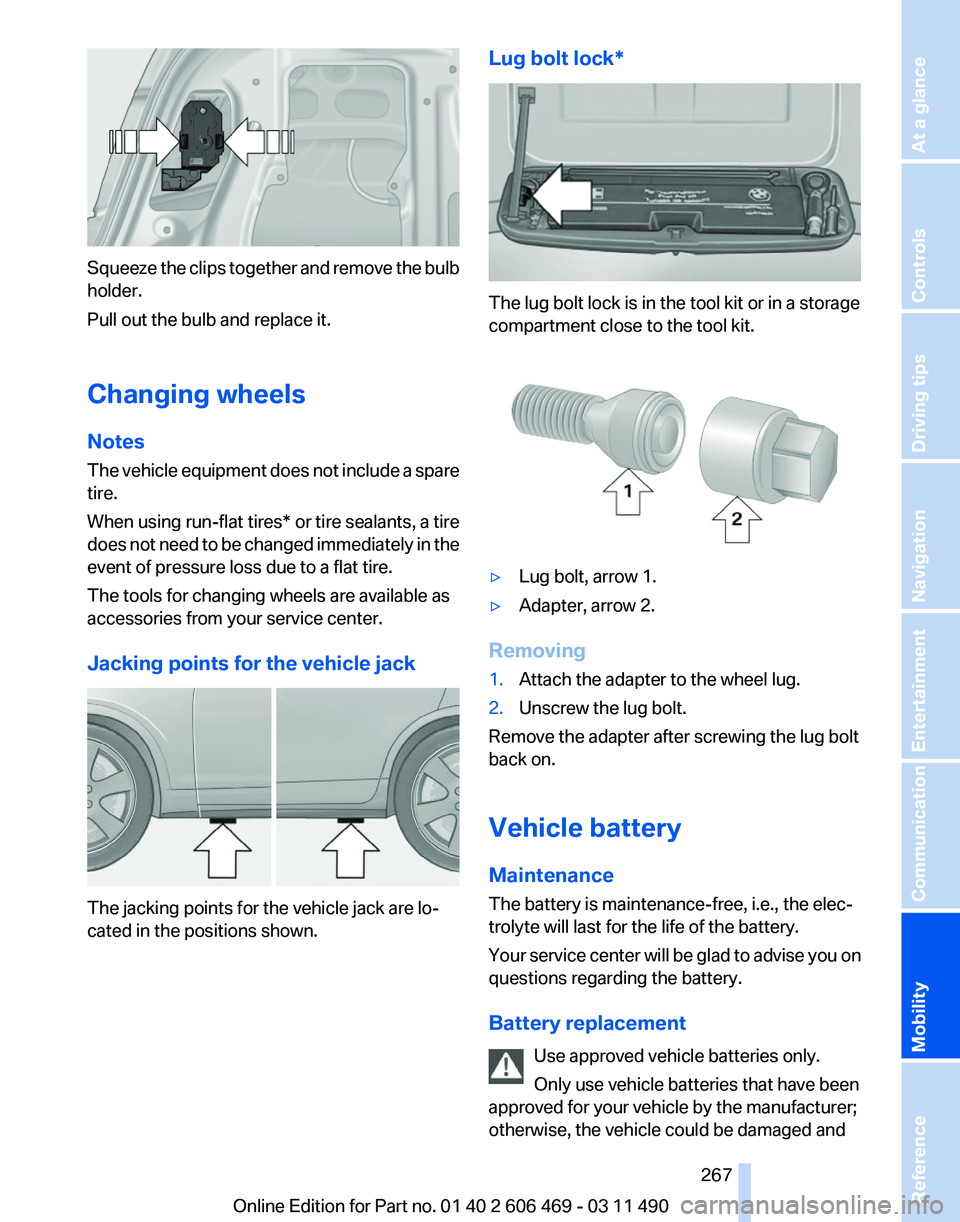
Squeeze the clips together and remove the bulb
holder.
Pull out the bulb and replace it.
Changing wheels
Notes
The
vehicle equipment does not include a spare
tire.
When using run-flat tires* or tire sealants, a tire
does not need to be changed immediately in the
event of pressure loss due to a flat tire.
The tools for changing wheels are available as
accessories from your service center.
Jacking points for the vehicle jack The jacking points for the vehicle jack are lo‐
cated in the positions shown. Lug bolt lock* The lug bolt lock is in the tool kit or in a storage
compartment close to the tool kit.
▷
Lug bolt, arrow 1.
▷ Adapter, arrow 2.
Removing
1. Attach the adapter to the wheel lug.
2. Unscrew the lug bolt.
Remove the adapter after screwing the lug bolt
back on.
Vehicle battery
Maintenance
The battery is maintenance-free, i.e., the elec‐
trolyte will last for the life of the battery.
Your
service center will be glad to advise you on
questions regarding the battery.
Battery replacement
Use approved vehicle batteries only.
Only use vehicle batteries that have been
approved for your vehicle by the manufacturer;
otherwise, the vehicle could be damaged and Seite 267
267Online Edition for Part no. 01 40 2 606 469 - 03 11 490
Reference
Mobility Communication Entertainment Navigation Driving tips Controls At a glance
Page 294 of 304
Everything from A to Z
Index
A
ABS, Antilock Brake Sys‐
tem 95
ACC, Active Cruise Control with Stop & Go 102
Activated-charcoal filter 129
Active Blind Spot Detec‐ tion 92
Active Cruise Control with Stop & Go, ACC 102
Active seat, front 46
Active seat ventilation, front 47
Active Steering, integral 98
Adaptive brake assistant 95
Adaptive brake lights, refer to Brake force display 94
Adaptive drive 97
Adaptive light control 81
Additional telephone 210
Additives, oil 258
Adjustments, seats/head re‐ straints 44
Airbags 85
Airbags, indicator/warning light 86
Air circulation, refer to Recir‐ culated-air mode 127
Air distribution, manual 126
Air drying, refer to Cooling function 128
Air pressure, tires 242
Air vents, refer to Ventila‐ tion 129
Air volume, automatic climate control 127
Alarm system 39
Alarm, unintentional 40
All around the center con‐ sole 14
All around the headliner 15 All around the steering
wheel 12
ALL program, automatic cli‐ mate control 128
All-season tires, refer to Win‐ ter tires 252
All-wheel-drive 96
Alternating-code hand-held transmitter 133
Alternative oil types 258
AM/FM station 174
Announcement, navigation, refer to Spoken instruc‐
tions 163
Antifreeze, washer fluid 64
Antilock Brake System, ABS 95
Anti-slip control, refer to DSC 95
Appointments 226
Approved engine oils 258
Apps 236
Armrest, refer to Center arm‐ rest 139
Arrival time 77
Ashtray 134
Ashtray, front 134
Ashtray, rear 135
Assist 232
Assistance, Roadside Assis‐ tance 270
Assistance when driving off 95
Audio playback 181
Audio playback, Blue‐ tooth 196
AUTO intensity 127
Automatic car wash 274
Automatic climate con‐ trol 126
Automatic Cruise Control with Stop & Go 102
Automatic Curb Monitor 52 Automatic deactivation, front
passenger airbags 86
Automatic headlamp con‐ trol 81
Automatic Hold 60
Automatic locking 35
Automatic recirculated-air control 127
Automatic Soft Closing, doors 35
Automatic transmission with Steptronic 65
Automatic trunk lid 36
AUTO program, automatic cli‐ mate control 127
AUTO program, intensity 127
AUX-IN port 192
Average fuel consumption 76
Average speed 76
Axle loads, weights 283
B
Backrest curvature, refer to Lumbar support 46
Backrest, seats 44
Backup camera 113
Backup lamps, bulb replace‐ ment 266
Balance 172
Band-Aids, refer to First aid kit 270
Bar for tow-starting/tow‐ ing 272
Bass 172
Battery replacement, remote control, rear entertain‐
ment 202
Battery replacement, vehicle battery 267
Battery replacement, vehicle remote control 28
Battery, vehicle 267
Seite 294
294 Online Edition for Part no. 01 40 2 606 469 - 03 11 490Everything from A to Z