2011 BMW 535I XDRIVE SEDAN load capacity
[x] Cancel search: load capacityPage 137 of 304
Ensure that the lock is securely en‐
gaged
When
folding back the backrest, be sure that
it locks in place securely. If it is not properly
engaged, transported cargo could enter the
passenger compartment during braking or
evasive maneuvers and endanger the vehi‐
cle occupants.◀ 2.
Release the latch plate from the fixture on
the rear window shelf and insert it into the
belt
lock of the center safety belt. Make sure
you hear the latch plate engage.
To secure cargo, refer to page 149,
with nets or
draw straps, the cargo area is fitted with lashing
eyes.
Ski bag*
Capacity
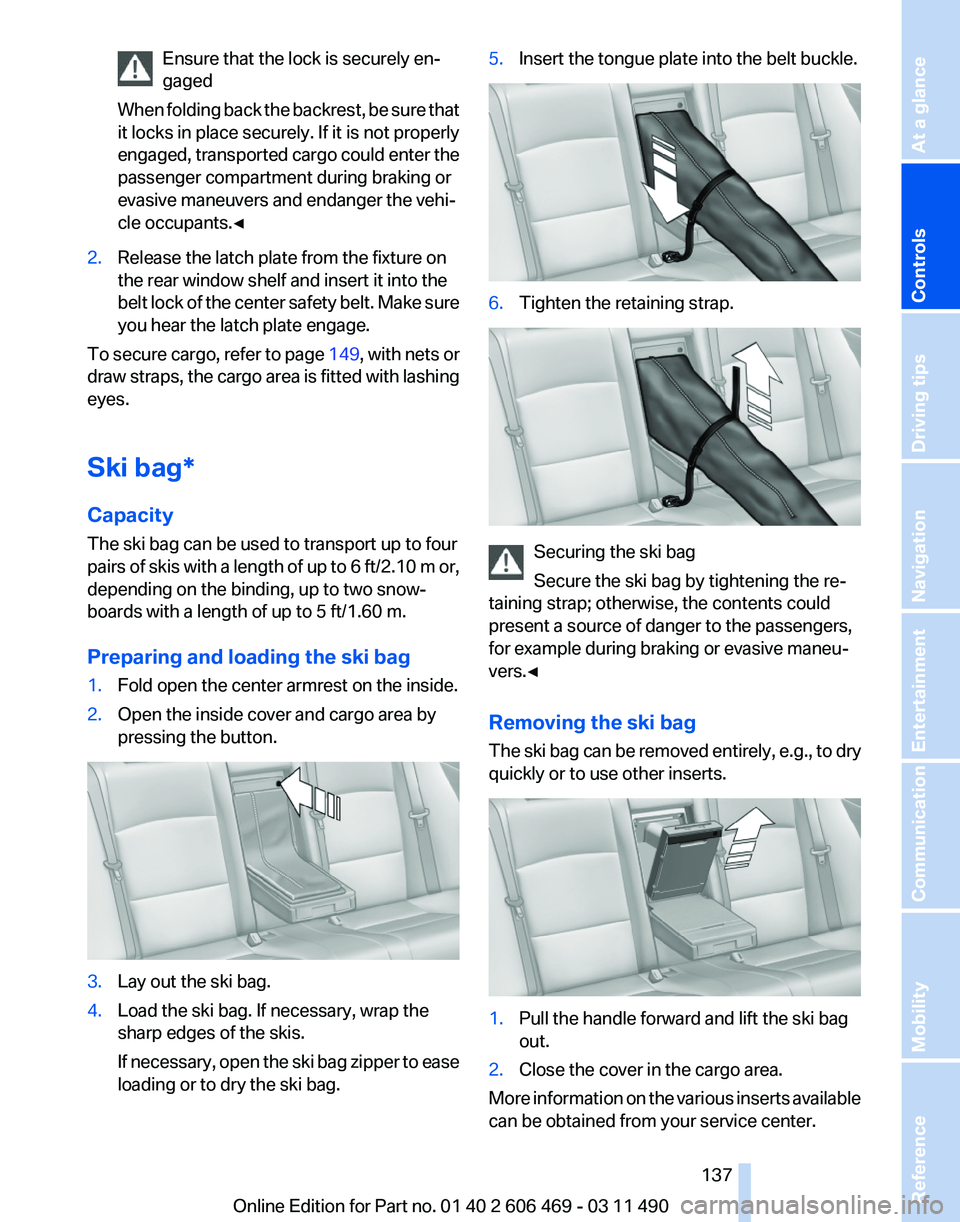
The ski bag can be used to transport up to four
pairs of skis with a length of up to 6 ft/2.10 m or,
depending on the binding, up to two snow‐
boards with a length of up to 5 ft/1.60 m.
Preparing and loading the ski bag
1. Fold open the center armrest on the inside.
2. Open the inside cover and cargo area by
pressing the button. 3.
Lay out the ski bag.
4. Load the ski bag. If necessary, wrap the
sharp edges of the skis.
If
necessary, open the ski bag zipper to ease
loading or to dry the ski bag. 5.
Insert the tongue plate into the belt buckle. 6.
Tighten the retaining strap. Securing the ski bag
Secure the ski bag by tightening the re‐
taining strap; otherwise, the contents could
present a source of danger to the passengers,
for example during braking or evasive maneu‐
vers.◀
Removing the ski bag
The
ski bag can be removed entirely, e.g., to dry
quickly or to use other inserts. 1.
Pull the handle forward and lift the ski bag
out.
2. Close the cover in the cargo area.
More information on the various inserts available
can be obtained from your service center. Seite 137
137Online Edition for Part no. 01 40 2 606 469 - 03 11 490
Reference Mobility Communication Entertainment Navigation Driving tips
Controls At a glance
Page 148 of 304
Driving in wet conditions
When
roads are wet or there is heavy rain, briefly
exert gentle pressure on the brake pedal every
few miles.
Ensure that this action does not endanger other
road users.
The heat generated in this process helps dry the
brake discs and pads.
In this way braking efficiency will be available
when you need it.
Hills
Drive long or steep downhill gradients in the gear
in which the least braking is required. Otherwise,
the brake system may overheat, resulting in a
reduction in the brake system efficiency.
Manual transmission:
You can increase the engine's braking effect by
shifting down, going all the way to first gear, if
necessary.
Automatic transmission*:
You can increase the engine's braking effect by
shifting down in the manual mode of the auto‐
matic transmission, refer to page 65.
Avoid load on the brakes
Avoid placing excessive load on the brake
system. Light but consistent brake pressure can
lead to high temperatures, brake wear and pos‐
sibly even brake failure.◀
Do not drive in neutral
Do not drive in neutral or with the engine
stopped, as doing so disables engine braking. In
addition, steering and brake assist is unavailable
with the engine stopped.◀
Brake disc corrosion
Corrosion on the brake discs and contamination
on the brake pads are furthered by:
▷ Low mileage.
▷ Extended periods when the vehicle is not
used at all.
▷ Infrequent use of the brakes. Corrosion occurs when the minimum pressure
that must be exerted by the pads during brake
applications to clean the discs is not reached.
Should corrosion form on the brake discs, the
brakes will tend to respond with a pulsating ef‐
fect that generally cannot be corrected.
Condensation
under the parked vehicle
When using the automatic climate control, con‐
densation water develops that exits underneath
the vehicle.
Therefore, traces of condensed water under the
vehicle are normal.
Loading
Overloading the vehicle
To avoid exceeding the approved carrying
capacity of the tires, never overload the vehicle.
Overloading can lead to overheating and in‐
creases the rate at which damage develops in‐
side the tires. This could result in a sudden loss
of tire inflation pressure.◀
No fluids in the trunk
Make sure that fluids do not leak into the
trunk; otherwise, the vehicle may be damaged.◀
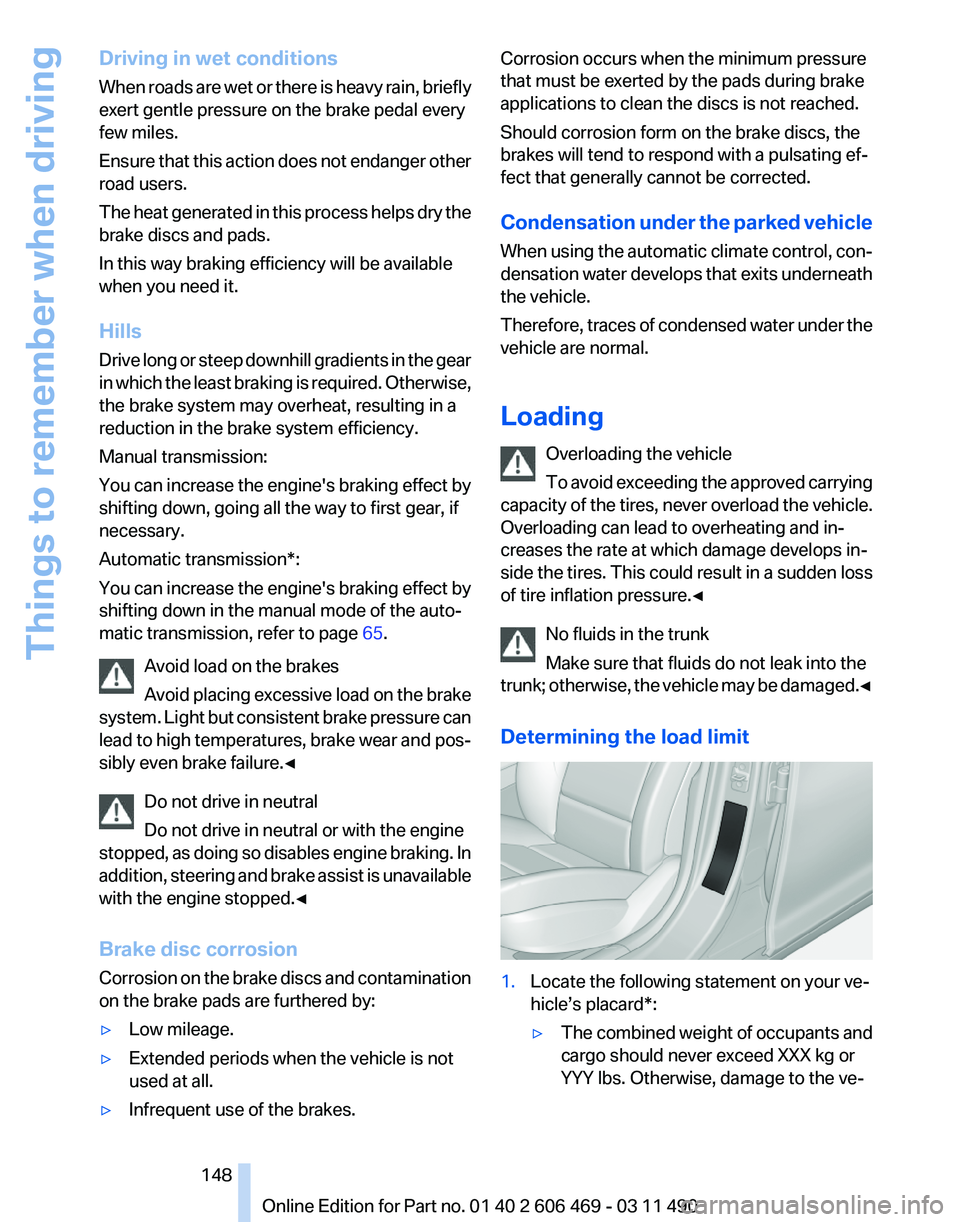
Determining the load limit 1.
Locate the following statement on your ve‐
hicle’s placard*:
▷The combined weight of occupants and
cargo should never exceed XXX kg or
YYY lbs. Otherwise, damage to the ve‐ Seite 148
148 Online Edition for Part no. 01 40 2 606 469 - 03 11 490
Things to remember when driving
Page 149 of 304
hicle and unstable driving situations may
result.
2. Determine the combined weight of the
driver and passengers that will be riding in
your vehicle.
3. Subtract the combined weight of the driver
and
passengers from XXX kilograms or YYY
pounds.
4. The resulting figure equals the available
amount
of cargo and luggage load capacity.
For example, if the YYY amount equals
1,000 lbs and there will be four 150 lbs pas‐
sengers in your vehicle, the amount of avail‐
able cargo and luggage load capacity is
400 lbs: 1,000 lbs minus 600 lbs = 400 lbs.
5. Determine the combined weight of luggage
and
cargo being loaded on the vehicle. That
weight may not safely exceed the available
cargo and luggage load capacity calculated
in Step 4.
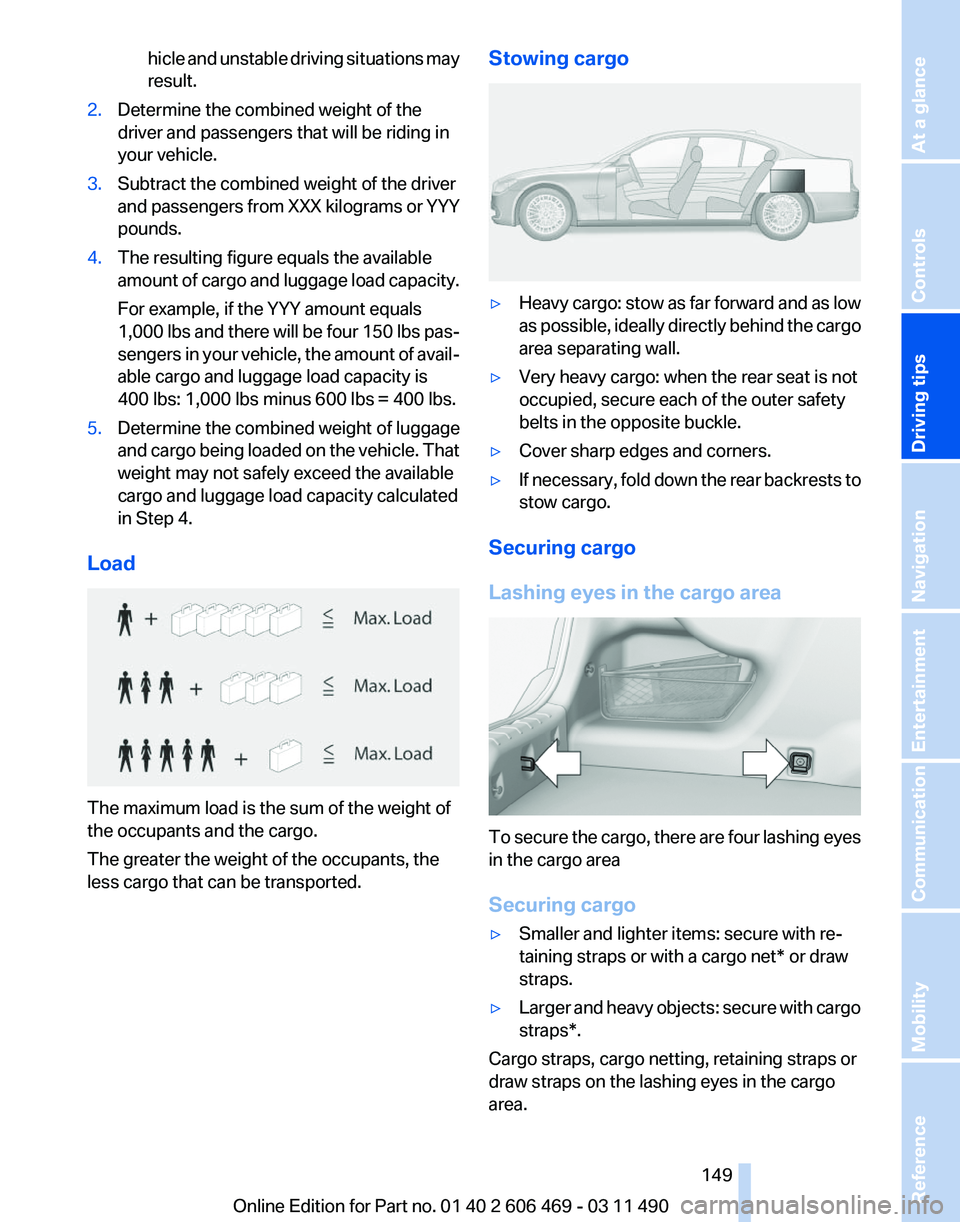
Load The maximum load is the sum of the weight of
the occupants and the cargo.
The greater the weight of the occupants, the
less cargo that can be transported. Stowing cargo ▷
Heavy cargo: stow as far forward and as low
as
possible, ideally directly behind the cargo
area separating wall.
▷ Very heavy cargo: when the rear seat is not
occupied, secure each of the outer safety
belts in the opposite buckle.
▷ Cover sharp edges and corners.
▷ If necessary, fold down the rear backrests to
stow cargo.
Securing cargo
Lashing eyes in the cargo area To secure the cargo, there are four lashing eyes
in the cargo area
Securing cargo
▷
Smaller and lighter items: secure with re‐
taining straps or with a
cargo net* or draw
straps.
▷ Larger and heavy objects: secure with cargo
straps*.
Cargo straps, cargo netting, retaining straps or
draw straps on the lashing eyes in the cargo
area.
Seite 149
149Online Edition for Part no. 01 40 2 606 469 - 03 11 490
Reference Mobility Communication Entertainment Navigation
Driving tips Controls At a glance
Page 283 of 304
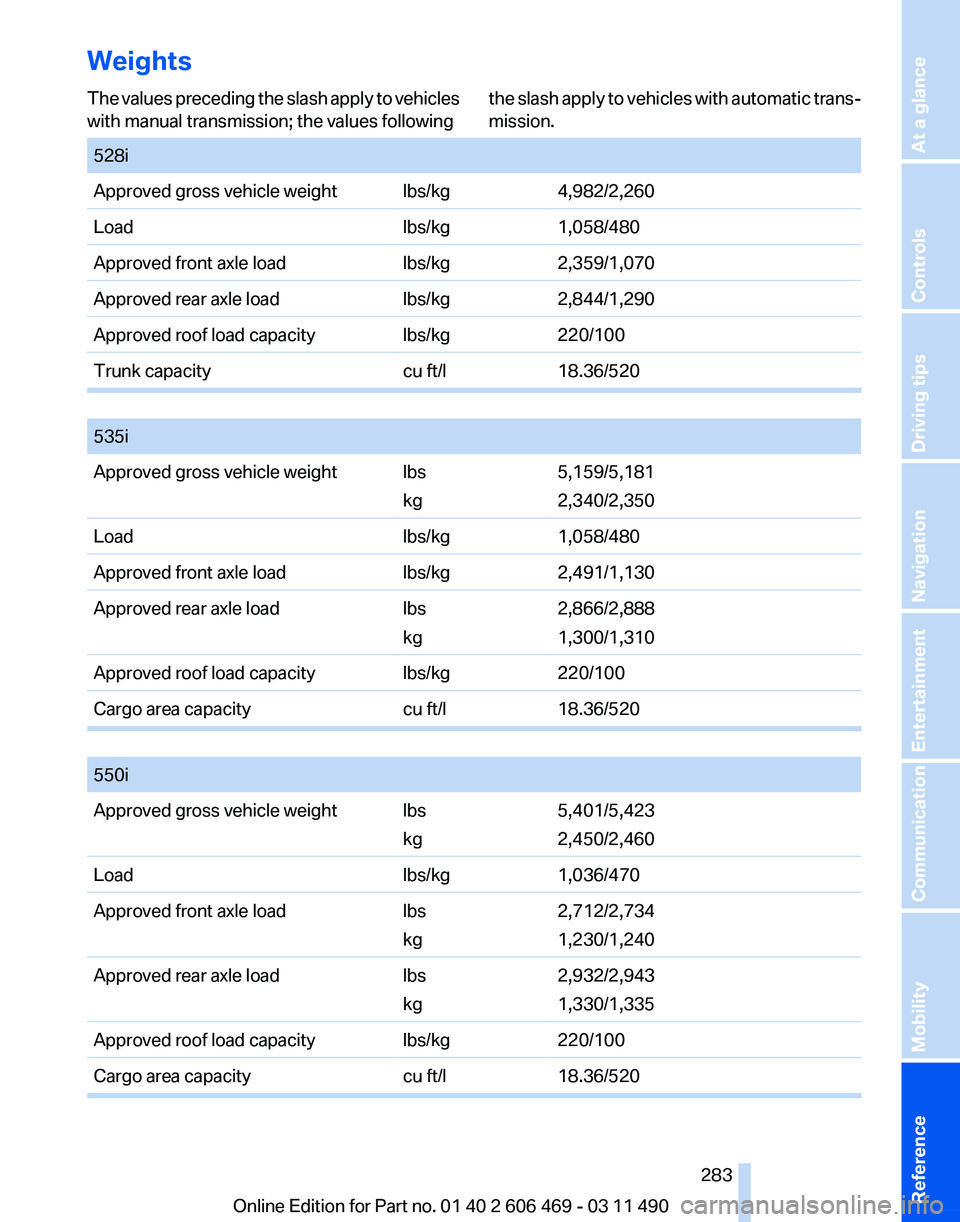
Weights
The values preceding the slash apply to vehicles
with manual transmission; the values following
the slash apply to vehicles with automatic trans‐
mission.
528i
Approved gross vehicle weight lbs/kg
4,982/2,260
Load lbs/kg1,058/480
Approved front axle load lbs/kg2,359/1,070
Approved rear axle load lbs/kg2,844/1,290
Approved roof load capacity lbs/kg220/100
Trunk capacity cu ft/l18.36/520
535i
Approved gross vehicle weight lbs
kg5,159/5,181
2,340/2,350
Load lbs/kg1,058/480
Approved front axle load lbs/kg2,491/1,130
Approved rear axle load lbs
kg2,866/2,888
1,300/1,310
Approved roof load capacity lbs/kg220/100
Cargo area capacity cu ft/l18.36/520
550i
Approved gross vehicle weight lbs
kg5,401/5,423
2,450/2,460
Load lbs/kg1,036/470
Approved front axle load lbs
kg2,712/2,734
1,230/1,240
Approved rear axle load lbs
kg2,932/2,943
1,330/1,335
Approved roof load capacity lbs/kg220/100
Cargo area capacity cu ft/l18.36/520 Seite 283
283Online Edition for Part no. 01 40 2 606 469 - 03 11 490
Reference Mobility Communication Entertainment Navigation Driving tips Controls At a glance
Page 284 of 304
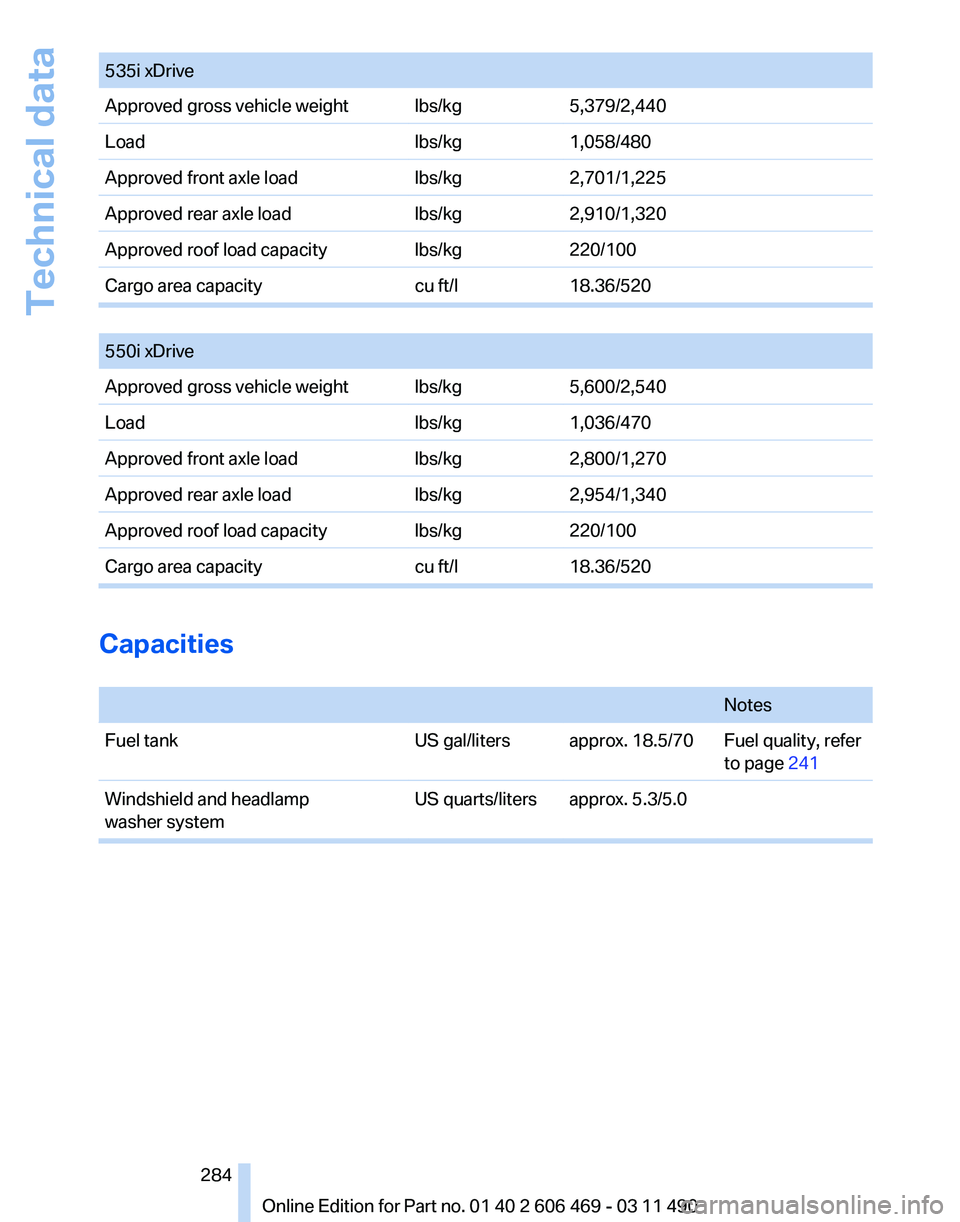
535i xDrive
Approved gross vehicle weight lbs/kg
5,379/2,440
Load lbs/kg1,058/480
Approved front axle load lbs/kg2,701/1,225
Approved rear axle load lbs/kg2,910/1,320
Approved roof load capacity lbs/kg220/100
Cargo area capacity cu ft/l18.36/520
550i xDrive
Approved gross vehicle weight lbs/kg
5,600/2,540
Load lbs/kg1,036/470
Approved front axle load lbs/kg2,800/1,270
Approved rear axle load lbs/kg2,954/1,340
Approved roof load capacity lbs/kg220/100
Cargo area capacity cu ft/l18.36/520Capacities
Notes
Fuel tank US gal/liters approx. 18.5/70 Fuel quality, refer
to page 241
Windshield and headlamp
washer system US quarts/liters approx. 5.3/5.0 Seite 284
284 Online Edition for Part no. 01 40 2 606 469 - 03 11 490Technical data
Page 300 of 304
Power sunroof, glass 41
Power windows
40
Pressure, tire air pres‐ sure 242
Profile, refer to Personal Pro‐ file 29
Programmable memory but‐ tons, iDrive 20
Protective
function, glass sun‐
roof 42
Protective function, win‐ dows 40
Push-and-turn switch, refer to Controller 16
R
Radiator fluid 258
Radio 174
Radio-operated key, refer to Remote control 28
Radio ready state 58
Rain sensor 63
Random 182
Random playback 182
RDS 175
Reading out loud 228
Rear automatic climate con‐ trol 130
Rear axle steering 98
Rear entertainment 201
Rear lamps 265
Rear socket 136
Rear source, selecting for rear entertainment 204
Rearview mirror 51
Rear window defroster 128
Recirculated-air mode 127
Recommended tire brands 252
Refueling 240
Remaining range 73
Reminders 227
Remote control/key 28
Remote control, malfunc‐ tion 33
Remote control, rear enter‐ tainment 202 Remote control, universal
132
Replacement fuse 268
Replacing parts 262
Replacing wheels/tires 251
Reporting safety defects 8
RES button 104
Reserve warning, refer to Range 73
Resetting,
Tire Pressure Mon‐
itor TPM 89
Residual heat, automatic cli‐ mate control 128
Retaining straps, securing cargo 149
Retreaded tires 252
Roadside Assistance 233
Roadside parking lamps 81
Roller sunblinds 41
Roll stabilization, refer to Adaptive Drive 97
Roll stabilization, refer to Dy‐ namic Drive 98
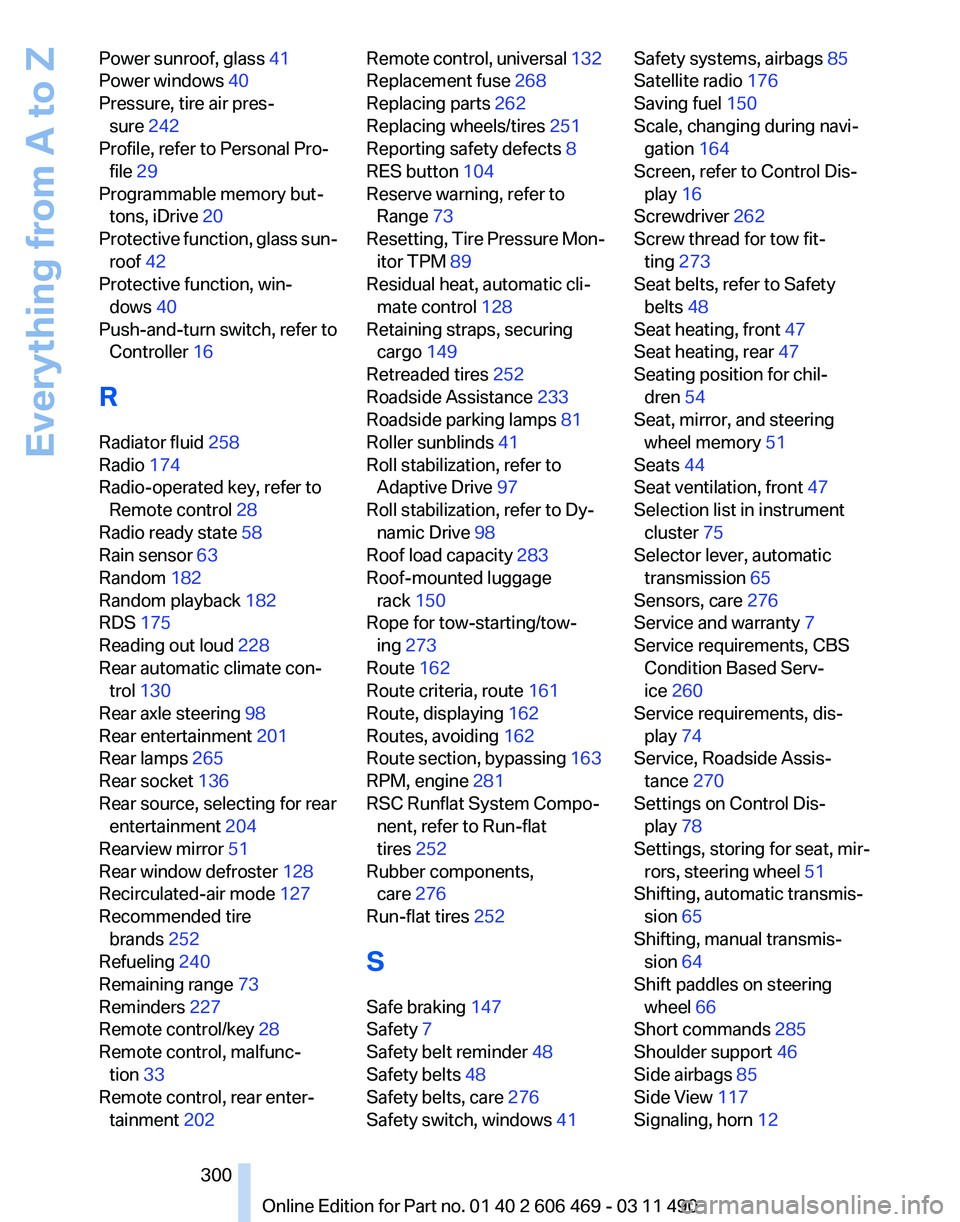
Roof load capacity 283
Roof-mounted luggage rack 150
Rope for tow-starting/tow‐ ing 273
Route 162
Route criteria, route 161
Route, displaying 162
Routes, avoiding 162
Route section, bypassing 163
RPM, engine 281
RSC Runflat System Compo‐ nent, refer to Run-flat
tires 252
Rubber components, care 276
Run-flat tires 252
S
Safe braking 147
Safety 7
Safety belt reminder 48
Safety belts 48
Safety belts, care 276
Safety switch, windows 41 Safety systems, airbags
85
Satellite radio 176
Saving fuel 150
Scale, changing during navi‐ gation 164
Screen, refer to Control Dis‐ play 16
Screwdriver 262
Screw thread for tow fit‐ ting 273
Seat belts, refer to Safety belts 48
Seat heating, front 47
Seat heating, rear 47
Seating position for chil‐ dren 54
Seat, mirror, and steering wheel memory 51
Seats 44
Seat ventilation, front 47
Selection list in instrument cluster 75
Selector lever, automatic transmission 65
Sensors, care 276
Service and warranty 7
Service requirements, CBS Condition Based Serv‐
ice 260
Service requirements, dis‐ play 74
Service, Roadside Assis‐ tance 270
Settings on Control Dis‐ play 78
Settings, storing for seat, mir‐ rors, steering wheel 51
Shifting, automatic transmis‐ sion 65
Shifting, manual transmis‐ sion 64
Shift paddles on steering wheel 66
Short commands 285
Shoulder support 46
Side airbags 85
Side View 117
Signaling, horn 12
Seite 300
300 Online Edition for Part no. 01 40 2 606 469 - 03 11 490
Everything from A to Z