2011 BMW 535I XDRIVE unlock
[x] Cancel search: unlockPage 37 of 304

With Comfort Access:
▷
Press the button, arrow 1, on the inside of
the trunk lid.
The trunk lid closes automatically.
Pressing again stops the motion.
▷ Press the button, arrow 2.
The trunk lid closes automatically and the
vehicle is locked. ▷
Press the button on the exterior of the trunk
lid.
Pressing again stops the motion.
The closing operation is interrupted:
▷ When starting the engine.
▷ The vehicle starts off with jerks.
Danger of pinching
Make sure that the closing path of the
trunk
lid is clear; otherwise, injuries may result.◀ Do not place the remote control in the
cargo area
Take the remote control with you and do not
leave it in the cargo area; otherwise, the remote
control may be locked inside the vehicle when
the trunk lid is closed.◀ Manual operation
In the event of an electrical fault, manually op‐
erate the unlocked trunk lid slowly and
smoothly.
Locking separately
The
trunk lid can be locked separately using the
switch in the front center armrest.
▷Trunk lid secured, arrow 1.
▷ Trunk lid not secured, ar‐
row 2.
Slide the switch into the arrow 1 position. This
secures
the trunk lid and disconnects it from the
central locking system.
When the center armrest is locked, the tailgate
cannot be accessed. This is beneficial when the
vehicle is parked using valet service. The infra‐
red remote control can be handed out without
the key.
Emergency unlocking* Pull the handle inside the cargo area.
The trunk lid unlocks.
Comfort Access*
The concept
The vehicle can be accessed without activating
the remote control.
All you need to do is to have the remote control
with you, e.g., in your jacket pocket. Seite 37
37Online Edition for Part no. 01 40 2 606 469 - 03 11 490
Reference Mobility Communication Entertainment Navigation Driving tips
Controls At a glance
Page 38 of 304

The vehicle automatically detects the remote
control when it is nearby or in the passenger
compartment.
Comfort Access supports the following func‐
tions:
▷
Unlocking/locking of the vehicle.
▷ Convenient closing.
▷ Unlocking of the trunk lid separately.
▷ Starting the engine.
Functional requirements
▷ There are no external sources of interfer‐
ence nearby.
▷ To lock the vehicle, the remote control must
be located outside of the vehicle.
▷ The next unlocking and locking cycle is not
possible until after approx. 2 seconds.
▷ The engine can only be started if the remote
control is inside the vehicle.
Comparison with ordinary remote
control
The
functions can be controlled by pressing the
buttons or via Comfort Access.
Unlocking Fully grasp a door handle, arrow 1. This corre‐
sponds to pressing the
button.Locking Press the area on the door handle, arrow 2, with
your finger for approx. 1 second.
This corresponds to pressing the
button.
To save battery power, ensure that the ignition
and all electronic systems and/or power con‐
sumers are switched off before locking the ve‐
hicle.
Convenient closing
Press the area, arrow 2, with your finger and
hold.
In
addition to locking, the windows and the glass
sunroof* are closed.
Monitor the closing process
Monitor the closing process to ensure that
no one becomes trapped.◀
Unlocking the trunk lid separately
Press the button on the exterior of the trunk lid,
refer to page 35.
This corresponds to pressing the button.
Do not place the remote control in the
cargo area
Take the remote control with you and do not
leave
it in the cargo area; otherwise, the remote
control may be locked inside the vehicle when
the trunk lid is closed.◀
Malfunction
Comfort Access may not function properly if it
experiences interference from external sources
such as mobile phones, metal objects, overhead
power lines, transmission towers, etc. Seite 38
38 Online Edition for Part no. 01 40 2 606 469 - 03 11 490
Opening and closing
Page 39 of 304

If this occurs, open or close the vehicle using the
buttons
on the remote control or use a key in the
door lock.
To subsequently start the engine, hold the re‐
mote control against the marked area on the
steering column, refer to page 29.
Alarm system*
The concept
The vehicle alarm system responds to:
▷ Opening of a door, the hood or the trunk lid.
▷ Movements in the vehicle: interior motion
sensor, refer to page 40.
▷ Changes in the vehicle tilt, e.g., during at‐
tempts to steal a wheel or when towing the
car.
▷ Interruptions in battery voltage.
The alarm system briefly indicates tampering:
▷ By sounding an acoustic alarm.
▷ By switching on the hazard warning system.
▷ By flashing the high beams.
Arming and disarming the alarm
system
General information
When
you lock or unlock the vehicle, either with
the remote control or at the door lock*, the alarm
system is armed or disarmed at the same time.
Door lock and armed alarm system
Unlocking via the door lock will trigger the alarm
on some country-specific versions.
Trunk lid and armed alarm system
The trunk lid can be opened using the remote
control, even if the alarm system is armed.
Press the button on the remote control
for approx. 1 second and release.
After the trunk lid is closed, it is locked and
monitored again by the alarm system. The haz‐
ard warning system flashes once. In some vehicle equipment variants, the trunk lid
can only be opened using the remote control if
the vehicle was unlocked first.
Panic mode*
Press
the button on the remote control
for at least 3 seconds.
Switching off the alarm
▷ Unlock the vehicle using the remote control.
▷ With Comfort Access: If you are carrying the
remote control with you, pull on the door
handle.
Indicator lamp on the interior rearview
mirror ▷
The indicator lamp flashes briefly every
2 seconds:
The system is armed.
▷ The indicator lamp flashes after locking:
The doors, hood or trunk lid is not closed
properly, but the rest of the vehicle is se‐
cured.
After
10 seconds, the indicator lamp flashes
continuously. The interior motion sensor is
not active.
▷ The indicator lamp goes out after unlocking:
The vehicle has not been tampered with.
▷ The indicator lamp flashes after unlocking
until
the engine is started, but no longer than
approx. 5 minutes:
An alarm has been triggered.
Tilt alarm sensor
The tilt of the vehicle is monitored. Seite 39
39Online Edition for Part no. 01 40 2 606 469 - 03 11 490
Reference Mobility Communication Entertainment Navigation Driving tips
Controls At a glance
Page 44 of 304

Adjusting
Sitting safely
The
ideal seating position can make a vital con‐
tribution to relaxed, fatigue-free driving.
The seating position plays an important role in
an accident in combination with:
▷ Safety belts, refer to page 48.
▷ Head restraints, refer to page 49.
▷ Airbags, refer to page 85.
Seats
Adjusting
General information Do not adjust the seat while driving
Never attempt to adjust the driver's seat
while driving.
The
seat could respond with unexpected move‐
ment and the ensuing loss of vehicle control
could lead to an accident.◀
Do not incline the backrest too far to the
rear
Do not incline the backrest on the front passen‐
ger side too far to the rear during driving. Oth‐
erwise, there is the danger of sliding under the
safety belt in an accident. This would eliminate
the protection normally provided by the belt.◀
The seat setting is stored for the remote control
currently in use. When the vehicle is unlocked
via the remote control, the position is automati‐
cally retrieved if this function, refer to page 33,
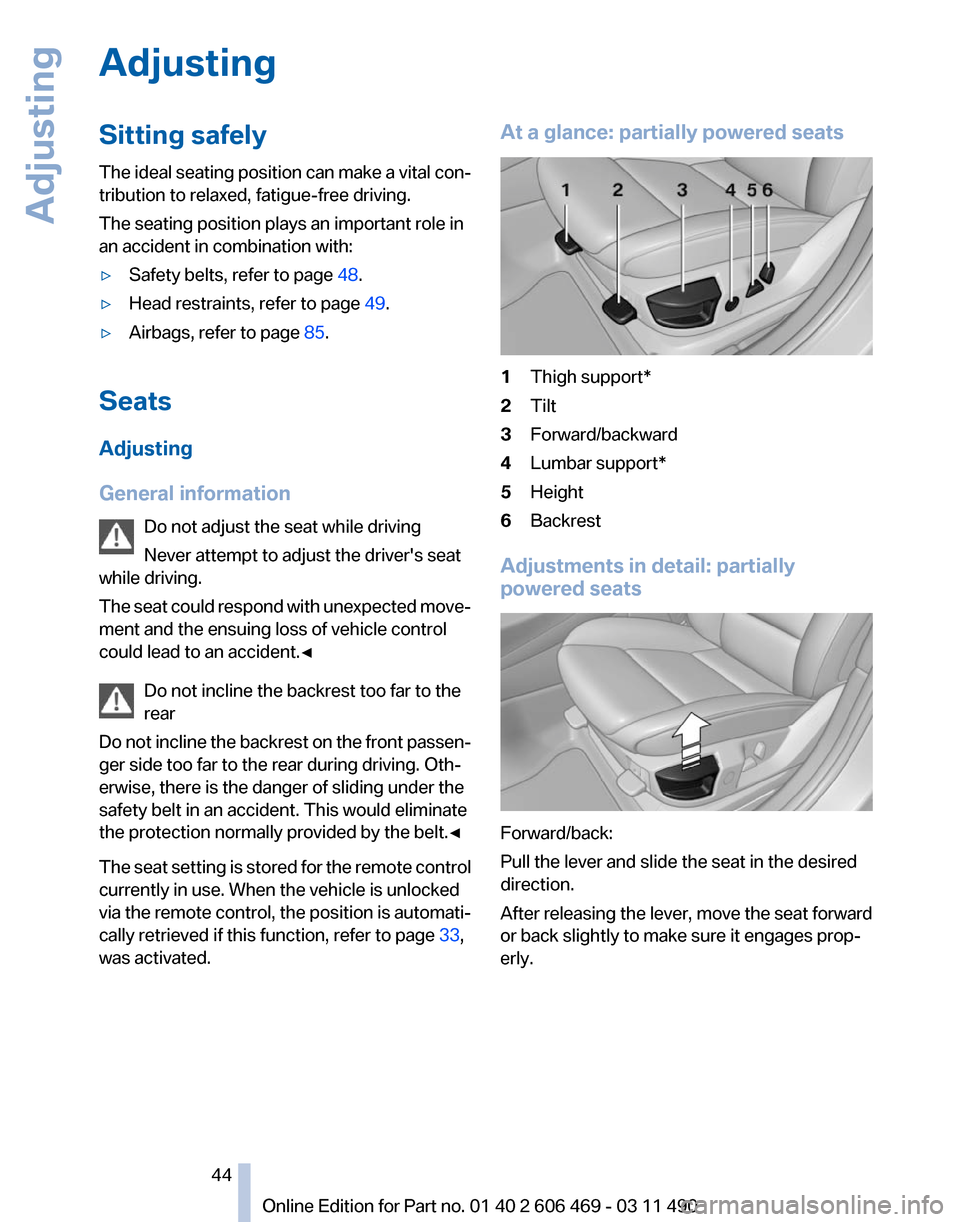
was activated. At a glance: partially powered seats
1
Thigh support*
2 Tilt
3 Forward/backward
4 Lumbar support*
5 Height
6 Backrest
Adjustments in detail: partially
powered seats Forward/back:
Pull the lever and slide the seat in the desired
direction.
After
releasing the lever, move the seat forward
or back slightly to make sure it engages prop‐
erly.
Seite 44
44 Online Edition for Part no. 01 40 2 606 469 - 03 11 490
Adjusting
Page 55 of 304

Backrest width*
Before
installing a child restraint fixing system in
the front passenger seat, open the backrest
width completely. Do not change the backrest
width again and do not call up a memory posi‐
tion.
Backrest width for the child seat
Before installing a child restraint fixing
system in the front passenger seat, the backrest
width must be opened completely. Do not
change the adjustment after this; otherwise, the
stability of the child seat will be reduced.◀
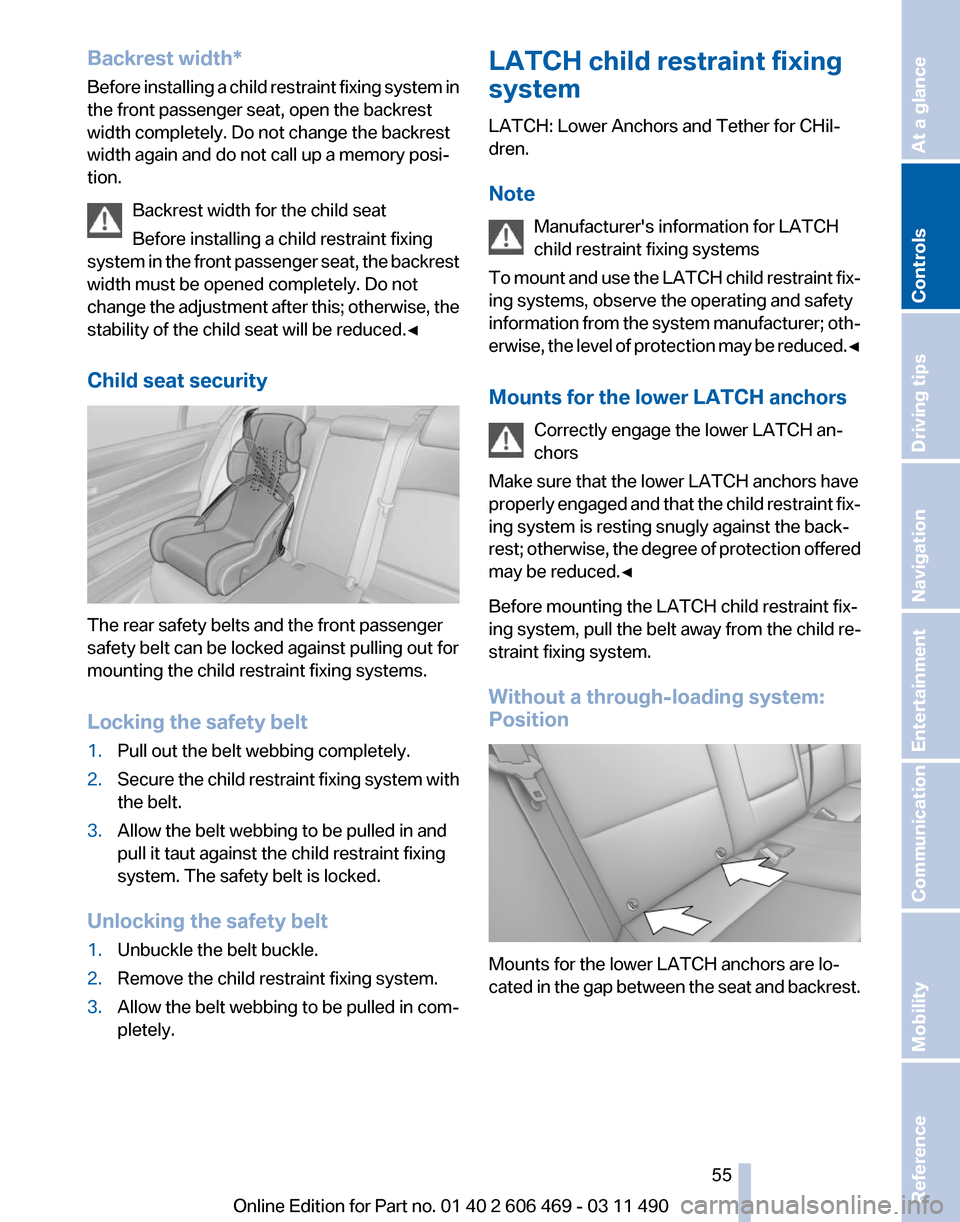
Child seat security The rear safety belts and the front passenger
safety belt can be locked against pulling out for
mounting the child restraint fixing systems.
Locking the safety belt
1.
Pull out the belt webbing completely.
2. Secure the child restraint fixing system with
the belt.
3. Allow the belt webbing to be pulled in and
pull it taut against the child restraint fixing
system. The safety belt is locked.
Unlocking the safety belt
1. Unbuckle the belt buckle.
2. Remove the child restraint fixing system.
3. Allow the belt webbing to be pulled in com‐
pletely. LATCH child restraint fixing
system
LATCH: Lower Anchors and Tether for CHil‐
dren.
Note
Manufacturer's information for LATCH
child restraint fixing systems
To
mount and use the LATCH child restraint fix‐
ing systems, observe the operating and safety
information from the system manufacturer; oth‐
erwise, the level of protection may be reduced.◀
Mounts for the lower LATCH anchors
Correctly engage the lower LATCH an‐
chors
Make sure that the lower LATCH anchors have
properly engaged and that the child restraint fix‐
ing system is resting snugly against the back‐
rest; otherwise, the degree of protection offered
may be reduced.◀
Before mounting the LATCH child restraint fix‐
ing system, pull the belt away from the child re‐
straint fixing system.
Without a through-loading system:
Position Mounts for the lower LATCH anchors are lo‐
cated
in the gap between the seat and backrest. Seite 55
55Online Edition for Part no. 01 40 2 606 469 - 03 11 490
Reference Mobility Communication Entertainment Navigation Driving tips
Controls At a glance
Page 65 of 304

Automatic transmission with
Steptronic*
Transmission positions
D Drive, automatic position
Position for normal vehicle operation. All for‐
ward gears are available.
R is Reverse
Select only when the vehicle is stationary.
N is Neutral
Use in automatic car washes, for example. The
vehicle can roll.
When the ignition is switched off, refer to
page
58, position P is engaged automatically.
P Park
Select only when the vehicle is stationary. The
drive wheels are blocked.
P is engaged automatically:
▷ After the engine is switched off, if the car is
in
radio ready state, refer to page 58, or if the
ignition is switched off, refer to page 58, and
if position R or D is engaged.
▷ If the ignition is switched off and position N
is engaged.
▷ If the safety belt is unbuckled, the driver's
door is opened, and the brake pedal is not
pressed while the vehicle is stationary and
transmission position R or D is engaged.
Kickdown
Kickdown is used to achieve maximum driving
performance. Press on the accelerator beyond
the resistance point at the full throttle position.
Engaging the transmission position
▷ Transmission position P can only be disen‐
gaged
if the engine is running and the brake
pedal is pressed.
▷ With the vehicle stationary, press on the
brake pedal before shifting out of P or N; otherwise, the shift command will not be
executed: shift lock.
Depress
the brake until you start driv‐
ing
To prevent the vehicle from creeping after
you select a driving position, maintain pres‐
sure on the brake pedal until you are ready
to start.◀ Engaging D, R and N
Briefly push the selector lever in the desired di‐
rection, beyond a resistance point if necessary.
After
releasing the selector lever, it returns to its
center position. Press the Unlock button to:
▷
Engage R.
▷ Shift out of P.
Seite 65
65Online Edition for Part no. 01 40 2 606 469 - 03 11 490
Reference Mobility Communication Entertainment Navigation Driving tips
Controls At a glance
Page 136 of 304

Rear center console
Remove the cover or cigarette lighter*.
In the cargo area*
The
socket is located in the cover of the loading
lip.
To access the socket: fold open the cover.
Through-loading system*
General information
The cargo area can be enlarged by folding down
the rear seat backrest.
The rear seat backrest is divided into two parts
at a ratio of 60 to 40. The sides can be folded
down separately or together.
Opening
Move the front seats to an upright position
Before folding down the rear backrests,
ensure that the front seats are moved forward
slightly and are in an upright position. Other‐
wise, the head restraint and screen could be
damaged.◀ 1.
Unlock the belt lock of the center safety belt
in the rear using the latch plate of another
safety belt.
2. Insert the latch plate at the end of the belt
into the specially designated fixture on the
rear window shelf. 3.
Push the corresponding head restraint
down as far as it will go.
4. Pull the corresponding lever in the cargo
area to release the rear seat backrest. 5.
The unlocked rear seat backrest moves for‐
ward slightly. Fold the backrest forward by
the head restraint. Closing
1.
Return the rear seat backrest to the upright
seating position and engage it.
Seite 136
136 Online Edition for Part no. 01 40 2 606 469 - 03 11 490
Interior equipment
Page 232 of 304

BMW ConnectedDrive
BMW Assist*
General information
BMW
Assist provides you with certain services,
e.g., transmission of the position data of your
vehicle to the BMW Assist Response Center if
an Emergency Request* has been initiated.
Many BMW Assist services depend on the indi‐
vidually agreed upon contract.
After your contract has expired, the BMW Assist
system will be deactivated by the BMW Assist
Response Center without your having to visit a
service center. After the BMW Assist system
has been deactivated, no BMW Assist services
will be available. The BMW Assist system can be
reactivated by a service center after you sign a
new contract.
Requirements
▷ The installed BMW Assist system is logged
in to a wireless communications network.
This network must be capable of transmit‐
ting the services.
▷ To transmit position data, the vehicle must
be able to determine the current position.
▷ The BMW Assist service contract was
signed with your service center or with the
BMW Assist Response Center. Enabling
must have been completed.
▷ BMW Assist is activated.
Services offered
▷ Emergency Request: when you press the
SOS button, a connection to the BMW As‐
sist Response Center is established. The
BMW Assist Response Center then speaks
with
you and takes further steps to help you.
▷ Automatic Collision Notification: under cer‐
tain conditions, a connection is established
to
the BMW Assist Response Center after a
serious accident. If possible, the BMW As‐ sist Response Center then speaks with you
and takes further steps to help you.
▷ Enhanced Roadside Assistance: BMW
Roadside Assistance* can be contacted if
assistance
is needed in the event of a break‐
down. If possible, the vehicle and position
data are transmitted in the process.
▷ Customer Relations: connection with Cus‐
tomer Relations for information on all as‐
pects of your vehicle.
▷ TeleService: data on your vehicle's service
status or required inspections are transmit‐
ted to your service center, either automati‐
cally before a service due date or when you
request a BMW service appointment.
▷ Remote Door Unlock: the BMW Assist Re‐
sponse
Center provides assistance if, for ex‐
ample, the remote control is not available
and the vehicle needs to be opened.
▷ Stolen Vehicle Recovery: after you report
that
your vehicle was stolen to the police, the
BMW Assist Response Center can deter‐
mine its position.
▷ In addition to these services, the optional
Convenience Plan offers Concierge service
and information for route planning, traffic,
and weather. A limited number of calls can
be made via the BMW Assist Response
Center with Critical Calling if, for example,
the mobile phone is not available or dis‐
charged.
Press the SOS button to contact the BMW
Assist Response Center.
BMW TeleService*
General information
TeleService
supports communication with your
service center.
▷ Data on the vehicle's service requirements
can
be sent directly to the service center. In
this way, the service center can plan its work
Seite 232
232 Online Edition for Part no. 01 40 2 606 469 - 03 11 490
BMW ConnectedDrive