2011 BMW 528I navigation system
[x] Cancel search: navigation systemPage 223 of 304

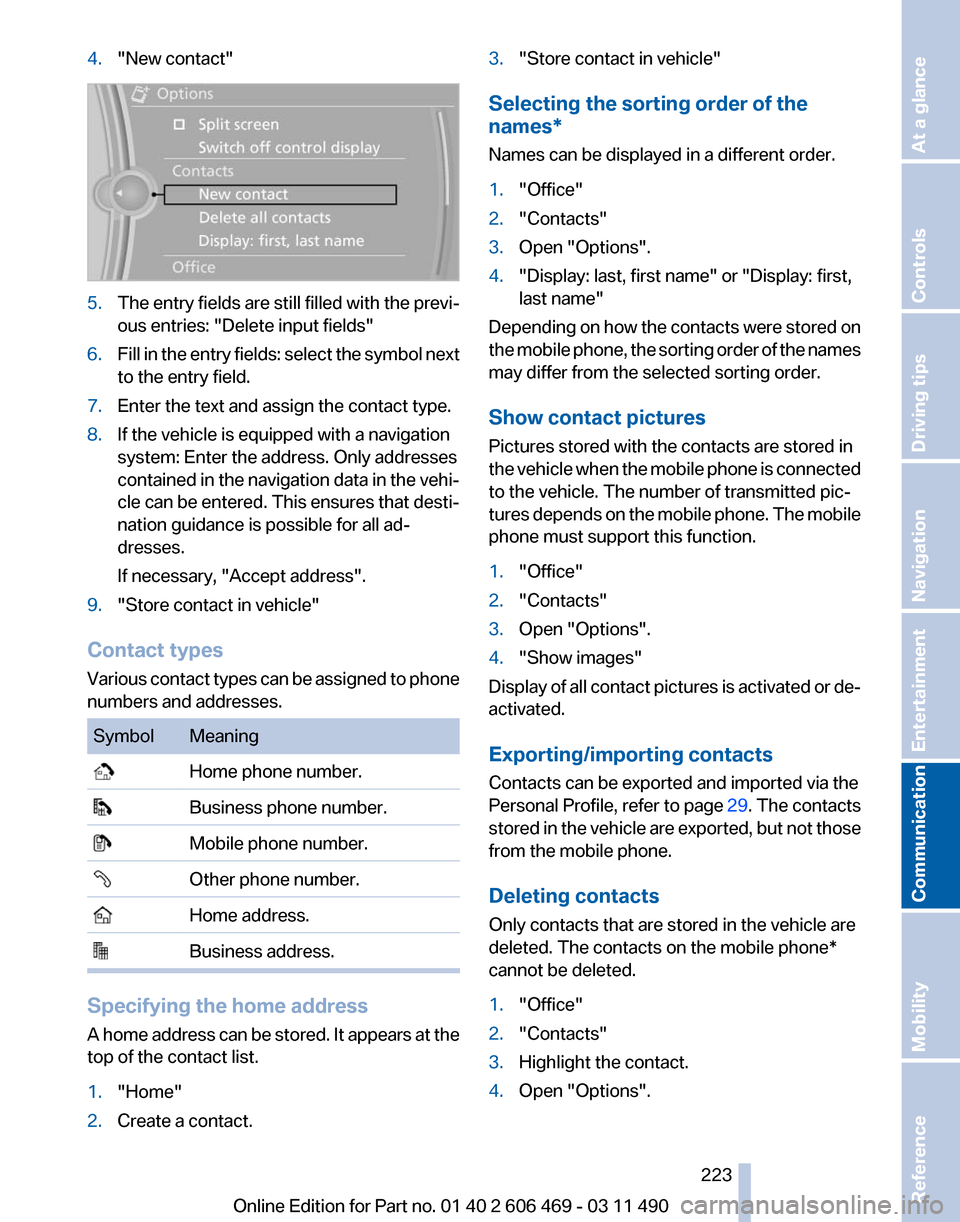
4.
"New contact" 5.
The entry fields are still filled with the previ‐
ous entries: "Delete input fields"
6. Fill in the entry fields: select the symbol next
to the entry field.
7. Enter the text and assign the contact type.
8. If the vehicle is equipped with a navigation
system: Enter the address. Only addresses
contained
in the navigation data in the vehi‐
cle can be entered. This ensures that desti‐
nation guidance is possible for all ad‐
dresses.
If necessary, "Accept address".
9. "Store contact in vehicle"
Contact types
Various
contact types can be assigned to phone
numbers and addresses. Symbol Meaning
Home phone number.
Business phone number.
Mobile phone number.
Other phone number.
Home address.
Business address.
Specifying the home address
A
home address can be stored. It appears at the
top of the contact list.
1. "Home"
2. Create a contact. 3.
"Store contact in vehicle"
Selecting the sorting order of the
names*
Names can be displayed in a different order.
1. "Office"
2. "Contacts"
3. Open "Options".
4. "Display: last, first name" or "Display: first,
last name"
Depending on how the contacts were stored on
the
mobile phone, the sorting order of the names
may differ from the selected sorting order.
Show contact pictures
Pictures stored with the contacts are stored in
the vehicle when the mobile phone is connected
to the vehicle. The number of transmitted pic‐
tures depends on the mobile phone. The mobile
phone must support this function.
1. "Office"
2. "Contacts"
3. Open "Options".
4. "Show images"
Display of all contact pictures is activated or de‐
activated.
Exporting/importing contacts
Contacts can be exported and imported via the
Personal Profile, refer to page 29. The contacts
stored
in the vehicle are exported, but not those
from the mobile phone.
Deleting contacts
Only contacts that are stored in the vehicle are
deleted. The contacts on the mobile phone*
cannot be deleted.
1. "Office"
2. "Contacts"
3. Highlight the contact.
4. Open "Options".
Seite 223
223Online Edition for Part no. 01 40 2 606 469 - 03 11 490
Reference Mobility
Communication Entertainment Navigation Driving tips Controls At a glance
Page 230 of 304

Contacts*
General information
Contacts
can be created and edited and the ad‐
dresses can be adopted as destinations for nav‐
igation.
New contact
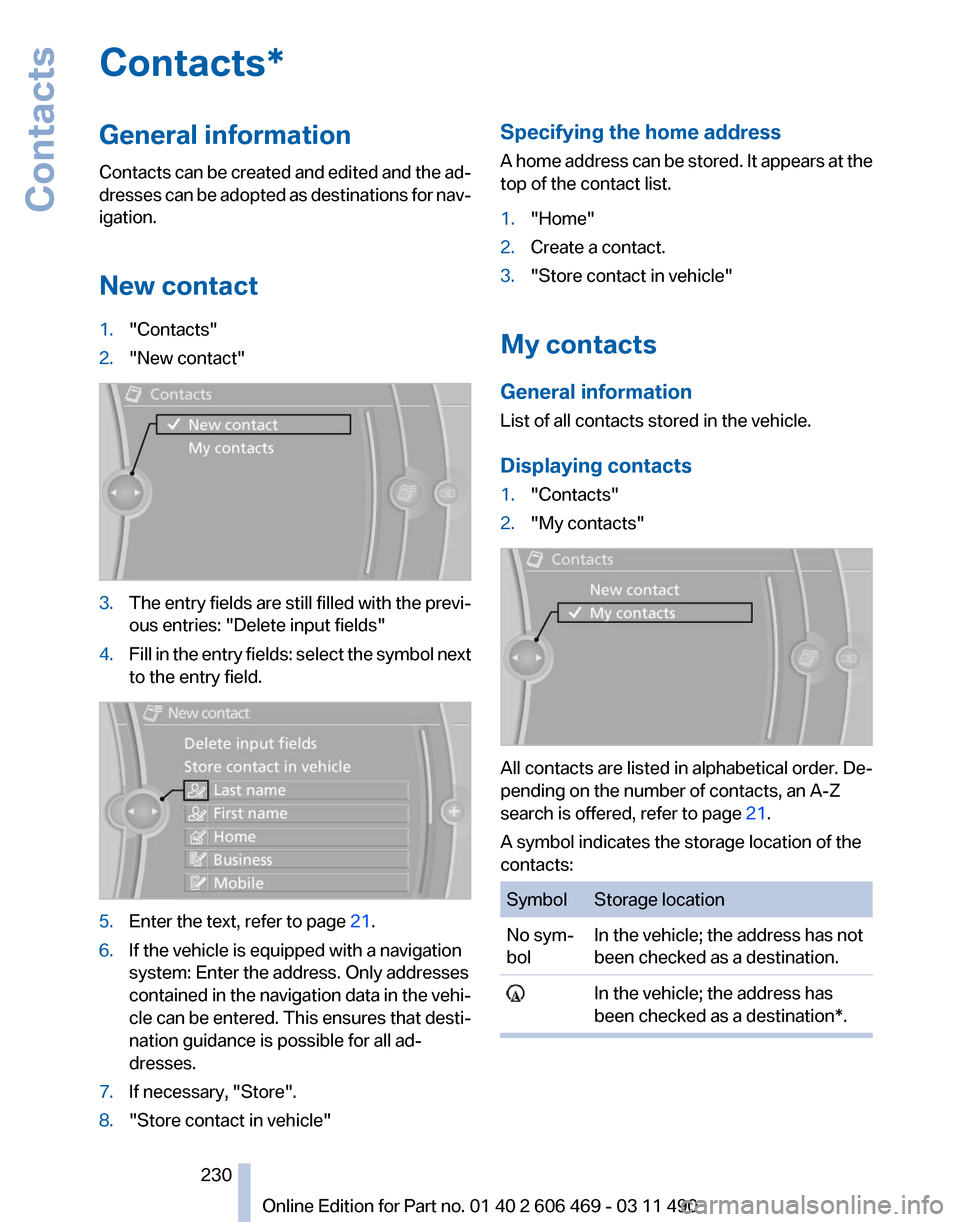
1. "Contacts"
2. "New contact" 3.
The entry fields are still filled with the previ‐
ous entries: "Delete input fields"
4. Fill in the entry fields: select the symbol next
to the entry field. 5.
Enter the text, refer to page 21.
6. If the vehicle is equipped with a navigation
system: Enter the address. Only addresses
contained
in the navigation data in the vehi‐
cle can be entered. This ensures that desti‐
nation guidance is possible for all ad‐
dresses.
7. If necessary, "Store".
8. "Store contact in vehicle" Specifying the home address
A
home address can be stored. It appears at the
top of the contact list.
1. "Home"
2. Create a contact.
3. "Store contact in vehicle"
My contacts
General information
List of all contacts stored in the vehicle.
Displaying contacts
1. "Contacts"
2. "My contacts" All contacts are listed in alphabetical order. De‐
pending on the number of contacts, an A-Z
search is offered, refer to page
21.
A symbol indicates the storage location of the
contacts: Symbol Storage location
No sym‐
bol
In the vehicle; the address has not
been checked as a destination. In the vehicle; the address has
been checked as a destination*. Seite 230
230 Online Edition for Part no. 01 40 2 606 469 - 03 11 490
Contacts
Page 251 of 304

Minimum tread depth
Wear indicators are distributed around the tire's
circumference and have the legally required
minimum height of 0.063 in/1.6 mm.
They
are marked on the side of the tire with TWI,
Tread Wear Indicator.
Tire damage
General information
Inspect your tires often for damage, foreign ob‐
jects lodged in the tread, and tread wear.
Notes
Indications of tire damage or other vehicle de‐
fects:
▷ Unusual vibrations during driving.
▷ Unusual handling such as a strong tendency
to pull to the left or right.
In case of tire damage
If there are indications of tire damage, re‐
duce your speed immediately and have the
wheels
and tires checked right away; otherwise,
there is the increased risk of an accident.
Drive carefully to the next service center or tire
shop.
If necessary, have the vehicle towed.◀
Repair of tire damage
For safety reasons, the manufacturer of
your vehicle recommends that you do not have
damaged tires repaired; they should be re‐
placed. Otherwise, damage can occur as a re‐
sult.◀ Changing wheels and tires
Mounting
Information on mounting tires
Have mounting and balancing performed
only by a service center or tire specialist.
If this work is not carried out properly, there is
the danger of subsequent damage and related
safety hazards.◀
Wheel and tire combination
Information on the correct wheel-tire combina‐
tion
and rim versions for your vehicle can be ob‐
tained from your service center.
Incorrect wheel and tire combinations impair the
function of a variety of systems such as ABS or
DSC.
To maintain good handling and vehicle re‐
sponse, use only tires with a single tread con‐
figuration from a single manufacturer.
Following tire damage, have the original wheel
and tire combination remounted on the vehicle
as soon as possible.
Approved wheels and tires
The manufacturer of your vehicle recom‐
mends that you use only wheels and tires that
have been approved for your particular vehicle
model.
For example, despite having the same official
size ratings, variations can lead to body contact
and with it, the risk of severe accidents.
The manufacturer of your vehicle cannot evalu‐
ate non-approved wheels and tires to determine
if they are suited for use, and therefore cannot
ensure the operating safety of the vehicle if they
are mounted.◀ Seite 251
251Online Edition for Part no. 01 40 2 606 469 - 03 11 490
Reference
Mobility Communication Entertainment Navigation Driving tips Controls At a glance
Page 253 of 304

The wheels are composed of special rims and
tires that are self-supporting, to a limited de‐
gree.
The
support of the sidewall allows the tire to re‐
main drivable to a restricted degree in the event
of a pressure loss.
Continued driving with a damaged tire., refer to
page 90
Changing run-flat tires
For your own safety, only use run-flat tires. No
spare tire is available in the case of a flat tire. Your
service center will be glad to advise you.
Snow chains
Fine-link snow chains
Only certain types of fine-link snow chains have
been tested by the manufacturer of your vehicle,
classified as road-safe and recommended.
Consult your service center for more informa‐
tion.
Use
Use only in pairs on the rear wheels, equipped
with the tires of the following size:
▷ 225/55 R 17.
▷ 245/45 R 18.
Follow the chain manufacturer's instructions.
Make
sure that the snow chains are always suf‐
ficiently tight. Retighten as needed according to
the chain manufacturer's instructions.
Do not initialize the Tire Pressure Monitor after
mounting snow chains, as doing so may result
in incorrect readings.
When driving with snow chains, briefly activate
Dynamic Traction Control if necessary.
Maximum speed with snow chains
Do not exceed a speed of 30 mph/50 km/h when
using snow chains. Snow chain detection*
The concept
When using snow chains, you should set
whether you are driving with or without snow
chains via the iDrive.
The
snow chain detection system supports you
by automatically showing the detected state on
the Control Display.
When snow chains are in use, the rear axle steer‐
ing of the Integral Active Steering* is deacti‐
vated automatically.
At speeds above the maximum allowable speed
with snow chains of 30 mph/50 km/h, the rear
axle steering is activated again automatically.
Activating the status
1. "Settings"
2. "Tire chains"
3. "Tire chains installed"
Automatic detection
If functioning properly:
▷ Snow chains are mounted. The setting is not
activated .
After you drive a short distance, a Check
Control message is shown and the state is
activated automatically.
Confirm the automatic activation.
▷ Snow chains are not mounted. The setting
is activated .
At speeds above 30 mph/50 km/h, a Check
Control message is displayed. Deactivate
the status manually.
If not functioning properly:
▷ Snow chains are mounted. The setting is not
activated .
A Check Control message is not displayed.
The
automatic detection system is malfunc‐
tioning. Activate the status manually.
Seite 253
253Online Edition for Part no. 01 40 2 606 469 - 03 11 490
Reference
Mobility Communication Entertainment Navigation Driving tips Controls At a glance
Page 261 of 304

This indicates that there is excessive
misfiring in the engine.
Reduce the vehicle speed and have
the system checked immediately;
otherwise, serious engine misfiring
within a brief period can seriously
damage emission control compo‐
nents,
in particular the catalytic con‐
verter.
Fuel cap The indicator lamp lights up.
If the fuel cap is not properly tightened,
the
OBD system may conclude that fuel
vapor is escaping. If the cap is then tightened,
the display should go out in a short time.
Data memory
Your vehicle records data relating to vehicle op‐
eration, faults and user settings. These data are
stored in the remote control and can be read out
with suitable devices, particularly when the ve‐
hicle is serviced. The data obtained in this way
provide valuable information for service proc‐
esses and repair or for optimizing and develop‐
ing vehicle functions further.
In addition, if you signed a service contract for
Assist, certain vehicle data can be sent directly
from the vehicle to facilitate the desired serv‐
ices. Seite 261
261Online Edition for Part no. 01 40 2 606 469 - 03 11 490
Reference
Mobility Communication Entertainment Navigation Driving tips Controls At a glance
Page 268 of 304

systems or functions may not be fully availa‐
ble.◀
After a battery replacement, have the battery
registered
on the vehicle by your service center
to ensure that all comfort functions are fully
available.
Charging the battery
In the vehicle, only charge the battery via the
terminals, refer to page 271, in the engine com‐
partment with the engine off.
Power failure
After a temporary power loss, some equipment
needs to be reinitialized.
Individual settings need to be reprogrammed:
▷ Seat, mirror, and steering wheel memory:
store the positions again.
▷ Time: update.
▷ Date: update.
▷ Radio station: save again.
▷ Navigation system: wait for the operability of
the navigation.
Disposing of old batteries Have old batteries disposed of by your
service center or bring them to a recy‐
cling center.
Maintain the battery in an upright position for
transport and storage. Secure the battery so
that it does not tip over during transport.
Fuses
Notes
Replacing fuses
Never attempt to repair a blown fuse and
do
not replace a defective fuse with a substitute
of another color or amperage rating; this could
lead to a circuit overload, ultimately resulting in
a fire in the vehicle.◀ Plastic tweezers and information on the fuse
types
and locations are stored in the fuse box in
the cargo area.
In the glove compartment Push the handle up, arrow 1, and open the lid,
arrow 2.
In the cargo area
Open the cover on the right side trim.
Information on the fuse types and locations is
found on a separate sheet.
Seite 268
268 Online Edition for Part no. 01 40 2 606 469 - 03 11 490
Replacing components
Page 269 of 304

Breakdown assistance
Hazard warning flashers
The button is located in the center console.
Emergency Request
*
Requirements
▷ Equipment version with full preparation
package mobile phone.
An Emergency Request can be made, even
if no mobile phones are paired with the ve‐
hicle.
▷ BMW Assist is activated.
▷ The radio ready state is switched on.
▷ The BMW Assist system is logged in to a
wireless communications network sup‐
ported by BMW Assist.
▷ The Assist system is functional.
Only press the SOS button in an emergency.
Emergency Request not guaranteed
For
technical reasons, the Emergency Re‐
quest cannot be guaranteed under unfavorable
conditions.◀
Service contract
▷ After your contract with BMW Assist has ex‐
pired,
the BMW Assist system can be deac‐
tivated by the service center without you
having to visit a workshop.
After deactivation, an Emergency Request
is no longer possible. ▷
Under certain circumstances, the system
can be reactivated by a service center after
you sign a new contract.
Initiating an Emergency Request 1.
Press the cover briefly to open it.
2. Press the SOS button until the LED in the
button lights up.
▷ The LED lights up: an Emergency Request
was initiated.
If the situation allows, wait in your vehicle
until the voice connection has been estab‐
lished.
▷ The LED flashes if the connection to the
BMW
Assist Response Center has been es‐
tablished.
After the Emergency Request arrives at the
BMW Assist Response Center, the BMW
Assist Response Center contacts you and
takes further steps to help you.
Even if you are unable to respond, the BMW
Assist Response Center can take further
steps to help you under certain circumstan‐
ces.
For this purpose, data that are used to de‐
termine the necessary rescue measures,
such as the current position of the vehicle if
it can be established, are transmitted to the
BMW Assist Response Center.
▷ If the LED is flashing but the BMW Assist
Response Center cannot be heard on the
hands-free system, the hands-free system
may be malfunctioning. However, the BMW
Seite 269
269Online Edition for Part no. 01 40 2 606 469 - 03 11 490
Reference
Mobility Communication Entertainment Navigation Driving tips Controls At a glance
Page 273 of 304

▷
Maneuvering capability is limited during cor‐
nering.
▷ The tow bar will generate lateral forces if it
is secured with an offset.
Tow rope
When starting to tow the vehicle, make sure that
the tow rope is taut.
To avoid jerking and the associated stresses on
the vehicle components when towing, always
use nylon ropes or nylon straps.
Attaching the tow rope correctly
Only secure the tow rope on the tow fit‐
ting; otherwise, damage can occur when it is se‐
cured on other parts of the vehicle.◀
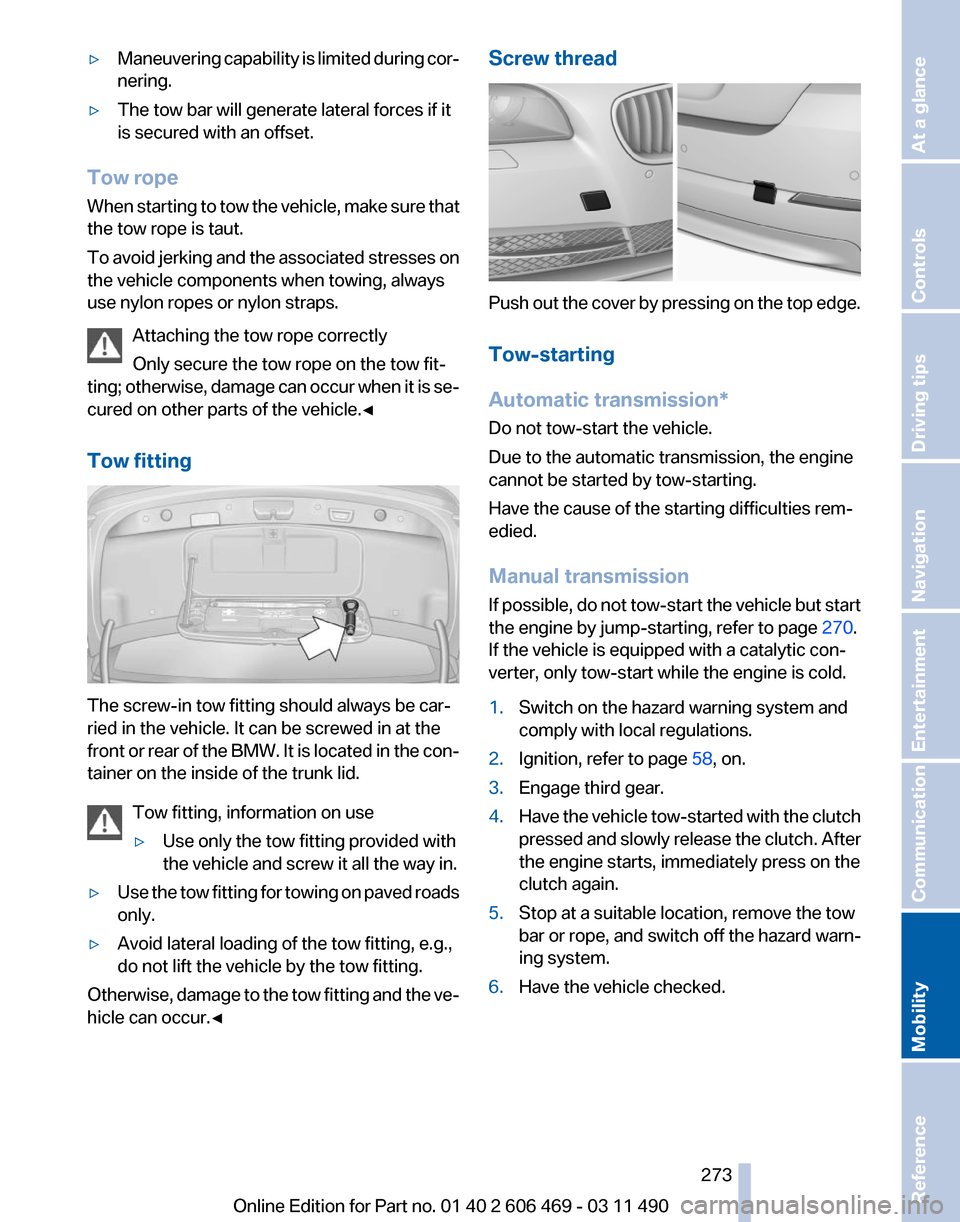
Tow fitting The screw-in tow fitting should always be car‐
ried in the vehicle. It can be screwed in at the
front
or rear of the BMW. It is located in the con‐
tainer on the inside of the trunk lid.
Tow fitting, information on use
▷Use only the tow fitting provided with
the vehicle and screw it all the way in.
▷ Use the tow fitting for towing on paved roads
only.
▷ Avoid lateral loading of the tow fitting, e.g.,
do not lift the vehicle by the tow fitting.
Otherwise, damage to the tow fitting and the ve‐
hicle can occur.◀ Screw thread
Push out the cover by pressing on the top edge.
Tow-starting
Automatic transmission
*
Do not tow-start the vehicle.
Due to the automatic transmission, the engine
cannot be started by tow-starting.
Have the cause of the starting difficulties rem‐
edied.
Manual transmission
If possible, do not tow-start the vehicle but start
the engine by jump-starting, refer to page 270.
If the vehicle is equipped with a catalytic con‐
verter, only tow-start while the engine is cold.
1. Switch on the hazard warning system and
comply with local regulations.
2. Ignition, refer to page 58, on.
3. Engage third gear.
4. Have the vehicle tow-started with the clutch
pressed
and slowly release the clutch. After
the engine starts, immediately press on the
clutch again.
5. Stop at a suitable location, remove the tow
bar or rope, and switch off the hazard warn‐
ing system.
6. Have the vehicle checked.
Seite 273
273Online Edition for Part no. 01 40 2 606 469 - 03 11 490
Reference
Mobility Communication Entertainment Navigation Driving tips Controls At a glance