2011 BMW 528I navigation system
[x] Cancel search: navigation systemPage 167 of 304

in the map using triangles or gray bars along the
calculated route.
▷
Red: congestion.
▷ Orange: stop-and-go traffic.
▷ Yellow: heavy traffic.
▷ Green: clear roads.
▷ Gray: general traffic bulletins, e.g., construc‐
tion site.
The displayed information depends on the par‐
ticular traffic information service.
Filtering traffic bulletins
You
can set which traffic bulletins appear on the
map.
1. "Navigation"
2. "Map"
3. Open "Options".
4. "Traffic Info categories"
5. Select the desired categories. Traffic bulletins of the selected category are dis‐
played on the map.
▷
Traffic bulletins that are relevant to the route
are always shown.
▷ For your own safety, traffic bulletins that no‐
tify you of potentially dangerous situations,
such as wrong-way drivers, cannot be hid‐
den.
Destination guidance with traffic
bulletins
Semi-dynamic destination guidance
When traffic bulletin reception is switched on,
semi-dynamic destination guidance is active. The destination guidance system takes the
available
traffic information into account. A mes‐
sage is displayed depending on the route, the
traffic bulletins, and the possible detour routes.
A detour is suggested in the event of a traffic
obstruction. In addition, distance and time dif‐
ferences between the original route and the de‐
tour are displayed.
To accept the detour: "Detour"
In the event of special hazards, e.g., objects on
the road, a message is displayed without a de‐
tour suggestion.
Detours
can also be accepted if the traffic mes‐
sages are called up in the list.
1. "Navigation"
2. "Map"
3. "Traffic Info"
4. "Detour information"
5. "Detour"
Dynamic destination guidance
The
route is automatically changed in the event
of traffic obstructions.
▷ The system does not point out traffic ob‐
structions along the original route.
▷ Traffic bulletins continue to be displayed on
the map.
▷ Depending on road type and the kind and
extent of the traffic obstruction, the calcu‐
lated route may lead through the traffic ob‐
struction.
▷ Dangerous situations are displayed regard‐
less of the setting.
To activate dynamic destination guidance:
1. "Navigation"
2. Open "Options".
3. "Dynamic guidance"
Seite 167
167Online Edition for Part no. 01 40 2 606 469 - 03 11 490
Reference Mobility Communication Entertainment
Navigation Driving tips Controls At a glance
Page 168 of 304

Navigation data
Information on the navigation data
1.
"Navigation"
2. Open "Options".
3. "Navigation system version": information on
the data version is displayed.
Updating the navigation data
General information
Navigation data and authorization codes are
available from your service center. Navigation
data are stored in the vehicle and can be up‐
dated.
▷ Depending on the data volume, a data up‐
date may take several hours.
▷ Update during the trip to preserve battery.
▷ During the update, only the basic functions
of the navigation system are available.
▷ The status of the update can be viewed.
▷ The system restarts after the update.
▷ The data carrier with the navigation data can
be removed after the update is complete.
Perform an update
1. Insert the navigation DVD into the DVD
player with the labeled side facing up.
2. Follow the instructions on the Control Dis‐
play.
3. Enter the authorization code of the naviga‐
tion DVD and change the DVD if needed.
After interrupting your trip, follow the instruc‐
tions on the Control Display.
Viewing the status
1. Press the button.
2. "Navigation update" What to do if...
▷
The current transmission position cannot be
displayed?
The vehicle is located in an unrecognized
region, is in a poor reception area, or the
system is currently determining the posi‐
tion. Reception is usually best when you
have an unobstructed view of the sky.
▷ The destination without street information is
not used for route guidance?
When
city has been input, no downtown can
be determined.
Input any street in the selected city and start
destination guidance.
▷ The destination is not used for route guid‐
ance?
The destination data is not contained in the
navigation data. Select a destination that is
as close as possible to the original.
▷ Letters for destination input cannot be se‐
lected?
The stored data do not contain the data of
the destination.
Select a goal that is as close as possible to
the original.
▷ Is the map displayed in shades of gray?
"Traffic conditions/gray map" Active: indi‐
cation on the control display is switched to
shades
of gray. This enables a better view of
the traffic bulletins.
▷ Spoken instructions are no longer output
during route guidance in front of intersec‐
tions?
The
area has not yet been fully recorded, or
you have left the recommended route and
the system requires a few seconds to cal‐
culate a new route suggestion.
Seite 168
168 Online Edition for Part no. 01 40 2 606 469 - 03 11 490
Navigation
Page 175 of 304
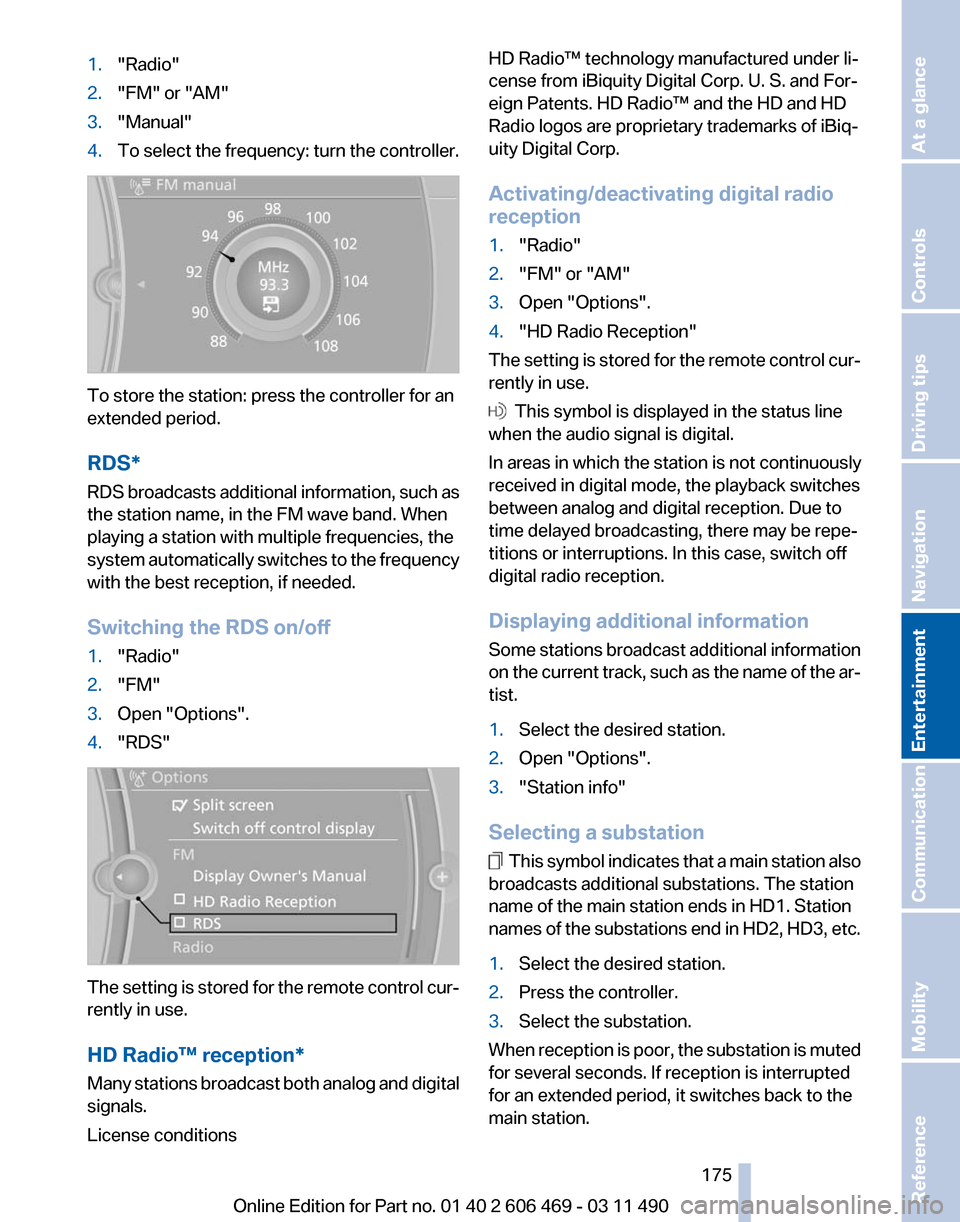
1.
"Radio"
2. "FM" or "AM"
3. "Manual"
4. To select the frequency: turn the controller. To store the station: press the controller for an
extended period.
RDS*
RDS
broadcasts additional information, such as
the station name, in the FM wave band. When
playing a station with multiple frequencies, the
system automatically switches to the frequency
with the best reception, if needed.
Switching the RDS on/off
1. "Radio"
2. "FM"
3. Open "Options".
4. "RDS" The setting is stored for the remote control cur‐
rently in use.
HD Radio™ reception
*
Many stations broadcast both analog and digital
signals.
License conditions HD Radio™ technology manufactured under li‐
cense from iBiquity Digital Corp. U. S. and For‐
eign Patents. HD Radio™ and the HD and HD
Radio logos are proprietary trademarks of iBiq‐
uity Digital Corp.
Activating/deactivating digital radio
reception
1.
"Radio"
2. "FM" or "AM"
3. Open "Options".
4. "HD Radio Reception"
The setting is stored for the remote control cur‐
rently in use. This symbol is displayed in the status line
when the audio signal is digital.
In areas in which the station is not continuously
received in digital mode, the playback switches
between analog and digital reception. Due to
time delayed broadcasting, there may be repe‐
titions or interruptions. In this case, switch off
digital radio reception.
Displaying additional information
Some
stations broadcast additional information
on the current track, such as the name of the ar‐
tist.
1. Select the desired station.
2. Open "Options".
3. "Station info"
Selecting a substation This symbol indicates that a main station also
broadcasts additional substations. The station
name of the main station ends in HD1. Station
names
of the substations end in HD2, HD3, etc.
1. Select the desired station.
2. Press the controller.
3. Select the substation.
When reception is poor, the substation is muted
for several seconds. If reception is interrupted
for an extended period, it switches back to the
main station.
Seite 175
175Online Edition for Part no. 01 40 2 606 469 - 03 11 490
Reference Mobility Communication
Entertainment Navigation Driving tips Controls At a glance
Page 179 of 304
Storing the league or team
Leagues
or teams can be added to the favorites
from a selection list.
1. "Radio"
2. "Satellite radio"
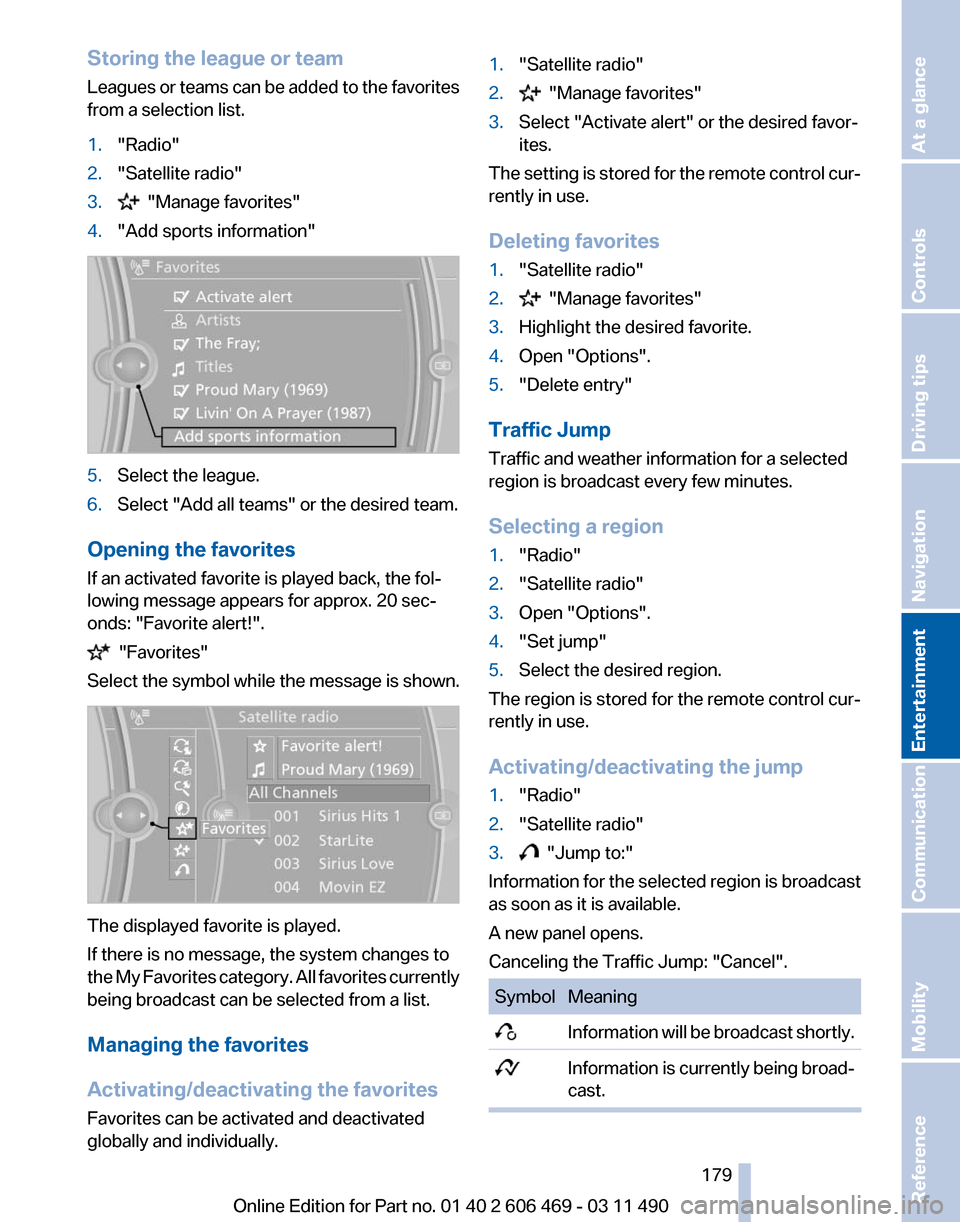
3. "Manage favorites"
4. "Add sports information" 5.
Select the league.
6. Select "Add all teams" or the desired team.
Opening the favorites
If an activated favorite is played back, the fol‐
lowing message appears for approx. 20 sec‐
onds: "Favorite alert!". "Favorites"
Select the symbol while the message is shown. The displayed favorite is played.
If there is no message, the system changes to
the
My Favorites category. All favorites currently
being broadcast can be selected from a list.
Managing the favorites
Activating/deactivating the favorites
Favorites can be activated and deactivated
globally and individually. 1.
"Satellite radio"
2. "Manage favorites"
3. Select "Activate alert" or the desired favor‐
ites.
The setting is stored for the remote control cur‐
rently in use.
Deleting favorites
1. "Satellite radio"
2. "Manage favorites"
3. Highlight the desired favorite.
4. Open "Options".
5. "Delete entry"
Traffic Jump
Traffic and weather information for a selected
region is broadcast every few minutes.
Selecting a region
1. "Radio"
2. "Satellite radio"
3. Open "Options".
4. "Set jump"
5. Select the desired region.
The region is stored for the remote control cur‐
rently in use.
Activating/deactivating the jump
1. "Radio"
2. "Satellite radio"
3. "Jump to:"
Information for the selected region is broadcast
as soon as it is available.
A new panel opens.
Canceling the Traffic Jump: "Cancel". Symbol Meaning
Information will be broadcast shortly.
Information is currently being broad‐
cast. Seite 179
179Online Edition for Part no. 01 40 2 606 469 - 03 11 490
Reference Mobility Communication
Entertainment Navigation Driving tips Controls At a glance
Page 201 of 304

Rear entertainment*
Controls
1
Screen, left
2 Screen, right
3 Center armrest, remote control
4 CD/DVD player
Rear CD/DVD player 1
CD/DVD slot
2 Eject CD/DVD
3 On/off, right
4 Headphone connection, right
5 RCA sockets
6 Headphone connection, left
7 On/off, left
Switching the system on/off Press the left or right side of the button
on the CD/DVD player in the rear for the
respective page. Rear entertainment and screens are switched
on/off.
After
switching off the ignition, the system must
be switched on again.
Screens
Adjusting
Danger of burns when screen is folded out
Do not reach behind the screen; other‐
wise, there is the danger of getting burned. The
back of the screen can become very hot.◀ ▷
To fold out: pull at the bottom edge.
▷ To fold in: press against the bottom edge.
Notes
▷ Do not cover lower screen edge, since this
is where the sensors and the infrared inter‐
face are installed.
▷ When loading the rear seats and adjusting
the backrest of the front seat, fold in the
screens.
▷ When using the through-loading system*,
fold the screens down.
▷ When cleaning the screen, follow the care
instructions, refer to page 276. Seite 201
201Online Edition for Part no. 01 40 2 606 469 - 03 11 490
Reference Mobility Communication
Entertainment Navigation Driving tips Controls At a glance
Page 202 of 304
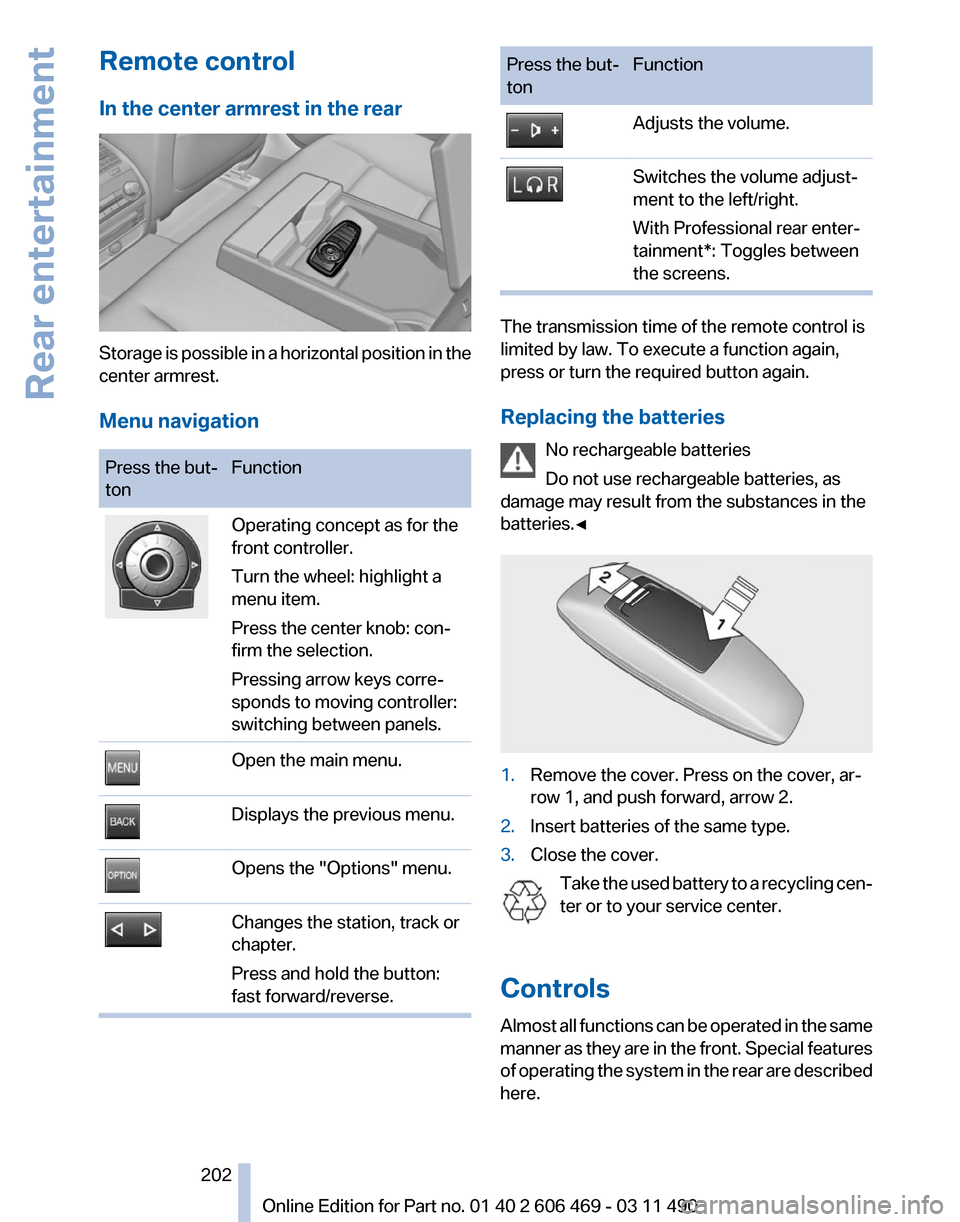
Remote control
In the center armrest in the rear
Storage is possible in a horizontal position in the
center armrest.
Menu navigation
Press the but‐
ton
Function Operating concept as for the
front controller.
Turn the wheel: highlight a
menu item.
Press the center knob: con‐
firm the selection.
Pressing arrow keys corre‐
sponds to moving controller:
switching between panels.
Open the main menu.
Displays the previous menu.
Opens the "Options" menu.
Changes the station, track or
chapter.
Press and hold the button:
fast forward/reverse. Press the but‐
ton
Function Adjusts the volume.
Switches the volume adjust‐
ment to the left/right.
With Professional rear enter‐
tainment*: Toggles between
the screens.
The transmission time of the remote control is
limited by law. To execute a function again,
press or turn the required button again.
Replacing the batteries
No rechargeable batteries
Do not use rechargeable batteries, as
damage may result from the substances in the
batteries.◀ 1.
Remove the cover. Press on the cover, ar‐
row 1, and push forward, arrow 2.
2. Insert batteries of the same type.
3. Close the cover.
Take the used battery to a recycling cen‐
ter or to your service center.
Controls
Almost
all functions can be operated in the same
manner as they are in the front. Special features
of operating the system in the rear are described
here. Seite 202
202 Online Edition for Part no. 01 40 2 606 469 - 03 11 490
Rear entertainment
Page 217 of 304
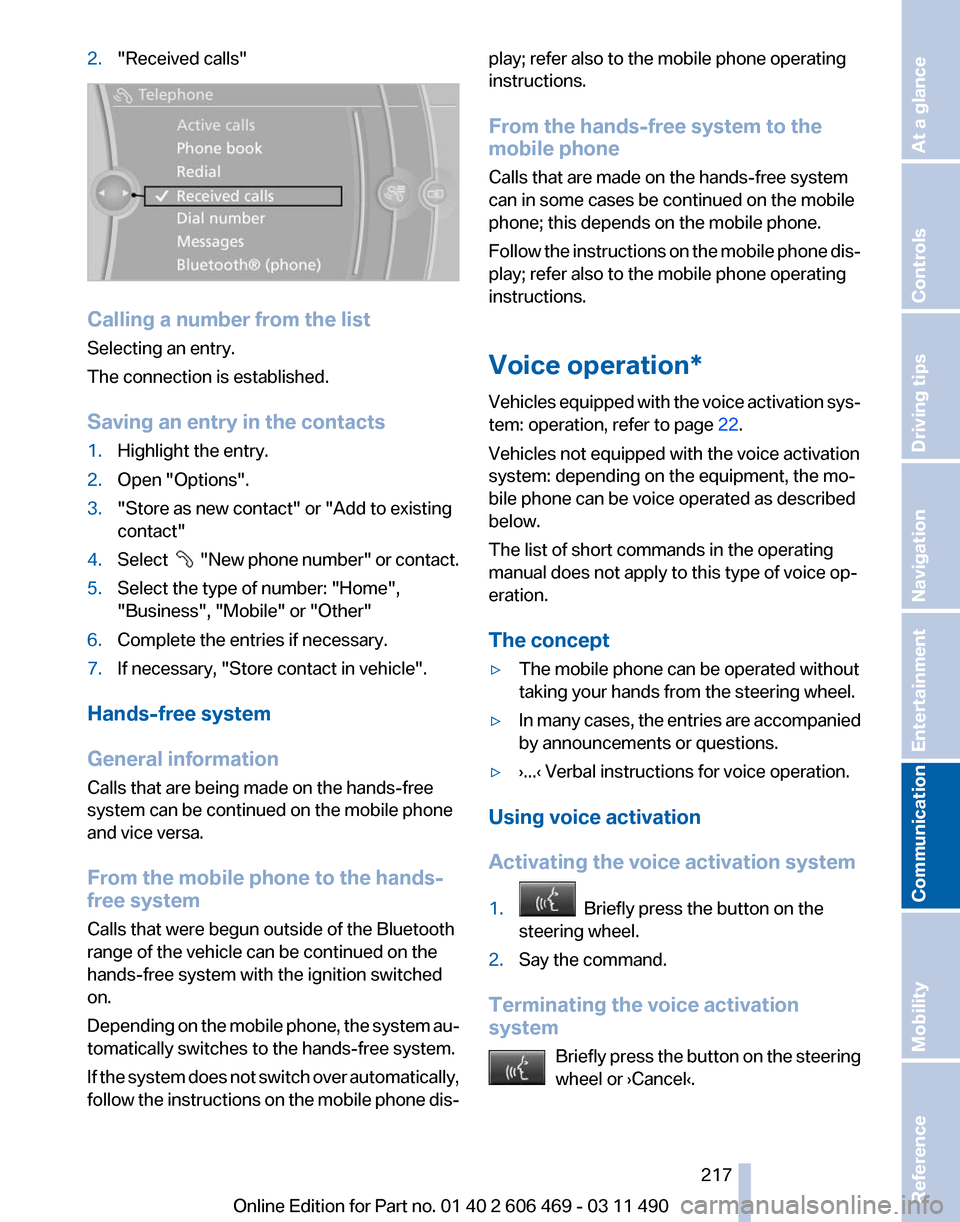
2.
"Received calls" Calling a number from the list
Selecting an entry.
The connection is established.
Saving an entry in the contacts
1.
Highlight the entry.
2. Open "Options".
3. "Store as new contact" or "Add to existing
contact"
4. Select "New phone number" or contact.
5. Select the type of number: "Home",
"Business", "Mobile" or "Other"
6. Complete the entries if necessary.
7. If necessary, "Store contact in vehicle".
Hands-free system
General information
Calls that are being made on the hands-free
system can be continued on the mobile phone
and vice versa.
From the mobile phone to the hands-
free system
Calls that were begun outside of the Bluetooth
range of the vehicle can be continued on the
hands-free system with the ignition switched
on.
Depending
on the mobile phone, the system au‐
tomatically switches to the hands-free system.
If the system does not switch over automatically,
follow the instructions on the mobile phone dis‐ play; refer also to the mobile phone operating
instructions.
From the hands-free system to the
mobile phone
Calls that are made on the hands-free system
can in some cases be continued on the mobile
phone; this depends on the mobile phone.
Follow
the instructions on the mobile phone dis‐
play; refer also to the mobile phone operating
instructions.
Voice operation*
Vehicles equipped with the voice activation sys‐
tem: operation, refer to page 22.
Vehicles not equipped with the voice activation
system: depending on the equipment, the mo‐
bile phone can be voice operated as described
below.
The list of short commands in the operating
manual does not apply to this type of voice op‐
eration.
The concept
▷ The mobile phone can be operated without
taking your hands from the steering wheel.
▷ In many cases, the entries are accompanied
by announcements or questions.
▷ ›...‹ Verbal instructions for voice operation.
Using voice activation
Activating the voice activation system
1. Briefly press the button on the
steering wheel.
2. Say the command.
Terminating the voice activation
system Briefly
press the button on the steering
wheel or ›Cancel‹. Seite 217
217Online Edition for Part no. 01 40 2 606 469 - 03 11 490
Reference Mobility
Communication Entertainment Navigation Driving tips Controls At a glance
Page 219 of 304
Adjusting the volume
Turn the knob during an announcement.
▷
The volume remains constant even if the
volume of other audio sources is changed.
▷ The volume is stored for the remote control
currently in use.
Notes
Do not use the voice operation to initiate an
Emergency
Request. In stressful situations, the
voice and vocal pitch can change. This can un‐
necessarily delay the establishment of a tele‐
phone connection.
Instead, use the SOS button*, refer to
page 269, in the vicinity of the interior mirror.
Environmental conditions
▷ Say the commands, numbers, and letters
smoothly and with normal volume, empha‐
sis, and speed.
▷ Always say commands in the language of
the system. The language for the mobile
phone voice operation is preset and cannot
be changed in the Control Display.
▷ Keep the doors, windows, and glass sun‐
roof* closed to prevent noise interference.
▷ Avoid making other noise in the vehicle
while speaking.
Snap-in adapter*
Installation position
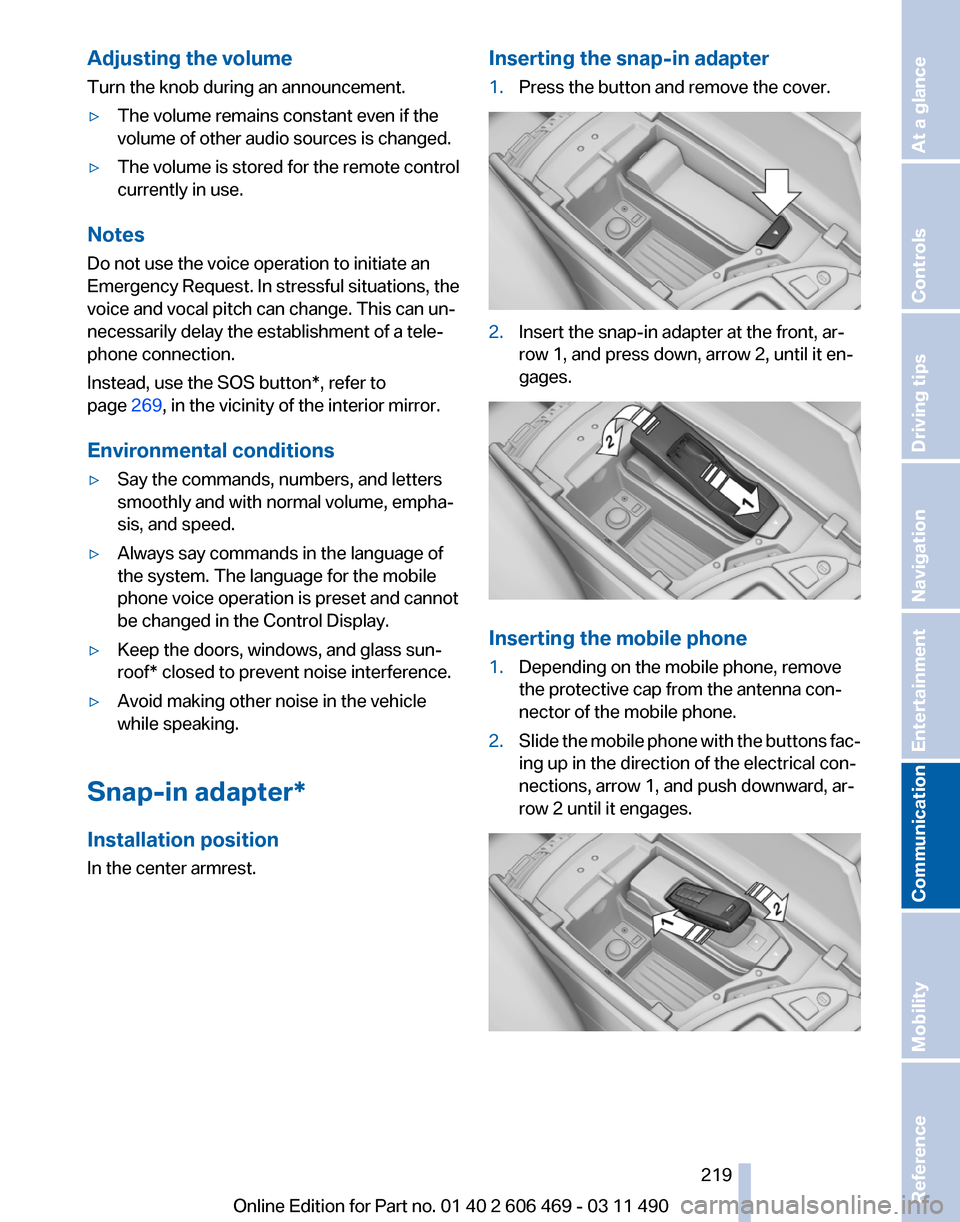
In the center armrest. Inserting the snap-in adapter
1.
Press the button and remove the cover. 2.
Insert the snap-in adapter at the front, ar‐
row 1, and press down, arrow 2, until it en‐
gages. Inserting the mobile phone
1.
Depending on the mobile phone, remove
the protective cap from the antenna con‐
nector of the mobile phone.
2. Slide the mobile phone with the buttons fac‐
ing up in the direction of the electrical con‐
nections, arrow 1, and push downward, ar‐
row 2 until it engages. Seite 219
219Online Edition for Part no. 01 40 2 606 469 - 03 11 490
Reference Mobility
Communication Entertainment Navigation Driving tips Controls At a glance