2011 BMW 3 SERIES change time
[x] Cancel search: change timePage 109 of 325

Driving comfort
Vehicle equipment
All standard, country-specific and optional
equipment that is offered in the model series is
described in this chapter. Therefore, equipment
is also described that is not available in a vehicle,
e. g., because of the selected optional equip‐
ment or country variant. This also applies for
safety-related functions and systems.
Active Cruise Control with
Stop & Go function, ACC
The concept
This system can be used to select a desired
speed that the vehicle will maintain automati‐
cally on clear roads.
To the extent possible, the system automatically
adjusts the speed to a slower vehicle ahead of
you.
The distance that the vehicle maintains to the
vehicle ahead of you can be varied.
For safety reasons, it depends on the speed.
To maintain a certain distance, the system au‐
tomatically decelerates, applies the brakes
lightly, or accelerates again if the vehicle ahead
begins moving faster.
If the vehicle ahead of you brakes to a halt, the
system is able to detect this within the given
system limits. If the vehicle ahead of your drives
away again from a halt, your vehicle is able to
accelerate if operated accordingly.
Even if some time passes before the vehicle
drives away again, the BMW can still be accel‐
erated automatically and simply.
As soon as the road is clear, it accelerates to the
desired speed.
The speed is also maintained on downhill gra‐
dients, but may not be maintained on uphill
slopes if engine power is insufficient.
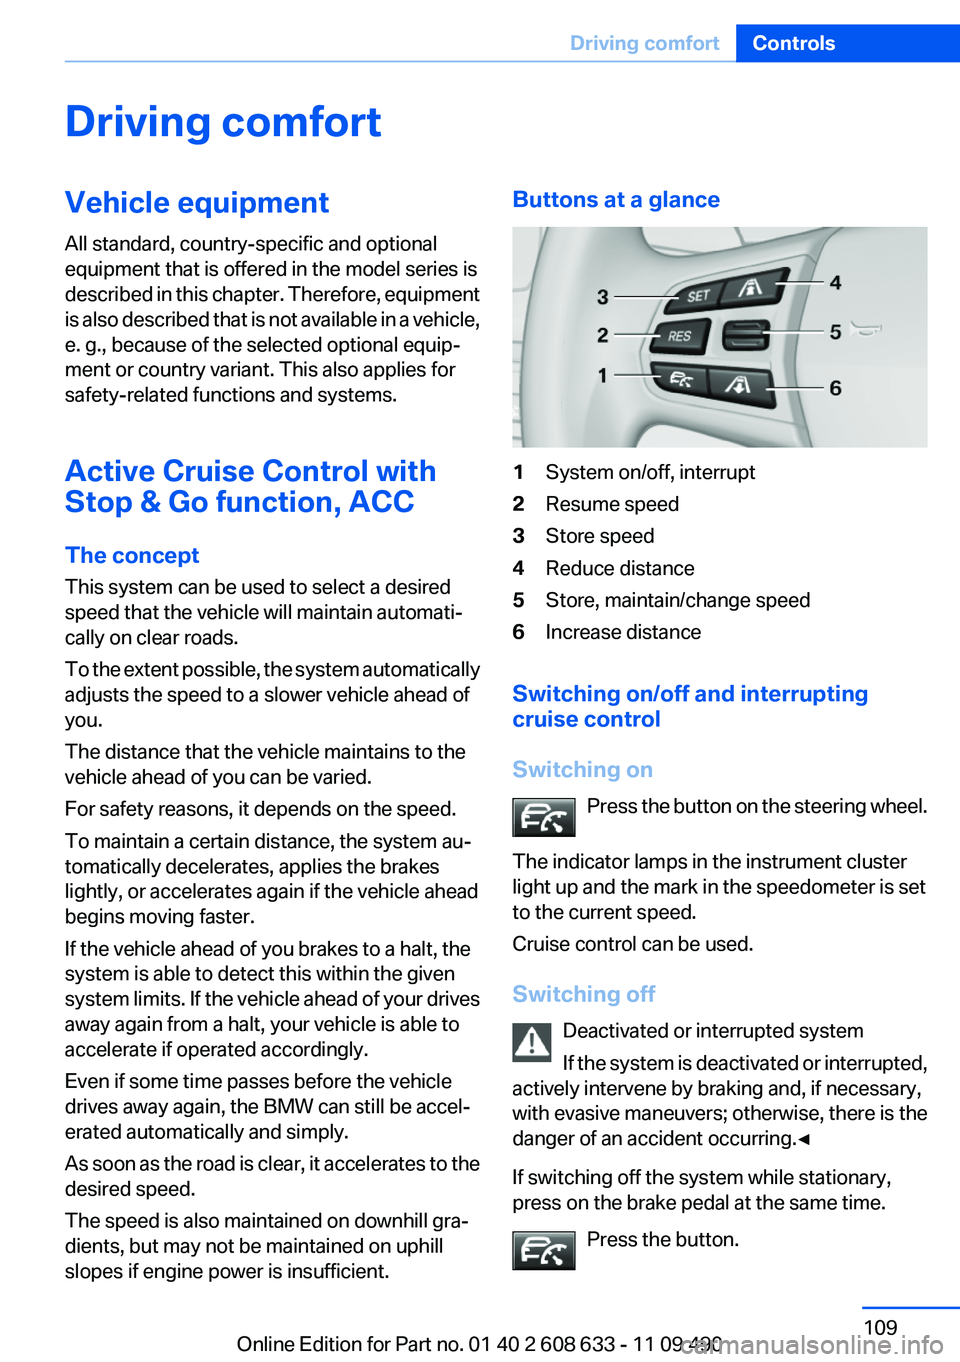
Buttons at a glance
1System on/off, interrupt
2Resume speed
3Store speed
4Reduce distance
5Store, maintain/change speed
6Increase distance
Switching on/off and interrupting
cruise control
Switching on
Press the button on the steering wheel.
The indicator lamps in the instrument cluster
light up and the mark in the speedometer is set
to the current speed.
Cruise control can be used.
Switching off
Deactivated or interrupted system
If the system is deactivated or interrupted,
actively intervene by braking and, if necessary,
with evasive maneuvers; otherwise, there is the
danger of an accident occurring.◀
If switching off the system while stationary,
press on the brake pedal at the same time.
Press the button.
Seite 109
Driving comfortControls
109Online Edition for Part no. 01 40 2 608 633 - 11 09 490
Page 113 of 325

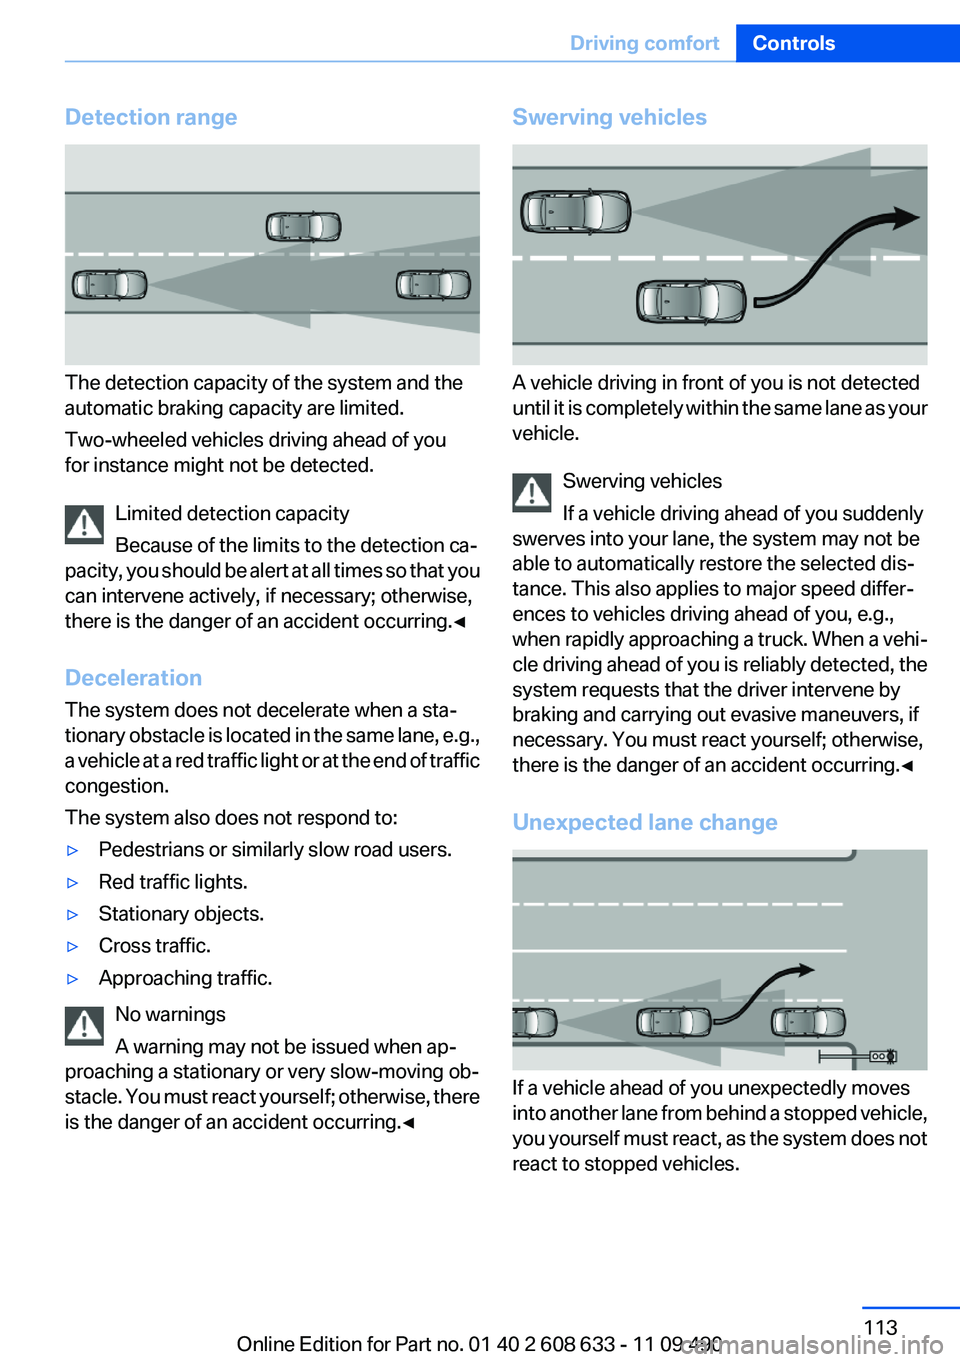
Detection range
The detection capacity of the system and the
automatic braking capacity are limited.
Two-wheeled vehicles driving ahead of you
for instance might not be detected.
Limited detection capacity
Because of the limits to the detection ca‐
pacity, you should be alert at all times so that you
can intervene actively, if necessary; otherwise,
there is the danger of an accident occurring.◀
Deceleration
The system does not decelerate when a sta‐
tionary obstacle is located in the same lane, e.g.,
a vehicle at a red traffic light or at the end of traffic
congestion.
The system also does not respond to:
▷Pedestrians or similarly slow road users.
▷Red traffic lights.
▷Stationary objects.
▷Cross traffic.
▷Approaching traffic.
No warnings
A warning may not be issued when ap‐
proaching a stationary or very slow-moving ob‐
stacle. You must react yourself; otherwise, there
is the danger of an accident occurring.◀
Swerving vehicles
A vehicle driving in front of you is not detected
until it is completely within the same lane as your
vehicle.
Swerving vehicles
If a vehicle driving ahead of you suddenly
swerves into your lane, the system may not be
able to automatically restore the selected dis‐
tance. This also applies to major speed differ‐
ences to vehicles driving ahead of you, e.g.,
when rapidly approaching a truck. When a vehi‐
cle driving ahead of you is reliably detected, the
system requests that the driver intervene by
braking and carrying out evasive maneuvers, if
necessary. You must react yourself; otherwise,
there is the danger of an accident occurring.◀
Unexpected lane change
If a vehicle ahead of you unexpectedly moves
into another lane from behind a stopped vehicle,
you yourself must react, as the system does not
react to stopped vehicles.
Seite 113
Driving comfortControls
113Online Edition for Part no. 01 40 2 608 633 - 11 09 490
Page 115 of 325

▷this device must accept any interference re‐
ceived, including interference that may
cause undesired operation.
Any unauthorized modifications or changes to
these devices could void the user's authority to
operate this equipment.
Note
To reduce electromagnetic effects, please use
properly.
The standard SAR value is 2.0 W/kg; the tested
value of this product is 0.751 W/kg.
NCC declaration:
1.Companies or persons without authoriza‐
tion should not change the frequency, in‐
crease the power, or change the character‐
istics or functions of the original design of
low-power radio frequency devices with
type approval.
2.Low-power radio frequency devices should
not impair legal communication or flight
safety. If this type of impairment is detected,
the device should be switched off immedi‐
ately. In this case, please contact the man‐
ufacturer and only use the product after the
problem has been corrected.
3.The "legal communication" specified above
refers to communication in accordance with
telecommunication regulations. Low-power
devices should withstand interference from
legal communication and ISM devices.
Collision warning
The concept
If the vehicle does not include Active Cruise
Control with Stop & Go, the collision warning is
controlled via the camera in the base of the in‐
terior rearview mirror.
The system issues a two-phase warning of a
danger of collision at speeds above approx.
10 mph/15 km/h. The time of these warnings
may vary depending on the current driving sit‐
uation.
In the process, vehicles in a similar direction of
movement are observed if they are located
within the detection range of the system.
When the vehicle is intentionally brought into
contact with a vehicle, the collision warning is
delayed to avoid false warnings.
Warning stages
Prewarning
This warning is issued, for example, when there
is the impending danger of a collision or the dis‐
tance to the vehicle ahead is too small.
Acute warning
Warning of the imminent danger of a collision
when the vehicle approaches another vehicle at
a relatively high differential speed.
Switching the warning function on/off
Press the button
▷On: the LED lights up.
Seite 115
Driving comfortControls
115Online Edition for Part no. 01 40 2 608 633 - 11 09 490
Page 120 of 325

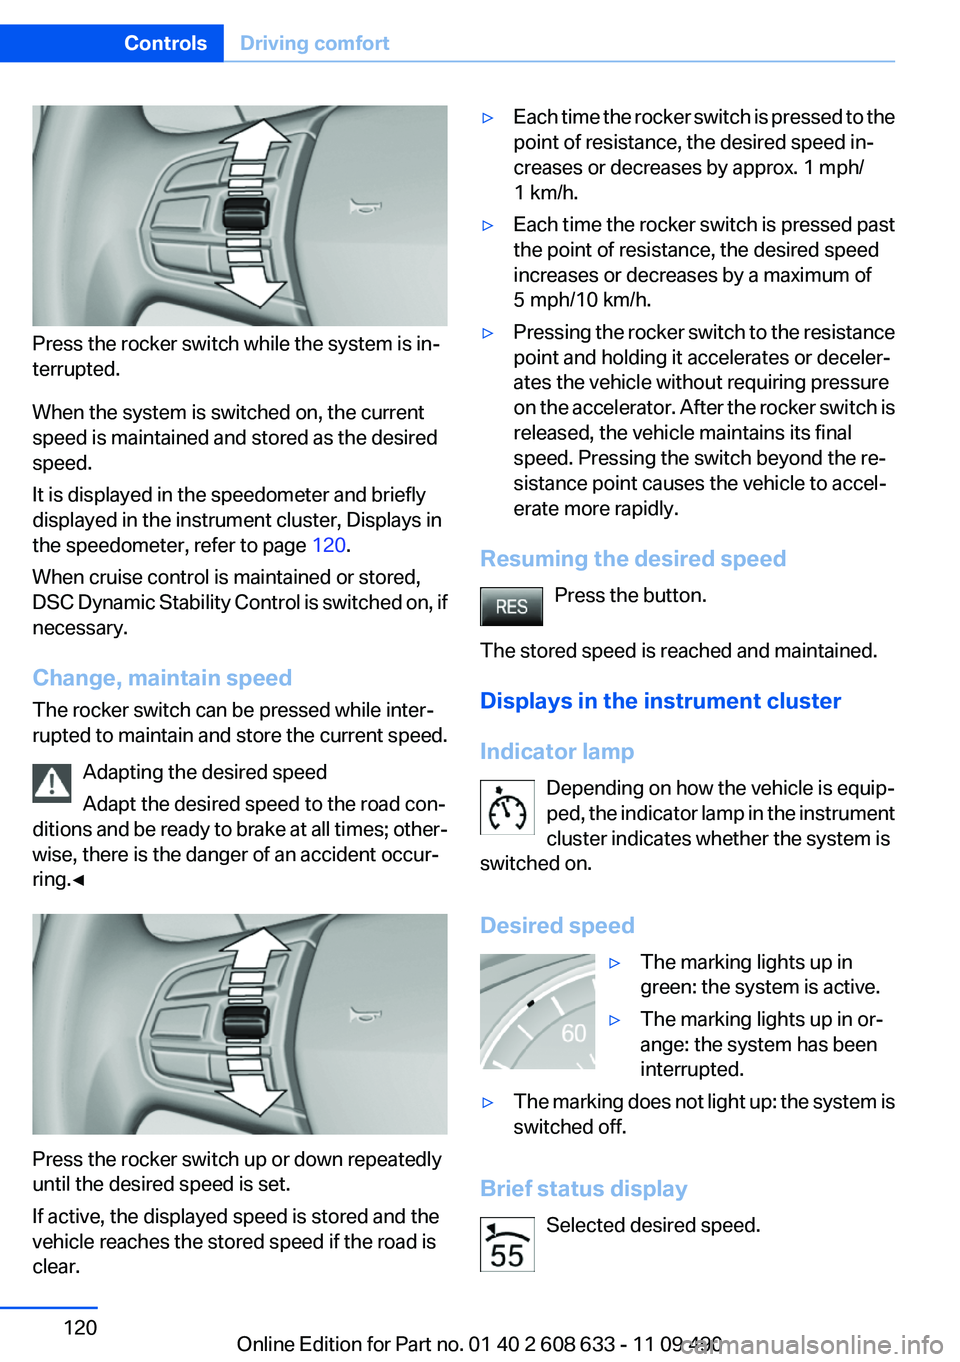
Press the rocker switch while the system is in‐
terrupted.
When the system is switched on, the current
speed is maintained and stored as the desired
speed.
It is displayed in the speedometer and briefly
displayed in the instrument cluster, Displays in
the speedometer, refer to page 120.
When cruise control is maintained or stored,
DSC Dynamic Stability Control is switched on, if
necessary.
Change, maintain speed
The rocker switch can be pressed while inter‐
rupted to maintain and store the current speed.
Adapting the desired speed
Adapt the desired speed to the road con‐
ditions and be ready to brake at all times; other‐
wise, there is the danger of an accident occur‐
ring.◀
Press the rocker switch up or down repeatedly
until the desired speed is set.
If active, the displayed speed is stored and the
vehicle reaches the stored speed if the road is
clear.
▷Each time the rocker switch is pressed to the
point of resistance, the desired speed in‐
creases or decreases by approx. 1 mph/
1 km/h.
▷Each time the rocker switch is pressed past
the point of resistance, the desired speed
increases or decreases by a maximum of
5 mph/10 km/h.
▷Pressing the rocker switch to the resistance
point and holding it accelerates or deceler‐
ates the vehicle without requiring pressure
on the accelerator. After the rocker switch is
released, the vehicle maintains its final
speed. Pressing the switch beyond the re‐
sistance point causes the vehicle to accel‐
erate more rapidly.
Resuming the desired speed
Press the button.
The stored speed is reached and maintained.
Displays in the instrument cluster
Indicator lamp
Depending on how the vehicle is equip‐
ped, the indicator lamp in the instrument
cluster indicates whether the system is
switched on.
Desired speed
▷The marking lights up in
green: the system is active.
▷The marking lights up in or‐
ange: the system has been
interrupted.
▷The marking does not light up: the system is
switched off.
Brief status display
Selected desired speed.
Seite 120
ControlsDriving comfort
120Online Edition for Part no. 01 40 2 608 633 - 11 09 490
Page 132 of 325

movement after the gear change when the
vehicle is stationary.
▷When parking in parking spaces on the driv‐
er's side, the corresponding turn signal must
be set.
Interrupting manually
The parking assistant can be interrupted at any
time by:
▷Grasping the steering wheel and steering
yourself.
▷ "Parking Assistant" Select the symbol on
the Control Display.
Interrupting automatically
The procedure is interrupted automatically:
▷If the vehicle speed exceeds approx. 6 mph/
10 km/h.
▷On snow-covered or slippery road surfaces
if necessary.
▷If doors are open.
A Check Control message is displayed.
Continuing
An interrupted parking procedure can be con‐
tinued if necessary.
Follow the instructions on the Control Display to
do this.
Switching off
The system can be deactivated as follows:
▷Press the button.
▷Switch off the ignition.
Malfunction
A Check Control message is displayed.
The parking assistant failed. Have the system
checked.
System limits
Changes to the parking space
Changes to the parking space after it was
measured are not taken into account by the sys‐
tem.
Therefore, always be alert and ready to inter‐
vene; otherwise, there is the danger of an acci‐
dent occurring.◀
Transporting loads
Loads that extend beyond the perimeter
of the vehicle are not taken into account by the
system during the parking procedure.
Therefore, always be alert and ready to inter‐
vene; otherwise, there is the danger of an acci‐
dent occurring.◀
Curbs
The parking assistant may steer the vehi‐
cle over or onto curbs.
Therefore, always be alert and ready to inter‐
vene; otherwise, the wheels, tires, or the vehicle
may become damaged.◀
No parking assistance
The parking assistant does not provide assis‐
tance in parking.
▷In tight curves.
Functional limitations
The system may not be fully functional in the
following situations:
▷When sensors are dirty or iced over.
▷In heavy fog, rain or snowfall.
▷On bumpy road surfaces such as gravel
roads.
▷When leaves or snow has collected in the
parking space.
Limits of ultrasonic measurement
The detection of objects can reach the physical
limits of ultrasonic measurement, e.g.:
Seite 132
ControlsDriving comfort
132Online Edition for Part no. 01 40 2 608 633 - 11 09 490
Page 142 of 325

4.Simultaneously press and hold the button of
the desired function on the hand-held trans‐
mitter and the button to be programmed on
the interior rearview mirror. The LED on the
interior rearview mirror will begin flashing
slowly.
5.Release both buttons as soon as the LED
flashes more rapidly. When the LED flashes
faster, this indicates that the button on the
interior rearview mirror has been program‐
med.
If the LED does not flash faster after at least
60 seconds, change the distance between
the interior rearview mirror and the hand-
held transmitter and repeat the step. Several
more attempts at different distances may be
necessary. Wait at least 15 seconds be‐
tween attempts.
Canada: if programming with the hand-held
transmitter was interrupted, hold down the
interior rearview mirror button and repeat‐
edly press and release the hand-held trans‐
mitter button for 2 seconds.
6.To program other functions on other but‐
tons, repeat steps 3 to 5.
The systems can be controlled using the interior
rearview mirror buttons.
Special feature of the alternating-code
wireless system
If you are unable to operate the system after re‐
peated programming, please check if the sys‐
tem to be controlled features an alternating-
code system.
Read the system's operating manual, or press
the programmed button on the interior rearview
mirror longer. If the LED on the interior rearview
mirror starts flashing rapidly and then stays lit
constantly for 2 seconds, the system features
an alternating-code system. Flashing and con‐
tinuous illumination of the LED will repeat for
approximately 20 seconds.
For systems with an alternating-code system,
the integrated universal remote control and the
system also have to be synchronized.
Please read the operating manual of the system
being set up for information on how to syn‐
chronize the system.
Synchronizing is easier with the aid of a second
person.
To synchronize:
1.Park the vehicle within range of the remote-
controlled system.
2.Program the relevant button on the interior
rearview mirror as described.
3.Locate and press the synchronizing button
on the system being programmed. You have
approx. 30 seconds for the next step.
4.Hold down the programmed button on the
interior rearview mirror for approximately
3 seconds and then release it. If necessary,
repeat this work step up to three times in or‐
der to finish synchronization. Once synchro‐
nization is complete, the programmed func‐
tion will be carried out.
Reprogramming individual buttons
1.Switch on the ignition.
2.Press and hold the interior rearview mirror
button to be programmed.
3.As soon as the interior rearview mirror LED
starts flashing slowly, hold the hand-held
transmitter for the system to be controlled
approx. 1 to 3 in/2.5 to 8 cm away from the
buttons on the interior rearview mirror. The
required distance depends on the manual
transmitter.
4.Likewise, press and hold the button of the
desired function on the hand-held transmit‐
ter.
5.Release both buttons as soon as the interior
rearview mirror LED flashes more rapidly.
When the LED flashes faster, this indicates
that the button on the interior rearview mir‐
Seite 142
ControlsInterior equipment
142Online Edition for Part no. 01 40 2 608 633 - 11 09 490
Page 176 of 325

3.Open "Options".
4."Delete all trips" or "Delete trip"
Calling up the last trip
1."Navigation"
2."Stored trips"
3."Last trip"
4."Start guidance"
Destination guidance
Starting destination guidance
1."Navigation"
2.Make a destination entry, refer to page 168.
3."Accept destination"
4."Start guidance"
▷The route is shown on the Control Display.
▷The distance to the destination/intermedi‐
ate destination and the estimated time of ar‐
rival are displayed in the map view.
▷The arrow view is shown in the instrument
cluster, in the Head-up Display, and on the
Control Display where appropriate.
Terminating destination guidance
1."Navigation"
2."Map"
3. "Guidance"
4."Stop guidance"
Continuing destination guidance
If the destination was not reached during the last
trip, destination guidance can be resumed.
"Resume guidance"
Route criteria
General information
▷The route calculated can be influenced by
selecting certain criteria.
▷The route criteria can be changed when the
destination is entered and during destina‐
tion guidance.
▷Road types are part of the navigation data
and are taken into consideration when plan‐
ning a route, such as when avoiding high‐
ways.
▷The recommended route may differ from the
route you would take based on personal ex‐
perience.
▷The settings are stored for the remote con‐
trol currently in use.
▷Destination guidance with traffic bulletins,
refer to page 182.
Changing the route criteria
1."Navigation"
2."Map"
3. "Route preference"
4.Select the criterion:
▷ "Fast route": time-optimized route,
being a combination of the shortest pos‐
sible route and the fastest roads.
▷ "ECO PRO route": optimized com‐
bination of the fastest and shortest
route.
▷ "Short route": short distance, irre‐
spective of how fast or slow progress will
be.
▷"Alternative routes": if available, alter‐
native routes are suggested during ac‐
tive route guidance.
Seite 176
NavigationNavigation system
176Online Edition for Part no. 01 40 2 608 633 - 11 09 490
Page 179 of 325

Lines in the map
Streets and routes are displayed in different col‐
ors and styles depending on their classification.
Dashed lines represent railways and ferry con‐
nections. Country borders are indicated by thin
lines.
Traffic obstructions
Small triangles along the planned route indicate
route sections with traffic obstructions, depend‐
ing on the map scale. The direction of the trian‐
gles indicates the direction of the obstruction.
The traffic signs indicate the significance of the
obstruction.
▷Red traffic sign: the obstruction affects the
planned route or direction.
▷Gray traffic sign: the obstruction does not
affect the planned route or direction.
Traffic bulletins, refer to page 180.
Planned route
After destination guidance is started, the plan‐
ned route is displayed on the map.
Status fields
Show/hide: press the controller.
▷Upper status field: time, telephone, and en‐
tertainment details.
▷Lower status field: symbol for active desti‐
nation guidance, status of traffic bulletins,
time of arrival, and distance to destination.
Function bar
The following functions are available in the func‐
tion bar:
Symbol Function
Start/end destination guidance.
Switch spoken instructions on/
off.
Change the route criteria.
Symbol Function
Search for a special destination.
Display traffic bulletins.
Interactive map.
Set the map view.
Change the scale.
To change to the function bar, move the con‐
troller to the left.
Changing the map section
"Interactive map"
▷To shift the map: move the controller in the
required direction.
▷To shift the map diagonally: move the con‐
troller in the required direction and turn it.
Changing the scale
1. Select the symbol.
2.To change the scale: turn the controller.
Automatically scaled map scale
In the map view facing north, turn the controller
in any direction until the AUTO scale is dis‐
played. The map shows the entire route be‐
tween the current location and the destination.
Settings for the map view
The settings are stored for the remote control
currently in use.
1."Navigation"
2."Map"
3."Options" Open.
4."Settings"
Set the map view.
▷"Day/night mode"
Select and create the necessary settings
depending on the light conditions.
Seite 179
Navigation systemNavigation
179Online Edition for Part no. 01 40 2 608 633 - 11 09 490