2011 BMW 135I CONVERTIBLE height
[x] Cancel search: heightPage 35 of 256

Controls
33Reference
At a glance
Driving tips
Communications
Navigation
Entertainment
Mobility
Tilt alarm sensor
The tilt of the vehicle is monitored. The alarm
system reacts, e.g. to attempts to steal a wheel
or tow the vehicle.
Interior motion sensor
Coupe
In order for the interior motion sensor to func-
tion properly, the windows and glass roof must
be completely closed
*.
Convertible
The interior of the car is monitored up to the
height of the seat cushions. Thus the alarm sys-
tem is activated together with the interior
motion sensor even if the convertible top is
open. An alarm can be triggered unintentionally
by falling objects such as leaves, refer to Avoid-
ing unintentional alarms.
Avoiding unintentional alarms
The tilt alarm sensor and interior motion sensor
may be switched off at the same time. This pre-
vents unintentional alarms, e.g. in the following
situations:
>In duplex garages
>During transport on car-carrying trains,
boats/ships or on a trailer
>When animals are to remain in the vehicle
Switching off tilt alarm sensor and
interior motion sensor
Press the button on the remote control
again as soon as the vehicle is locked.
The indicator lamp lights up briefly and then
flashes continuously. The tilt alarm sensor and
the interior motion sensor are switched off until
the next time the vehicle is unlocked and subse-
quently locked again.
Comfort Access*
Comfort Access enables you to enter your vehi-
cle without needing to hold the remote control
in your hand. All you need to do is wear the
remote control close to your body, e.g. in your
jacket pocket. The vehicle detects the corre-
sponding remote control within the immediate
vicinity or in the passenger compartment.
Comfort Access supports the following func-
tions:
>Unlocking/locking the vehicle
>Unlocking the trunk lid separately
>Engine starting
>Convenient closing
Functional requirement
>The vehicle or the trunk lid can only be
locked when the vehicle detects that the
remote control currently in use is outside of
the vehicle.
>The vehicle cannot be locked or unlocked
again until after approx. 2 seconds.
>The engine can only be started when the
vehicle detects that the remote control cur-
rently in use is inside the vehicle.
Comparison to the standard remote
control
In general, there is no difference between using
Comfort Access or pressing the buttons on the
remote control to carry out the functions men-
tioned above. You should therefore first famil-
iarize yourself with the instructions on opening
and closing starting on page26.
Special features regarding the use of Comfort
Access are described below.
If you notice a brief delay while opening or
closing windows, the glass roof or the
convertible top, the system is checking whether
a remote control is inside the vehicle. Please
repeat the opening or closing procedure, if nec-
essary.<
Page 46 of 256
Adjustments
44
Seats
Note before adjusting
Never attempt to adjust your seat while
the vehicle is moving. The seat could
respond with unexpected movement, and the
ensuing loss of vehicle control could lead to an
accident.
On the front passenger seat as well, do not
incline the backrest too far to the rear while the
vehicle is being driven; otherwise, there is a
danger in the event of an accident of sliding
under the safety belt, eliminating the protection
normally provided by the belt.<
Comply with the instructions on head restraint
height on page46, and on damaged safety
belts on page49.
Manual adjustment
Observe the adjustment instructions
above to ensure the best possible per-
sonal protection.<
Longitudinal direction
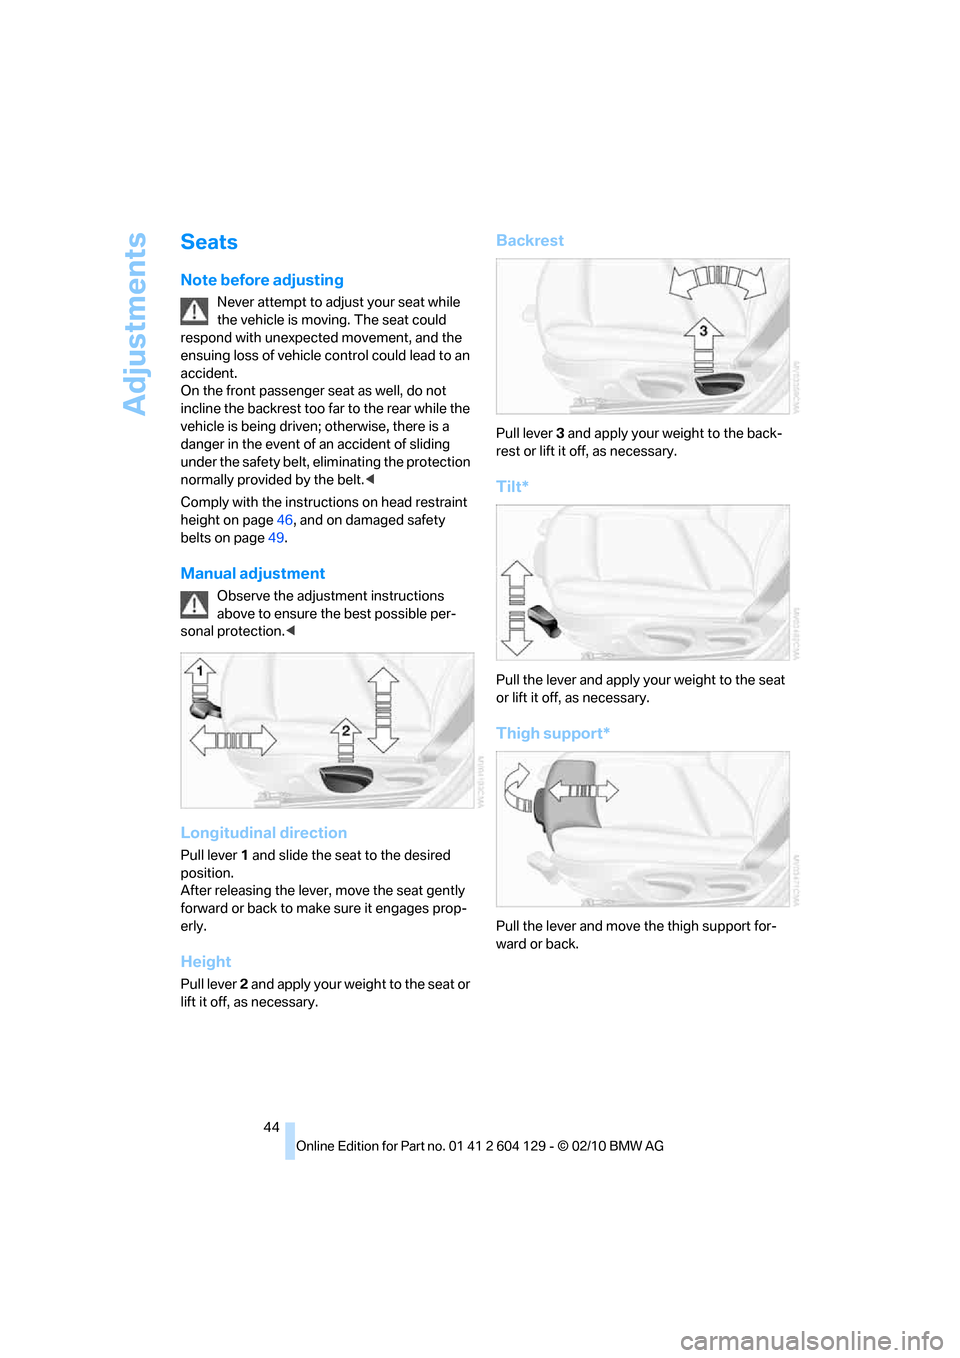
Pull lever 1 and slide the seat to the desired
position.
After releasing the lever, move the seat gently
forward or back to make sure it engages prop-
erly.
Height
Pull lever 2 and apply your weight to the seat or
lift it off, as necessary.
Backrest
Pull lever 3 and apply your weight to the back-
rest or lift it off, as necessary.
Tilt*
Pull the lever and apply your weight to the seat
or lift it off, as necessary.
Thigh support*
Pull the lever and move the thigh support for-
ward or back.
Page 47 of 256
Controls
45Reference
At a glance
Driving tips
Communications
Navigation
Entertainment
Mobility
Electrical adjustment*
Observe the adjustment instructions
above to ensure the best possible per-
sonal protection.<
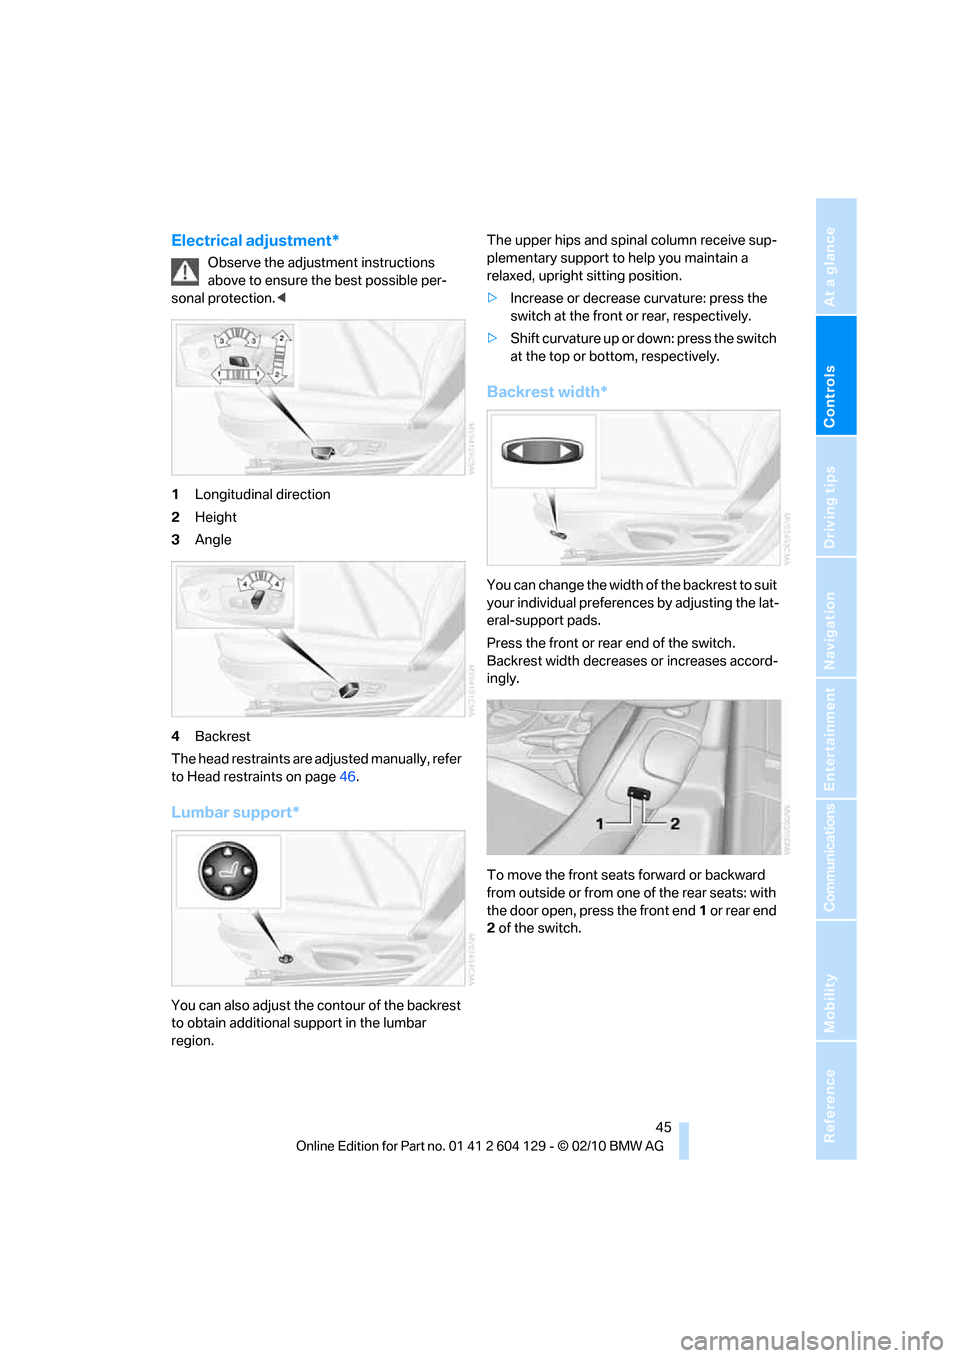
1Longitudinal direction
2Height
3Angle
4Backrest
The head restraints are adjusted manually, refer
to Head restraints on page46.
Lumbar support*
You can also adjust the contour of the backrest
to obtain additional support in the lumbar
region.The upper hips and spinal column receive sup-
plementary support to help you maintain a
relaxed, upright sitting position.
>Increase or decrease curvature: press the
switch at the front or rear, respectively.
>Shift curvature up or down: press the switch
at the top or bottom, respectively.
Backrest width*
You can change the width of the backrest to suit
your individual preferences by adjusting the lat-
eral-support pads.
Press the front or rear end of the switch.
Backrest width decreases or increases accord-
ingly.
To move the front seats forward or backward
from outside or from one of the rear seats: with
the door open, press the front end 1 or rear end
2 of the switch.
Page 48 of 256
Adjustments
46
Head restraints
Correctly adjusted head restraint
A correctly adjusted head restraint reduces the
risk of neck injury in the event of an accident.
Adjust the head restraint in such a way
that its center is at approx. ear level. Oth-
erwise, there is an increased risk of injury in the
event of an accident. Only remove a head
restraint if no one will be sitting on the seat in
question. Reinstall the head restraint before
transporting anyone on that seat. Otherwise,
the passenger will be without protection from
the head restraint.<
Height
Adjust the head restraint so that its center is
approximately at ear level.
Distance
Adjust the distance so that the head restraint is
as close as possible to the back of the head.
Front seats
Height adjustment
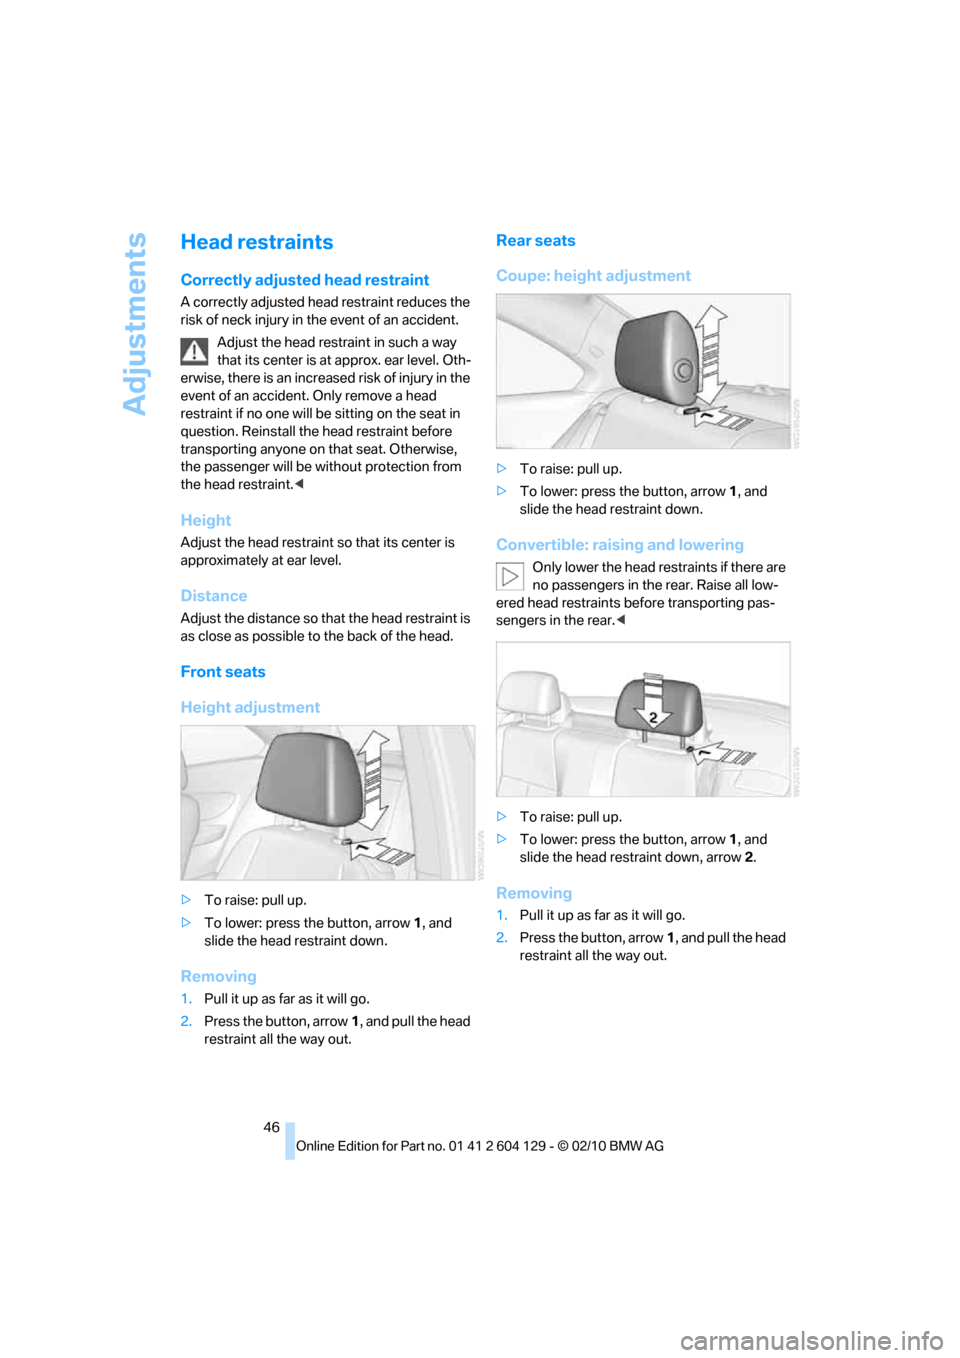
>To raise: pull up.
>To lower: press the button, arrow1, and
slide the head restraint down.
Removing
1.Pull it up as far as it will go.
2.Press the button, arrow1, and pull the head
restraint all the way out.
Rear seats
Coupe: height adjustment
>To raise: pull up.
>To lower: press the button, arrow1, and
slide the head restraint down.
Convertible: raising and lowering
Only lower the head restraints if there are
no passengers in the rear. Raise all low-
ered head restraints before transporting pas-
sengers in the rear.<
>To raise: pull up.
>To lower: press the button, arrow 1, and
slide the head restraint down, arrow 2.
Removing
1.Pull it up as far as it will go.
2.Press the button, arrow1, and pull the head
restraint all the way out.
Page 53 of 256
Controls
51Reference
At a glance
Driving tips
Communications
Navigation
Entertainment
Mobility
Interior and exterior mirrors, automatic
dimming feature*
The automatic dimming feature of the interior
and exterior mirrors
* is controlled by two photo
cells in the interior rearview mirror. One photo
cell is in the mirror frame, see arrow; the other is
on the back of the mirror.
In order to ensure that the system functions
correctly, keep the photo cells clean, do not
cover the area between the interior rearview
mirror and windshield, and do not affix adhesive
labels or stickers of any kind to the windshield
directly in front of the mirror.
Steering wheel
Adjustments
Do not adjust the steering wheel position
while the car is in motion; otherwise, there
is a risk of an accident due to unexpected move-
ment.<
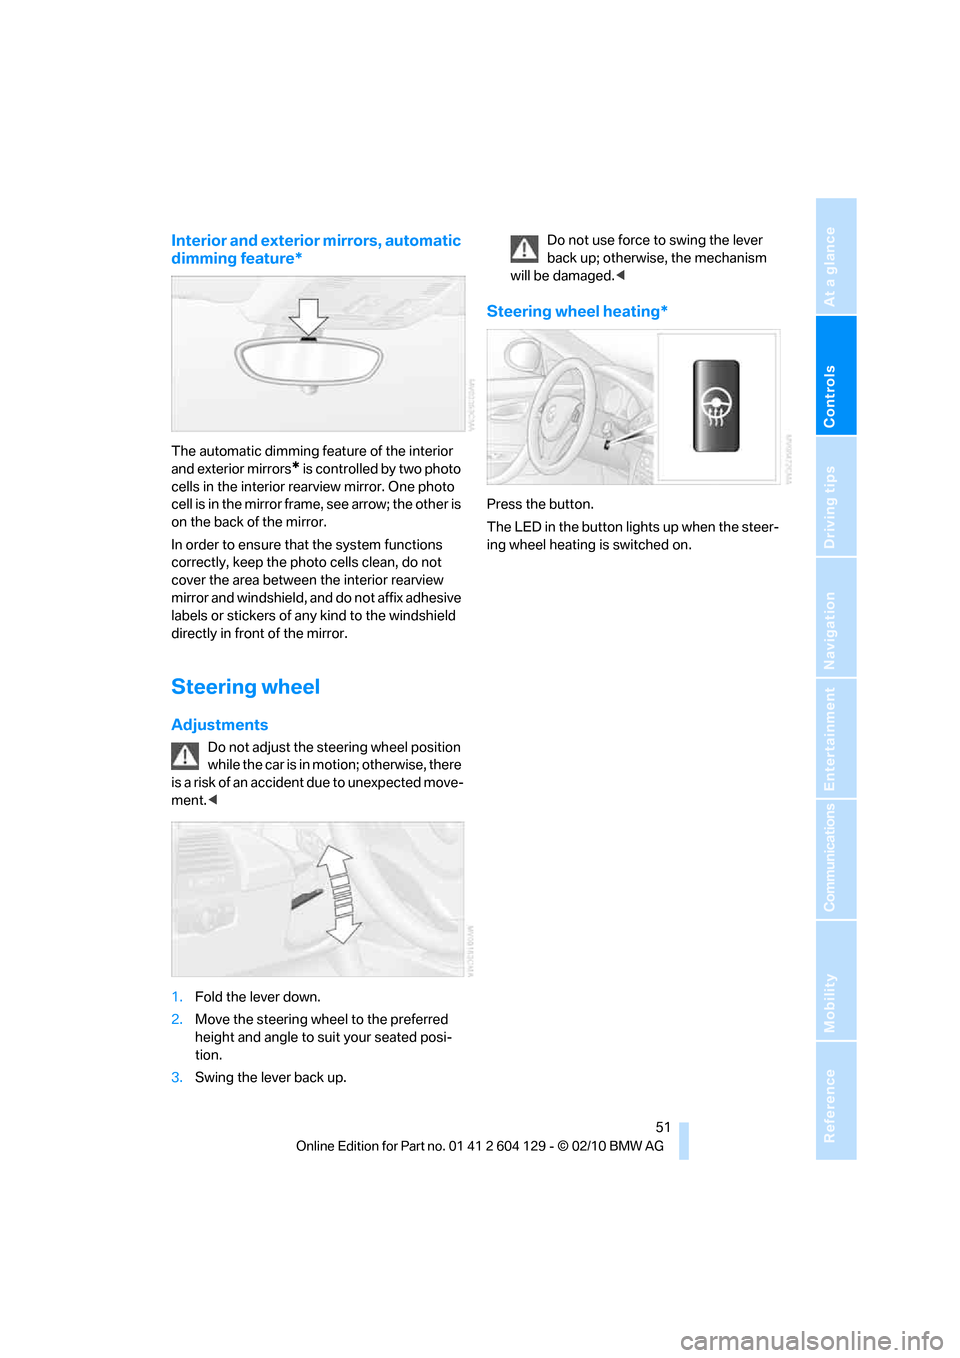
1.Fold the lever down.
2.Move the steering wheel to the preferred
height and angle to suit your seated posi-
tion.
3.Swing the lever back up.Do not use force to swing the lever
back up; otherwise, the mechanism
will be damaged.<
Steering wheel heating*
Press the button.
The LED in the button lights up when the steer-
ing wheel heating is switched on.
Page 204 of 256
Under the hood
202
Under the hood
Do not work on the car unless you pos-
sess the necessary technical knowledge.
If you are unfamiliar with the statutory guide-
lines, have any work on the vehicle performed
only by a BMW center or by a workshop that
work according to BMW repair procedures with
correspondingly trained personnel. If this work
is not carried out properly, there is a danger of
subsequent damage and related safety haz-
ards.<
Hood
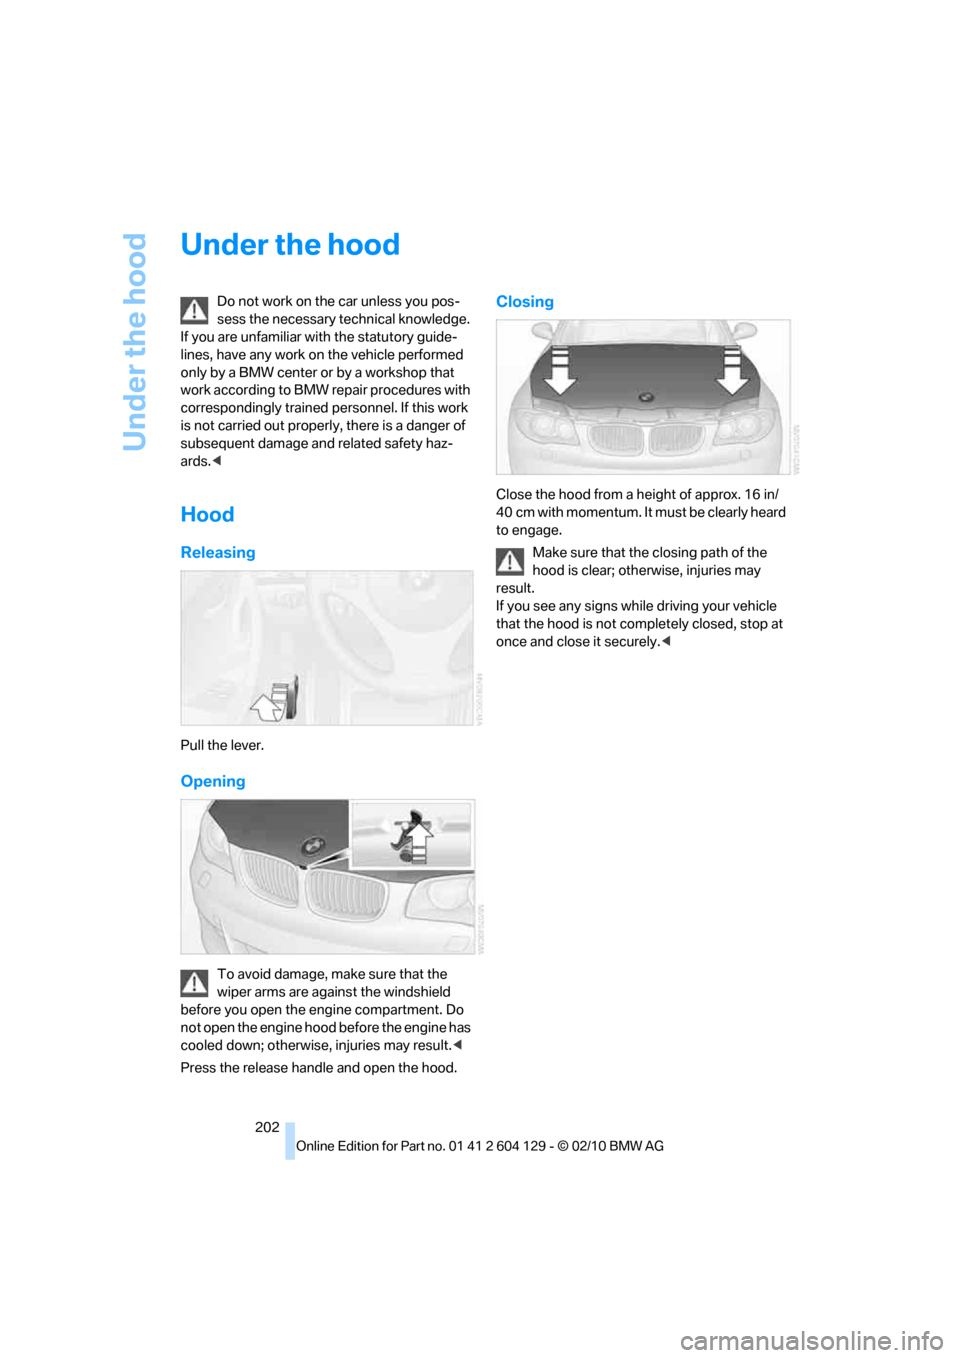
Releasing
Pull the lever.
Opening
To avoid damage, make sure that the
wiper arms are against the windshield
before you open the engine compartment. Do
not open the engine hood before the engine has
cooled down; otherwise, injuries may result.<
Press the release handle and open the hood.
Closing
Close the hood from a height of approx. 16 in/
40 cm with momentum. It must be clearly heard
to engage.
Make sure that the closing path of the
hood is clear; otherwise, injuries may
result.
If you see any signs while driving your vehicle
that the hood is not completely closed, stop at
once and close it securely.<
Page 211 of 256

Mobility
209Reference
At a glance
Controls
Driving tips
Communications
Navigation
Entertainment
Care
Care products
Regular cleaning and care contributes signifi-
cantly to the value retention of your BMW.
BMW recommends cleaning and caring for your
vehicle with products that are approved by
BMW for this purpose.
Your BMW center will be happy to advise you on
the products and services available for cleaning
and caring for your BMW.
Original BMW CareProducts have been
material tested, laboratory checked and
proven in the field, and offer optimal care and
protection for your vehicle.<
Do not use cleaners that contain alcohol
or solvents as these may result in dam-
age.<
Cleaning agents can contain substances
that are dangerous or hazardous to your
health. Therefore, follow the warning and safety
instructions on the packaging. When cleaning
inside the vehicle, always open the doors or
windows of the vehicle. In enclosed areas, pro-
vide for sufficient ventilation. Only use products
designed for cleaning vehicles.<
Exterior care
Washing the vehicle
Especially during the winter months,
ensure that the vehicle is washed more
frequently. Heavy soiling and road salt can lead
to vehicle damage.<
After washing the vehicle, apply the
brakes briefly to dry them; otherwise,
water can reduce braking efficiency over the
short term and brake discs can corrode.<
Automatic car washes
Preference should be given to cloth car washes.
Do not use high-pressure car washes;
otherwise, water may drip into the vehicle
around the windows.<
Before driving into a car wash, ensure that it is
suitable for your BMW. Check the following:
>Dimensions of your vehicle, refer to
page227.
>If necessary, fold in the outside rearview
mirrors, refer to page50.
>Maximum permissible tire width.
Avoid car washes with guide rail heights
over 4 in/10 cm; otherwise, there is the
danger of damaging chassis parts.<
>In Convertibles, do not treat the convertible
top with wax. Ensure that a program is avail-
able that does not apply wax or is designed
specifically for convertibles.
Preparations before driving into an automatic
car wash:
>Unscrew the rod antenna
*.
>Deactivate the rain sensor
* to prevent unin-
tentional wiping.
>Remove additional attachments, e.g. spoil-
ers or telephone antennas, if there is a pos-
sibility that they could be damaged.
Automatic transmission
Before driving into an automatic car wash, per-
form the following steps to ensure that the vehi-
cle can roll:
1.Insert the remote control into the ignition
lock, even with Comfort Access.
2.Move the selector lever to position N.
3.Release the parking brake.
4.Switch off the engine.
5.Leave the remote control in the ignition lock
so that the vehicle can roll.
Page 229 of 256
Reference 227
At a glance
Controls
Driving tips
Communications
Navigation
Entertainment
Mobility
Dimensions
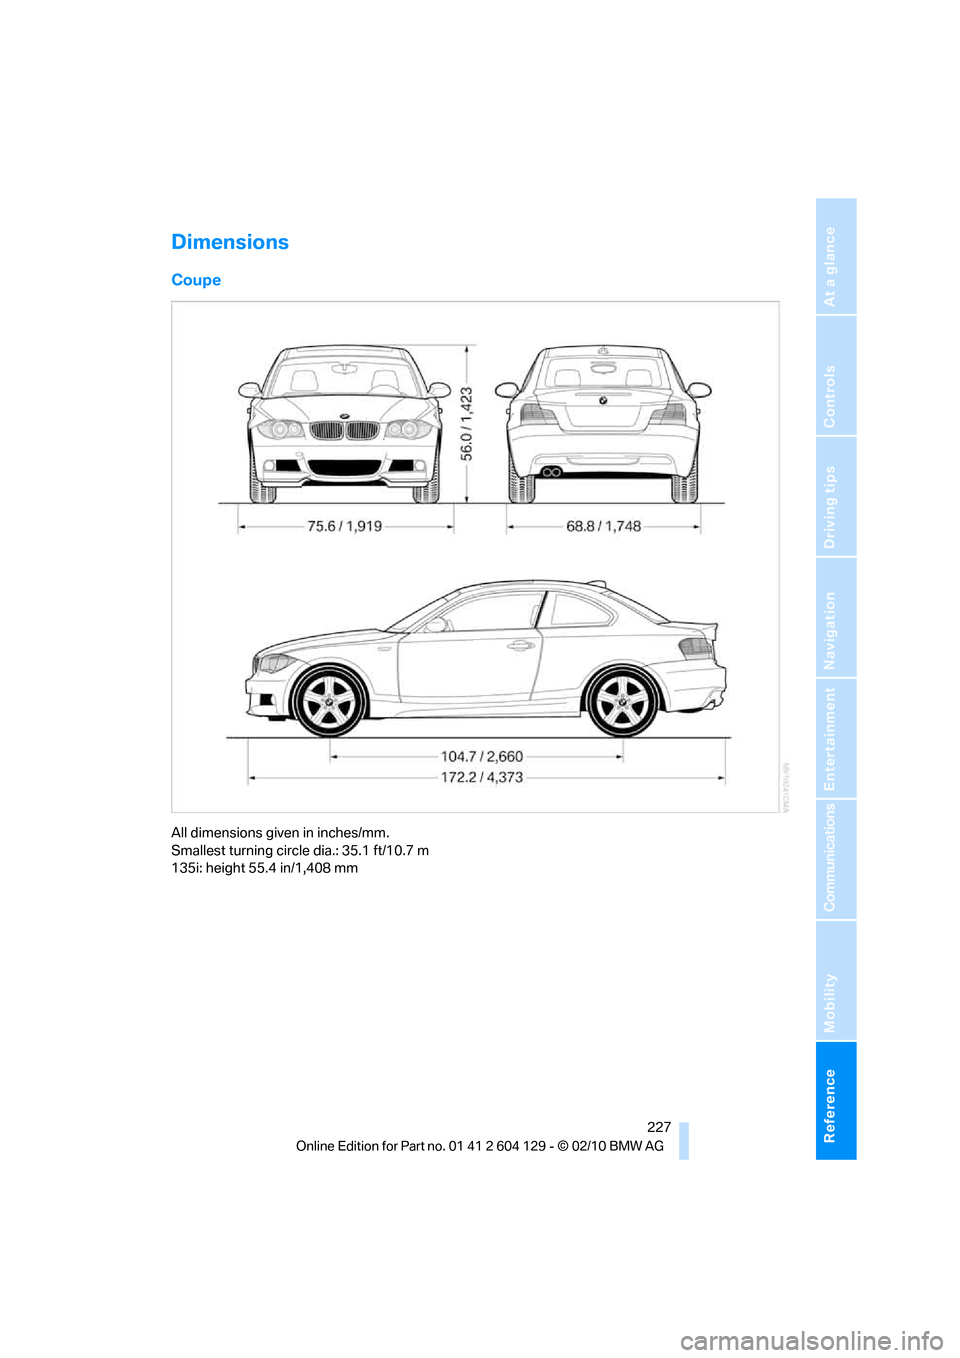
Coupe
All dimensions given in inches/mm.
Smallest turning circle dia.: 35.1 ft/10.7 m
135i: height 55.4 in/1,408 mm