2011 BMW 135I CONVERTIBLE child lock
[x] Cancel search: child lockPage 38 of 256

Opening and closing
36
Jointly
>Press the switch to the resistance point:
All windows open as long as you press the
switch.
>Press the switch beyond the resistance
point:
All windows open automatically. Press the
switch again to stop the opening move-
ment.
>Pull the switch:
All windows close as long as you pull the
switch.
After switching off the ignition
When the remote control is removed or the igni-
tion is switched off, you can still operate the
windows for approx. 1 minute as long as no
door has been opened.
Convenient operation
For information on Convenient operation via the
remote control or the door lock, refer to page27
or30. For information on Convenient closing
with Comfort Access, refer to Locking on
page34.
Pinch protection system
If the closing force exceeds a specific value as a
power window closes, the closing action is
interrupted and the window reopens slightly.
Despite the pinch protection system
check and clear the window's travel path
prior to closing it; otherwise, the safety system
might fail to detect certain kinds of obstruc-
tions, such as thin objects, and the window
would continue closing.
Do not install any accessories that might inter-fere with window movement. Otherwise, the
pinch protection system could be impaired.
Convertible: the rear windows are not equipped
with pinch protection. Therefore, watch them
closely when closing to avoid personal injury.<
Closing without pinch protection
If there is an external danger, or if ice on the win-
dows, etc., prevents you from closing the win-
dows normally, proceed as follows:
1.Pull the switch past the resistance point and
hold it there. Pinch protection is limited and
the window reopens slightly if the closing
force exceeds a certain value.
2.Pull the switch again past the resistance
point within approx. 4 seconds and hold it
there. The window closes without pinch
protection.
Coupe: glass roof*, electric
To prevent injuries, watch the glass roof
while closing it.
Take the remote control with you when you
leave the car; otherwise, children could operate
the roof and possibly injure themselves.<
Raising
Press the switch.
>The closed glass roof is raised and the slid-
ing visor opens slightly.
Do not close the sliding visor forcibly with
the roof in the raised position, as this
would damage the mechanism.<
Page 40 of 256

Opening and closing
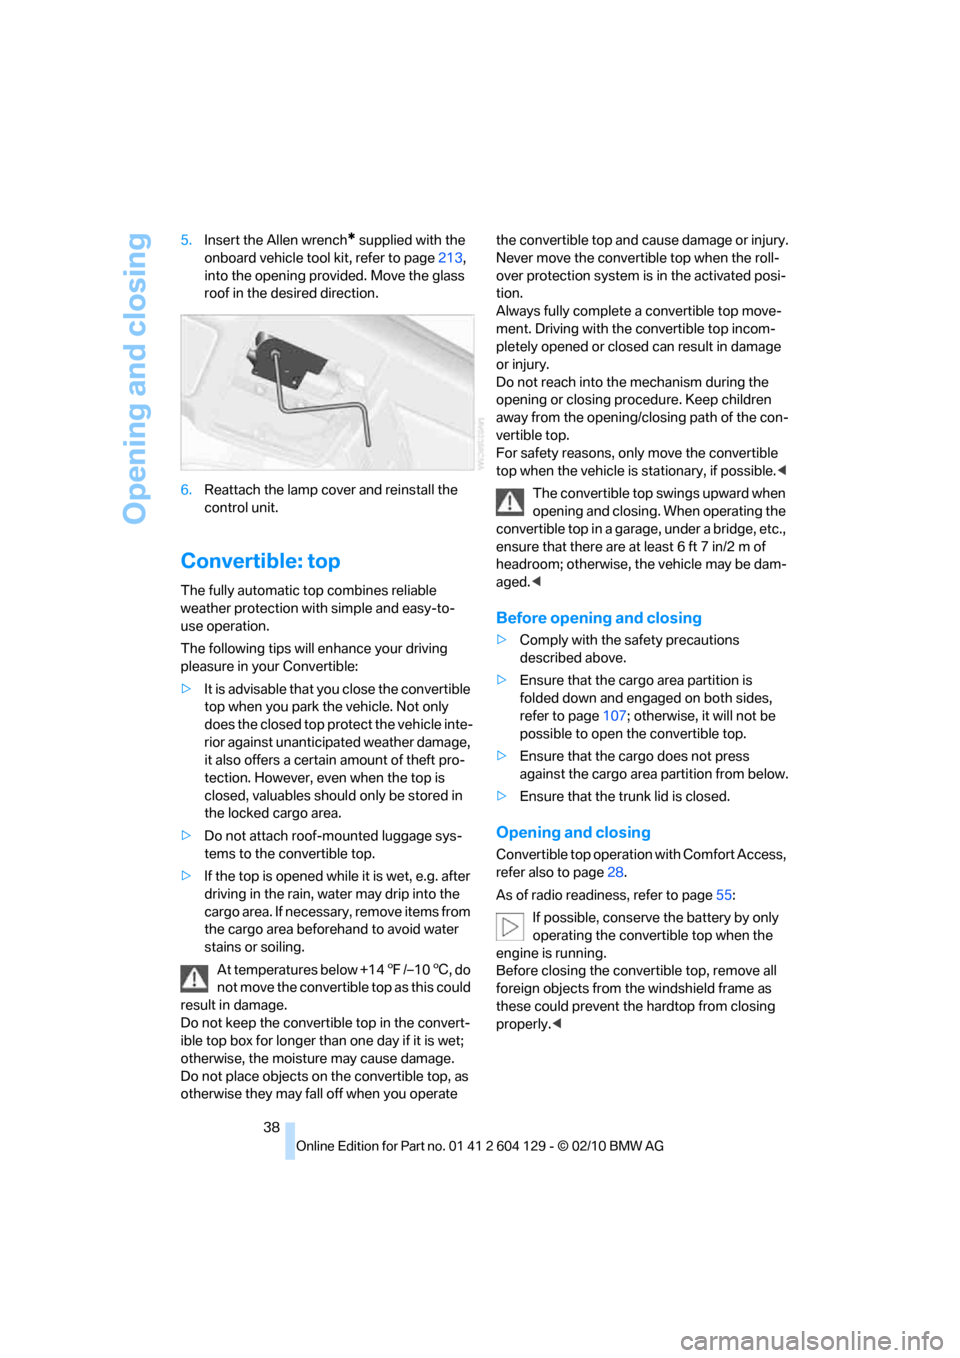
38 5.Insert the Allen wrench
* supplied with the
onboard vehicle tool kit, refer to page213,
into the opening provided. Move the glass
roof in the desired direction.
6.Reattach the lamp cover and reinstall the
control unit.
Convertible: top
The fully automatic top combines reliable
weather protection with simple and easy-to-
use operation.
The following tips will enhance your driving
pleasure in your Convertible:
>It is advisable that you close the convertible
top when you park the vehicle. Not only
does the closed top protect the vehicle inte-
rior against unanticipated weather damage,
it also offers a certain amount of theft pro-
tection. However, even when the top is
closed, valuables should only be stored in
the locked cargo area.
>Do not attach roof-mounted luggage sys-
tems to the convertible top.
>If the top is opened while it is wet, e.g. after
driving in the rain, water may drip into the
cargo area. If necessary, remove items from
the cargo area beforehand to avoid water
stains or soiling.
At temperatures below +147/–106, do
not move the convertible top as this could
result in damage.
Do not keep the convertible top in the convert-
ible top box for longer than one day if it is wet;
otherwise, the moisture may cause damage.
Do not place objects on the convertible top, as
otherwise they may fall off when you operate the convertible top and cause damage or injury.
Never move the convertible top when the roll-
over protection system is in the activated posi-
tion.
Always fully complete a convertible top move-
ment. Driving with the convertible top incom-
pletely opened or closed can result in damage
or injury.
Do not reach into the mechanism during the
opening or closing procedure. Keep children
away from the opening/closing path of the con-
vertible top.
For safety reasons, only move the convertible
top when the vehicle is stationary, if possible.<
The convertible top swings upward when
opening and closing. When operating the
convertible top in a garage, under a bridge, etc.,
ensure that there are at least 6 ft 7 in/2 m of
headroom; otherwise, the vehicle may be dam-
aged.<
Before opening and closing
>Comply with the safety precautions
described above.
>Ensure that the cargo area partition is
folded down and engaged on both sides,
refer to page107; otherwise, it will not be
possible to open the convertible top.
>Ensure that the cargo does not press
against the cargo area partition from below.
>Ensure that the trunk lid is closed.
Opening and closing
Convertible top operation with Comfort Access,
refer also to page28.
As of radio readiness, refer to page55:
If possible, conserve the battery by only
operating the convertible top when the
engine is running.
Before closing the convertible top, remove all
foreign objects from the windshield frame as
these could prevent the hardtop from closing
properly.<
Page 45 of 256

Controls
43Reference
At a glance
Driving tips
Communications
Navigation
Entertainment
Mobility
Adjustments
Sitting safely
The ideal sitting position can make a vital con-
tribution to relaxed, fatigue-free driving. In con-
junction with the safety belts, the head
restraints and the airbags, the seated position
has a major influence on your safety in the event
of an accident. To ensure that the safety sys-
tems operate with optimal efficiency, we
strongly urge you to observe the instructions
contained in the following section.
For additional information on transporting chil-
dren safely, refer to page52.
Airbags
Always maintain an adequate distance
between yourself and the airbags. Always
grip the steering wheel on the rim, with your
hands in the 3 o'clock and 9 o'clock positions,
to minimize the risk of injury to the hands or
arms in the event of the airbag being triggered
off.
No one and nothing should come between the
airbags and the seat occupant.
Do not use the cover of the front airbag on the
front passenger side as a storage area. Make
sure that the front passenger is sitting correctly,
i.e. not resting feet or legs on the dashboard;
otherwise, leg injuries can occur if the front air-
bag deploys.
Make sure that passengers keep their heads
away from the side airbag and do not lean
against the cover of the head airbag; otherwise,
serious injuries can result if the airbag
deploys.<
Even if you follow all the instructions, injuries
resulting from contact with airbags cannot be
fully excluded, depending on the circum-
stances. The ignition and inflation noise may
provoke a mild hearing loss in extremely sensi-
tive individuals. This effect is usually only tem-
porary.
For airbag locations and additional information
on airbags, refer to page88.
Head restraint
A correctly adjusted head restraint reduces the
risk of neck injury in the event of an accident.
Adjust the head restraint in such a way
that its center is at approx. ear level. Oth-
erwise, there is an increased risk of injury in the
event of an accident.<
Head restraints, refer to page46.
Safety belt
Before every drive, make sure that all occupants
wear their safety belts. Airbags complement the
safety belt as an additional safety device, but
they do not represent a substitute.
Your vehicle has four seats, each of which is
equipped with a safety belt.
Never allow more than one person to
wear a single safety belt. Never allow
infants or small children to ride in a passenger's
lap. Make sure that the belt in the lap area sits
low across the hips and does not press against
the abdomen.
The safety belt must not rest against the throat,
run across sharp edges, pass over hard or frag-
ile objects or be pinched. Fasten the safety belt
so that it sits as snugly as possible against the
lap and shoulder without being twisted. Other-
wise, the belt could slide over your hips and
injure your abdomen in the event of a frontal
collision. Avoid wearing bulky clothing and reg-
ularly pull the belt in the upper-body area taut;
otherwise, its restraining effect could be
impaired.<
Safety belts, refer to page49.
Page 51 of 256

Controls
49Reference
At a glance
Driving tips
Communications
Navigation
Entertainment
Mobility
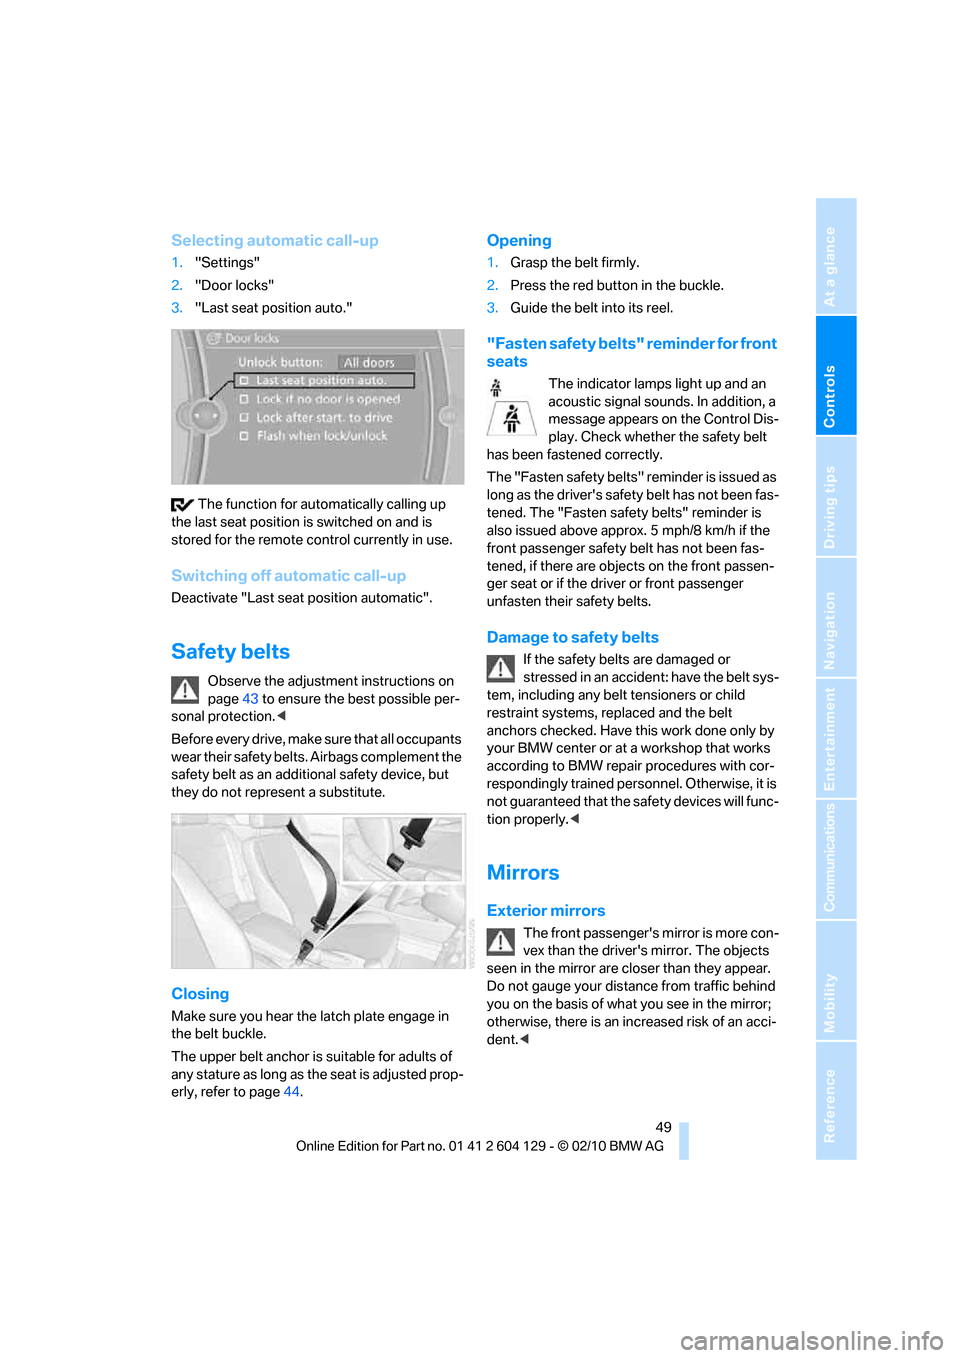
Selecting automatic call-up
1."Settings"
2."Door locks"
3."Last seat position auto."
The function for automatically calling up
the last seat position is switched on and is
stored for the remote control currently in use.
Switching off automatic call-up
Deactivate "Last seat position automatic".
Safety belts
Observe the adjustment instructions on
page43 to ensure the best possible per-
sonal protection.<
Before every drive, make sure that all occupants
wear their safety belts. Airbags complement the
safety belt as an additional safety device, but
they do not represent a substitute.
Closing
Make sure you hear the latch plate engage in
the belt buckle.
The upper belt anchor is suitable for adults of
any stature as long as the seat is adjusted prop-
erly, refer to page44.
Opening
1.Grasp the belt firmly.
2.Press the red button in the buckle.
3.Guide the belt into its reel.
"Fasten safety belts" reminder for front
seats
The indicator lamps light up and an
acoustic signal sounds. In addition, a
message appears on the Control Dis-
play. Check whether the safety belt
has been fastened correctly.
The "Fa sten safety belts " reminder is iss ued a s
long as the driver's safety belt has not been fas-
tened. The "Fasten safety belts" reminder is
also issued above approx. 5 mph/8 km/h if the
front passenger safety belt has not been fas-
tened, if there are objects on the front passen-
ger seat or if the driver or front passenger
unfasten their safety belts.
Damage to safety belts
If the safety belts are damaged or
stressed in an accident: have the belt sys-
tem, including any belt tensioners or child
restraint systems, replaced and the belt
anchors checked. Have this work done only by
your BMW center or at a workshop that works
according to BMW repair procedures with cor-
respondingly trained personnel. Otherwise, it is
not guaranteed that the safety devices will func-
tion properly.<
Mirrors
Exterior mirrors
The front passenger's mirror is more con-
vex than the driver's mirror. The objects
seen in the mirror are closer than they appear.
Do not gauge your distance from traffic behind
you on the basis of what you see in the mirror;
otherwise, there is an increased risk of an acci-
dent.<
Page 55 of 256

Controls
53Reference
At a glance
Driving tips
Communications
Navigation
Entertainment
Mobility
Child seat security
The rear safety belts and the front passenger
safety belt can be prevented from being pulled
out in order to fasten child restraint systems.
To lock the safety belt
1.Secure the child restraint system with the
belt.
2.Pull the belt strap all the way out.
3.Allow the belt strap to retract and pull it taut
against the child restraint system.
The safety belt is locked.
To unlock the safety belt
1.Open the belt buckle.
2.Remove the child restraint system.
3.Allow the safety belt strap to retract all the
way.
LATCH child restraint fixing
system
LATCH: lower Anchors and Tethers for CHil-
dren.
To install and use the LATCH child
restraint system, follow the operating and
safety instructions provided by the manufac-
turer of the system; otherwise, the protective
function of the seat may be compromised.<
Mounts for the lower LATCH anchors
Before installing the child seat, pull the belt out
of the area for the child restraint fixing system.Ensure that both lower LATCH anchors
are correctly engaged and that the child
restraint system is resting firmly against the
backrest; otherwise, the protective function of
the seat may be compromised.<
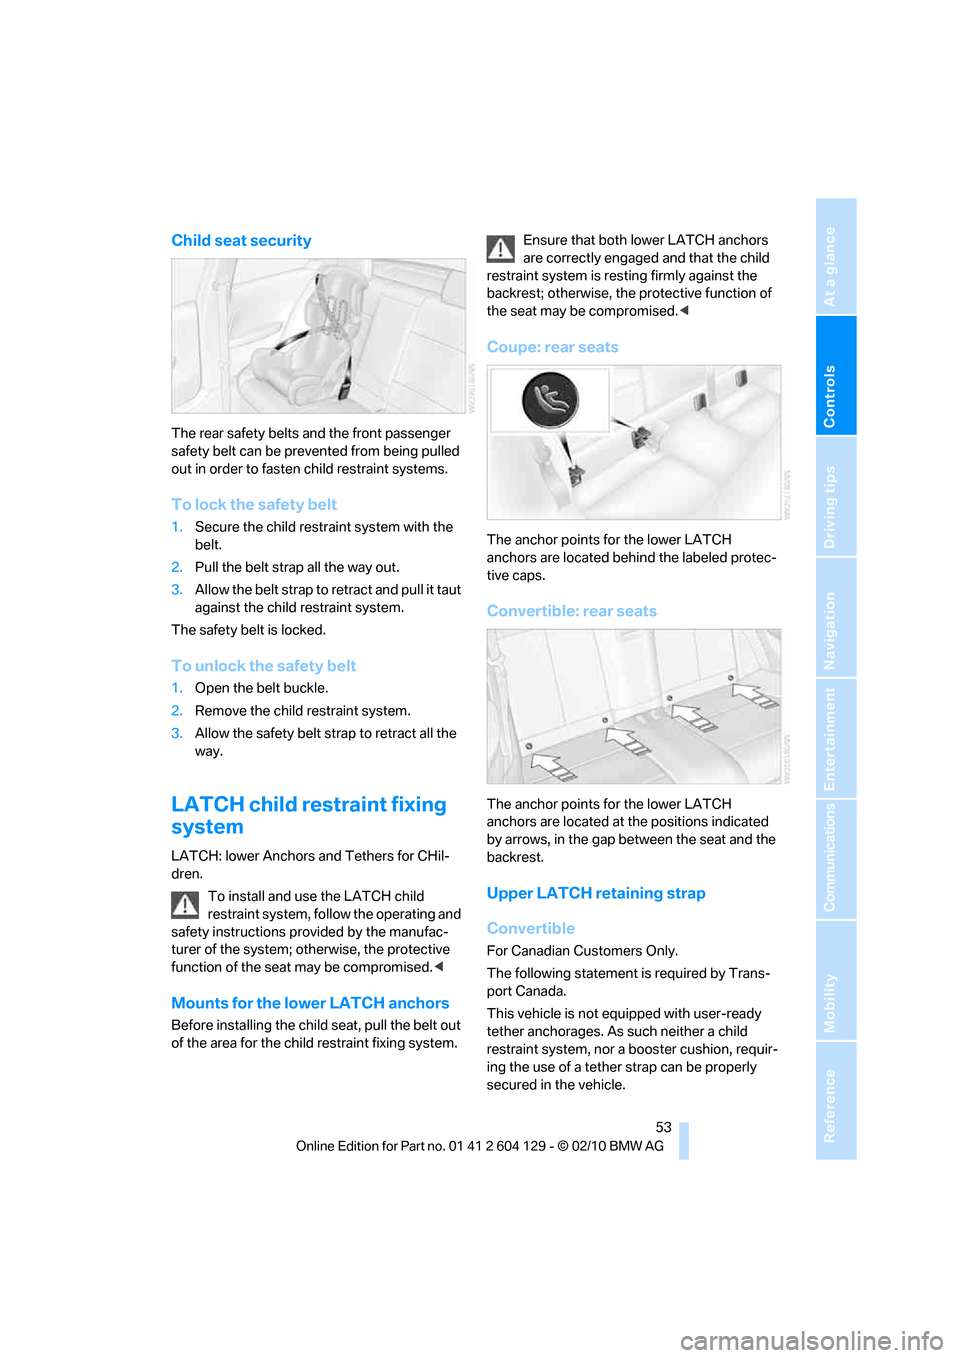
Coupe: rear seats
The anchor points for the lower LATCH
anchors are located behind the labeled protec-
tive caps.
Convertible: rear seats
The anchor points for the lower LATCH
anchors are located at the positions indicated
by arrows, in the gap between the seat and the
backrest.
Upper LATCH retaining strap
Convertible
For Canadian Customers Only.
The following statement is required by Trans-
port Canada.
This vehicle is not equipped with user-ready
tether anchorages. As such neither a child
restraint system, nor a booster cushion, requir-
ing the use of a tether strap can be properly
secured in the vehicle.
Page 108 of 256

Practical interior accessories
106
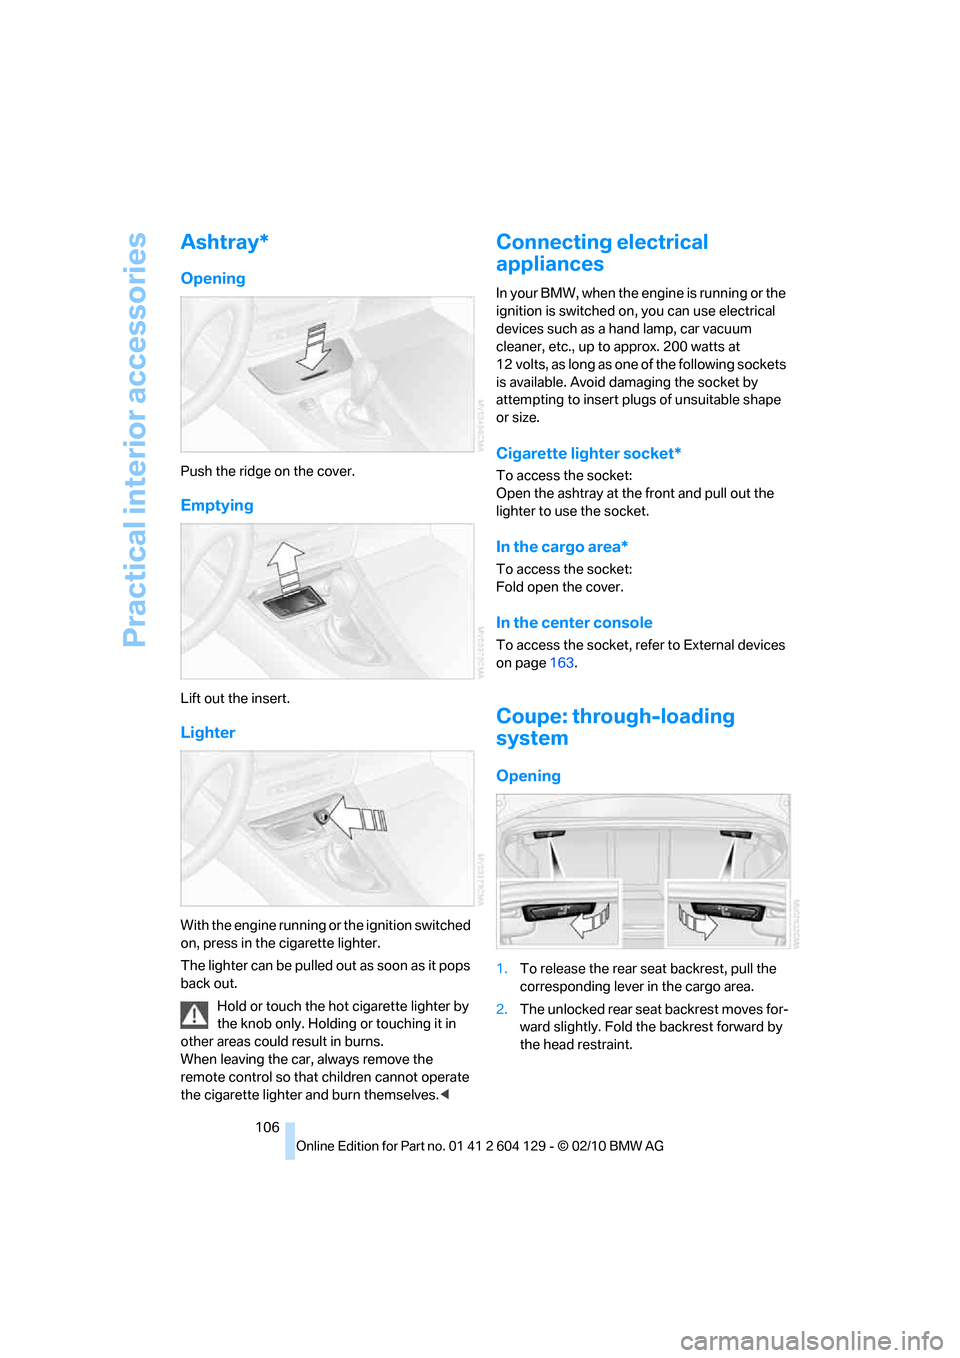
Ashtray*
Opening
Push the ridge on the cover.
Emptying
Lift out the insert.
Lighter
With the engine running or the ignition switched
on, press in the cigarette lighter.
The lighter can be pulled out as soon as it pops
back out.
Hold or touch the hot cigarette lighter by
the knob only. Holding or touching it in
other areas could result in burns.
When leaving the car, always remove the
remote control so that children cannot operate
the cigarette lighter and burn themselves.<
Connecting electrical
appliances
In your BMW, when the engine is running or the
ignition is switched on, you can use electrical
devices such as a hand lamp, car vacuum
cleaner, etc., up to approx. 200 watts at
12 volts, as long as one of the following sockets
is available. Avoid damaging the socket by
attempting to insert plugs of unsuitable shape
or size.
Cigarette lighter socket*
To access the socket:
Open the ashtray at the front and pull out the
lighter to use the socket.
In the cargo area*
To access the socket:
Fold open the cover.
In the center console
To access the socket, refer to External devices
on page163.
Coupe: through-loading
system
Opening
1.To release the rear seat backrest, pull the
corresponding lever in the cargo area.
2.The unlocked rear seat backrest moves for-
ward slightly. Fold the backrest forward by
the head restraint.
Page 242 of 256

Everything from A to Z
240 Car key, refer to Integrated
key/remote control26
Car phone
– installation location, refer to
Center armrest105
– refer to separate Owner's
Manual
Car phone, refer to
Telephone170
Car radio, refer to Radio143
Car shampoo210
Car wash209
Catalytic converter, refer to
Hot exhaust system113
CD, audio playback151
CD changer151,155
– controls140
– fast forward/reverse153
– filling or emptying the
magazine156
– random play sequence152
– selecting a track151
– switching on/off140
– tone control140
– volume140
CD player151
– controls140
– fast forward/reverse153
– random play sequence152
– selecting a track151
– switching on/off140
– tone control140
– volume140
Center armrest105
Center brake lamp, replacing
bulb217
Center console, refer to
Around the center
console14
Central key, refer to Integrated
key/remote control26
Central locking
– from inside30
– from outside27
Central locking system27
– Comfort Access33
Changes, technical, refer to
For your own safety5Changing the language on the
Control Display79
Changing wheels217
Chassis number, refer to
Engine compartment203
Check Control76
Checking oil level203
Child restraint fixing system
LATCH53
Child restraint systems52
Child seats52
Chrome parts211
Chrome polish211
Cigarette lighter106
Cleaning headlamps65
– washer fluid66
Cleaning your BMW, refer to
Care209
Climate control
– automatic air distribution97
Clock68
– 12h/24h mode75
– setting the time and date75
– setting time74
Closing
– from inside30
– from outside27
clothes hooks105
Cold start, refer to Starting the
engine56
Comfort Access33
– replacing the battery35
Comfort access, refer to
Comfort Access33
Comfort area, refer to Around
the center console14
Compartment for remote
control, refer to Ignition
lock55
Compass103
Computer69
– displays on Control
Display70
Computer, refer to iDrive16
Concierge service185
Condensation, refer to When
the vehicle is parked114
Condition Based Service
CBS207Configuring settings, refer to
Personal Profile26
Confirmation signals for
locking/unlocking the
vehicle28
Congestion
– refer to Route, bypassing
sections131
Connecting vacuum cleaner,
refer to Connecting
electrical appliances106
Consumption, refer to
Average fuel
consumption70
Contacts
– creating182
Control Center, refer to
iDrive16
Control Display16
Control Display, refer to iDrive
– switching on/off19
Controller, refer to iDrive16
Controls and displays10
Convenient operation
– windows
28
– windows with Comfort
Access34
– with Comfort Access34
Convenient starting, refer to
Starting the engine56
Convertible
– rollover protection
system90
– top38
– wind deflector41
Convertible top
– convenient opening28
Convertible top care210
Coolant205
– checking level206
– filling206
Coolant temperature69
Cooling, maximum97
Cooling fluid, refer to
Coolant205
Copyright2
Corner-illuminating lamps92
Page 246 of 256

Everything from A to Z
244 iDrive16
– adjusting brightness79
– changing date and time75
– changing language79
– menu guidance17
– operating principle16
– status information19
Ignition55
– switched off56
– switched on55
Ignition key, refer to
Integrated key/remote
control26
Ignition key position 1, refer to
Radio readiness55
Ignition key position 2, refer to
Ignition on55
Ignition lock55
Imprint2
Indicator and warning
lamps13
– Tire Pressure Monitor
TPM85
Individual settings, refer to
Personal Profile26
Inflation pressure, tires194
Inflation pressure monitoring,
refer to Tire Pressure
Monitor TPM84
Initializing
– compass, refer to
Calibrating104
– radio, refer to Station,
storing143
– refer to Setting the time and
date75
Initializing, Flat Tire Monitor
FTM83
Instructions for navigation
system, refer to Voice
instructions132
Instrument cluster12
Instrument combination, refer
to Instrument cluster12
Instrument lighting95
Integrated key26
Integrated universal remote
control101
Interactive map126Interior lamps95
– remote control28
Interior motion sensor33
Interior rearview mirror50
– automatic dimming
feature51
– compass103
Intermittent mode of the
wipers65
Intersection, entering,
navigation122
iPod, connecting, refer to
AUX-IN port163
iPod, connecting, refer to USB
audio interface163
J
Jacking points217
Jets, refer to Air vents96
Joystick, refer to iDrive16
Jumpering, refer to Jump-
starting220
Jump-starting220
K
Key, refer to Integrated key/
remote control26
Keyless go, refer to Comfort
Access33
Keyless opening and closing,
refer to Comfort Access33
Key Memory, refer to Personal
Profile26
Kickdown58
Knock control193
L
Lamps
– adaptive light control92
– interior lighting95
Lamps, refer to Parking lamps/
low beams91
Lamps and bulbs, replacing
bulbs213
Lashing eyes, refer to
Securing cargo116Last destinations124
LATCH child restraint fixing
system53
Launch Control64
Leather care211
LED Light-emitting
diodes213
Length, refer to
Dimensions227
License plate lamp, replacing
bulb217
Light
– instrument lighting95
– refer to High-beam
assistant93
Light-alloy wheels211
Light control
– refer to High-beam
assistant93
Light-emitting diodes
LED213
Lighter106
– socket106
Lighting
– lamps and bulbs213
– of instruments95
– of vehicle, refer to Lamps91
Light switch91
Limit, refer to Speed limit78
Load115
Load securing equipment,
refer to Securing cargo116
Lock buttons of doors, refer to
Locking30
Locking
– adjusting confirmation
signal28
– from inside30
– from outside28
– without remote control, refer
to Comfort Access33
Locking and unlocking doors
– from inside30
– from outside27
Low beam control, refer to
High-beam assistant93
Low-beam headlamps91
– automatic91
– replacing bulbs214