2011 Acura RDX light
[x] Cancel search: lightPage 107 of 176

106Navigation System
System Setup
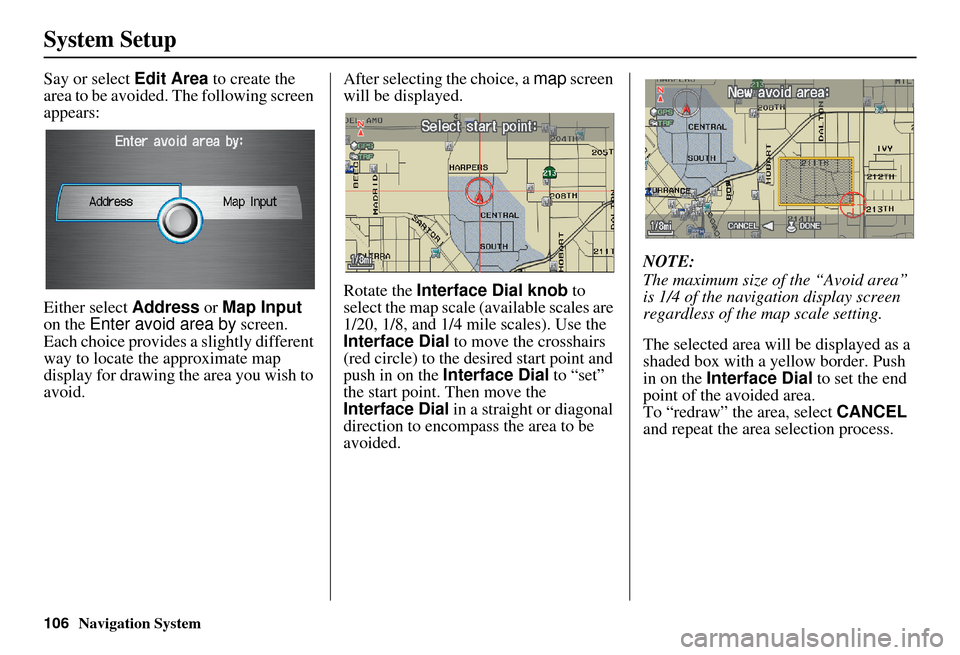
Say or select Edit Area to create the
area to be avoided. The following screen
appears:
Either select Address or Map Input
on the Enter avoid area by screen.
Each choice provides a slightly different
way to locate the approximate map
display for drawing th e area you wish to
avoid. After selecting the choice, a
map screen
will be displayed.
Rotate the Interface Dial knob to
select the map scale (available scales are
1/20, 1/8, and 1/4 mile scales). Use the
Interface Dial to move the crosshairs
(red circle) to the de sired start point and
push in on the Interface Dial to “set”
the start point. Then move the
Interface Dial in a straight or diagonal
direction to encompass the area to be
avoided. NOTE:
The maximum size of the “Avoid area”
is 1/4 of the navigation display screen
regardless of the map scale setting.
The selected area will be displayed as a
shaded box with a yellow border. Push
in on the
Interface Dial to set the end
point of the avoided area.
To “redraw” the area, select CANCEL
and repeat the area selection process.
Page 108 of 176

Navigation System107
System Setup
Say or select DONE to return to the
Edit avoid area screen.
If your selected area contains a freeway,
the system will prompt you with a pop-
up box saying “Do you want to avoid
freeways?” Answering “No” allows you
to enter a route through an avoided area
on a freeway and skip the “Avoid area
caution box” (see Pop-Ups and
Disclaimers on page 71).
When you return to the Edit avoid area
screen, the “Vicinity” field is
automatically filled in by the system.
Re-edit the area “Name” if desired.
Select Done on the Edit avoid area
screen to finish editing. Your new
avoided area will now appear on the
“Avoid area” list and be viewable on the
map screen. NOTE:
You can select areas to avoid,
however you cannot select roads or
areas that you want the system to use
for routing.
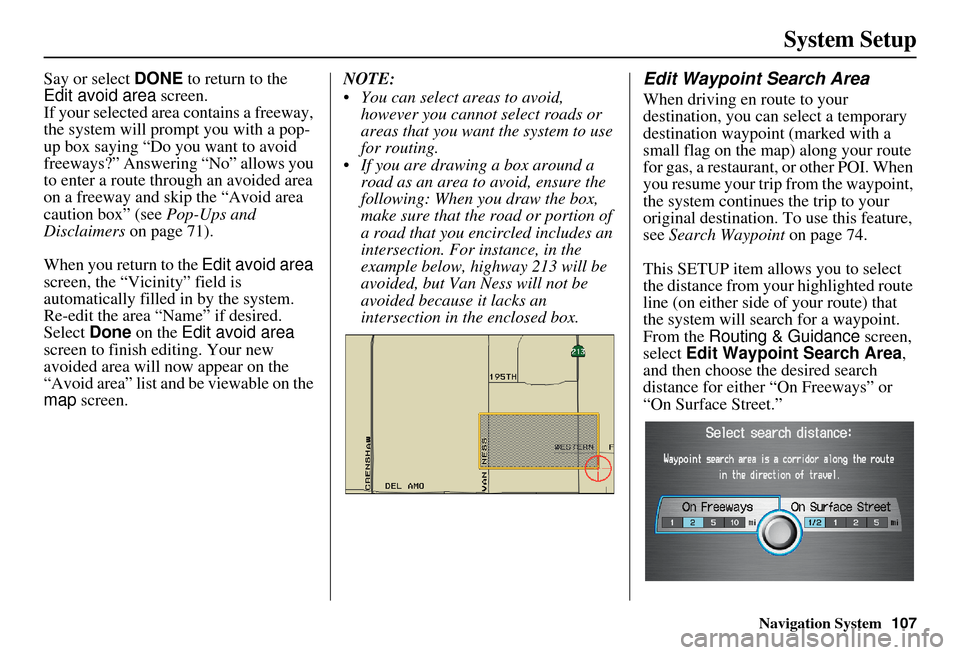
If you are drawing a box around a road as an area to avoid, ensure the
following: When you draw the box,
make sure that the road or portion of
a road that you encircled includes an
intersection. For instance, in the
example below, highway 213 will be
avoided, but Van Ness will not be
avoided because it lacks an
intersection in th e enclosed box.Edit Waypoint Search Area
When driving en route to your
destination, you can select a temporary
destination waypoint (marked with a
small flag on the map) along your route
for gas, a restaurant, or other POI. When
you resume your trip from the waypoint,
the system continues the trip to your
original destination. To use this feature,
see Search Waypoint on page 74.
This SETUP item allows you to select
the distance from your highlighted route
line (on either side of your route) that
the system will search for a waypoint.
From the Routing & Guidance screen,
select Edit Waypoint Search Area ,
and then choose the desired search
distance for either “On Freeways” or
“On Surface Street.”
Page 110 of 176

Navigation System
System Setup
Clock Adjustment
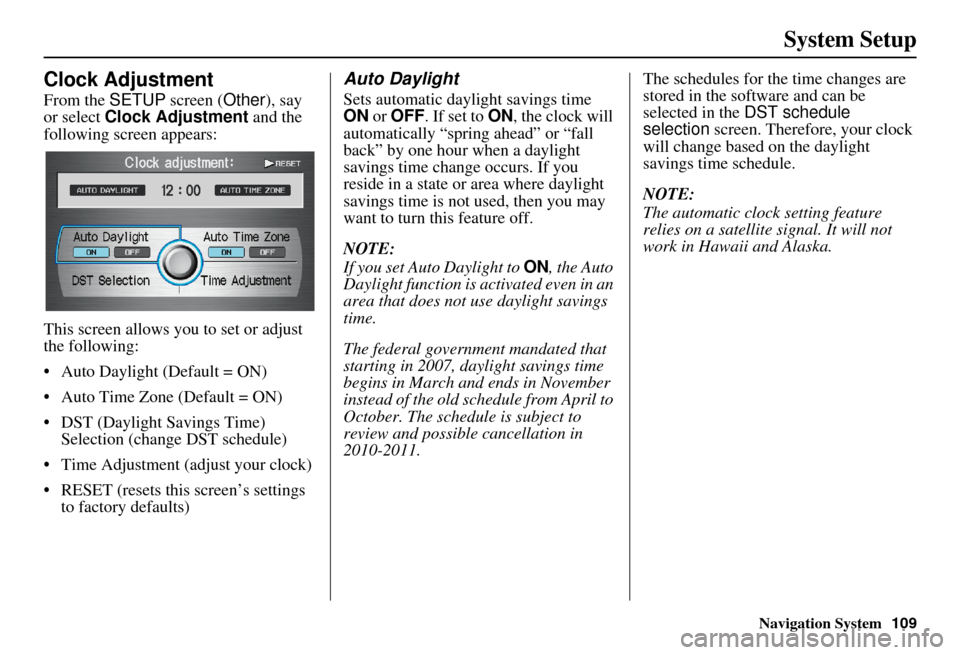
From the SETUP screen ( Other), say
or select Clock Adjustment and the
following screen appears:
This screen allows y ou to set or adjust
the following:
• Auto Daylight (Default = ON)
Auto Time Zone (Default = ON)
DST (Daylight Savings Time) Selection (change DST schedule)
Time Adjustment (adjust your clock)
RESET (resets this screen’s settings to factory defaults)
Auto Daylight
Sets automatic daylight savings time
ON or OFF . If set to ON , the clock will
automatically “spring ahead” or “fall
back” by one hour when a daylight
savings time change occurs. If you
reside in a state or area where daylight
savings time is not used, then you may
want to turn this feature off.
NOTE:
If you set Auto Daylight to ON, the Auto
Daylight function is ac tivated even in an
area that does not use daylight savings
time.
The federal government mandated that
starting in 2007, daylight savings time
begins in March and ends in November
instead of the old schedule from April to
October. The schedu le is subject to
review and possible cancellation in
2010-2011. The schedules for the time changes are
stored in the software and can be
selected in the
DST schedule
selection screen. Therefore, your clock
will change based on the daylight
savings time schedule.
NOTE:
The automatic clock setting feature
relies on a satellite signal. It will not
work in Hawaii and Alaska.
109
Page 111 of 176

Navigation System
System Setup
Auto Time Zone
Sets automatic time zone selection by
GPS to ON or OFF . If you are driving
across the country and passing through
time zones, then this feature will
automatically set the time to the time
zone you are traveling through.
However, if you live and work in two
different time zones, you may want to
turn this feature off.
NOTE:
When driving near a time zone
boundary, the displayed time zone may
fluctuate between the two zone times.
Daylight Savings Time (DST)
Selection (Change DST
Schedule)
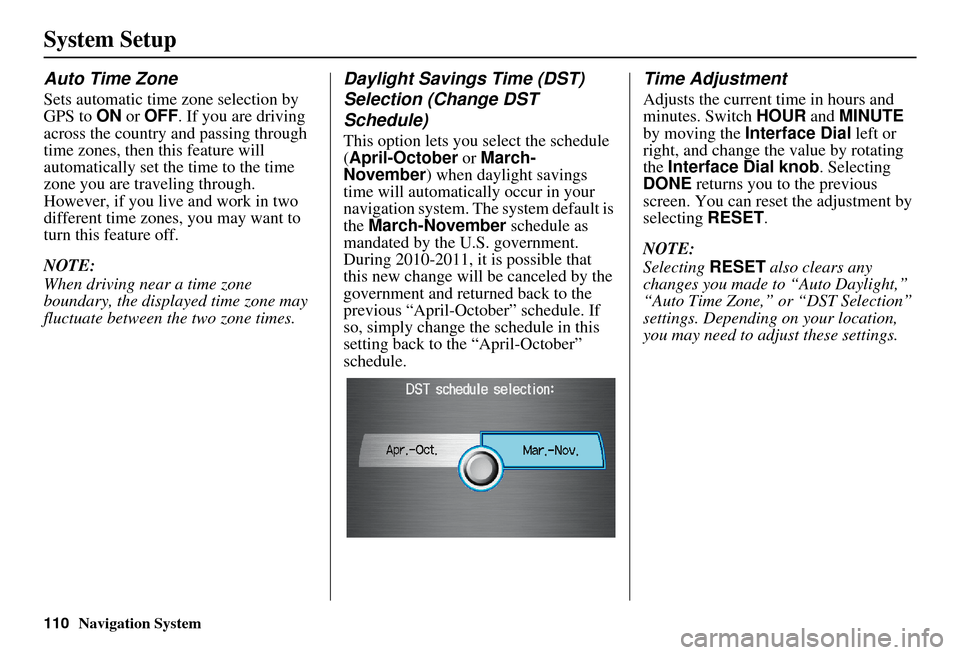
This option lets you select the schedule
(April-October or March-
November ) when daylight savings
time will automatically occur in your
navigation system. The system default is
the March-November schedule as
mandated by the U.S. government.
During 2010-2011, it is possible that
this new change will be canceled by the
government and returned back to the
previous “April-October” schedule. If
so, simply change the schedule in this
setting back to the “April-October”
schedule.
Time Adjustment
Adjusts the current time in hours and
minutes. Switch HOUR and MINUTE
by moving the Interface Dial left or
right, and change the value by rotating
the Interface Dial knob . Selecting
DONE returns you to the previous
screen. You can reset the adjustment by
selecting RESET.
NOTE:
Selecting RESET also clears any
changes you made to “Auto Daylight,”
“Auto Time Zone,” or “DST Selection”
settings. Depending on your location,
you may need to adjust these settings.
110
Page 115 of 176

114Navigation System
System Setup
Switching Display Mode AutomaticallyI
Recommended Display Mode Day/Night Settings:
• With the headlights on, select mid-ra nge for the dash illumination (see your Owner’s Manual for location of knob).
• With the headlights off, select mid-range for the dash illumination (see your Owner’s Manual for location of knob).
• On the SETUP Color adjustment screen, choose white for the map Day display and black for the map Night display (see
page 113). Inappropriate adjustment of these colors can cause the Day/Night modes to appear inoperative.
NOTE:
See your Owner’s Manual for additional informa tion regarding the dash brightness adjustment.
llumination control Priority Operation But remember
Display Mode button
(see page 11) 1 Allows selection of
Day, Night , or Off display mode.
Press this button to displa y the Brightness control.
When the Brightness control is displayed, pressing
this button switches to the Day, Night, or Off display
mode.
This button has the highest priority for the display
control adjustments. —
Dash illumination adjustment
knob (see your Owner’s
Manual for location) 2 When headlights are turned on, and you wish to have
the Day display mode, then adjust the illumination to
the full bright setting (beeps). Adjust the dash brightness back to mid-
range to allow auto switching by sensing
the headlights are on or off.
Headlights (Auto/On/Off) 3 When turned on (or off), the display changes to Night
(or Day ) display mode. By using Display Mode
button , adjust bright ness Day/Night mode
independently. Use the
Display Mode button , or
adjust the dash illumination to full bright
to set the display to your desired choice.
Map Day/Night screen color
choice (see page 113 for the
Day and Night color choices) N/A The user can select the color of the screen that will be
displayed for the Day and Night display modes
described above. For best cont
rast, ensure that the map
color is white for Day and black for
Night .
Page 118 of 176

Navigation System117
System Setup
NOTE:
The rearview camera has a special
lens that makes distances appear
closer than they actually are.
The rearview camera display has a limited range, and the size and
position of objects around the area
may appear different from reality.
Make sure to check the surrounding
area carefully.
Tip:
To make guidelines disappear, press
and hold the CANCEL button for three
seconds.Rearview Camera Brightness
Adjustment
When in reverse, the navigation “hard”
buttons are locked out, except the
rotating portion of the Interface Dial
(knob ). Rotate the knob clockwise to
make the camera image brighter, and
counterclockwise to darken the image.
This brightness adjustment is
independent of the screen brightness
adjustment in SETUP.
NOTE:
The camera brightness cannot be adjusted by voice control.
Slight delays can occur when switching to the ca mera image, or
switching back to the map/menu
screen. This is normal.
Page 125 of 176

124Navigation System
Client Assistance
Reporting Errors
Occasionally, you may encounter
database errors.
• If the error pertains to freeways and main “verified” roads shown in black
on the map, then report it either
online at
http://update.navteq.com/ , or to
Acura Client Services.
• If the error involves a light brown “unverified” road, then do not report
it. These areas have not been verified
and are provided for reference only
(see Map Overview on page 6).
• For errors in points of interest (POI), like a business that has changed its
name, do not report them. Keep in
mind that depending on when the data
was collected and when your DVD
was purchased, the database can be
out of date. The business may have
not reported the change(s), or not be
in the database at all. Update
Navigation DVDs are available for
purchase, usually in the fall of each
year. • If the error does not involve the
database, such as vehicle position
icon errors, screen error messages, or
other GPS-related errors, see
Frequently Asked Questions on
page 146, System Limitations on
page 120, or Troubleshooting on
page 154.
Acura Automobile Client
Services
Telephone: (800) 382-2238
Fax: (310) 783-3535
Mail:
Acura Navi
America Honda Motor Co., Inc.
Acura Client Services
MS 500-2N-7E
1919 Torrance Blvd.
Torrance, CA 90501-2746
Page 145 of 176

144Navigation System
Coverage Areas
Address and POI Entry Screens
When in Hawaii, the following
differences occur for map, address, and
POI selection:
• It is not possible to enter U.S. mainland addresses or scroll the map
east to the U.S. mainland.
• Selection of the “State” is confined to the state of Hawaii only.
• Entry of a destination address or POI on an island other than your current
island may result in a screen caution
message. This is normal because
there are no “ferry” routes between
islands available in the database.
• If the “Guidance Prompts” setting on the SETUP screen ( Main Setup) is
set to normal or maximum, street
names will not be spoken in voice
guidance commands.
Setup Screen Differences
The SETUP screen differences are
minor and are listed below. See the
Setup section (page 91) for additional
information.
Routing and Guidance (Unverified
Area Routing On/Off)
This feature is unavailable. All roads
displayed on the map are verified.
Clock Adjust Screen
There is no daylight saving time for
Hawaii. Auto Daylight , Auto Time
Zone , and DST Selection will not be
shown on the Clock adjustment
screen. To test your adjustment, use the
voice control system, and say “What
time is it?” (see page 109).
AcuraLink/Messages
This item is not shown on the Hawaii
SETUP screen ( Other) because XM is
not available.
Traffic & Weather Status
This item is not shown on the Hawaii
SETUP screen ( Other) because XM is
not available.
Information Screen Differences
Messages
The Information screen Messages
feature utilizes XM, and because XM is
not available, it is not shown on the
Hawaii Information screen. In addition,
the “Map menu” item New Messages
will appear grayed out. This is normal.
Vehicle generated AcuraLink messages
may display on the screen; however,
they may be inaccurate and should be
ignored.
Traffic Incidents
This item is not shown on the Hawaii
Information screen because XM is not
available.
Weather Information
This item is not shown on the Hawaii
Information screen because XM is not
available.