2011 Acura CSX light
[x] Cancel search: lightPage 54 of 145

54
Navigation System
Driving to Your DestinationMap ScaleUse the ZOOM buttons or say a voice command such as “Display 800 metre scale” (see page 132) to change the scale of the map.
Zooming in increases the detail, while zooming out gives you a view of a wider area. After changing the scale, give the system a
few moments to update the display.
Functions available at various map scales
NOTE:
• You can change between kilometres or miles in Setup (see Units on page 92).
• For information on the available voice commands, see Voice Command Index on page 131.Map Scale (Metric and English)
For selecting units, see page 92.80 m 200 m 400 m 800 m
1.6 km
3 km 8 km 24 km 80 km
240 km 560 km
1/20 mi. 1/8 mi. 1/4 mi. 1/2 mi. 1 mi. 2 mi. 5 mi. 15 mi. 50 mi. 150 mi. 350 mi.
POI icon symbols (like ATM) page 56 X X
Breadcrumbs (off-road tracking dots)page60XXXX
Highway exit information icons page 53 X X X
One-way traffic icon page 56 X
Unverified road display (light brown) page 83 X X X
Map orientation “Heading-up” page55XXXXX
Map orientation “North-up” page55XXXXXXXXXXX
Map features (park, golf course, etc.)page50XXXXXXXXXX
Avoid area shown on map page 87 X X X
Avoid area scales (when creating) page 87 X X X
Waypoint “flag” icons page 63XXXXXXXXXXX
Page 61 of 145

Navigation System61
Viewing/Saving the Current
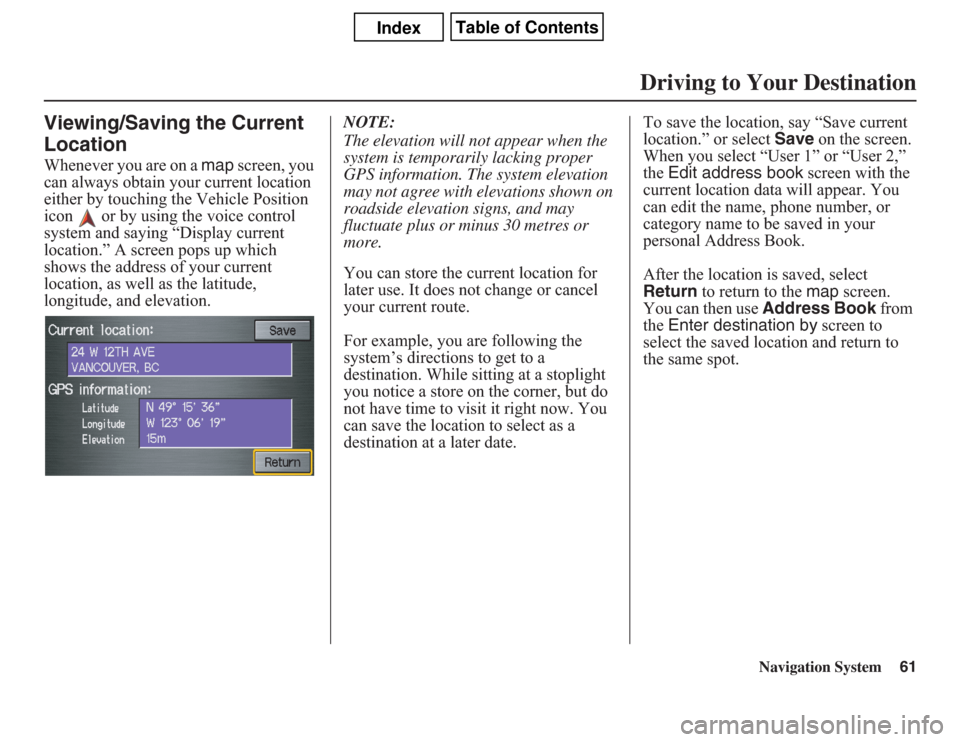
LocationWhenever you are on a map screen, you
can always obtain your current location
either by touching the Vehicle Position
icon or by using the voice control
system and saying “Display current
location.” A screen pops up which
shows the address of your current
location, as well as the latitude,
longitude, and elevation.NOTE:
The elevation will not appear when the
system is temporarily lacking proper
GPS information. The system elevation
may not agree with elevations shown on
roadside elevation signs, and may
fluctuate plus or minus 30 metres or
more.
You can store the current location for
later use. It does not change or cancel
your current route.
For example, you are following the
system’s directions to get to a
destination. While sitting at a stoplight
you notice a store on the corner, but do
not have time to visit it right now. You
can save the location to select as a
destination at a later date.To save the location, say “Save current
location.” or select Save on the screen.
When you select “User 1” or “User 2,”
the Edit address book screen with the
current location data will appear. You
can edit the name, phone number, or
category name to be saved in your
personal Address Book.
After the location is saved, select
Return to return to the map screen.
You can then use Address Book from
the Enter destination by screen to
select the saved location and return to
the same spot.
Driving to Your Destination
Page 70 of 145

70
Navigation System
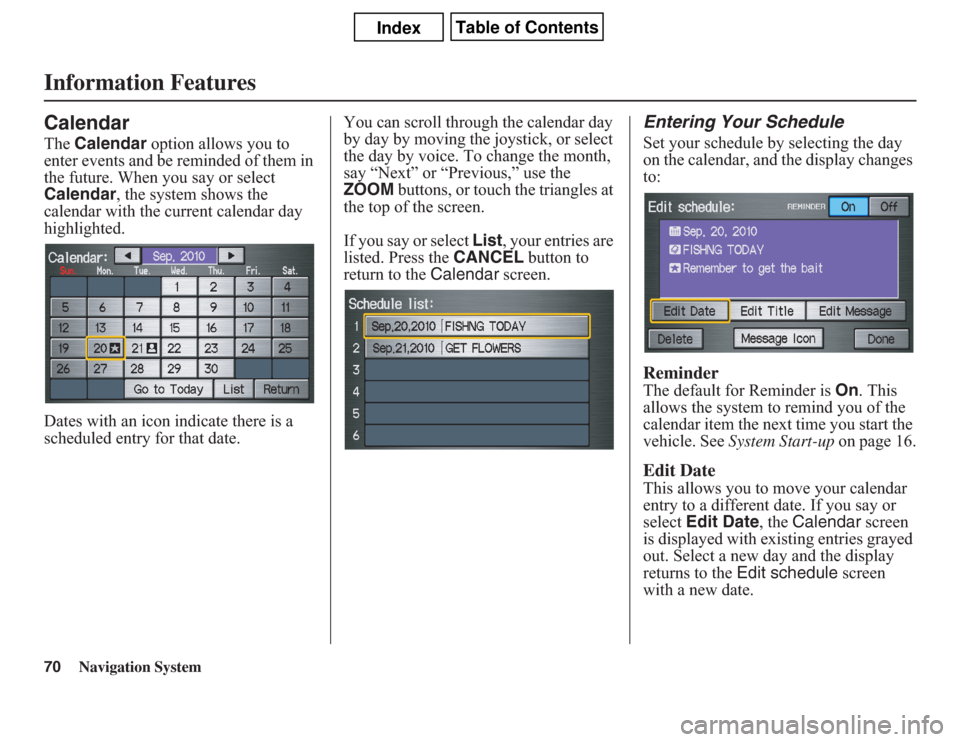
Information FeaturesCalendarThe Calendar option allows you to
enter events and be reminded of them in
the future. When you say or select
Calendar, the system shows the
calendar with the current calendar day
highlighted.
Dates with an icon indicate there is a
scheduled entry for that date.You can scroll through the calendar day
by day by moving the joystick, or select
the day by voice. To change the month,
say “Next” or “Previous,” use the
ZOOM buttons, or touch the triangles at
the top of the screen.
If you say or select List, your entries are
listed. Press the CANCEL button to
return to the Calendar screen.
Entering Your ScheduleSet your schedule by selecting the day
on the calendar, and the display changes
to:ReminderThe default for Reminder is On. This
allows the system to remind you of the
calendar item the next time you start the
vehicle. See System Start-up on page 16.Edit DateThis allows you to move your calendar
entry to a different date. If you say or
select Edit Date, the Calendar screen
is displayed with existing entries grayed
out. Select a new day and the display
returns to the Edit schedule screen
with a new date.
Page 73 of 145

Navigation System73
System Setup
Setup ModeThe Setup function consists of two
different screens that allow you to
change and update information in the
system. To display the Setup screens,
use the voice control system and say
“Setup” or press the SETUP button. To
change to another Setup screen, say or
select More in the upper right corner of
the screen.
On any of the Setup screens, you can
use the voice control system to select
any item on the screen.
NOTE:
• If some items appear to be grayed out
and cannot be selected, it is because
you did not select OK on the initial
Disclaimer screen. See System Start-
up on page 16.
• For information on the available
voice commands, see Voice
Command Index on page 131.
Setup Screen (first)From any screen, say “Setup” or press
the SETUP button, and the following
screen appears:BrightnessThe screen brightness has 11 settings.
To change the brightness, use the voice
control system and say “Brightness up”
or “Brightness down.” You can also
select the Bright. bar and move the
cursor by moving the joystick left or
right, or by touching the arrowheads in
the bar.
Tip:
If you are having trouble viewing the
screen in bright lighting conditions, try
increasing the brightness.NOTE:
You can have a separate daytime and
nighttime setting for brightness. Adjust
each setting when the display is in either
daytime or nighttime mode.
VolumeThe navigation voice volume has 10
settings, and also can be turned off. To
adjust the volume, use the voice control
system and say “Volume up” or
“Volume down.” You can also select the
Volume bar and move the cursor by
moving the joystick left or right, or by
touching the arrowheads in the bar.
After adjusting the volume, you will
hear beeps at the new volume level. You
can also select volume off.
NOTE:
If you turn the volume off, you will not
hear route guidance or voice command
confirmations.
Page 74 of 145

74
Navigation System
System SetupDisplayThere are two screen display modes:
Day and Night. The recommended
setting is Auto, which automatically
switches the screen between Day and
Night modes as you turn the headlights
on or off.
You can select Day or Night mode to
override the Auto mode. This is a
useful feature for drivers that like to use
headlights during the day and want to
temporarily override Night mode.
However, the screen in Day mode will
be extremely bright at night.
Day Mode
Night Mode
Display
ModeHow setting affects
display mode:To override setting
while driving:But remember:
Auto
(factory
default)Automatically switches
between Day and Night
mode by sensing if the
headlights are on.Override night display:
Adjust dash brightness
(with headlights on) to
full bright.
Override day display:
Turn on headlights and
ensure the dash
brightness is not at full
bright.Adjust the dash
brightness (with
headlights on) back to
normal to allow auto
switching by sensing
headlights.
DayStays in Day mode. Push and hold the
joystick for 10 seconds
(switches to Night
mode).There is no auto Night/
Day mode change with
the headlights on/off.
You control the setting.
NightStays in Night mode. Push and hold the
joystick for 10 seconds
(switches to Day mode).There is no auto Night/
Day mode change with
the headlights on/off.
You control the setting.
ClockTurns the screen to the
clock screen.To return to the previous
screen, press the NAVI
BACK button.Remember, your route
guidance stops when the
clock screen is
displayed.
Page 83 of 145

Navigation System83
System Setup
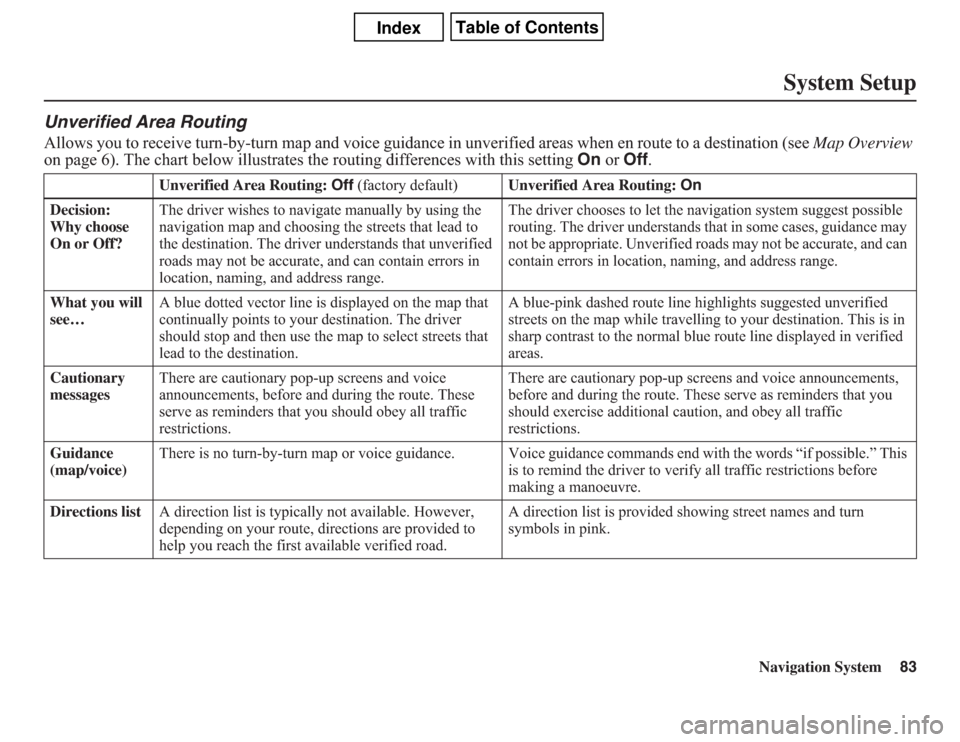
Unverified Area RoutingAllows you to receive turn-by-turn map and voice guidance in unverified areas when en route to a destination (see Map Overview
on page 6). The chart below illustrates the routing differences with this setting On or Off.
Unverified Area Routing: Off (factory default)Unverified Area Routing: On
Decision:
Why choose
On or Off?The driver wishes to navigate manually by using the
navigation map and choosing the streets that lead to
the destination. The driver understands that unverified
roads may not be accurate, and can contain errors in
location, naming, and address range.The driver chooses to let the navigation system suggest possible
routing. The driver understands that in some cases, guidance may
not be appropriate. Unverified roads may not be accurate, and can
contain errors in location, naming, and address range.
What you will
see…A blue dotted vector line is displayed on the map that
continually points to your destination. The driver
should stop and then use the map to select streets that
lead to the destination.A blue-pink dashed route line highlights suggested unverified
streets on the map while travelling to your destination. This is in
sharp contrast to the normal blue route line displayed in verified
areas.
Cautionary
messagesThere are cautionary pop-up screens and voice
announcements, before and during the route. These
serve as reminders that you should obey all traffic
restrictions.There are cautionary pop-up screens and voice announcements,
before and during the route. These serve as reminders that you
should exercise additional caution, and obey all traffic
restrictions.
Guidance
(map/voice)There is no turn-by-turn map or voice guidance. Voice guidance commands end with the words “if possible.” This
is to remind the driver to verify all traffic restrictions before
making a manoeuvre.
Directions listA direction list is typically not available. However,
depending on your route, directions are provided to
help you reach the first available verified road.A direction list is provided showing street names and turn
symbols in pink.
Page 84 of 145

84
Navigation System
System SetupUnverified Area RoutingWhen driving to your destination, you
have the choice of using or not using
“unverified” roads. You make this
choice in the Setup screen (second).
The next few pages contain an example
of a route to a destination in an
unverified area explaining the routing
differences found in unverified areas.
Note that the “Unverified” roads are
displayed only on the U.S. areas.
With Unverified Area Routing Off,
the system tries to use verified roads
whenever possible. In this example,
since only verified streets are used, it
created a longer route than necessary.
With Unverified Area Routing On,
the route is shorter, but consists of
unverified (light coloured) streets that
may not be accurate. Because the streets
are unverified, there may be errors in
street location, name, or address range.
Additional caution is recommended in
these areas. Always obey posted traffic
restrictions.Because both routes bypass or use
unverified streets, an initial Disclaimer
screen is provided. It is recommended
that you stop and review the map.
Unverified Area Routing “Off”Unverified Area Routing “On”
NOTE:
Unverified roads are shown only when
viewing the map in the 80, 200, and 400
metre map scales, or the 1/20, 1/8, and
1/4 mile map scales.
Page 88 of 145

88
Navigation System
System SetupEither select Address or Map Input
on the Enter avoid area by screen.
Each choice provides a slightly different
way to locate the approximate map
display for drawing the area you wish to
avoid. After selecting the choice, a map
screen will be displayed.
Use the ZOOM buttons to select the
map scale (available scales are 80, 200,
and 400 metre scales). Use the joystick
to move the crosshairs (red circle) to the
desired start point and push in the
joystick to “set” the start point. Then
move the joystick in a straight or
diagonal direction to encompass the
area to be avoided.NOTE:
The maximum size of the “Avoid area”
is 1/4 of the navigation display screen
regardless of the map scale setting.
The selected area will be displayed as a
shaded box with a yellow border. Push
in on the joystick to set the end point of
the avoided area. To “redraw” the area,
touch Cancel and repeat the area
selection process. If your selected area
contains a highway, the system will
prompt you with a pop-up box saying
“Do you want to avoid highways?”Answering “No” allows you to enter a
route through an avoided area on a
highway and skip the “Avoid area
caution box” (see Pop-Ups and
Disclaimers on page 62).
Say or select Done to return to the Edit
area screen. When you return, the
“Vicinity” field is automatically filled in
by the system. Re-edit the area “Name”
if desired. Select Done on the Edit
avoid area screen to finish editing.
Your new avoided area will now appear
on the “Avoid area” list and be viewable
on the map screen.