2010 YAMAHA XT660Z brake pads
[x] Cancel search: brake padsPage 6 of 100

TABLE OF CONTENTS
LOCATION OF IMPORTANT LABELS...1-1
SAFETY INFORMATION.....................2-1
Be a Responsible Owner ..................2-1
Safe riding .........................................2-1
Protective apparel .............................2-2
Avoid Carbon Monoxide Poisoning ...2-2
Loading .............................................2-3
Genuine Yamaha Accessories ..........2-3
Aftermarket Parts, Accessories,
and Modifications .......................2-4
Aftermarket Tires and Rims ..............2-4
DESCRIPTION.....................................3-1
Left view ............................................3-1
Right view .........................................3-2
Controls and instruments ..................3-3
INSTRUMENT AND CONTROL
FUNCTIONS........................................4-1
Immobilizer system ...........................4-1
Main switch/steering lock ..................4-2
Indicator and warning lights ..............4-3
Multi-function display ........................4-5
Tachometer .......................................4-6
Tripmeter and tachometer modes .....4-6
Clock mode .......................................4-7
Fuel meter .........................................4-7
Self-diagnosis devices ......................4-7Handlebar switches ...........................4-9
Clutch lever .....................................4-10
Shift pedal .......................................4-10
Brake lever ......................................4-11
Brake pedal .....................................4-11
Fuel tank cap ..................................4-11
Fuel .................................................4-12
Fuel tank breather hose ..................4-13
Catalytic converter ..........................4-13
Seat .................................................4-14
Adjusting the front fork ....................4-15
Adjusting the shock absorber
assembly ..................................4-16
Sidestand ........................................4-17
Ignition circuit cut-off system ..........4-17
FOR YOUR SAFETY -
PRE-OPERATION CHECKS...............5-1
Pre-operation check list ....................5-2
OPERATION AND IMPORTANT
RIDING POINTS..................................6-1
Starting the engine............................6-1
Shifting ..............................................6-2
Tips for reducing fuel consumption ...6-3
Engine break-in .................................6-3
Parking ..............................................6-4PERIODIC MAINTENANCE AND
ADJUSTMENT.....................................7-1
Owner’s tool kit .................................7-1
Periodic maintenance chart for
the emission control system.......7-2
General maintenance
and lubrication chart ..................7-3
Removing and installing
the cowling and panels ..............7-8
Checking the spark plug ...................7-8
Engine oil and oil filter element.........7-9
Coolant ............................................7-12
Replacing the air filter element
and cleaning the check hose ...7-14
Checking the engine idling speed ...7-15
Checking the throttle cable
free play ...................................7-16
Valve clearance ...............................7-16
Tires ................................................7-16
Spoke wheels..................................7-19
Adjusting the clutch lever free play...7-20
Checking the front and rear
brake pads ...............................7-21
Checking the brake fluid level .........7-22
Changing the brake fluid .................7-23
Drive chain slack .............................7-23
Cleaning and lubricating
the drive chain ..........................7-25
XT660Z 01-03 ING-AUS:AUSTRALIA 11-05-2009 9:57 Pagina 6
Page 36 of 100

FOR YOUR SAFETY – PRE-OPERATION CHECKS
5-2
1
2
3
4
5
6
7
8
9
10
ITEM
Fuel
Engine oil
Coolant
Front brake
Rear brake
EAU15605
Before using this vehicle, check the following points:
CHECKS
Check fuel level in fuel tank.
Refuel if necessary.
Check fuel line for leakage.
Check oil level in oil tank.
If necessary, add recommended oil to specified level.
Check vehicle for oil leakage.
Check coolant level in reservoir.
If necessary, add recommended coolant to specified level.
Check cooling system for leakage.
Check operation.
If soft or spongy, have Yamaha dealer bleed hydraulic system.
Check brake pads for wear.
Replace if necessary.
Check fluid level in reservoir.
If necessary, add recommended brake fluid to specified level.
Check hydraulic system for leakage.
Check operation.
If soft or spongy, have Yamaha dealer bleed hydraulic system.
Check brake pads for wear.
Replace if necessary.
Check fluid level in reservoir.
If necessary, add recommended brake fluid to specified level.
Check hydraulic system for leakage.PAGE
4-12
7-9
7-12
4-11, 7-21, 7-22, 7-26
4-11, 7-21, 7-22, 7-27
XT660Z 05-07 ING-AUS:MY03 04-06 ING 11-05-2009 10:09 Pagina 2
Page 45 of 100

1
2
3
4
5
6
7
8
9
10
PERIODIC MAINTENANCE AND ADJUSTMENT
7-3
NO. ITEM CHECK OR MAINTENANCE JOB
ODOMETER READING
1000 km 10000 km 20000 km 30000 km 40000 km(600 mi) (6000 mi) (12000 mi) (18000 mi) (24000 mi)
ANNUAL
CHECK
√√
√√√ √√
√√√
√√
√
√√√ √√ √
√√ √√ √
√√ √√
√√ √√ √
√√ √√1
2
3
✻
4✻
5✻
6✻
7✻
8✻
Replace.
Check operation.
Adjust.
Check operation, fluid level and vehicle
for fluid leakage.
Replace brake pads.
Check operation, fluid level and vehicle
for fluid leakage.
Replace brake pads.
Check for cracks or damage.
Replace.
Check runout, spoke tightness and
for damage.
Tighten spokes if necessary.
Check tread depth and for damage.
Replace if necessary.
Check air pressure.
Correct if necessary.
Check bearing for looseness or damage. Air filter element
Clutch
Front brake
Rear brake
Brake hoses
Wheels
Tires
Wheel bearings
EAU1770C
General maintenance and lubrication chart
Whenever worn to the limit
Whenever worn to the limit
Every 4 years
XT660Z 05-07 ING-AUS:MY03 04-06 ING 11-05-2009 10:09 Pagina 7-3
Page 63 of 100

1
2
3
4
5
6
7
8
9
10
PERIODIC MAINTENANCE AND ADJUSTMENT
7-21
EAU22390
Checking the front and rear
brake pads
The front and rear brake pads must be
checked for wear at the intervals spec-
ified in the periodic maintenance and
lubrication chart.
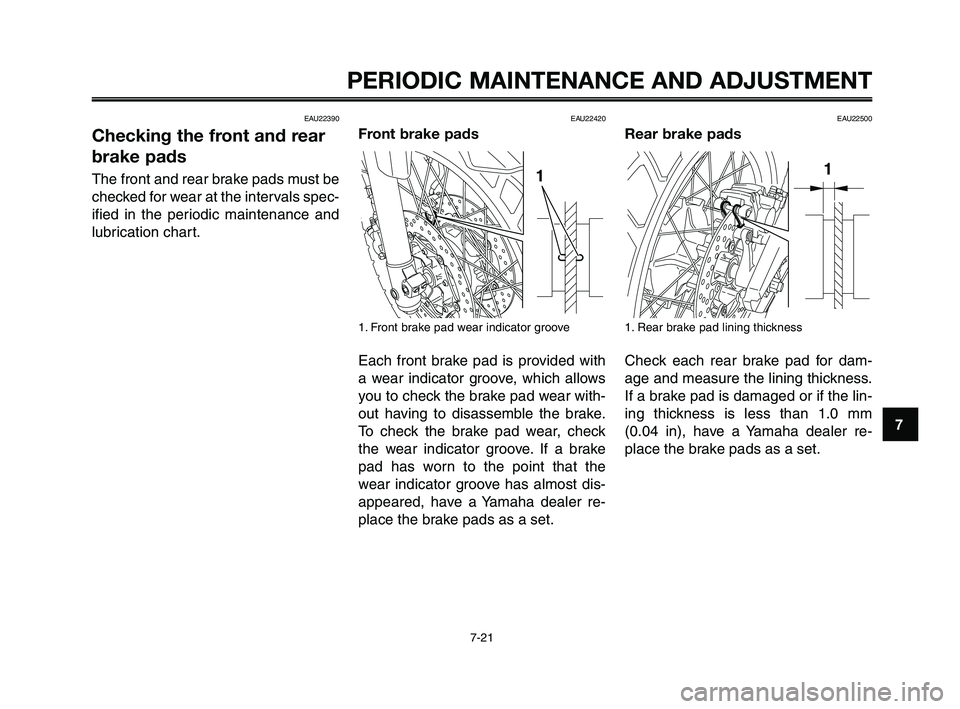
EAU22420
Front brake pads
1. Front brake pad wear indicator groove
Each front brake pad is provided with
a wear indicator groove, which allows
you to check the brake pad wear with-
out having to disassemble the brake.
To check the brake pad wear, check
the wear indicator groove. If a brake
pad has worn to the point that the
wear indicator groove has almost dis-
appeared, have a Yamaha dealer re-
place the brake pads as a set.
EAU22500
Rear brake pads
1. Rear brake pad lining thickness
Check each rear brake pad for dam-
age and measure the lining thickness.
If a brake pad is damaged or if the lin-
ing thickness is less than 1.0 mm
(0.04 in), have a Yamaha dealer re-
place the brake pads as a set.
XT660Z 05-07 ING-AUS:MY03 04-06 ING 11-05-2009 10:09 Pagina 7-21
Page 64 of 100

PERIODIC MAINTENANCE AND ADJUSTMENT
7-22
1
2
3
4
5
6
7
8
9
10
Insufficient brake fluid may allow air to
enter the brake system, possibly caus-
ing it to become ineffective.
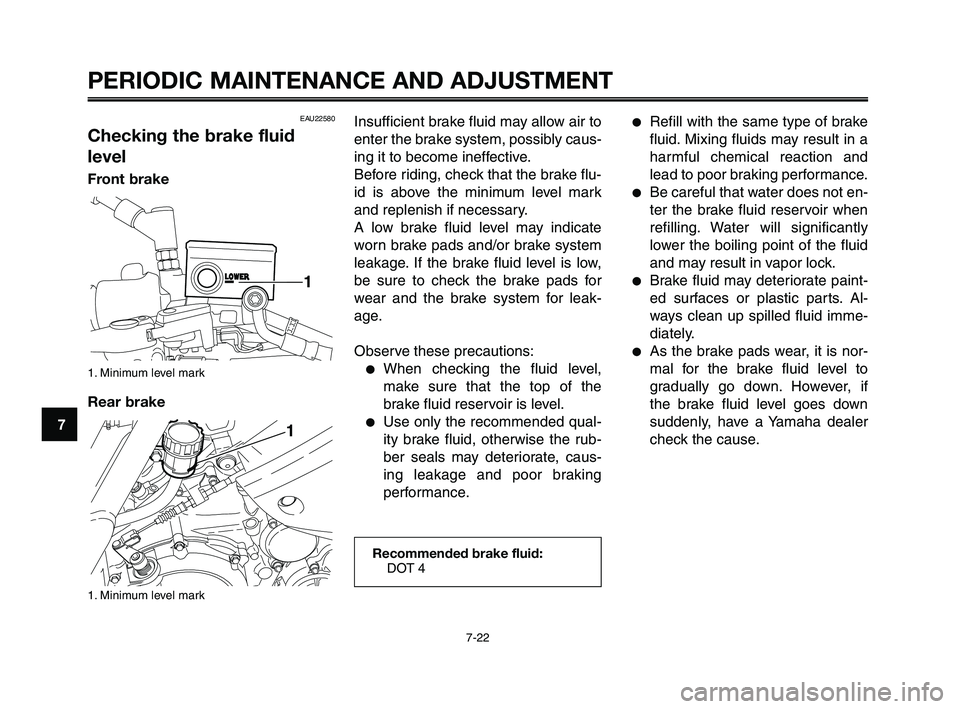
Before riding, check that the brake flu-
id is above the minimum level mark
and replenish if necessary.
A low brake fluid level may indicate
worn brake pads and/or brake system
leakage. If the brake fluid level is low,
be sure to check the brake pads for
wear and the brake system for leak-
age.
Observe these precautions:
●When checking the fluid level,
make sure that the top of the
brake fluid reservoir is level.
●Use only the recommended qual-
ity brake fluid, otherwise the rub-
ber seals may deteriorate, caus-
ing leakage and poor braking
performance.
●Refill with the same type of brake
fluid. Mixing fluids may result in a
harmful chemical reaction and
lead to poor braking performance.
●Be careful that water does not en-
ter the brake fluid reservoir when
refilling. Water will significantly
lower the boiling point of the fluid
and may result in vapor lock.
●Brake fluid may deteriorate paint-
ed surfaces or plastic parts. Al-
ways clean up spilled fluid imme-
diately.
●As the brake pads wear, it is nor-
mal for the brake fluid level to
gradually go down. However, if
the brake fluid level goes down
suddenly, have a Yamaha dealer
check the cause.
Recommended brake fluid:
DOT 4
EAU22580
Checking the brake fluid
level
Front brake
1. Minimum level mark
Rear brake
1. Minimum level mark
XT660Z 05-07 ING-AUS:MY03 04-06 ING 11-05-2009 10:10 Pagina 7-22
Page 79 of 100

1
2
3
4
5
6
7
8
9
10
PERIODIC MAINTENANCE AND ADJUSTMENT
7-37
1. Loosen the front wheel axle pinch
bolts, the wheel axle and the
brake caliper bolts.
2. Lift the front wheel off the ground
according to the procedure on
page 7-36.
3. Remove the brake caliper on
each side by removing the bolts.
ECA11050
NOTICE
Do not apply the brake after the
brake calipers have been removed,
otherwise the brake pads will be
forced shut.
4. Pull the wheel axle out, and then
remove the wheel.
EAUB1470
To install the front wheel
1. Lift the wheel up between the fork
legs.
2. Insert the wheel axle.
3. Install the brake calipers by in-
stalling the bolts.
TIP
Make sure that there is enough space
between the brake pads before in-
stalling the brake calipers onto the
brake discs.
4. Lower the front wheel so that it is
on the ground.
5. Tighten the wheel axle and the
brake caliper bolts to the specified
torques.
ECAB0060
NOTICE
Be sure the right brake disc is posi-
tioned exactly in the middle of the
caliper pads to prevent any brake
drag. Tap the side of the right fork
leg to position the disc correctly.
Tightening torques:
Wheel axle:
60 Nm (6.0 m·kgf, 44 ft·lbf)
Front wheel axle pinch bolt:
18 Nm (1.8 m·kgf, 13 ft·lbf)
Brake caliper bolt:
40 Nm (4.0 m·kgf, 29 ft·lbf)
6. Tighten wheel axle pinch bolt A,
and then pinch bolt B to the spec-
ified torque.
7. Retighten pinch bolt A to the
specified torque.
8. Apply the front brake several
times, and then while holding the
brake lever in, push down hard on
the handlebar several times to
check for proper fork operation.
XT660Z 05-07 ING-AUS:MY03 04-06 ING 11-05-2009 10:10 Pagina 7-37
Page 80 of 100

PERIODIC MAINTENANCE AND ADJUSTMENT
7-38
1
2
3
4
5
6
7
8
9
10
TIP
●If the drive chain is difficult to re-
move, remove the wheel axle first,
and then lift the wheel upward
enough to remove the drive chain
from the rear sprocket.
●The drive chain cannot be disas-
sembled.
7. While supporting the brake
caliper bracket, pull the wheel
axle out, and then remove the
wheel. NOTICE: Do not apply
the brake after the wheel has
been removed together with
the brake disc, otherwise the
brake pads will be forced shut.
EAUB1450
To install the rear wheel
1. Install the wheel and the brake
caliper bracket by inserting the
wheel axle from the right-hand
side.
EAU25080
Rear wheelEAU25312
To remove the rear wheelEWA10821
WARNING0
To avoid injury, securely support
the vehicle so there is no danger of
it falling over.
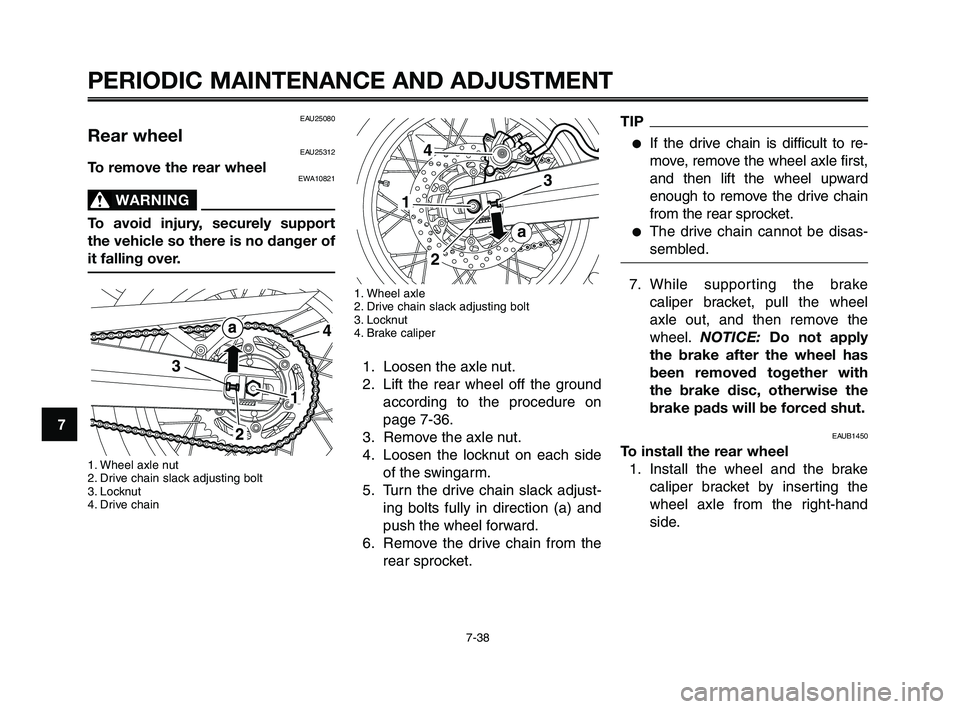
1. Wheel axle nut
2. Drive chain slack adjusting bolt
3. Locknut
4. Drive chain
3
4
1
1. Wheel axle
2. Drive chain slack adjusting bolt
3. Locknut
4. Brake caliper
1. Loosen the axle nut.
2. Lift the rear wheel off the ground
according to the procedure on
page 7-36.
3. Remove the axle nut.
4. Loosen the locknut on each side
of the swingarm.
5. Turn the drive chain slack adjust-
ing bolts fully in direction (a) and
push the wheel forward.
6. Remove the drive chain from the
rear sprocket.
4
3
1
2
a
XT660Z 05-07 ING-AUS:MY03 04-06 ING 11-05-2009 10:10 Pagina 7-38
Page 81 of 100

1
2
3
4
5
6
7
8
9
10
PERIODIC MAINTENANCE AND ADJUSTMENT
7-39
TIP
●Make sure that the slot in the
brake caliper bracket is fit over the
retainer on the swingarm.
●Make sure that there is enough
space between the brake pads
before installing the wheel.
2. Install the drive chain onto the
rear sprocket.
3. Install the axle nut, and then low-
er the rear wheel so that it is on
the ground.
4. Adjust the drive chain slack. (See
page 7-24.)
5. Apply the rear brake several
times, and then tighten the axle
nut to the specified torque.
Tightening torque:
Axle nut:
105 Nm (10.5 m·kgf, 75 ft·lbf)
EAU25871
Troubleshooting
Although Yamaha motorcycles receive
a thorough inspection before shipment
from the factory, trouble may occur
during operation. Any problem in the
fuel, compression, or ignition systems,
for example, can cause poor starting
and loss of power.
The following troubleshooting charts
represent quick and easy procedures
for checking these vital systems your-
self. However, should your motorcycle
require any repair, take it to a Yamaha
dealer, whose skilled technicians have
the necessary tools, experience, and
know-how to service the motorcycle
properly.
Use only genuine Yamaha replace-
ment parts. Imitation parts may look
like Yamaha parts, but they are often
inferior, have a shorter service life and
can lead to expensive repair bills.
EWA15141
WARNING0
When checking the fuel system, do
not smoke, and make sure there
are no open flames or sparks in the
area, including pilot lights from wa-
ter heaters or furnaces. Gasoline or
gasoline vapors can ignite or ex-
plode, causing severe injury or
property damage.
XT660Z 05-07 ING-AUS:MY03 04-06 ING 11-05-2009 10:10 Pagina 7-39