Page 35 of 88

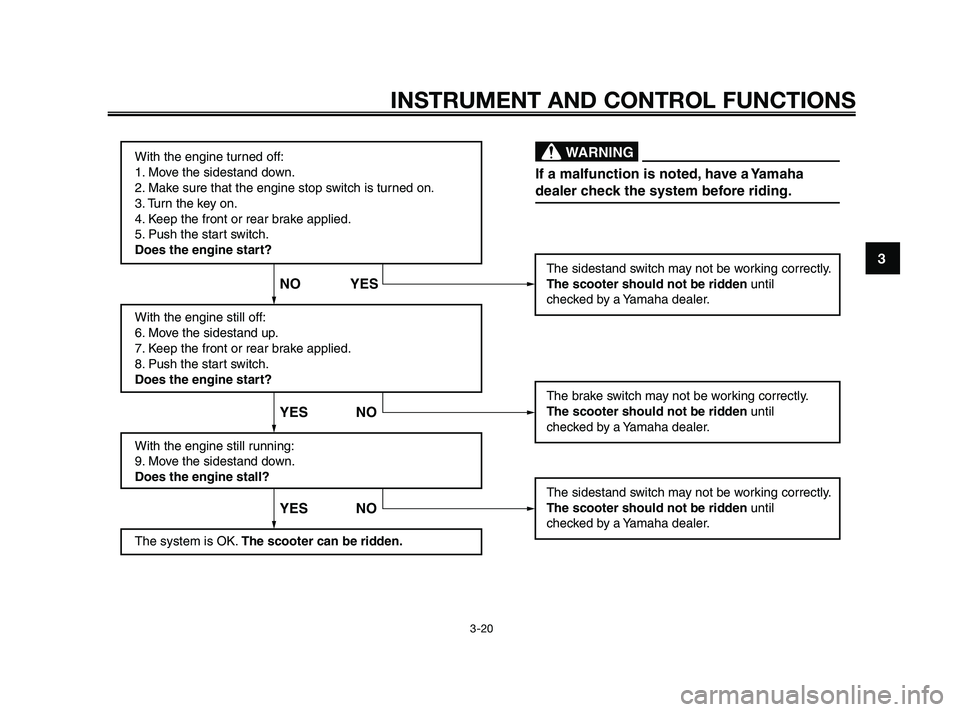
With the engine turned off:
1. Move the sidestand down.
2. Make sure that the engine stop switch is turned on.
3. Turn the key on.
4. Keep the front or rear brake applied.
5. Push the start switch.
Does the engine start?
With the engine still off:
6. Move the sidestand up.
7. Keep the front or rear brake applied.
8. Push the start switch.
Does the engine start?
With the engine still running:
9. Move the sidestand down.
Does the engine stall?
The system is OK. The scooter can be ridden.The sidestand switch may not be working correctly.
The scooter should not be ridden until
checked by a Yamaha dealer.
The brake switch may not be working correctly.
The scooter should not be ridden until
checked by a Yamaha dealer.
The sidestand switch may not be working correctly.
The scooter should not be ridden until
checked by a Yamaha dealer.
YES NO YES NO NO YES
If a malfunction is noted, have a Yamaha
dealer check the system before riding.
WARNING
INSTRUMENT AND CONTROL FUNCTIONS
3-20
3
39D-F8199-E0 4/11/09 20:21 Página 35
Page 36 of 88

FOR YOUR SAFETY – PRE-OPERATION CHECKS
4-1
4
EAU15596
Inspect your vehicle each time you use it to make sure the vehicle is in safe operating condition. Always follow the ins-
pection and maintenance procedures and schedules described in the Owner’s Manual.
EWA11151
Failure to inspect or maintain the vehicle properly increases the possibility of an accident or equipment dama-
ge. Do not operate the vehicle if you find any problem. If a problem cannot be corrected by the procedures pro-
vided in this manual, have the vehicle inspected by a Yamaha dealer.
Before using this vehicle, check the following points:
WARNING
ITEM CHECKS PAGE
• Check fuel level in fuel tank.
Fuel• Refuel if necessary.3-13
• Check fuel line for leakage.
• Check oil level in engine.
Engine oil• If necessary, add recommended oil to specified level. 6-10
• Check vehicle for oil leakage.
Final transmission oil• Check vehicle for oil leakage. 6-13
• Check coolant level in reservoir.
Coolant• If necessary, add recommended coolant to specified level. 6-14
• Check cooling system for leakage.
• Check operation.
• If soft or spongy, have Yamaha dealer bleed hydraulic system.
• Check brake pads for wear.
Front brake• Replace if necessary. 6-20, 6-21
• Check fluid level in reservoir.
• If necessary, add recommended brake fluid to specified level.
• Check hydraulic system for leakage.
39D-F8199-E0 4/11/09 20:21 Página 36
Page 37 of 88

ITEM CHECKS PAGE
• Check operation.
• If soft or spongy, have Yamaha dealer bleed hydraulic system.
• Check brake pads for wear.
Rear brake• Replace if necessary. 6-20, 6-21
• Check fluid level in reservoir.
• If necessary, add recommended brake fluid to specified level.
• Check hydraulic system for leakage.
• Make sure that operation is smooth.
Throttle grip• Check cable free play.
• If necessary, have Yamaha dealer adjust cable free play and lubricate cable 6-17, 6-22
and grip housing.
• Check for damage.
Wheels and tires• Check tire condition and tread depth.
• Check air pressure.6-18, 6-19
• Correct if necessary.
Brake levers• Make sure that operation is smooth.
• Lubricate lever pivoting points if necessary.6-23
Centerstand, sidestand• Make sure that operation is smooth.
• Lubricate pivots if necessary.6-23
Chassis fasteners• Make sure that all nuts, bolts and screws are properly tightened.
• Tighten if necessary.—
Instruments, lights, • Check operation.
signals and switches• Correct if necessary.—
Sidestand switch • Check operation of ignition circuit cut-off system.
• If system is not working correctly, have Yamaha dealer check vehicle.3-18
FOR YOUR SAFETY – PRE-OPERATION CHECKS
4-2
4
39D-F8199-E0 4/11/09 20:21 Página 37
Page 39 of 88

2. Close the throttle completely.
3. Start the engine by pushing the
start switch while applying the
front or rear brake. NOTICE: For
maximum engine life, never
accelerate hard when the engi-
ne is cold!
[ECA11041]
If the engine does not start, rele-
ase the start switch, wait a few
seconds, and then try again.
Each starting attempt should be
as short as possible to preserve
the battery. Do not crank the
engine more than 10 seconds on
any one attempt.
EAU45091
Starting off
1. While pulling the rear brake lever
with your left hand and holding
the grab bar with your right hand,
push the scooter off the centers-
tand.
1. Grab bar
2. Sit astride the seat, and then
adjust the rear view mirrors.
3. Switch the turn signals on.
4. Check for oncoming traffic, and
then slowly turn the throttle grip
(on the right) in order to take off.
5. Switch the turn signals off.
EAU16780
Acceleration and
deceleration
The speed can be adjusted by ope-
ning and closing the throttle. To incre-
ase the speed, turn the throttle grip in
direction (a). To reduce the speed,
turn the throttle grip in direction (b).
(a)(b)
OPERATION AND IMPORTANT RIDING POINTS
5-2
5
39D-F8199-E0 4/11/09 20:21 Página 39
Page 40 of 88

EAU16793
BrakingEWA10300
�Avoid braking hard or suddenly
(especially when leaning over
to one side), otherwise the sco-
oter may skid or overturn.
�Railroad crossings, streetcar
rails, iron plates on road cons-
truction sites, and manhole
covers become extremely slip-
pery when wet. Therefore, slow
down when approaching such
areas and cross them with cau-
tion.
�Keep in mind that braking on a
wet road is much more difficult.
�Ride slowly down a hill, as bra-
king downhill can be very diffi-
cult.
1. Close the throttle completely.
2. Apply both front and rear brakes
simultaneously while gradually
increasing the pressure.Front
Rear
EAU16820
Tips for reducing fuel
consumption
Fuel consumption depends largely on
your riding style. Consider the follo-
wing tips to reduce fuel consumption:
�Avoid high engine speeds during
acceleration.
�Avoid high engine speeds with no
load on the engine.
�Turn the engine off instead of let-
ting it idle for an extended length
of time (e.g., in traffic jams, at
traffic lights or at railroad cros-
sings).
WARNING
OPERATION AND IMPORTANT RIDING POINTS
5-3
5
39D-F8199-E0 4/11/09 20:21 Página 40
Page 45 of 88
PERIODIC MAINTENANCE AND ADJUSTMENT
6-4
6
EAU17717
General maintenance and lubrication chart
ODOMETER READING
CHECK OR ANNUAL
NO. ITEM MAINTENANCE JOB
1000 km 6000 km 12000 km 18000 km 24000 kmCHECK
(600 mi) (3500 mi) (7000 mi) (10500 mi) (14000 mi)
1Air filter element• Replace.√√
2V-belt case air filter
element• Clean.√√√ √
• Check operation, fluid level and
3*Front brakevehicle for fluid leakage.√√ √ √ √ √
• Replace brake pads. Whenever worn to the limit
4*Rear brake• Check operation, fluid level and
vehicle for fluid leakage.√√ √ √ √
√
• Replace brake pads. Whenever worn to the limit
5*Brake hoses• Check for cracks or damage.√√√ √√• Replace. Every 4 years
6*Wheels• Check runout and for damage.√√√ √
• Check tread depth and for
damage.
7*Tires• Replace if necessary.√√√ √√
• Check air pressure.
• Correct if necessary.
8*Wheel bearings• Check bearing for looseness or
damage.√√√ √
39D-F8199-E0 4/11/09 20:21 Página 45
Page 46 of 88

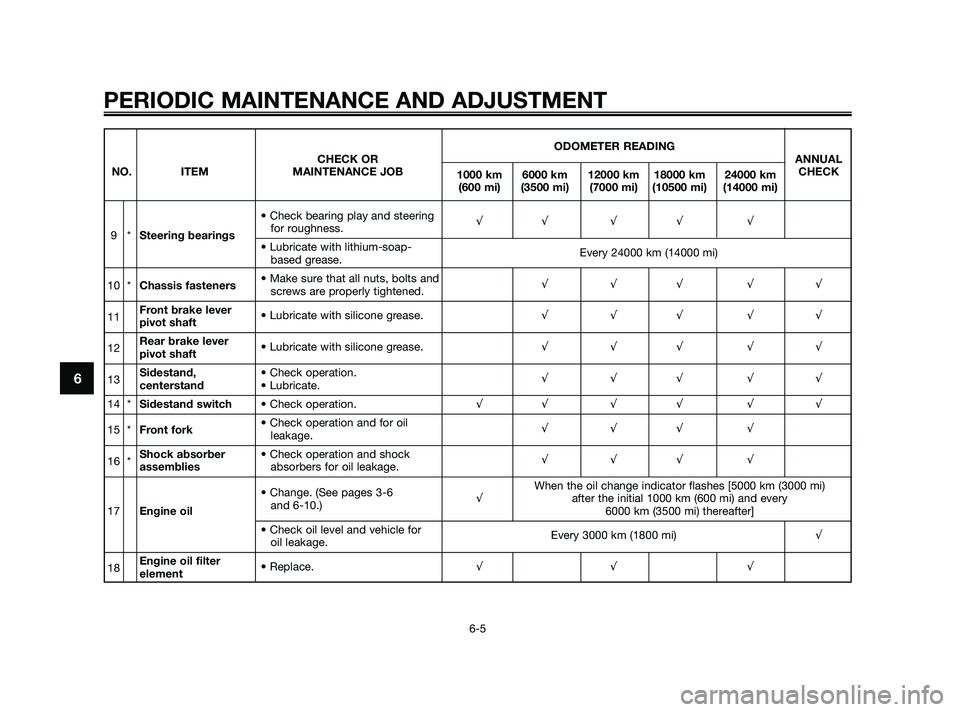
PERIODIC MAINTENANCE AND ADJUSTMENT
6-5
6
ODOMETER READING
CHECK OR ANNUAL
NO. ITEM MAINTENANCE JOB
1000 km 6000 km 12000 km 18000 km 24000 kmCHECK
(600 mi) (3500 mi) (7000 mi) (10500 mi) (14000 mi)
• Check bearing play and steering
9*Steering bearingsfor roughness.√√ √ √ √
• Lubricate with lithium-soap-
based grease.Every 24000 km (14000 mi)
10 *Chassis fasteners• Make sure that all nuts, bolts and
screws are properly tightened.√√√ √√
11Front brake lever
pivot shaft• Lubricate with silicone grease.√√√ √√
12Rear brake lever
pivot shaft• Lubricate with silicone grease.√√√ √√
13Sidestand, • Check operation.
centerstand• Lubricate.√√√ √√
14 *Sidestand switch• Check operation.√√ √ √ √ √
15 *Front fork• Check operation and for oil
leakage.√√√ √
16 *Shock absorber • Check operation and shock
assembliesabsorbers for oil leakage.√√√ √
When the oil change indicator flashes [5000 km (3000 mi)
• Change. (See pages 3-6
√after the initial 1000 km (600 mi) and every
17Engine oiland 6-10.)
6000 km (3500 mi) thereafter]
• Check oil level and vehicle for
oil leakage.Every 3000 km (1800 mi)√
18Engine oil filter
element• Replace.√√ √
39D-F8199-E0 4/11/09 20:21 Página 46
Page 47 of 88
PERIODIC MAINTENANCE AND ADJUSTMENT
6-6
6
ODOMETER READING
CHECK OR ANNUAL
NO. ITEM MAINTENANCE JOB
1000 km 6000 km 12000 km 18000 km 24000 kmCHECK
(600 mi) (3500 mi) (7000 mi) (10500 mi) (14000 mi)
• Check coolant level and vehicle
19 *Cooling systemfor coolant leakage.√√√ √√
• Change. Every 3 years
20Final transmission • Check vehicle for oil leakage.√√ √oil
• Change.√√ √
21 *V-belt• Replace.When the V-belt replacement indicator flashes
[every 18000 km (10500 mi)]
22 *Front and rear brake
switches• Check operation.√√ √ √ √ √
23Moving parts and
cables• Lubricate.√√√ √√
• Check operation and free play.
Throttle grip • Adjust the throttle cable free play
24 *housingif necessary.√√√ √√
and cable• Lubricate the throttle grip housing
and cable.
25 *Lights, signals and • Check operation.
switches• Adjust headlight beam.√√ √ √ √ √
39D-F8199-E0 4/11/09 20:21 Página 47