Page 26 of 168
3-1
3
EBU17680
DESCRIPTION
EBU17690Left view
EBU17700Right view
1. Radiator cap
2. Battery
3. Fuses
4. Air filter case
5. Spark arrester
6. Engine oil dipstick
7. Oil filter cartridge
8. Coolant reservoir
1. Rear shock absorber assembly spring preload adjusting
ring
2. Rear storage compartment and tool kit
3. Fuel tank cap cover
4. Front shock absorber assembly spring preload adjusting
ring
5. Spark plug
6. Brake pedal
7. V-belt case drain plug
U43P62E0.book Page 1 Tuesday, February 17, 2009 1:09 PM
Page 52 of 168

5-1
5
EBU19201
PRE-OPERATION CHECKS
EBU19224Inspect your vehicle each time you use it to make sure the vehicle is in safe operating condition. Always
follow the inspection and maintenance procedures and schedules described in the Owner’s Manual.
WARNING
EWB00481Failure to inspect or maintain the vehicle properly increases the possibility of an accident or equip-
ment damage. Do not operate the vehicle if you find any problem. If a problem cannot be corrected
by the procedures provided in this manual, have the vehicle inspected by a Yamaha dealer.Before using this vehicle, check the following points:
ITEM ROUTINE PAGE
FuelCheck fuel level in fuel tank, and add recommended fuel if neces-
sary.
Check fuel line for leakage. Correct if necessary.4-16, 5-3
Engine oilCheck oil level in engine, and add recommended oil to specified lev-
el if necessary.
Check ATV for oil leakage. Correct if necessary.5-3, 8-22
Final gear oilCheck ATV for oil leakage. Correct if necessary. 5-3, 8-26
Differential gear oilCheck ATV for oil leakage. Correct if necessary. 5-3, 8-28
CoolantCheck coolant level in reservoir, and add recommended coolant to
specified level if necessary.
Check cooling system for leakage. Correct if necessary.5-3, 8-30
U43P62E0.book Page 1 Tuesday, February 17, 2009 1:09 PM
Page 121 of 168

4. Remove the coolant reservoir cap")
8-31
8
TIPThe coolant should be between the minimum and
maximum level marks.3. If the coolant is at or below the minimum level
mark, remove panel D. (See page 8-8.)
4. Remove the coolant reservoir cap, add cool-
ant or distilled water to the maximum level
mark, install the reservoir cap, and then install
the panel. NOTICE: If coolant is not avail-
able, use distilled water or soft tap water
instead. Do not use hard water or salt wa-
ter since they are harmful to the engine. Ifwater has been used instead of coolant, re-
place it with coolant as soon as possible,
otherwise the cooling system will not be
protected against frost and corrosion. If
water has been added to the coolant, have
a Yamaha dealer check the antifreeze con-
tent of the coolant as soon as possible,
otherwise the effectiveness of the coolant
will be reduced.
[ECB01011]
1. Maximum level mark
2. Minimum level mark
1. Coolant reservoir cap
2. Maximum level mark
3. Minimum level mark
U43P62E0.book Page 31 Tuesday, February 17, 2009 1:09 PM
Page 122 of 168
8-32
8
TIP�The radiator fan is automatically switched on or
off according to the coolant temperature in the
radiator.�If the engine overheats, see page 8-63 for fur-
ther instructions.EBU27762To change the coolant
WARNING
EWB01890Wait for the engine and radiator to cool before
removing the radiator cap. You could be
burned by hot fluid and steam blown out under
pressure. Always place a thick rag over the cap
when opening. Allow any remaining pressure
to escape before completely removing the cap.1. Place the ATV on a level surface.
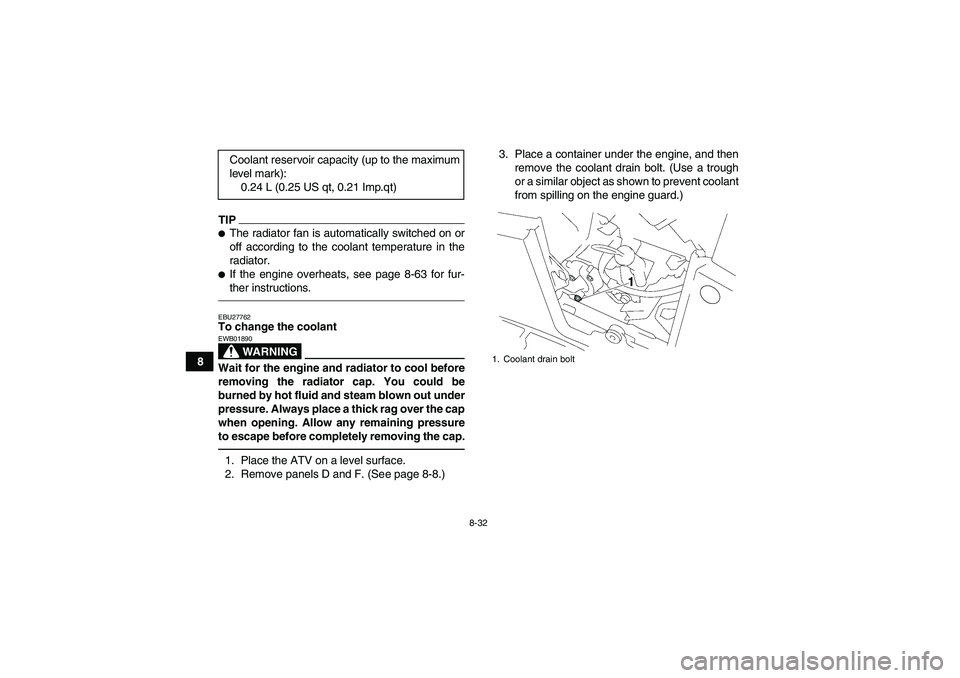
2. Remove panels D and F. (See page 8-8.)3. Place a container under the engine, and then
remove the coolant drain bolt. (Use a trough
or a similar object as shown to prevent coolant
from spilling on the engine guard.) Coolant reservoir capacity (up to the maximum
level mark):
0.24 L (0.25 US qt, 0.21 Imp.qt)
1. Coolant drain bolt
U43P62E0.book Page 32 Tuesday, February 17, 2009 1:09 PM
Page 123 of 168
8-33
8 4. Remove panel B. (See page 8-8.)
5. Remove the radiator cap.6. Remove the coolant reservoir cap.
7. Disconnect the hose on the coolant reservoir
side, and then drain the coolant from the cool-
ant reservoir.
8. After draining the coolant, thoroughly flush the
cooling system with clean tap water.
9. Replace the coolant drain bolt washer if it is
damaged, install the coolant drain bolt, and
then tighten it to the specified torque.
1. Trough
1. Radiator cap
1. Coolant reservoir hoseTightening torque:
Coolant drain bolt:
10 Nm (1.0 m·kgf, 7.2 ft·lbf)
U43P62E0.book Page 33 Tuesday, February 17, 2009 1:09 PM
Page 124 of 168

8-34
810. Connect the coolant reservoir hose.
11. Pour the recommended coolant into the radia-
tor until it is full.
12. Pour the recommended coolant into the reser-
voir to the maximum level mark, and then in-
stall the reservoir cap. NOTICE: Mix
antifreeze with distilled water only. Howev-
er, if distilled water is not available, soft
water may be used for refilling. Do not use
hard water or salt water since they are
harmful to the engine.
[ECB00991]
13. Loosen the water pump air bleed bolt, without
removing it, to allow all of the air to escape
from the air bleed bolt hole.
14. When coolant begins to flow out of the bolt
hole, tighten the water pump air bleed bolt to
the specified torque.
15. Remove panel E. (See page 8-8.)
16. Loosen the clamp screw, and then remove the
V-belt cooling duct. Antifreeze/water mixture ratio:
1:1
Recommended antifreeze:
High-quality ethylene glycol antifreeze con-
taining corrosion inhibitors for aluminum en-
gines
Coolant quantity:
Radiator capacity (including all routes):
1.99 L (2.10 US qt, 1.75 Imp.qt)
Coolant reservoir capacity (up to the maxi-
mum level mark):
0.24 L (0.25 US qt, 0.21 Imp.qt)1. Water pump air bleed boltTightening torque:
Water pump air bleed bolt:
10 Nm (1.0 m·kgf, 7.2 ft·lbf)
U43P62E0.book Page 34 Tuesday, February 17, 2009 1:09 PM
Page 154 of 168
8-64
8Engine overheating
WARNING
EWB02290Wait for the engine and radiator to cool before removing the radiator cap. You could be burned by
hot fluid and steam blown out under pressure. Always put a thick rag over the cap when opening.
Allow any remaining pressure to escape before completely removing the cap.TIPIf coolant is not available, tap water can be temporarily used instead, provided that it is changed to the rec-
ommended coolant as soon as possible.Wait until the
engine has cooled.
Check the coolant level in the
reservoir and radiator.
The coolant level
is OK.The coolant level is low.
Check the cooling system
for leakage.
Have a Yamaha dealer check
and repair the cooling system.Add coolant. (See TIP.)
Start the engine. If the engine overheats again, have a
Yamaha dealer check and repair the cooling system.
There is
leakage.
There is
no leakage.
U43P62E0.book Page 64 Tuesday, February 17, 2009 1:09 PM
Page 159 of 168

10-2
10
Type:
SAE 5W-30 or SAE 10W-40 or SAE 20W-50
Recommended engine oil grade:
API service SG type or higher, JASO standard MA
Engine oil quantity:
Without oil filter cartridge replacement:
2.00 L (2.11 US qt, 1.76 Imp.qt)
With oil filter cartridge replacement:
2.10 L (2.22 US qt, 1.85 Imp.qt)Final gear oil:Type:
SAE 80 API GL-4 Hypoid gear oil
Quantity:
0.20 L (0.21 US qt, 0.18 Imp.qt)Differential gear oil:Type:
SAE 80 API GL-4 Hypoid gear oilQuantity:
0.22 L (0.23 US qt, 0.19 Imp.qt)
Cooling system:Coolant reservoir capacity (up to the maximum level mark):
0.24 L (0.25 US qt, 0.21 Imp.qt)
Radiator capacity (including all routes):
1.99 L (2.10 US qt, 1.75 Imp.qt)Air filter:Air filter element:
Wet elementFuel:Recommended fuel:
YFM700FAPZ Unleaded gasoline only
YFM7FGPHZ Regular unleaded gasoline only
YFM7FGPZ Regular unleaded gasoline only
Fuel tank capacity:
20.0 L (5.28 US gal, 4.40 Imp.gal)
Fuel reserve amount:
4.5 L (1.19 US gal, 0.99 Imp.gal)Fuel injection:Throttle body:
Type/quantity:
44EIS/1Spark plug (s):Manufacturer/model:
NGK/LMAR6A-9
Spark plug gap:
0.8–0.9 mm (0.031–0.035 in)Clutch:Clutch type:
Wet, centrifugal automatic
0 10 30 50 70 90 110 130 ˚F -20 -10 0 10 20 30 40 50 ˚CSAE 5W-30
SAE 10W-40
SAE 20W-50
U43P62E0.book Page 2 Tuesday, February 17, 2009 1:09 PM


5. Remove the radiator cap.6. Remove the coolant reservoir cap.
7. Disconnect the hose on the coolant reservoir
side, and then drain the coolant from the cool")
