Page 10 of 168

Checking and lubricating the brake
pedal ...................................................... 8-51
Checking the wheel hub bearings ............ 8-52
Checking the stabilizer bushes ................ 8-52
Lubricating the rear knuckle pivots ........... 8-52
Lubricating the steering shaft ................... 8-52
Battery ...................................................... 8-53
Replacing a fuse ...................................... 8-56
Replacing a headlight bulb ....................... 8-58
Adjusting a headlight beam ...................... 8-59
Replacing the tail/brake light bulb ............ 8-60
Removing a wheel .................................... 8-61
Installing a wheel ...................................... 8-61
Troubleshooting ....................................... 8-62
Troubleshooting charts ............................. 8-63
CLEANING AND STORAGE .......................... 9-1
Cleaning ..................................................... 9-1
Storage ....................................................... 9-2
SPECIFICATIONS ...................................... 10-1
CONSUMER INFORMATION ...................... 11-1
Identification numbers .............................. 11-1
U43P62E0.book Page 3 Tuesday, February 17, 2009 1:09 PM
Page 26 of 168
3-1
3
EBU17680
DESCRIPTION
EBU17690Left view
EBU17700Right view
1. Radiator cap
2. Battery
3. Fuses
4. Air filter case
5. Spark arrester
6. Engine oil dipstick
7. Oil filter cartridge
8. Coolant reservoir
1. Rear shock absorber assembly spring preload adjusting
ring
2. Rear storage compartment and tool kit
3. Fuel tank cap cover
4. Front shock absorber assembly spring preload adjusting
ring
5. Spark plug
6. Brake pedal
7. V-belt case drain plug
U43P62E0.book Page 1 Tuesday, February 17, 2009 1:09 PM
Page 35 of 168

4-8
4
EBU18101Start switch“”
Push this switch to crank the engine with the start-
er. See the starting instructions on page 6-1 prior
to starting the engine.EBU18152Light switch“//OFF”
Set this switch to“” to turn on the low beams
and the taillight. Set the switch to“” to turn on
the high beams and the taillight. Set the switch to
“OFF” to turn off all the lights.NOTICEECB00041Do not use the headlights with the engine
turned off for an extended period of time, oth-
erwise the battery may discharge to the point
that the starter motor will not operate properly.
If this should happen, remove the battery and
recharge it. See page 8-53 for battery charging
information.EBU18170Horn switch“”
Press the switch to sound the horn.
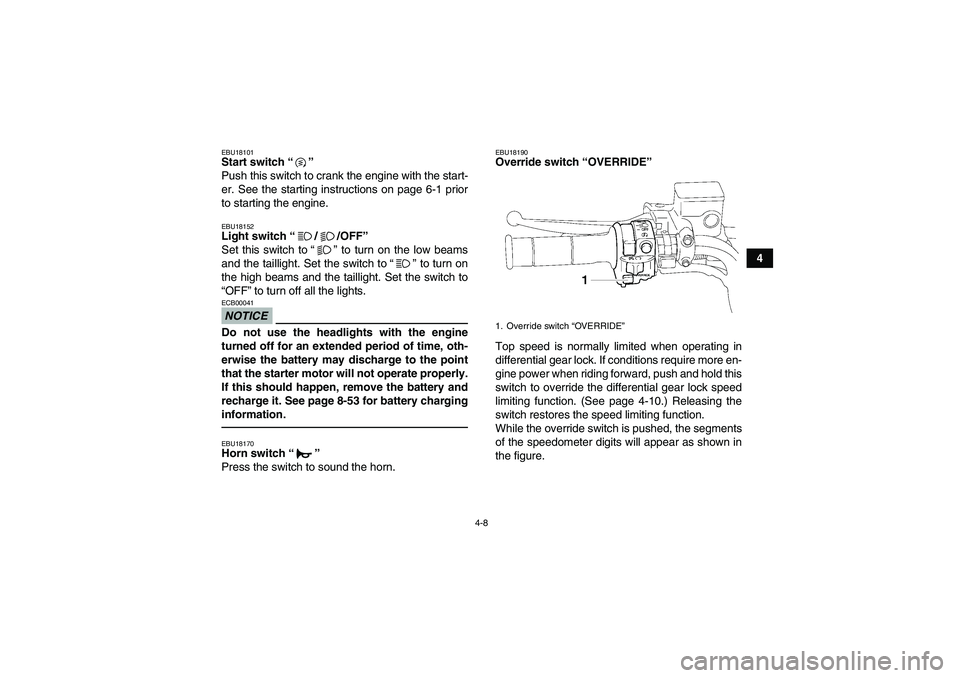
EBU18190Override switch “OVERRIDE”
Top speed is normally limited when operating in
differential gear lock. If conditions require more en-
gine power when riding forward, push and hold this
switch to override the differential gear lock speed
limiting function. (See page 4-10.) Releasing the
switch restores the speed limiting function.
While the override switch is pushed, the segments
of the speedometer digits will appear as shown in
the figure.1. Override switch “OVERRIDE”
U43P62E0.book Page 8 Tuesday, February 17, 2009 1:09 PM
Page 51 of 168
4-24
4
�If accessories are used without the engine
running or with the headlights turned on, the
battery will lose its charge and engine start-
ing may become difficult.�Do not use an automotive cigarette lighter or
other accessories with a plug that gets hot
because the jack can be damaged.
U43P62E0.book Page 24 Tuesday, February 17, 2009 1:09 PM
Page 60 of 168

6-2
6
�The rear brake lever or brake pedal is applied
with the drive select lever in any position. How-
ever, it is recommended to shift into the neutral
or park position before starting the engine.3. Apply the rear brake lever or brake pedal.
4. Completely close the throttle lever and start
the engine by pushing the start switch.
NOTICE: For maximum engine life, never
accelerate hard when the engine is cold!
[ECB00162]
TIPIf the engine fails to start, release the start switch,
then push it again. Pause a few seconds before
the next attempt. Each cranking should be as short
as possible to preserve battery energy. Do not
crank the engine more than 10 seconds on each
attempt.
EBU20441Operating the drive select lever and
driving in reverse NOTICEECB00170Before shifting, stop the ATV, otherwise the
transmission may be damaged.Shifting: Neutral to High-range and High-range
to Low-range
1. Bring the ATV to a complete stop.
2. Apply the brake pedal, and then shift by mov-
ing the drive select lever along the shift guide.TIPMake sure that the drive select lever is completely
shifted into position.
U43P62E0.book Page 2 Tuesday, February 17, 2009 1:09 PM
Page 143 of 168

8-53
8
EBU29045Battery This model is equipped with a VRLA (Valve Regu-
lated Lead Acid) battery. There is no need to check
the electrolyte or to add distilled water. However,
the battery lead connections need to be checked
and, if necessary, tightened.NOTICEECB00620Never attempt to remove the battery cell seals,
as this would permanently damage the battery.
WARNING
EWB02160Battery electrolyte is poisonous and danger-
ous, as it contains sulfuric acid, which can
cause severe burns. Avoid contact with skin,
eyes or clothing. Always shield your eyes
when working near batteries.
Antidote:
EXTERNAL: Flush with water.
INTERNAL: Drink large quantities of water or
milk. Follow with milk of magnesia, beaten egg
or vegetable oil. Call a physician immediately.
EYES: Flush with water for 15 minutes and get
prompt medical attention.Batteries produce explosive gases. Keep
sparks, flame, cigarettes or other sources of ig-
nition away. Ventilate when charging or using
in an enclosed space.
KEEP OUT OF REACH OF CHILDREN.
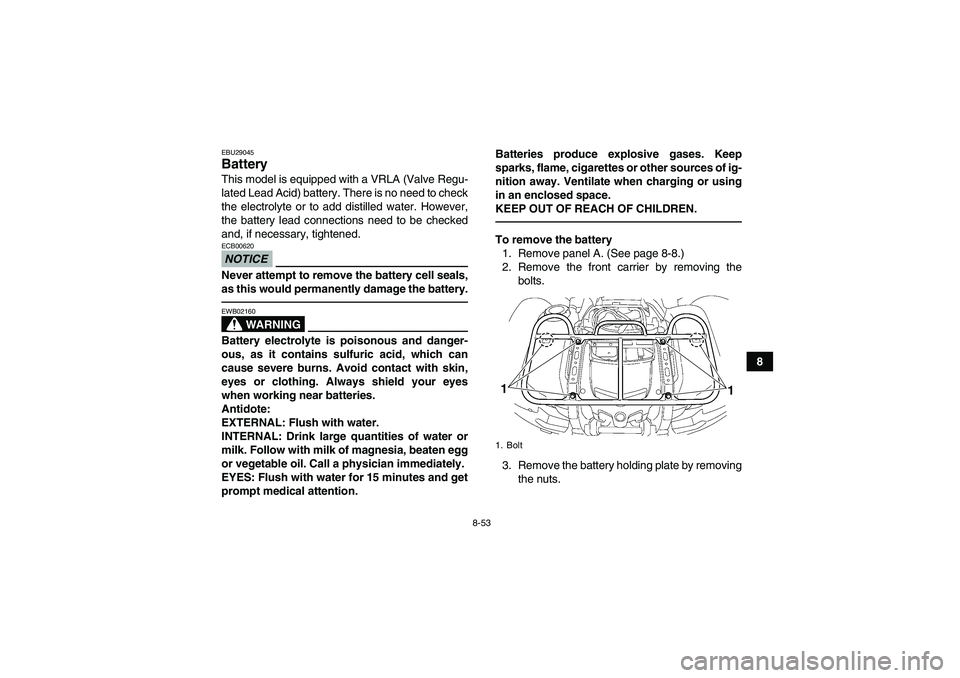
To remove the battery
1. Remove panel A. (See page 8-8.)
2. Remove the front carrier by removing the
bolts.
3. Remove the battery holding plate by removing
the nuts.1. Bolt1
1
U43P62E0.book Page 53 Tuesday, February 17, 2009 1:09 PM
Page 144 of 168

8-54
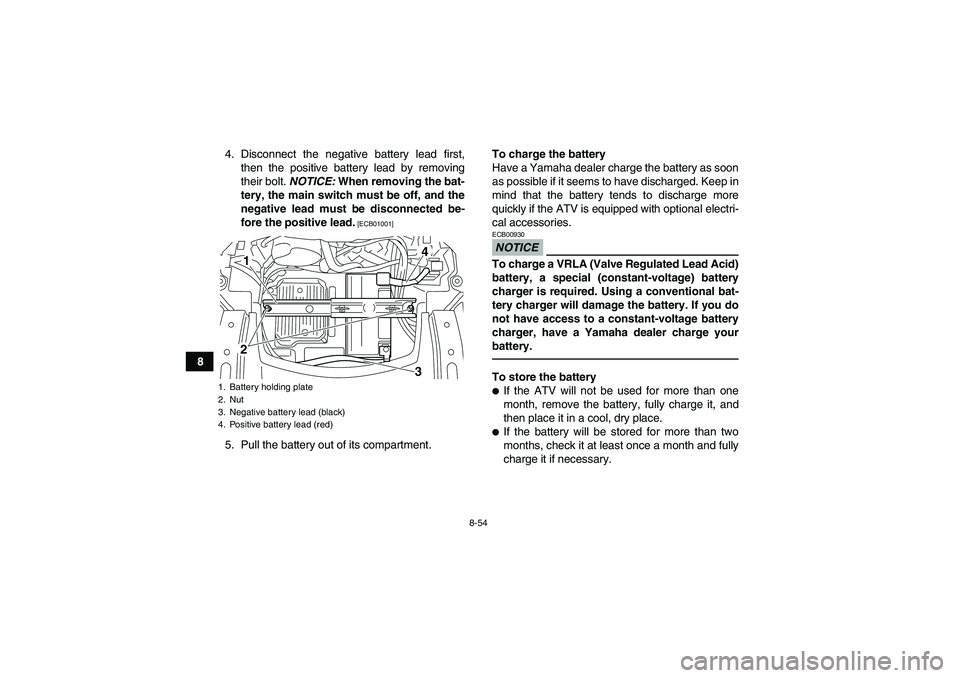
84. Disconnect the negative battery lead first,
then the positive battery lead by removing
their bolt. NOTICE: When removing the bat-
tery, the main switch must be off, and the
negative lead must be disconnected be-
fore the positive lead.
[ECB01001]
5. Pull the battery out of its compartment.To charge the battery
Have a Yamaha dealer charge the battery as soon
as possible if it seems to have discharged. Keep in
mind that the battery tends to discharge more
quickly if the ATV is equipped with optional electri-
cal accessories.
NOTICEECB00930To charge a VRLA (Valve Regulated Lead Acid)
battery, a special (constant-voltage) battery
charger is required. Using a conventional bat-
tery charger will damage the battery. If you do
not have access to a constant-voltage battery
charger, have a Yamaha dealer charge your
battery.To store the battery�If the ATV will not be used for more than one
month, remove the battery, fully charge it, and
then place it in a cool, dry place.�If the battery will be stored for more than two
months, check it at least once a month and fully
charge it if necessary.
1. Battery holding plate
2. Nut
3. Negative battery lead (black)
4. Positive battery lead (red)
12
43
U43P62E0.book Page 54 Tuesday, February 17, 2009 1:09 PM
Page 145 of 168
8-55
8
NOTICEECB00940Always keep the battery charged. Storing a dis-
charged battery can cause permanent battery
damage.To install the batteryTIPBe sure the battery is fully charged.1. Place the battery in its compartment.
2. Connect the positive battery lead first, then
connect the negative battery lead by installing
their bolt.3. Install the battery holding plate by installing
the nuts.
4. Install the front carrier by installing the bolts.
5. Install the panel.
1. Positive battery lead (red)
2. Negative battery lead (black)
12
U43P62E0.book Page 55 Tuesday, February 17, 2009 1:09 PM