Page 91 of 168

8-1
8
EBU28783
PERIODIC MAINTENANCE AND ADJUSTMENT
EBU21671Periodic inspection, adjustment, and lubrication
will keep your vehicle in the safest and most effi-
cient condition possible. Safety is an obligation of
the vehicle owner/operator. The most important
points of vehicle inspection, adjustment, and lubri-
cation are explained on the following pages.
WARNING
EWB01841Failure to properly maintain the vehicle or per-
forming maintenance activities incorrectly may
increase your risk of injury or death during ser-
vice or while using the vehicle. If you are not fa-
miliar with vehicle service, have a Yamaha
dealer perform the service.
WARNING
EWB02561Turn off the engine when performing mainte-
nance unless otherwise specified.�A running engine has moving parts that can
catch on body parts or clothing and electri-
cal parts that can cause shocks or fires.
�Running the engine while servicing can lead
to eye injury, burns, fire, or carbon monoxide
poisoning - possibly leading to death. See
page 2-1 for more information about carbon
monoxide.The intervals given in the periodic maintenance
and lubrication chart should be considered as a
general guide under normal riding conditions.
However, DEPENDING ON THE WEATHER,
TERRAIN, GEOGRAPHICAL LOCATION, AND
INDIVIDUAL USE, THE MAINTENANCE INTER-
VALS MAY NEED TO BE SHORTENED.EBU27111Owner’s manual and tool kit Be sure to put this owner’s manual in the plastic
bag and to always carry it as well as the owner’s
tool kit and the low-pressure tire gauge in their re-
spective compartments under the seat.
U43P62E0.book Page 1 Tuesday, February 17, 2009 1:09 PM
Page 122 of 168
8-32
8
TIP�The radiator fan is automatically switched on or
off according to the coolant temperature in the
radiator.�If the engine overheats, see page 8-63 for fur-
ther instructions.EBU27762To change the coolant
WARNING
EWB01890Wait for the engine and radiator to cool before
removing the radiator cap. You could be
burned by hot fluid and steam blown out under
pressure. Always place a thick rag over the cap
when opening. Allow any remaining pressure
to escape before completely removing the cap.1. Place the ATV on a level surface.
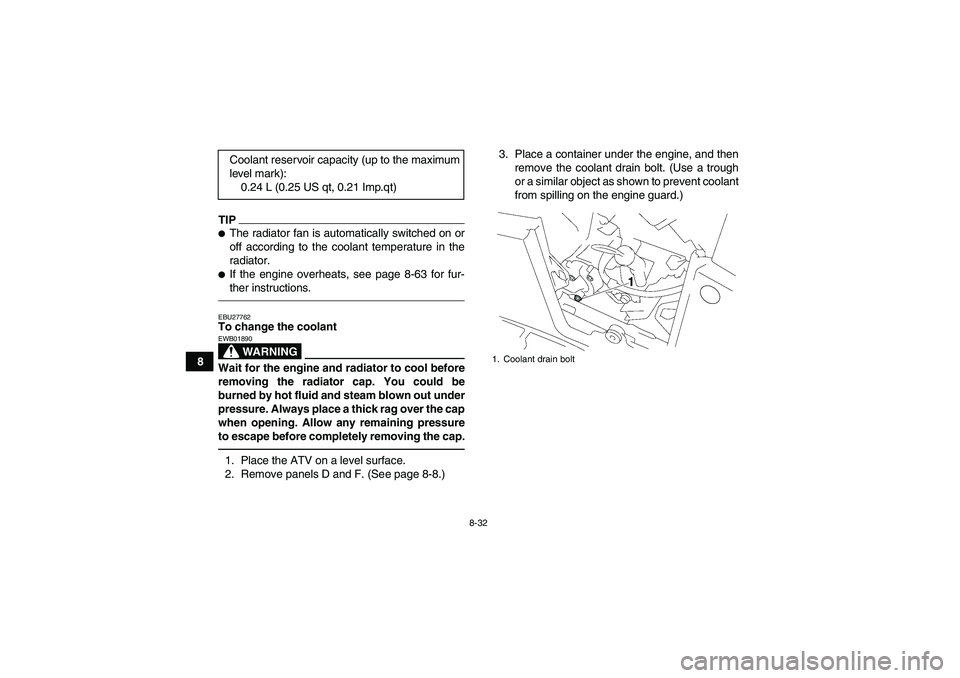
2. Remove panels D and F. (See page 8-8.)3. Place a container under the engine, and then
remove the coolant drain bolt. (Use a trough
or a similar object as shown to prevent coolant
from spilling on the engine guard.) Coolant reservoir capacity (up to the maximum
level mark):
0.24 L (0.25 US qt, 0.21 Imp.qt)
1. Coolant drain bolt
U43P62E0.book Page 32 Tuesday, February 17, 2009 1:09 PM
Page 128 of 168

8-38
85. Clean the mesh with solvent, and then wipe
the solvent off.
6. Wash the sponge material gently, but thor-
oughly, in solvent. WARNING! Always use
parts cleaning solvent to clean the sponge
material. Never use low-flash-point sol-
vents or gasoline to clean the sponge ma-
terial because the engine could catch fire
or explode.
[EWB01941]
7. Squeeze the excess solvent out of the sponge
material and let it dry. NOTICE: Do not twist
the sponge material when squeezing it.
[ECB00441]
8. Check the sponge material and replace it if
damaged.
9. Apply Yamaha foam air filter oil or other qual-
ity foam air filter oil to the sponge material.TIPThe sponge material should be wet but not drip-
ping.10. Install the mesh and the sponge material into
the air filter case. NOTICE: Make sure that
the air filter element is properly seated in
the air filter case. Never operate the engine
with the air filter element removed. This
will allow unfiltered air to enter the engine,
causing rapid engine wear and possible
1. Sponge material
2. Air filter meshU43P62E0.book Page 38 Tuesday, February 17, 2009 1:09 PM
Page 131 of 168

8-41
8 7. Start the engine and rev it up approximately
twenty times while momentarily creating ex-
haust system back pressure by blocking the
end of the muffler with a shop towel.
8. Stop the engine and allow the exhaust pipe to
cool.
9. Install the purging bolt and tighten it to the
specified torque.
WARNING
EWB02380Never run the engine in an enclosed area when
purging the spark arrester, otherwise it could
cause injury to the eyes, burns, carbon monox-
ide poisoning, possibly leading to death, and
start a fire.�Always let the exhaust system cool prior to
touching exhaust components.�Always wear eye protection, and make sure
no one is behind the ATV.�Make sure there are no combustible materi-
als in the area.EBU23930V-belt case drain plug After riding in water deep enough to allow it to en-
ter the V-belt case, remove this plug to drain the
water from the case.TIPIf water drains from the V-belt case after removing
the plug, have a Yamaha dealer check the ATV as
the water may affect other engine parts.
1. Purging boltTightening torque:
Purging bolt:
27 Nm (2.7 m·kgf, 19 ft·lbf)
U43P62E0.book Page 41 Tuesday, February 17, 2009 1:09 PM
Page 133 of 168

8-43
8
EBU24060Valve clearance The valve clearance changes with use, resulting in
improper air-fuel mixture and/or engine noise. To
prevent this from occurring, the valve clearance
must be adjusted by a Yamaha dealer at the inter-
vals specified in the periodic maintenance and lu-
brication chart.EBU24071Adjusting the drive select lever safety
system cable The drive select lever safety system cable stretch-
es with use, which can result in improper function.
Therefore, the safety system cable should be
checked and adjusted by a Yamaha dealer at the
intervals specified in the periodic maintenance and
lubrication chart.EBU29601Brakes Replacement of brake components requires pro-
fessional knowledge. Brake service should be per-
formed by a Yamaha dealer.
WARNING
EWB02571Operating with improperly serviced or adjust-
ed brakes could lead to a loss in braking ability
and an accident.EBU27470Checking the front and rear brake pads The front and rear brake pads must be checked for
wear at the intervals specified in the periodic main-
tenance and lubrication chart. Each brake pad is
provided with a wear indicator groove, which al-
lows you to check the brake pad wear without hav-
ing to disassemble the brake. If a brake pad has
worn to the point that the wear indicator groove has
almost disappeared, have a Yamaha dealer re-
place the brake pads as a set.TIPThe wheels need to be removed to check the
brake pads. (See page 8-61.)
U43P62E0.book Page 43 Tuesday, February 17, 2009 1:09 PM
Page 140 of 168

8-50
8
EBU24901Checking and lubricating the cables The operation and the condition of all control ca-
bles should be checked before each ride, and the
cables and cable ends should be lubricated if nec-
essary. If a cable is damaged or does not move
smoothly, have a Yamaha dealer check or replace
it.
WARNING
EWB02581�Inspect cables frequently and replace if dam-
aged. Corrosion can result when the cable
sheaths become damaged, and cables can
also become frayed or kinked, which could
restrict the operation of controls and lead to
an accident or injury.�Always make sure all control cables work
smoothly before you begin riding in cold
weather. If the control cables are frozen or do
not work smoothly, you could be unable to
control the ATV, which could lead to an acci-
dent or collision.EBU24912Checking and lubricating the front and
rear brake levers The operation of the front and rear brake levers
should be checked before each ride, and the lever
pivots should be lubricated if necessary.
1. Rear axle boot (each side)Recommended lubricant:
Engine oil
1
1
Recommended lubricant:
Silicone grease
U43P62E0.book Page 50 Tuesday, February 17, 2009 1:09 PM
Page 143 of 168
 battery. There is no need to check
the electrolyte or to add distilled water. However,
the battery lead connecti")
8-53
8
EBU29045Battery This model is equipped with a VRLA (Valve Regu-
lated Lead Acid) battery. There is no need to check
the electrolyte or to add distilled water. However,
the battery lead connections need to be checked
and, if necessary, tightened.NOTICEECB00620Never attempt to remove the battery cell seals,
as this would permanently damage the battery.
WARNING
EWB02160Battery electrolyte is poisonous and danger-
ous, as it contains sulfuric acid, which can
cause severe burns. Avoid contact with skin,
eyes or clothing. Always shield your eyes
when working near batteries.
Antidote:
EXTERNAL: Flush with water.
INTERNAL: Drink large quantities of water or
milk. Follow with milk of magnesia, beaten egg
or vegetable oil. Call a physician immediately.
EYES: Flush with water for 15 minutes and get
prompt medical attention.Batteries produce explosive gases. Keep
sparks, flame, cigarettes or other sources of ig-
nition away. Ventilate when charging or using
in an enclosed space.
KEEP OUT OF REACH OF CHILDREN.
To remove the battery
1. Remove panel A. (See page 8-8.)
2. Remove the front carrier by removing the
bolts.
3. Remove the battery holding plate by removing
the nuts.1. Bolt1
1
U43P62E0.book Page 53 Tuesday, February 17, 2009 1:09 PM
Page 147 of 168
8-57
8
NOTICEECB00640To prevent accidental short-circuiting, turn off
the main switch when checking or replacing a
fuse.2. Remove the blown fuse, and then install a
new fuse of the specified amperage.
WARNING! Always use a fuse of the spec-
ified rating, and never use a substitute ob-
ject in place of the proper fuse. An
improper fuse or a substitute object can
cause damage to the electrical system,
which could lead to a fire.
[EWB02172]
3. Turn the key to “ON” and turn on the electrical
circuits to check if the devices operate.
4. If the fuse immediately blows again, have a
Yamaha dealer check the electrical system. Specified fuses:
Main fuse:
40.0 A
Headlight fuse:
15.0 A
Ignition fuse:
15.0 A
Four-wheel-drive motor fuse:
15.0 A
Signaling system fuse:
5.0 A
Auxiliary DC jack fuse:
15.0 A
Radiator fan fuse:
20.0 A
Fuel injection system fuse:
15.0 A
EPS fuse:
40.0 A
U43P62E0.book Page 57 Tuesday, February 17, 2009 1:09 PM