Page 58 of 168
5-7
5
EBU19840Chassis fasteners Make sure that all nuts, bolts and screws are prop-
erly tightened.EBU19850Instruments, lights and switches Check that all instruments, lights and switches are
working properly. Correct if necessary.U43P62E0.book Page 7 Tuesday, February 17, 2009 1:09 PM
Page 59 of 168

6-1
6
EBU19880
OPERATION
EBU19901Read the Owner’s Manual carefully before riding
the ATV. If there is a control or function you do not
understand, ask your Yamaha dealer.
WARNING
EWB00631Read the Owner’s Manual carefully to become
familiar with all controls in order to help pre-
vent any loss of control, which could cause an
accident or injury.EBU27345Starting the engine NOTICEECB00150See the “Engine break-in” section on page 6-4
prior to operating the engine for the first time.1. Turn the key to “ON” and the engine stop
switch to“”.
The following warning lights should come on
for a few seconds, then go off.
�Coolant temperature warning light
�Engine trouble warning light
The EPS warning light should come on, then
go off when the engine is started.
NOTICEECB00824If a warning light does not go off, see page 4-2
for the corresponding warning light circuit
check. To avoid possible damage, do not oper-
ate the ATV if a warning light stays on.2. Apply the brake pedal, and then shift the drive
select lever into the neutral or park position.
The corresponding indicator light should
come on. If the indicator light does not come
on, have a Yamaha dealer check the electrical
circuit.TIPThis model is equipped with an ignition circuit cut-
off system. The engine can be started under the
following conditions:�The drive select lever is in the neutral or park po-
sition.
U43P62E0.book Page 1 Tuesday, February 17, 2009 1:09 PM
Page 96 of 168

8-6
8
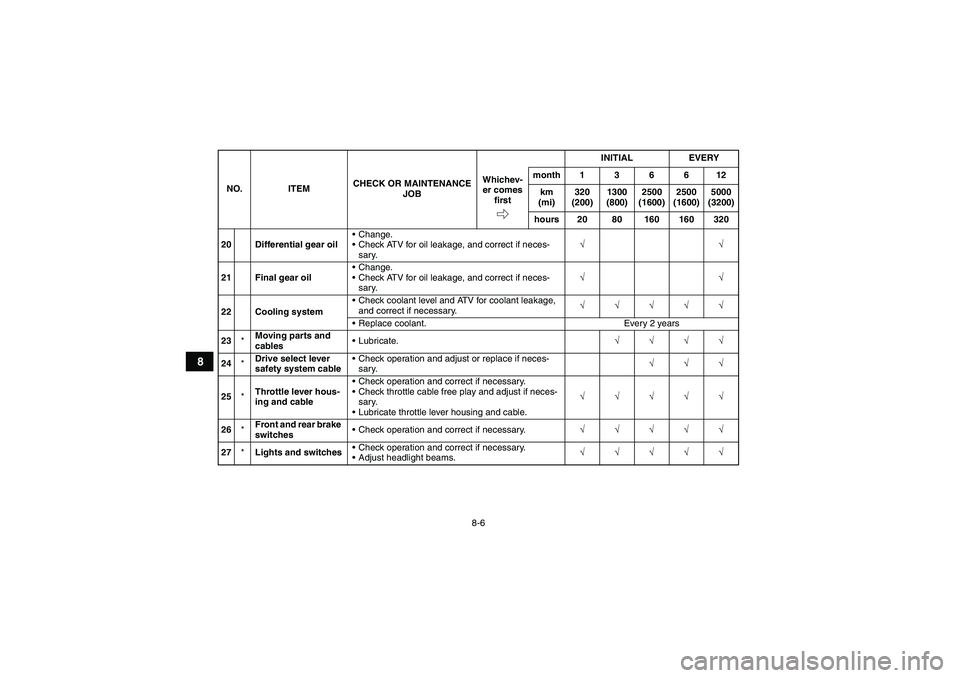
20 Differential gear oilChange.
Check ATV for oil leakage, and correct if neces-
sary.√√
21 Final gear oilChange.
Check ATV for oil leakage, and correct if neces-
sary.√√
22 Cooling systemCheck coolant level and ATV for coolant leakage,
and correct if necessary.√√√√√
Replace coolant. Every 2 years
23*Moving parts and
cablesLubricate.√√√√
24*Drive select lever
safety system cableCheck operation and adjust or replace if neces-
sary.√√√
25*Throttle lever hous-
ing and cableCheck operation and correct if necessary.
Check throttle cable free play and adjust if neces-
sary.
Lubricate throttle lever housing and cable.√√√√√
26*Front and rear brake
switchesCheck operation and correct if necessary.√√√√√
27*Lights and switchesCheck operation and correct if necessary.
Adjust headlight beams.√√√√√ NO. ITEMCHECK OR MAINTENANCE
JOBINITIAL EVERY
Whichev-
er comes
firstmonth136612
km
(mi)320
(200)1300
(800)2500
(1600)2500
(1600)5000
(3200)
hours 20 80 160 160 320U43P62E0.book Page 6 Tuesday, February 17, 2009 1:09 PM
Page 152 of 168

8-62
83. Lower the ATV to the ground.
4. Tighten the wheel nuts to the specified
torques.
EBU25740Troubleshooting Although Yamaha ATVs receive a thorough in-
spection before shipment from the factory, trouble
may occur during operation. Any problem in the fu-
el, compression, or ignition systems, for example,
can cause poor starting and loss of power.
The following troubleshooting charts represent
quick and easy procedures for checking these vital
systems yourself. However, should your ATV re-
quire any repair, take it to a Yamaha dealer, whose
skilled technicians have the necessary tools, expe-
rience, and know-how to service the ATV properly.
Use only genuine Yamaha replacement parts. Im-
itation parts may look like Yamaha parts, but they
are often inferior, have a shorter service life and
can lead to expensive repair bills.
WARNING
EWB02280Do not smoke when checking the fuel system.
Fuel can ignite or explode, causing severe inju-
ry or property damage. Make sure there are no
open flames or sparks in the area, including pi-
lot lights from water heaters or furnaces.
1. Tapered nutTightening torques:
Front wheel nut:
55 Nm (5.5 m·kgf, 40 ft·lbf)
Rear wheel nut:
55 Nm (5.5 m·kgf, 40 ft·lbf)
U43P62E0.book Page 62 Tuesday, February 17, 2009 1:09 PM
Page 166 of 168

INDEX
AAccessories and loading ................................................ 6-6
Accessories, auxiliary jack ........................................... 4-23
Air filter element, cleaning ............................................ 8-36
Axle boots .................................................................... 8-49BBattery .......................................................................... 8-53
Brake fluid, changing .................................................... 8-46
Brake fluid level, checking ............................................ 8-45
Brake hose protectors, checking the rear .................... 8-44
Brake lever, front .......................................................... 4-14
Brake levers, checking and lubricating ......................... 8-50
Brake pads, checking the front and rear ...................... 8-43
Brake pedal and rear brake lever ................................. 4-14
Brake pedal, checking and lubricating ......................... 8-51
Brake pedal free play, adjusting ................................... 8-47
Brakes .......................................................................... 8-43
Brakes, front and rear .................................................... 5-3CCables, checking and lubricating ................................. 8-50
Carrier, front ................................................................. 4-21
Carrier, rear .................................................................. 4-21
Chassis fasteners ........................................................... 5-7
Cleaning ......................................................................... 9-1
Coolant .................................................................. 5-3, 8-30
Coolant temperature warning light ................................. 4-2DDifferential gear oil ................................................ 5-3, 8-28Drive select lever .......................................................... 4-15
Drive select lever and driving in reverse ........................ 6-2
Drive select lever safety system cable, adjusting ......... 8-43
EEngine break-in .............................................................. 6-4
Engine oil ....................................................................... 5-3
Engine oil and oil filter cartridge ................................... 8-22
Engine stop switch ......................................................... 4-7
Engine trouble warning light ........................................... 4-3
EPS warning light ........................................................... 4-3FFinal gear oil .......................................................... 5-3, 8-26
Four-wheel-drive/differential gear lock indicator ............ 4-4
Front and rear brake lever free play, checking ............. 8-46
Fuel ....................................................................... 4-16, 5-3
Fuel tank cap ................................................................ 4-15
Fuses, replacing ........................................................... 8-56HHandlebar switches ........................................................ 4-7
Headlight beam, adjusting ............................................ 8-59
Headlight bulb, replacing .............................................. 8-58
High-range indicator light ............................................... 4-4
Horn switch .................................................................... 4-8IIdentification numbers .................................................. 11-1
Indicator lights and warning lights .................................. 4-2
Instruments, lights and switches .................................... 5-7
U43P62E0.book Page 1 Tuesday, February 17, 2009 1:09 PM