Page 82 of 168

7-16
7If you are climbing a hill and you find that you have
not properly judged your ability to make it to the
top, you should turn the ATV around while you still
have forward motion (provided you have the room
to do so) and go down the hill.
If your ATV has stalled or stopped and you believe
you can continue up the hill, restart carefully to
make sure you do not lift the front wheels which
could cause you to lose control. If you are unable
to continue up the hill, dismount the ATV on the up-
hill side. Physically turn the ATV around and then
descend the hill.
If you start to roll backwards, DO NOT apply either
brake abruptly. If you are in “2WD”, apply only the
front brake. When fully stopped, apply the rear
brake as well, and then shift to the park position. If
you are in “4WD”, because all wheels are intercon-
nected by the drive train, applying either brake will
brake all wheels, therefore, avoid sudden applica-
tion of either the front or rear brake as the wheels
on the uphill side could come off the ground. The
ATV could easily tip over backwards. Apply both
the front and rear brakes gradually. When fully
stopped, lock shift to the park position and dis-
mount the ATV immediately on the uphill side. Dis-
mount on uphill side or to a side if pointed straightuphill. Turn the ATV around and remount, following
the procedure described in the Owner’s Manual.
WARNING! Stalling, rolling backwards or im-
properly dismounting while climbing a hill
could result in ATV overturning. If you cannot
control the ATV, dismount immediately on the
uphill side.
[EWB01802]
RIDING DOWNHILL
WARNING
EWB01621Going down a hill improperly could cause
overturns or loss of control. Always follow
proper procedures for going down hills as de-
scribed in this Owner’s Manual.
U43P62E0.book Page 16 Tuesday, February 17, 2009 1:09 PM
Page 83 of 168

7-17
7
�Always check the terrain carefully before
you start down any hill.�Never operate the ATV on hills too steep for
the ATV or for your abilities. The ATV can
overturn more easily on extremely steep hills
than on level surfaces or small hills.�Shift your weight backward and to the up
side of the hill.�Never go down a hill at high speed.�Avoid going down a hill at an angle that
would cause the ATV to lean sharply to one
side. Go straight down the hill where possi-
ble.�Improper braking can cause the wheels on
the uphill side to come off the ground or
cause loss of traction. Apply brakes gradual-
ly. If in “2WD”, apply only the rear brake.When riding your ATV downhill, shift your weight
as far to the rear and uphill side of the ATV as pos-
sible. Move back on the seat and sit with your arms
straight. Engine compression will do most of the
braking for you. For maximum engine compres-
sion braking effect, select the low-range position
and change to “4WD” before beginning to descend
the hill.Use caution while descending a hill with loose or
slippery surfaces. Braking ability and traction may
be adversely affected by these surfaces. Improper
braking may also cause a loss of traction.
When this ATV is in “4WD”, all wheels (front and
rear) are interconnected by the drive train. This
means that applying either the front brake or the
rear brake will brake all wheels. When descending
hills, using either brake lever or the brake pedal will
brake the wheels on the downhill side. Avoid sud-
den application of either the front or rear brake be-
cause the wheels on the uphill side could come off
the ground. Apply both the front and rear brakes
gradually.
Whenever possible, ride your ATV straight down-
hill. Avoid sharp angles which could allow the ATV
to tip or roll over. Carefully choose your path and
ride no faster than you will be able to react to ob-
stacles which may appear.U43P62E0.book Page 17 Tuesday, February 17, 2009 1:09 PM
Page 132 of 168
8-42
8
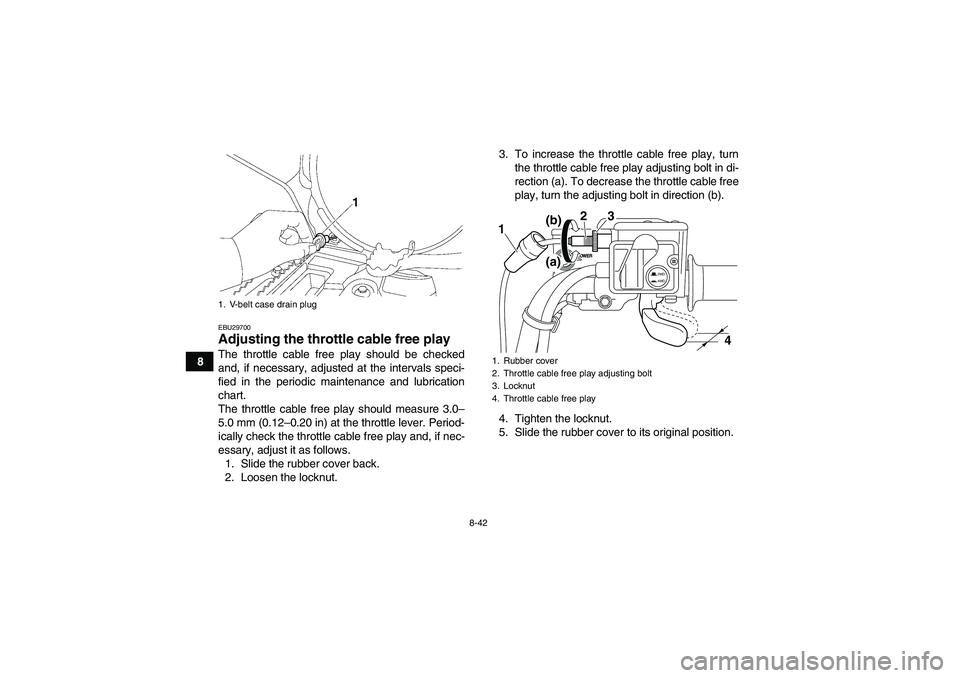
EBU29700Adjusting the throttle cable free play The throttle cable free play should be checked
and, if necessary, adjusted at the intervals speci-
fied in the periodic maintenance and lubrication
chart.
The throttle cable free play should measure 3.0–
5.0 mm (0.12–0.20 in) at the throttle lever. Period-
ically check the throttle cable free play and, if nec-
essary, adjust it as follows.
1. Slide the rubber cover back.
2. Loosen the locknut.3. To increase the throttle cable free play, turn
the throttle cable free play adjusting bolt in di-
rection (a). To decrease the throttle cable free
play, turn the adjusting bolt in direction (b).
4. Tighten the locknut.
5. Slide the rubber cover to its original position.1. V-belt case drain plug
1. Rubber cover
2. Throttle cable free play adjusting bolt
3. Locknut
4. Throttle cable free play
2WD
4WD
3
2
1
4 (b)
(a)
U43P62E0.book Page 42 Tuesday, February 17, 2009 1:09 PM
Page 135 of 168
8-45
8
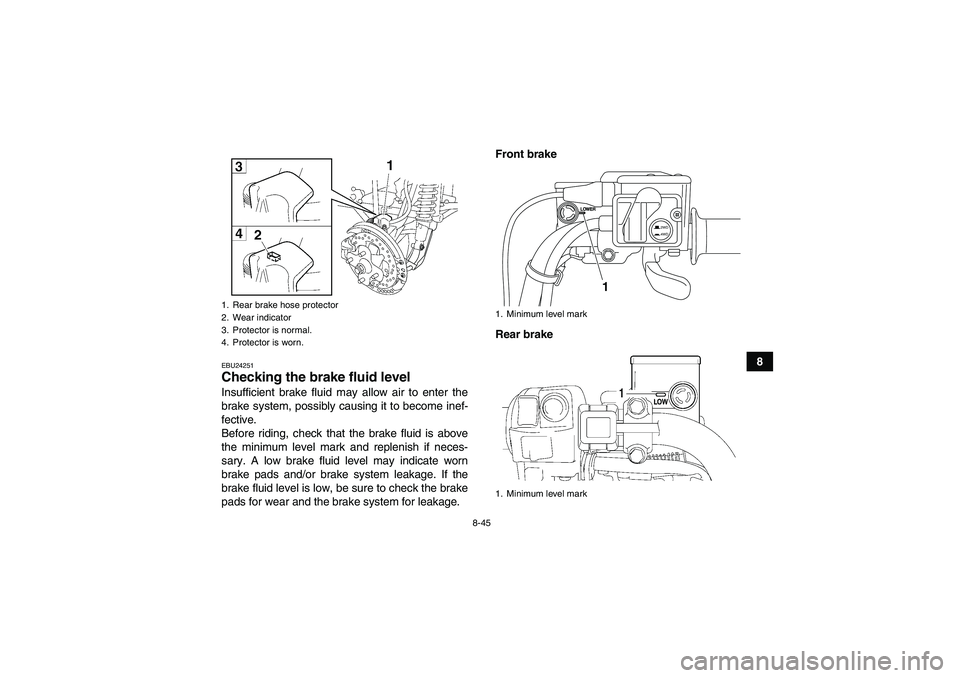
EBU24251Checking the brake fluid level Insufficient brake fluid may allow air to enter the
brake system, possibly causing it to become inef-
fective.
Before riding, check that the brake fluid is above
the minimum level mark and replenish if neces-
sary. A low brake fluid level may indicate worn
brake pads and/or brake system leakage. If the
brake fluid level is low, be sure to check the brake
pads for wear and the brake system for leakage.Front brake
Rear brake1. Rear brake hose protector
2. Wear indicator
3. Protector is normal.
4. Protector is worn.
1. Minimum level mark
1. Minimum level mark
2WD
4WD
1
U43P62E0.book Page 45 Tuesday, February 17, 2009 1:09 PM