Page 131 of 168

8-41
8 7. Start the engine and rev it up approximately
twenty times while momentarily creating ex-
haust system back pressure by blocking the
end of the muffler with a shop towel.
8. Stop the engine and allow the exhaust pipe to
cool.
9. Install the purging bolt and tighten it to the
specified torque.
WARNING
EWB02380Never run the engine in an enclosed area when
purging the spark arrester, otherwise it could
cause injury to the eyes, burns, carbon monox-
ide poisoning, possibly leading to death, and
start a fire.�Always let the exhaust system cool prior to
touching exhaust components.�Always wear eye protection, and make sure
no one is behind the ATV.�Make sure there are no combustible materi-
als in the area.EBU23930V-belt case drain plug After riding in water deep enough to allow it to en-
ter the V-belt case, remove this plug to drain the
water from the case.TIPIf water drains from the V-belt case after removing
the plug, have a Yamaha dealer check the ATV as
the water may affect other engine parts.
1. Purging boltTightening torque:
Purging bolt:
27 Nm (2.7 m·kgf, 19 ft·lbf)
U28P61E0.book Page 41 Wednesday, March 18, 2009 9:25 AM
Page 145 of 168

8-55
8
NOTICEECB00930To charge a VRLA (Valve Regulated Lead Acid)
battery, a special (constant-voltage) battery
charger is required. Using a conventional bat-
tery charger will damage the battery. If you do
not have access to a constant-voltage battery
charger, have a Yamaha dealer charge your
battery.To store the battery�If the ATV will not be used for more than one
month, remove the battery, fully charge it, and
then place it in a cool, dry place.�If the battery will be stored for more than two
months, check it at least once a month and fully
charge it if necessary.NOTICEECB00940Always keep the battery charged. Storing a dis-
charged battery can cause permanent battery
damage.
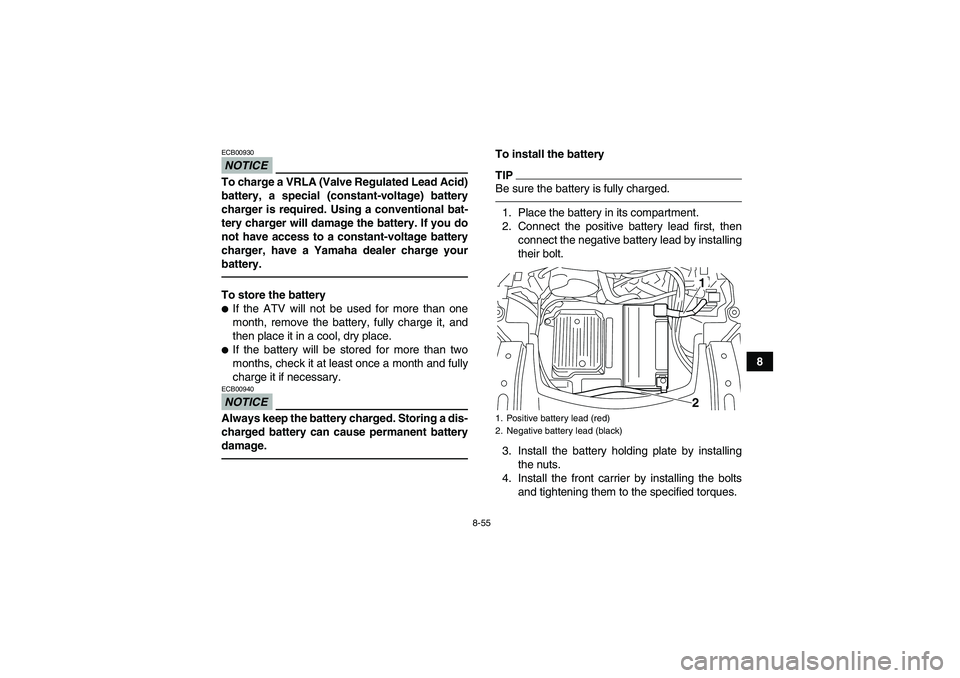
To install the batteryTIPBe sure the battery is fully charged.1. Place the battery in its compartment.
2. Connect the positive battery lead first, then
connect the negative battery lead by installing
their bolt.
3. Install the battery holding plate by installing
the nuts.
4. Install the front carrier by installing the bolts
and tightening them to the specified torques.1. Positive battery lead (red)
2. Negative battery lead (black)
12
U28P61E0.book Page 55 Wednesday, March 18, 2009 9:25 AM
Page 146 of 168
8-56
85. Install the panel.
EBU27751Replacing a fuse
The main fuse, the fuel injection system fuse, the
EPS fuse, and the fuse box are located under pan-
el A. (See page 8-8.)
If a fuse is blown, replace it as follows.
1. Turn the key to “OFF” and turn off all electrical
circuits. Tightening torques:
Carrier bolt (top):
26 Nm (2.6 m·kgf, 19 ft·lbf)
Carrier bolt (under the fenders):
7 Nm (0.7 m·kgf, 5.1 ft·lbf)
1. Fuse box
2. Main/EPS spare fuse
3. Main fuse
4. EPS fuse (for EPS model)
5. Fuel injection system spare fuse
6. Fuel injection system fuse
1. Ignition fuse
2. Headlight fuse
3. Four-wheel-drive motor fuse
4. Radiator fan fuse
5. Signaling system fuse
6. Auxiliary DC jack fuse
7. Spare fuse
U28P61E0.book Page 56 Wednesday, March 18, 2009 9:25 AM
Page 152 of 168

8-62
83. Lower the ATV to the ground.
4. Tighten the wheel nuts to the specified
torques.
EBU25740Troubleshooting Although Yamaha ATVs receive a thorough in-
spection before shipment from the factory, trouble
may occur during operation. Any problem in the fu-
el, compression, or ignition systems, for example,
can cause poor starting and loss of power.
The following troubleshooting charts represent
quick and easy procedures for checking these vital
systems yourself. However, should your ATV re-
quire any repair, take it to a Yamaha dealer, whose
skilled technicians have the necessary tools, expe-
rience, and know-how to service the ATV properly.
Use only genuine Yamaha replacement parts. Im-
itation parts may look like Yamaha parts, but they
are often inferior, have a shorter service life and
can lead to expensive repair bills.
WARNING
EWB02280Do not smoke when checking the fuel system.
Fuel can ignite or explode, causing severe inju-
ry or property damage. Make sure there are no
open flames or sparks in the area, including pi-
lot lights from water heaters or furnaces.
1. Tapered nutTightening torques:
Front wheel nut:
55 Nm (5.5 m·kgf, 40 ft·lbf)
Rear wheel nut:
55 Nm (5.5 m·kgf, 40 ft·lbf)
U28P61E0.book Page 62 Wednesday, March 18, 2009 9:25 AM
Page:
< prev 1-8 9-16 17-24