Page 54 of 142

6-5
60–160 km (0–100 mi) or 0–10 hours
Avoid prolonged operation above 1/2 throttle. Vary
the speed of the ATV regularly. Do not operate it at
one set throttle position.
160–320 km (100–200 mi) or 10–20 hours
Avoid prolonged operation above 3/4 throttle. Rev
the engine freely, but do not use full throttle at any
time.
320 km (200 mi) or 20 hours and beyond
The ATV can now be operated normally.
NOTICEECB00220If any engine trouble should occur during the
engine break-in period, immediately have a
Yamaha dealer check the ATV.EBU20700Parking When parking the ATV, stop the engine, shift the
drive select lever into the forward position, apply
the parking brake, and then turn the fuel cock to
“OFF”.
EBU20760Parking on a slope
WARNING
EWB00830Avoid parking on hills or other inclines. Park-
ing on a hill or other incline could cause the
ATV to roll out of control, increasing the
chance of an accident. If you must park on an
incline, place the ATV transversely across the
incline, shift the drive select lever to the for-
ward position, stop the engine, apply the park-
ing brake, and then block the front and rear
wheels with rocks or other objects.1. Parking brake lock plate
U1AB60E0.book Page 5 Wednesday, April 29, 2009 10:19 AM
Page 72 of 142

7-15
7Do not attempt to climb hills until you have mas-
tered basic maneuvers on flat ground. Always
check the terrain carefully before attempting any
hill. In all cases avoid inclines with slippery or loose
surfaces, or obstacles that might cause you to lose
control.
To climb a hill, you need traction, momentum, and
steady throttle. For more traction and control for
climbing steeper and/or rougher slopes, select
“4WD”. Travel fast enough to maintain momentum,
but not so fast that you cannot react to changes in
the terrain as you climb.
It is important when climbing a hill to make sure
that your weight is transferred forward on the ATV.
This can be accomplished by leaning forward and,
on steeper inclines, standing on the footboards
and leaning forward over the handlebars. Whenev-
er possible, ride straight up hills.
Slow down when you reach the crest of the hill if
you cannot see clearly what is on the other side –
there could be another person, an obstacle, or a
sharp drop-off. Use common sense and remember
that some hills are too steep for you to climb or de-
scend.If you are climbing a hill and you find that you have
not properly judged your ability to make it to the
top, you should turn the ATV around while you still
have forward motion (provided you have the room
to do so) and go down the hill.
If your ATV has stalled or stopped and you believe
you can continue up the hill, restart carefully to
make sure you do not lift the front wheels which
could cause you to lose control. If you are unable
to continue up the hill, dismount the ATV on the up-
hill side. Physically turn the ATV around and then
descend the hill.
If you start to roll backwards, DO NOT apply either
brake abruptly. If you are in “2WD”, apply only the
front brake. When fully stopped, apply the rear
brake as well, and then lock the parking brake. If
you are in “4WD”, because all wheels are intercon-
nected by the drive train, applying either brake will
brake all wheels, therefore, avoid sudden applica-
tion of either the front or rear brake as the wheels
on the uphill side could come off the ground. The
ATV could easily tip over backwards. Apply both
the front and rear brakes gradually. When fully
stopped, lock the parking brake and dismount the
ATV immediately on the uphill side, or to a side if
pointed straight uphill. Turn the ATV around and
U1AB60E0.book Page 15 Wednesday, April 29, 2009 10:19 AM
Page 101 of 142
8-21
8 4. Pull the air filter element out of the air filter
case.5. Pull off the air filter element lock plate, and
then remove the sponge material from the air
filter element frame.
1. Air filter case cover holder
2. Air filter case cover
1. Air filter element
U1AB60E0.book Page 21 Wednesday, April 29, 2009 10:19 AM
Page 102 of 142

8-22
86. Wash the sponge material gently but thor-
oughly in solvent. WARNING! Always use
parts cleaning solvent to clean the sponge
material. Never use low-flash-point sol-
vents or gasoline to clean the sponge ma-
terial because the engine could catch fire
or explode.
[EWB01941]
7. Squeeze the excess solvent out of the sponge
material and let it dry. NOTICE: Do not twist
the sponge material when squeezing it.
[ECB00441]
8. Check the sponge material and replace it if
damaged.
9. Apply Yamaha foam air filter oil or other qual-
ity foam air filter oil to the sponge material.TIPThe sponge material should be wet but not drip-
ping.10. Pull the sponge material over the air filter ele-
ment frame, and then install the lock plate.
11. Insert the air filter element into the air filter
case, and then install the air filter case cover
by hooking the holders onto the air filter case.
NOTICE: Make sure that the air filter ele-
ment is properly seated in the air filter
1. Air filter element frame
2. Sponge material
3. Air filter element lock plateU1AB60E0.book Page 22 Wednesday, April 29, 2009 10:19 AM
Page 107 of 142

8-27
8
EBU24045Adjusting the throttle cable free play The throttle cable free play should be checked
and, if necessary, adjusted at the intervals speci-
fied in the periodic maintenance and lubrication
chart.
The throttle cable free play should measure 3.0–
5.0 mm (0.12–0.20 in) at the throttle lever. Period-
ically check the throttle cable free play and, if nec-
essary, adjust it as follows.TIPThe engine idling speed must be checked, and ad-
justed if necessary, before adjusting the throttle ca-
ble free play.1. Slide the rubber cover back.
2. Loosen the locknut.
3. To increase the throttle cable free play, turn
the throttle cable free play adjusting bolt in di-
rection (a). To decrease the throttle cable free
play, turn the adjusting bolt in direction (b).4. Tighten the locknut.
5. Slide the rubber cover to its original position.
EBU24060Valve clearance The valve clearance changes with use, resulting in
improper air-fuel mixture and/or engine noise. To
prevent this from occurring, the valve clearance
must be adjusted by a Yamaha dealer at the inter-
vals specified in the periodic maintenance and lu-
brication chart.1. Throttle cable free play
2. Rubber cover
3. Locknut
4. Throttle cable free play adjusting bolt2
43
1
U1AB60E0.book Page 27 Wednesday, April 29, 2009 10:19 AM
Page 110 of 142

8-30
8
�Use only the recommended quality brake fluid,
otherwise the rubber seals may deteriorate,
causing leakage and poor braking performance.�Refill with the same type of brake fluid. Mixing
fluids may result in a harmful chemical reaction
and lead to poor braking performance.�Be careful that water does not enter the brake
fluid reservoir when refilling. Water will signifi-
cantly lower the boiling point of the fluid and may
result in vapor lock.�Brake fluid may deteriorate painted surfaces or
plastic parts. Always clean up spilled fluid imme-
diately.�As the brake pads wear, it is normal for the brake
fluid level to gradually go down. However, if the
brake fluid level goes down suddenly, have a
Yamaha dealer check the cause.EBU24281Changing the brake fluid Have a Yamaha dealer change the brake fluid at
the intervals specified in the TIP after the periodic
maintenance and lubrication chart. In addition,have the oil seals of the brake master cylinder and
calipers as well as the brake hoses replaced at the
intervals listed below or whenever they are dam-
aged or leaking.
�Oil seals: Replace every two years.�Brake hoses: Replace every four years.EBU24394Checking the front brake lever free play The brake lever free play must be checked at the
intervals specified in the periodic maintenance and
lubrication chart. The brake lever should have no
free play as shown. If there is free play, have a
Yamaha dealer check the brake system. Recommended brake fluid:
DOT 41. No free play
U1AB60E0.book Page 30 Wednesday, April 29, 2009 10:19 AM
Page 112 of 142
8-32
8Adjusting the brake lever free play
The brake lever free play should measure 3.0–5.0
mm (0.12–0.20 in) as shown. If the free play is in-
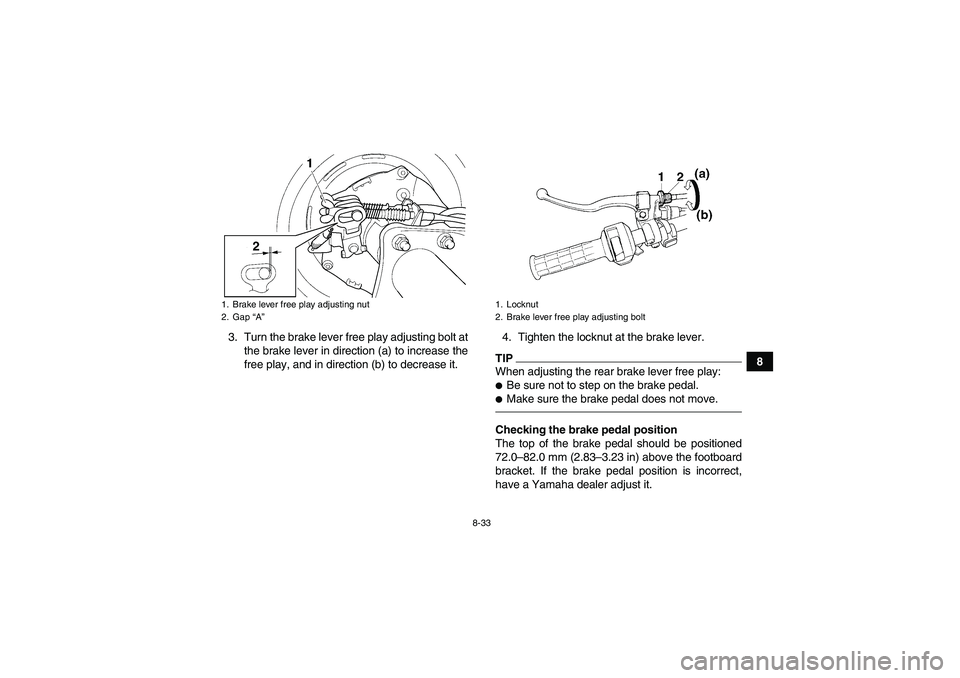
correct, adjust it as follows.1. Loosen the locknut at the brake lever and fully
turn in the brake lever free play adjusting bolt.
2. Turn the brake lever free play adjusting nut on
the brake cable at the rear wheel hub so that
gap “A” measures 0–1 mm (0–0.04 in).
1. Brake pedal free play adjusting nut
2. Brake lever free play adjusting nut
1. Brake lever free play
2. Locknut
3. Brake lever free play adjusting bolt
U1AB60E0.book Page 32 Wednesday, April 29, 2009 10:19 AM
Page 113 of 142
8-33
8 3. Turn the brake lever free play adjusting bolt at
the brake lever in direction (a) to increase the
free play, and in direction (b) to decrease it.4. Tighten the locknut at the brake lever.
TIPWhen adjusting the rear brake lever free play:�Be sure not to step on the brake pedal.�Make sure the brake pedal does not move.Checking the brake pedal position
The top of the brake pedal should be positioned
72.0–82.0 mm (2.83–3.23 in) above the footboard
bracket. If the brake pedal position is incorrect,
have a Yamaha dealer adjust it.
1. Brake lever free play adjusting nut
2. Gap “A”
1. Locknut
2. Brake lever free play adjusting bolt
U1AB60E0.book Page 33 Wednesday, April 29, 2009 10:19 AM